XML, like JSON, offers a way to provide structured data between computer systems. Although it is not as easy for humans to understand visually, it is easy for machines to parse and generate.
XML 和 JSON 一樣,提供了在電腦系統之間傳遞結構化資料的方式。雖然它在視覺上不像 JSON 那麼容易讓人理解,但機器很容易解析與產生。
One thing to keep in mind is that XML may look similar to HTML, but they're different. Although both use tags to define objects and elements, HTML is used to display data. Its web browser knows how to display websites—it consumes an HTML object and displays it. XML, on the other hand, is used to describe data so that your XML client (programming language, and so on) can consume an object that has meaning for it.
有一點要記住:XML 看起來可能與 HTML 相似,但兩者其實不同。雖然兩者都使用標籤(tag)來定義物件與元素,但 HTML 是用來顯示資料的。你的網頁瀏覽器知道如何顯示網站——它讀取 HTML 物件並將其顯示出來。而 XML 則是用來描述資料,讓你的 XML 用戶端(程式語言等)可以讀取對它有意義的物件。
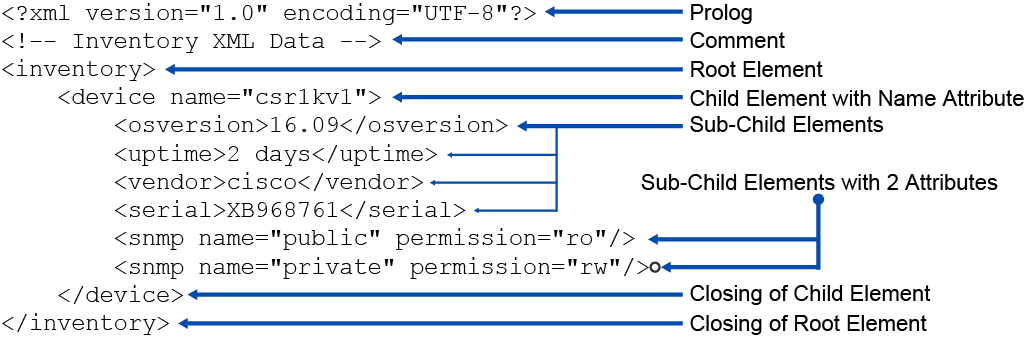
XML is a markup language, like HTML, that defines a set of rules for encoding data for machines to use. It was designed with several factors in mind: to store and transport data, to be self-descriptive, and to be readable by both humans and machines.
XML 與 HTML 一樣是一種標記語言,定義了一套供機器使用的資料編碼規則。它在設計時考量了幾個因素:儲存與傳輸資料、具備自我描述性,以及讓人與機器都能讀取。
XML focuses on the data itself rather than displaying it, and its tags are not predefined, which gives you flexibility while working with it. Here is an example of XML data:
XML 著重於資料本身,而非資料的呈現方式,而且它的標籤並非預先定義好的,這讓你在使用時有很大的彈性。以下是一個 XML 資料範例:
?xml version="1.0" encoding="UTF-8"?
 Inventory XML Data
  16.09
 2 days
 cisco
 XB968761
XML tags are used to define the stored data. When you create an XML document, you need to follow a certain structure, called element trees. The beginning of the tree is the root element and is followed by the child and subchild elements. The previous example identifies the root, child, and subchild elements.
XML 標籤用來定義所儲存的資料。當你建立 XML 文件時,需要遵循一種稱為元素樹(element tree)的特定結構。這棵樹的起點是根元素(root element),接著是子元素與孫元素。前面的範例標示出了根元素、子元素與孫元素。
?xml version="1.0" encoding="UTF-8"?: This element is called the prolog, which is optional. If it exists, it defines the version of the XML and character encoding.?xml version="1.0" encoding="UTF-8"?:這個元素稱為序言(prolog),是可選的。如果存在,它會定義 XML 的版本與字元編碼。Inventory XML Data: This element is a comment that can be provided at any level of the XML document.Inventory XML Data:這個元素是一則註解,可以出現在 XML 文件的任何層級。: This element is a root element of the XML document or a parent to all elements below it.:這個元素是 XML 文件的根元素,是所有下層元素的父元素。: This element is a child element of and has a name attribute with the value csr1kv1.:這個元素是根元素的子元素,具有一個值為 csr1kv1 的 name 屬性。: This element is a subchild of the device and has a value of 16.09.:這個元素是 device 的孫元素,值為 16.09。: This element is a subchild of the device and has a value of 2 days.:這個元素是 device 的孫元素,值為 2 天。: This element is a subchild of the device and has a value of cisco.:這個元素是 device 的孫元素,值為 cisco。: This element is a subchild of the device and has a value of XB587381.:這個元素是 device 的孫元素,值為 XB587381。: This element is a subchild of the device and has two attributes, name, and permission.:這個元素是 device 的孫元素,具有兩個屬性:name 和 permission。: This element is a subchild of the device and has two attributes, name and permission.:這個元素是 device 的孫元素,具有兩個屬性:name 和 permission。
XML Namespace
XML 命名空間
XML has the flexibility to name the tags in any manner you want. This flexibility creates a challenge. Suppose that two developers were tasked with creating an API response to a call. The task for the first developer is to return a list of networking devices known to the API server. The task for the second developer is to return a list of servers. If both developers give the name "inventory" to their root key, it will conflict with the merging file on the API server because the root key must be unique.
XML 讓你可以用任何方式來命名標籤,這種彈性也帶來了挑戰。假設有兩位開發人員被指派負責建立某個 API 呼叫的回應。第一位開發人員的任務是回傳 API 伺服器已知的網路裝置清單,第二位開發人員的任務則是回傳伺服器清單。如果兩位開發人員都將根鍵(root key)命名為 “inventory”,在 API 伺服器上合併檔案時就會發生衝突,因為根鍵必須是唯一的。
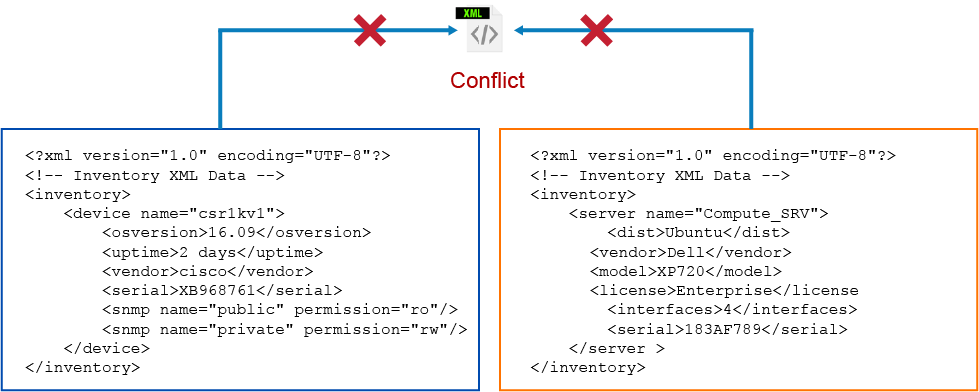
To fix this problem, XML namespaces are used. Namespaces serve as unique XML identifiers. There are two ways to apply a namespace: you can set it as a default namespace for all XML or use it as a prefix that must later be assigned to each element. Both cases are shown here:
為了解決這個問題,會使用 XML 命名空間(namespace)。命名空間可作為唯一的 XML 識別項。套用命名空間有兩種方式:可以將它設為整份 XML 的預設命名空間,或作為前綴使用,之後再指派給每個元素。以下展示這兩種方式:
First, the default namespaces for the entire root element are set:
首先,為整個根元素設定預設命名空間:
?xml version="1.0" encoding="UTF-8"?
 Inventory XML Data
xmlns="https://www.cisco.com/ns/routers">
  16.09
 2 days
 cisco
 XB968761


xmlns="https://www.dell.com/ns/servers">
  Ubuntu
 Dell
 XP720
 Enterprise        4
 183AF789
The namespace syntax starts with xmlns (XML NameSpace), and the URI is assigned as the namespace value. Each inventory root element has a different namespace, which resolves the conflict of the same root element name.
命名空間語法以 xmlns(XML NameSpace)開頭,並將 URI 指派為命名空間的值。每個 inventory 根元素都有不同的命名空間,藉此解決根元素名稱相同所造成的衝突。
It is also possible to use namespaces with prefix tags. Each element is tagged so it can qualify as part of that namespace. For example, creating a namespace prefix called prod and assigning it to the device child and all subchild elements will make them part of the prod namespace.
使用帶有前綴的命名空間也是可行的。每個元素都會加上標籤,以表明它屬於該命名空間的一部分。例如,建立一個名為 prod 的命名空間前綴,並將其指派給 device 子元素及其所有孫元素,就能讓它們成為 prod 命名空間的一部分。
?xml version="1.0" encoding="UTF-8"?
 Inventory XML Data
 xmlns:prod="https://www.cisco.com/ns/routers/prod">
  16.09
 2 days
 cisco
 XB968781
 snmp name="public" permission="ro"/>
 :snmp name="private" permission="rw"/>
Work with XML and JSON
搭配使用 XML 和 JSON
XML documents can be complex and lengthy, but they can be easily parsed using Python modules.
XML 文件可能既複雜又冗長,但可以使用 Python 模組輕鬆解析。
In comparison, if the XML data is converted to JSON, it will take the same form as the previous example. When you start interacting with XML in the Python interpreter, you will see this situation.
相對地,如果將 XML 資料轉換成 JSON,會呈現與前面範例相同的形式。當你開始在 Python 直譯器中與 XML 互動時,就會看到這種情況。

Python easily understands JSON and requires no additional imports when working with JSON data encoding. As you saw, JSON maps natively into a Python dictionary. On the other hand, Python needs special modules and methods that understand XML. These modules need to know how to convert XML to a data type that Python can consume. In the next few examples, you will be introduced to Python modules that will help you interact with XML data in Python.
Python 可以輕鬆理解 JSON,處理 JSON 資料編碼時不需要額外匯入模組。如你所見,JSON 能自然對應到 Python 字典。相對地,Python 需要特殊的模組與方法才能理解 XML。這些模組必須知道如何將 XML 轉換成 Python 可以使用的資料型態。在接下來的幾個範例中,你將認識能協助你在 Python 中處理 XML 資料的模組。
Interact with XML in Python
在 Python 中處理 XML
The same XML data is used for this demonstration, but with more devices to make a better case. The XML file was saved in the inventory.xml file. Note that different namespaces are defined in the root element.
此示範使用相同的 XML 資料,但加入更多裝置以便更清楚說明。這份 XML 檔案儲存為 inventory.xml 檔案。請注意,根元素中定義了不同的命名空間。
student@student-vm:~/section07/sg/$ cat inventory.xml
?xml version="1.0"?
           xmlns:prod="https://www.cisco.com/ns/routers/prod"
           xmlns:dev="https://www.cisco.com/ns/routers/dev">
  16.09
 2 days
 cisco
 XB968781


  16.09
 14 days
 cisco
 XB587381


  16.09
 182 daysmust        cisco
 XB914781
The rest of the steps will be shown in the Python interpreter.
接下來的步驟將在 Python 直譯器中進行。
First, the ElementTree object needs to be imported.
首先,需要匯入 ElementTree 物件。
>>> import xml.etree.ElementTree as ETThen you can parse the document by using the ET.parse() method. You must provide the filename as an argument like this:
接著,你可以使用 ET.parse() 方法來解析文件。你必須提供檔名作為引數,如下所示:
>>> tree = ET.parse('inventory.xml')To obtain all data that are assigned to the root key, you can use thegetroot() method on the tree variable and assign it to a new variable named root_data.
要取得指派給根鍵的所有資料,你可以對 tree 變數使用getroot() 方法,並將結果指派給一個名為 root_data 的新變數。
>>> root_data = tree.getroot()Now you can see the root key tag by printing the tag object. Note that the namespace is also being printed.
現在你可以透過印出 tag 物件來查看根鍵標籤。請注意,命名空間也會一併印出。
>>> root_data.tag
'{https://www.cisco.com/ns/routers}inventory'
To see all children that belong to root_data, you can iterate over it with a for loop and print each child’s tag and attributes as follows:
要查看屬於 root_data 的所有子元素,你可以用 for 迴圈對它進行迭代,並依下列方式印出每個子元素的標籤與屬性:
>>> for child in root_data:
...     print(child.tag, child.attrib)
...
{https://www.cisco.com/ns/routers/prod}device {'name': 'csr1kv1'}
{https://www.cisco.com/ns/routers/prod}device {'name': 'csr1kv2'}
{https://www.cisco.com/ns/routers/dev}device {'name': 'csr1kv3'}
You can also find all serial numbers that are part of the production (prod) namespace by using theiter()method with the root_data variable, because it will iterate over all subchild elements. Note that you need to include the URI of the prod prefix in curly braces:
你也可以透過對 root_data 變數使用iter()方法,找出所有屬於 production(prod)命名空間的序號,因為它會迭代所有孫元素。請注意,你需要在大括號中加入 prod 前綴的 URI:
>>> for serial in root_data.iter('{https://www.cisco.com/ns/routers/prod}serial'):
...     print(serial.text)
...
XB968781
XB587381
You cannot really tell which serial number belongs to which device. You can find all the desired elements by changing the approach and using the findall() and find() methods:
你其實無法分辨哪個序號屬於哪個裝置。你可以改變做法,使用 findall() 和 find() 方法來找出所需的元素:
>>> for device in root_data.findall('{https://www.cisco.com/ns/routers/prod}device'):
...     name= device.attrib['name']
...     serial= device.find('{https://www.cisco.com/ns/routers/prod}serial').text
...     print(name, serial)
...
csr1kv1 XB968781
csr1kv2 XB587381
To print all attributes that are related to the SNMP element, the iter() method can be used again. The following example returns SNMP information that is related to the dev namespace:
要印出與 SNMP 元素相關的所有屬性,可以再次使用 iter() 方法。以下範例會回傳與 dev 命名空間相關的 SNMP 資訊:
>>> for snmp in root_data.iter('{https://www.cisco.com/ns/routers/dev}snmp'):
...     print(snmp.attrib)
...
{'name': 'public', 'permission': 'ro'}
{'name': 'private', 'permission': 'rw'}
Convert XML to JSON
將 XML 轉換為 JSON
Now, an open-source module named xmltodict will be used to convert XML to JSON.
現在,將使用一個名為 xmltodict 的開放原始碼模組,將 XML 轉換為 JSON。
The first step is to import the necessary modules:
第一步是匯入必要的模組:
>>> import xmltodict
>>> import json
Then the file contents need to be read and parsed with the xmltodict parse method. The returned data will be assigned to an XML variable.
接著需要讀取檔案內容,並使用 xmltodict 的 parse 方法進行解析。回傳的資料將指派給一個 XML 變數。
>>> with open('inventory.xml') as xml_file:
...     xml = xmltodict.parse(xml_file.read())
...
>>>
The XML variable contains an object that can be converted to JSON using the json.dumps() method as follows:
可以使用 json.dumps() 方法將 XML 變數中包含的物件轉換成 JSON,如下所示:
>>> print(json.dumps(xml, indent=4))
{
    "inventory": {
        "@xmlns": "https://www.cisco.com/ns/routers",
        "@xmlns:prod": "https://www.cisco.com/ns/routers/prod",
        "@xmlns:dev": "https://www.cisco.com/ns/routers/dev",
        "prod:device": [
            {
                "@name": "csr1kv1",
                "prod:osversion": "16.09",
                "prod:uptime": "2 days",
                "prod:vendor": "cisco",
                "prod:serial": "XB968781",
                "prod:snmp": [
                    {
                        "@name": "public",
                        "@permission": "ro"
                    },
                    {
                        "@name": "private",
                        "@permission": "rw"
                    }
                ]
            },
            {
                "@name": "csr1kv2",
                "prod:osversion": "16.09",
                "prod:uptime": "14 days",
                "prod:vendor": "cisco",
                "prod:serial": "XB587381",
                "prod:snmp": [
                    {
                        "@name": "public",
                        "@permission": "ro"
                    },
                    {
                        "@name": "private",
                        "@permission": "rw"
                    }
                ]
            }
        ],
        "dev:device": {
            "@name": "csr1kv3",
            "dev:osversion": "16.09",
            "dev:uptime": "182 days",
            "dev:vendor": "cisco",
            "dev:serial": "XB914781",
            "dev:snmp": [
                {
                    "@name": "public",
                    "@permission": "ro"
                },
                {
                    "@name": "private",
                    "@permission": "rw"
                }
            ]
        }
    }
}
You may have noticed that the XML attributes like "name" and "permission" were converted to @name and @permission. You can get rid of it by using two methods.
你可能已經注意到,像 “name” 和 “permission” 這類 XML 屬性被轉換成了 @name 和 @permission。你可以透過兩種方法去除它們。
You can use the built-in "replace" method, which can be used on strings; substitute the attribute prefix with nothing instead of the at (@) symbol during the XML-to-dictionary conversion.
你可以使用內建的 “replace” 方法(可用於字串),在 XML 轉字典的過程中,將屬性前綴替換成空字串,而不是 at(@)符號。
To use the replace method, you must identify what needs to be replaced and provide the replacement. Remember that JSON is a string containing a dictionary, like data.
要使用 replace 方法,你必須指定要替換的內容以及替換後的內容。請記住,JSON 是一個包含類似字典資料的字串。
>>> print(json.dumps(xml, indent=4).replace("@", "")) #.replace("@", "") instructs to replace @ with nothing
{
    "inventory": {
        "xmlns": "https://www.cisco.com/ns/routers",
        "xmlns:prod": "https://www.cisco.com/ns/routers/prod",
        "xmlns:dev": "https://www.cisco.com/ns/routers/dev",
        "prod:device": [
            {
                "name": "csr1kv1",
                "prod:osversion": "16.09",
                "prod:uptime": "2 days",
                "prod:vendor": "cisco",
                "prod:serial": "XB968781",
                "prod:snmp": [
                    {
                        "name": "public",
                        "permission": "ro"
                    },
                    {
                        "name": "private",
                        "permission": "rw"
                    }
                ]
            },
            {
                "name": "csr1kv2",
                "prod:osversion": "16.09",
                "prod:uptime": "14 days",
                "prod:vendor": "cisco",
                "prod:serial": "XB587381",
                "prod:snmp": [
                    {
                        "name": "public",
                        "permission": "ro"
                    },
                    {
                        "name": "private",
                        "permission": "rw"
                    }
                ]
            }
        ],
        "dev:device": {
            "name": "csr1kv3",
            "dev:osversion": "16.09",
            "dev:uptime": "182 days",
            "dev:vendor": "cisco",
            "dev:serial": "XB914781",
            "dev:snmp": [
                {
                    "name": "public",
                    "permission": "ro"
                },
                {
                    "name": "private",
                    "permission": "rw"
                }
            ]
        }
    }
}
To use the second option, you need to supply an extra argument to the xmltodict parse method as follows:
要使用第二種選項,你需要在呼叫 xmltodict 的 parse 方法時提供一個額外的引數,如下所示:
>>> with open('inventory.xml') as xml_file:
...     xml = xmltodict.parse(xml_file.read(), attr_prefix='')
...
>>>
If json.dumps is used again, no @ symbols will be seen:
如果再次使用 json.dumps,就不會再看到任何 @ 符號:
>>> print(json.dumps(xml, indent=4))
{
    "inventory": {
        "xmlns": "https://www.cisco.com/ns/routers",
        "xmlns:prod": "https://www.cisco.com/ns/routers/prod",
        "xmlns:dev": "https://www.cisco.com/ns/routers/dev",
        "prod:device": [
            {
                "name": "csr1kv1",
                "prod:osversion": "16.09",
                "prod:uptime": "2 days",
                "prod:vendor": "cisco",
                "prod:serial": "XB968781",
                "prod:snmp": [
                    {
                        "name": "public",
                        "permission": "ro"
                    },
                    {
                        "name": "private",
                        "permission": "rw"
                    }
                ]
            },
            {
                "name": "csr1kv2",
                "prod:osversion": "16.09",
                "prod:uptime": "14 days",
                "prod:vendor": "cisco",
                "prod:serial": "XB587381",
                "prod:snmp": [
                    {
                        "name": "public",
                        "permission": "ro"
                    },
                    {
                        "name": "private",
                        "permission": "rw"
                    }
                ]
            }
        ],
        "dev:device": {
            "name": "csr1kv3",
            "dev:osversion": "16.09",
            "dev:uptime": "182 days",
            "dev:vendor": "cisco",
            "dev:serial": "XB914781",
            "dev:snmp": [
                {
                    "name": "public",
                    "permission": "ro"
                },
                {
                    "name": "private",
                    "permission": "rw"
                }
            ]
        }
    }
}