Introduction
簡介
In this exercise, you will explore the basics of ACLs. The lab is prepared with the devices that are represented in the topology diagram and the connectivity table. All devices have their basic configurations in place, including hostnames and IPv4 addresses. SRV2 server is a Domain Name Service (DNS) server for both departments. The domain names of the devices are equal to their host names. Note that static routing is implemented between the routers to ensure connectivity between the network segments.
在這個練習中,你將探索 ACL(存取控制清單)的基礎。此實驗已備妥拓樸圖與連通性表所示的裝置。所有裝置皆已完成基本設定,包括主機名稱與 IPv4 位址。SRV2 伺服器是兩個部門共用的網域名稱服務(DNS)伺服器。裝置的網域名稱與其主機名稱相同。請注意,路由器之間已實作靜態路由,以確保網段之間的連通性。
This exercise is broken into two tasks. The first task deals with standard access lists and the second task with the extended access lists.
這個練習分為兩個任務。第一個任務處理標準存取清單,第二個任務處理延伸存取清單。
The first task has two sections. The first section makes use of an access list that has already been prepared on R1 to demonstrate the importance of statement order in an access list and to demonstrate the effectiveness of using wildcard masks to specify the ranges of IPv4 addresses. You will apply the standard access list to filter traffic between the two departments. In the second section, you will modify the access list and verify that the changes are implemented as expected.
第一個任務有兩個小節。第一小節使用已在 R1 上準備好的存取清單,示範存取清單中陳述式順序的重要性,以及使用萬用字元遮罩指定 IPv4 位址範圍的效果。你將套用標準存取清單以過濾兩部門間的流量。在第二小節中,你將修改存取清單,並驗證變更是否如預期般實作。
In the second task, you will refine traffic filtering by configuring and applying an extended access list. You will verify that the extended access list filters traffic as expected.
在第二個任務中,你將設定並套用延伸存取清單,以精細化流量過濾。你將驗證延伸存取清單是否如預期般過濾流量。
Topology
拓樸
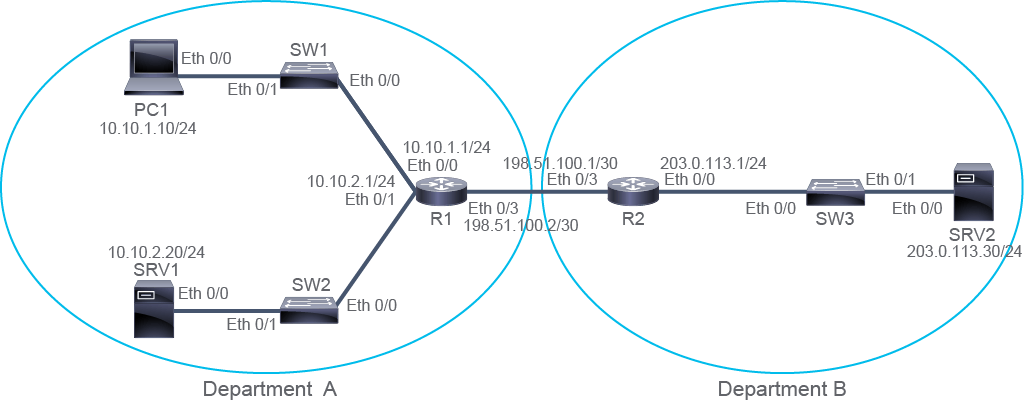
Job Aid
工作輔助資料
Device Information
裝置資訊
Device Information
裝置資訊
Device 裝置 | Characteristic 特性 | Value 值 |
PC1 PC1 | IPv4 address IPv4 位址 | 10.10.1.10/24 10.10.1.10/24 |
PC1 PC1 | Default gateway 預設閘道 | 10.10.1.1 10.10.1.1 |
SRV1 SRV1 | IPv4 address IPv4 位址 | 10.10.2.20/24 10.10.2.20/24 |
SRV1 SRV1 | Default gateway 預設閘道 | 10.10.2.1 10.10.2.1 |
SRV2 SRV2 | IPv4 address IPv4 位址 | 203.0.113.30/24 203.0.113.30/24 |
SRV2 SRV2 | Default gateway 預設閘道 | 203.0.113.1 203.0.113.1 |
SRV2 SRV2 | Username 使用者名稱 | admin admin |
SRV2 SRV2 | Password 密碼 | Cisco123 Cisco123 |
SW1 SW1 | VLAN 1 IPv4 address VLAN 1 IPv4 位址 | 10.10.1.4/24 10.10.1.4/24 |
SW1 SW1 | Default gateway 預設閘道 | 10.10.1.1 10.10.1.1 |
SW1 SW1 | Ethernet0/0 Ethernet0/0 | Link to R1 連往 R1 的連結 |
SW1 SW1 | Ethernet0/1 Ethernet0/1 | Link to PC1 連往 PC1 的連結 |
SW2 SW2 | VLAN 1 IPv4 address VLAN 1 IPv4 位址 | 10.10.2.4/24 10.10.2.4/24 |
SW2 SW2 | Default gateway 預設閘道 | 10.10.2.1 10.10.2.1 |
SW2 SW2 | Ethernet0/0 Ethernet0/0 | Link to R1 連往 R1 的連結 |
SW2 SW2 | Ethernet0/1 description Ethernet0/1 描述 | Link to SRV1 連往 SRV1 的連結 |
SW3 SW3 | VLAN 1 IPv4 address VLAN 1 IPv4 位址 | 203.0.113.4/24 203.0.113.4/24 |
SW3 SW3 | Default gateway 預設閘道 | 203.0.113.1 203.0.113.1 |
SW3 SW3 | Ethernet0/0 Ethernet0/0 | Link to R2 連往 R2 的連結 |
SW3 SW3 | Ethernet0/1 Ethernet0/1 | Link to SRV2 連往 SRV2 的連結 |
R1 R1 | Ethernet0/0 Ethernet0/0 | Link to SW1 連往 SW1 的連結 |
R1 R1 | Ethernet0/0 IPv4 address Ethernet0/0 IPv4 位址 | 10.10.1.1/24 10.10.1.1/24 |
R1 R1 | Ethernet0/1 Ethernet0/1 | Link to SW2 連往 SW2 的連結 |
R1 R1 | Ethernet0/1 IPv4 address Ethernet0/1 IPv4 位址 | 10.10.2.1/24 10.10.2.1/24 |
R1 R1 | Ethernet0/3 Ethernet0/3 | Link to R2 連往 R2 的連結 |
R1 R1 | Ethernet0/3 IPv4 address Ethernet0/3 IPv4 位址 | 198.51.100.2/30 198.51.100.2/30 |
R2 R2 | Ethernet0/0 Ethernet0/0 | Link to SW3 連往 SW3 的連結 |
R2 R2 | Ethernet0/0 IPv4 address Ethernet0/0 IPv4 位址 | 203.0.113.1/24 203.0.113.1/24 |
R2 R2 | Ethernet0/3 Ethernet0/3 | Link to R1 連往 R1 的連結 |
R2 R2 | Ethernet0/3 IPv4 address Ethernet0/3 IPv4 位址 | 198.51.100.1/30 198.51.100.1/30 |
Task 1: Configure, Apply, and Modify Standard IPv4 ACLs
任務 1:設定、套用並修改標準 IPv4 ACL
Activity
活動
On router R1, display the content of the access list 10 by using the show running-config command. To see only the access list content from the output, use the include output filter, specifying the string access-list 10.
在路由器 R1 上,使用 show running-config 指令顯示存取清單 10 的內容。若只想從輸出中查看存取清單內容,可使用 include 輸出過濾器,並指定字串 access-list 10。
On R1, enter the following command:
在 R1 上,輸入以下指令:
R1# show running-config | include access-list 10
access-list 10 permit 10.10.1.10
access-list 10 deny   10.10.1.0 0.0.0.255
access-list 10 permit 10.10.0.0 0.0.255.255
access-list 10 deny   10.0.0.0 0.255.255.255
access-list 10 permit any
This ACL demonstrates the use of progressively less restrictive wildcard masks.
此 ACL 展示了逐漸放寬限制的萬用字元遮罩的使用方式。
Each line in the ACL becomes progressively less specific. Using the asterisk (*) character to represent any octet (0 to 255), the access list could be interpreted as follows:
ACL 中每一行都變得逐漸較不具體。若使用星號(*)代表任一位元組(0 到 255),該存取清單可解讀如下:
- Permit 10.10.1.10允許 10.10.1.10
- Deny 10.10.1.*拒絕 10.10.1.*
- Permit 10.10.*.*允許 10.10.*.*
- Deny 10.*.*.*拒絕 10.*.*.*
- Permit *.*.*.*允許 *.*.*.*
Access list 10 will allow traffic from PC1, whose IPv4 address is 10.10.1.10. It will deny the traffic coming from other devices in the 10.10.1.0/24 subnet. Traffic from other 10.10.0.0/16 subnets will pass the access list. In the topology, there is a 10.10.2.0/24 subnet. Traffic from other 10.0.0.0/8 subnets will be denied, whereas, traffic from all other networks will be permitted.
存取清單 10 將允許來自 PC1(IPv4 位址為 10.10.1.10)的流量,並拒絕來自 10.10.1.0/24 子網路中其他裝置的流量。來自其他 10.10.0.0/16 子網路的流量將通過此存取清單。在拓樸中,存在一個 10.10.2.0/24 子網路。來自其他 10.0.0.0/8 子網路的流量將被拒絕,而來自所有其他網路的流量則將被允許。
To demonstrate access list 10 in action, you will filter traffic that transits router R1. First, you will apply the access list and then generate test traffic to verify that the access list is filtering traffic as expected. On R1, apply access list 10 to the interface Ethernet 0/3 in the outbound direction.
為示範存取清單 10 的實際效果,你將過濾通過路由器 R1 的流量。首先,你會套用該存取清單,接著產生測試流量以驗證存取清單是否如預期般過濾流量。在 R1 上,將存取清單 10 套用到 Ethernet 0/3 介面的出向方向。
On R1, enter the following commands:
在 R1 上,輸入以下指令:
R1# configure terminal
R1(config)# interface Ethernet 0/3
R1(config-if)# ip access-group 10 out
Defining an ACL on a Cisco IOS device does not change the behavior of the device until the ACL is applied. ACLs are used for various purposes. Depending on the purpose of an ACL, different commands are used in different configuration mode. In this lab, you use access list 10 to filter traffic transiting R1 router.
在 Cisco IOS 裝置上定義 ACL 並不會改變裝置的行為,直到該 ACL 被套用為止。ACL 有多種用途,依用途不同,會在不同的設定模式下使用不同的指令。在本實驗中,你將使用存取清單 10 來過濾通過 R1 路由器的流量。
The placement of an access list and the traffic direction of access list processing are very important, so care must be taken when choosing the most appropriate location. To filter traffic coming from department A and going to department B using a standard access list, the best place to filter is on the R1 interface facing department B, outbound. Have in mind that standard access lists filter the traffic only based on the source IPv4 address in a packet. Placing access list 10 inbound on either Ethernet 0/0 or Ethernet 0/1 R1 interfaces would also filter the communication between 10.10.1.0/24 and 10.10.2.0/24 subnets.
存取清單的放置位置與存取清單處理的流量方向非常重要,因此選擇最適當的位置時必須格外謹慎。若要以標準存取清單過濾從部門 A 前往部門 B 的流量,最適合的過濾位置是在 R1 面向部門 B 的介面上,方向為出向。請記住,標準存取清單僅根據封包中的來源 IPv4 位址過濾流量。若將存取清單 10 以入向方式放置在 R1 的 Ethernet 0/0 或 Ethernet 0/1 介面上,同樣也能過濾 10.10.1.0/24 與 10.10.2.0/24 子網路之間的通訊。
Leave the interface configuration mode on R1 and go directly to the privileged EXEC mode.
離開 R1 上的介面設定模式,直接回到特權 EXEC 模式。
On R1, enter the following command:
在 R1 上,輸入以下指令:
R1(config-if)# end
R1#View access list 10, this time using the show access-lists command. The show access-lists command will display the content of all configured access lists, for IPv4 and IPv6. You can narrow the output by specifying the access list number or name. You can also use the show ip access-lists command to display all the configured IPv4 access lists and their content.
這次使用 show access-lists 指令來檢視存取清單 10。show access-lists 指令會顯示所有已設定存取清單的內容,包括 IPv4 與 IPv6。你可以透過指定存取清單編號或名稱來縮小輸出範圍。你也可以使用 show ip access-lists 指令來顯示所有已設定的 IPv4 存取清單及其內容。
On R1, enter the following command:
在 R1 上,輸入以下指令:
R1# show access-lists 10
Standard IP access list 10
 10 permit 10.10.1.10
 20 deny   10.10.1.0, wildcard bits 0.0.0.255
 30 permit 10.10.0.0, wildcard bits 0.0.255.255
 40 deny   10.0.0.0, wildcard bits 0.255.255.255
 50 permit any
Although you can view access list entries from the running configuration output, there are advantages to using the show access-lists command. Note that the output of the show access-lists command displays all the configured access lists. You can use output filters to display only the desired access-list or you can specify the access list name or number as the argument.
雖然你可以從執行中設定的輸出中查看存取清單項目,但使用 show access-lists 指令有其優點。請注意,show access-lists 指令的輸出會顯示所有已設定的存取清單。你可以使用輸出過濾器只顯示所需的存取清單,或是以存取清單名稱或編號作為引數指定。
The show access-lists command shows the ACL entries in a format which is different than the format used to configure the entry in configuration mode. A sequence number is displayed at the beginning of each entry in the output of the show access-lists command, but the sequence number was not included when you displayed the access list as part of the running configuration. The sequence number was automatically assigned by Cisco IOS when you entered the access list entries.
show access-lists 指令以不同於在設定模式下設定項目時所用的格式來顯示 ACL 項目。show access-lists 指令的輸出中,每個項目開頭都會顯示一個序號,但在以執行中設定顯示存取清單時並不包含序號。此序號是你輸入存取清單項目時由 Cisco IOS 自動指派的。
Also note that the output of the show access-lists command explicitly tells you that this access list is a standard access list. Your access list is a numbered access list with the number 10. When using numbered access lists,the number chosen for the list indicates access list type.
另請注意,show access-lists 指令的輸出會明確告知你此存取清單為標準存取清單。你的存取清單是編號為 10 的編號式存取清單。使用編號式存取清單時,所選的編號會指出存取清單的類型。
To verify the filtering action of access list 10, you are now going to generate traffic and observe the result of ACL processing. The first line in access list 10 permits traffic from single address 10.10.1.10, which is the address of PC1. To generate traffic from PC1, access the console of PC1 and execute a ping to SRV2, whose address is 203.0.113.30.
為驗證存取清單 10 的過濾動作,你現在將產生流量並觀察 ACL 處理的結果。存取清單 10 的第一行允許來自單一位址 10.10.1.10(即 PC1 的位址)的流量。若要從 PC1 產生流量,請存取 PC1 的主控台,並對 SRV2(位址為 203.0.113.30)執行 ping。
On PC1, enter the following commands:
在 PC1 上,輸入以下指令:
PC1# ping 203.0.113.30
Type escape sequence to abort.
Sending 5, 100-byte ICMP Echos to 203.0.113.30, timeout is 2 seconds:
.!!!!
Success rate is 80 percent (4/5), round-trip min/avg/max = 1/201/1005 ms
The ping is successful. The ping utility on PC1 sends five ICMP requests.
ping 成功。PC1 上的 ping 工具會發送五個 ICMP 請求。
After an ACL has been applied to an interface and some testing has occurred, the show access-lists command will display statistics for each statement that has been matched. Return to the console of R1 and display access list 10 again.
在 ACL 套用到介面並進行一些測試之後,show access-lists 指令會顯示每個已比對到流量的陳述式統計資料。回到 R1 的主控台,再次顯示存取清單 10。
On R1, enter the following command:
在 R1 上,輸入以下指令:
R1# show access-lists 10
Standard IP access list 10
    10 permit 10.10.1.10 (5 matches)
    20 deny   10.10.1.0, wildcard bits 0.0.0.255
    30 permit 10.10.0.0, wildcard bits 0.0.255.255
    40 deny   10.0.0.0, wildcard bits 0.255.255.255
    50 permit any
In the output of the command, note that first entry has been matched. The counter of matched packets is shown in brackets, at the end of the access list entry. Each time an access list matches traffic, the counter of matched packets increases.
在指令輸出中,請注意第一個項目已被比對到。已比對封包的計數器顯示在存取清單項目結尾的中括號內。每當存取清單比對到流量,已比對封包的計數器就會增加。
When the first match in the ACL is encountered, the access list entry is executed. In the lab, the PC1 address 10.10.1.10 matches every line in the access list 10, but only the permit instruction of the first line was executed. After the instruction in the matching statement is executed, the ACL processing stops. Other processes take over the packet.
當 ACL 中出現第一次比對時,該存取清單項目就會被執行。在本實驗中,PC1 位址 10.10.1.10 會符合存取清單 10 中的每一行,但只有第一行的允許指令會被執行。執行符合的陳述式中的指令後,ACL 處理便會停止,接下來由其他程序接手處理該封包。
Continue testing access list 10. The second line of access list 10 denies traffic from 10.10.1.0 0.0.0.255, denying packets with the source IPv4 address 10.10.1.* (other than 10.10.1.10 which is permitted by the first line). In the lab topology, the SW1 has IPv4 address 10.10.1.4. The packets from SW1 should pass by the first entry and match the second entry in the access list 10. To generate traffic from SW1, access the console of SW1 and use the ping command to check the connectivity to SRV2. The attempt should fail.
繼續測試存取清單 10。存取清單 10 的第二行會拒絕來自 10.10.1.0 0.0.0.255 的流量,也就是拒絕來源 IPv4 位址為 10.10.1.*(PC1 除外,PC1 已由第一行允許)的封包。在實驗拓樸中,SW1 的 IPv4 位址為 10.10.1.4。來自 SW1 的封包應該會通過第一個項目,並符合存取清單 10 中的第二個項目。若要從 SW1 產生流量,請存取 SW1 的主控台,並使用 ping 指令檢查與 SRV2 的連通性,此嘗試應該會失敗。
On SW1, enter the following command:
在 SW1 上,輸入以下指令:
SW1# ping 203.0.113.30
Type escape sequence to abort.
Sending 5, 100-byte ICMP Echos to 203.0.113.30, timeout is 2 seconds:
U.U.U
Success rate is 0 percent (0/5)
The ping was unsuccessful. You can presume that the access list 10 discards the packets coming from devices in the 10.10.1.0/24 subnet, other than PC1. In ping output, "U" stands for ICMP unreachable, which can be a good indication that an access list in the network is blocking the traffic.
ping 未成功。你可以推斷存取清單 10 已捨棄來自 10.10.1.0/24 子網路中(PC1 除外)裝置的封包。在 ping 輸出中,「U」代表 ICMP 無法到達(unreachable),這通常是網路中有存取清單正在阻擋流量的良好指標。
To verify that the filtering action of access list 10 is the cause for unsuccessful pings from SW1, return to the console of R1 and view access list 10 again. Look for the number of matches of the entry denying traffic from 10.10.1.0 subnet.
為驗證存取清單 10 的過濾動作是導致 SW1 ping 失敗的原因,回到 R1 的主控台,再次檢視存取清單 10。留意拒絕來自 10.10.1.0 子網路流量的項目的比對次數。
On R1, enter the following command:
在 R1 上,輸入以下指令:
R1# show access-lists 10
Standard IP access list 10
    10 permit 10.10.1.10 (5 matches)
    20 deny   10.10.1.0, wildcard bits 0.0.0.255 (8 matches)
    30 permit 10.10.0.0, wildcard bits 0.0.255.255
    40 deny   10.0.0.0, wildcard bits 0.255.255.255
    50 permit any
Note that the statistics show matches also in the second line. The new match counter increased because of the SW1 ping packets. The exact number of matches will depend on how the router platform processes the denied packets.
請注意統計資料顯示第二行也有比對次數。新的比對計數器因 SW1 的 ping 封包而增加。實際的比對次數會依路由器平台處理被拒絕封包的方式而有所不同。
Now test the third line of the access list 10. The third line permits other packets that originate from the 10.10.0.0/16 subnets: packets with source IPv4 address 10.10.*.*. SRV1 and SW2 both have addresses in the 10.10.2.0/24 range. To test the access list, you could generate traffic directly on SRV1 by checking connectivity from SRV1 to SRV2 using ping. Another way to test the third line of the access list 10 is to provoke the SRV1 to generate traffic or, in networking terminology, to solicit a response from SRV1. You can solicit a response from SRV1 by testing the connectivity from R2 to SRV1. Remember that for the ping to succeed, connectivity must exist in both directions: from R2 to SRV1 and from SRV1 back to R2. In this lab's topology, the SRV1 replies to R2 ping will pass the router R1, where they will "encounter" access list 10 as they egress R1 through the Ethernet 0/3 interface.
現在測試存取清單 10 的第三行。第三行允許來源於 10.10.0.0/16 子網路的其他封包,即來源 IPv4 位址為 10.10.*.* 的封包。SRV1 與 SW2 的位址皆位於 10.10.2.0/24 範圍內。若要測試此存取清單,你可以直接在 SRV1 上產生流量,透過 ping 檢查 SRV1 與 SRV2 之間的連通性。另一種測試存取清單 10 第三行的方式,是促使 SRV1 產生流量,或者用網路術語來說,引發(solicit)SRV1 的回應。你可以透過測試從 R2 到 SRV1 的連通性來引發 SRV1 的回應。請記住,ping 要成功,兩個方向都必須有連通性:從 R2 到 SRV1,以及從 SRV1 回到 R2。在本實驗的拓樸中,SRV1 回覆 R2 的封包會通過路由器 R1,並在經由 Ethernet 0/3 介面離開 R1 時「遇上」存取清單 10。
On R2, enter the following command:
在 R2 上,輸入以下指令:
R2# ping 10.10.2.20
Type escape sequence to abort.
Sending 5, 100-byte ICMP Echos to 10.10.2.20, timeout is 2 seconds:
.!!!!
Success rate is 80 percent (4/5), round-trip min/avg/max = 1/1/1 ms
The ping is successful as expected.
如預期,ping 成功。
Although you saw that the ping from R2 to SRV1 was successful, it is a good practice to verify that the access list filtered the traffic. Return to the console of R1 and again show statistics for access list 10. Note down the values of match counters for each line.
雖然你已看到從 R2 到 SRV1 的 ping 成功,但養成習慣去驗證存取清單確實過濾了流量仍是良好做法。回到 R1 的主控台,再次顯示存取清單 10 的統計資料。記下每一行比對計數器的數值。
On R1, enter the following command:
在 R1 上,輸入以下指令:
R1# show access-lists 10
Standard IP access list 10
    10 permit 10.10.1.10 (5 matches)
    20 deny   10.10.1.0, wildcard bits 0.0.0.255 (8 matches)
    30 permit 10.10.0.0, wildcard bits 0.0.255.255 (4 matches)
    40 deny   10.0.0.0, wildcard bits 0.255.255.255
    50 permit any
The match counter for the third statement was incremented, which indicates that the access list filtered the traffic sent form SRV1.
第三個陳述式的比對計數器已增加,這表示存取清單過濾了來自 SRV1 送出的流量。
The fourth entry in the access list 10 denies traffic from 10.0.0.0 0.255.255.255. Any packet with the source IPv4 address 10.*.*.* , other than 10.10.*.*, should be discarded. The fifth entry permits connections from any IPv4 address that did not match the first four statements, or in other words, any address that starts with something other than 10. There are no appropriate addresses in the lab topology to test the fourth and the fifth lines. The only devices with addresses that do not belong to the 10.0.0.0/8 range are the R1 and R2 routers. Although Ethernet 0/3 interface on R1 has an IPv4 address 198.51.100.2, R1 cannot be used in testing the access list. Because of the way that routers process traffic, the access list 10 does not process the traffic that originates from the router itself. Ping the SRV2 from the public interface of R1. To ensure that you are using the 198.51.100.2 as the source address, use the version of the ping command that specifies the source address explicitly, such as ping 203.0.113.30 source 198.51.100.2.
存取清單 10 中的第四個項目拒絕來自 10.0.0.0 0.255.255.255 的流量。任何來源 IPv4 位址為 10.*.*.*(10.10.*.* 除外)的封包都應該被捨棄。第五個項目允許來自任何未符合前四個陳述式的 IPv4 位址的連線,換句話說,就是任何開頭不是 10 的位址。在實驗拓樸中,沒有適合的位址可用來測試第四行與第五行。唯一位址不屬於 10.0.0.0/8 範圍的裝置是 R1 與 R2 路由器。雖然 R1 上的 Ethernet 0/3 介面具有 IPv4 位址 198.51.100.2,但 R1 無法用來測試該存取清單。由於路由器處理流量的方式,存取清單 10 不會處理來源為路由器自身所產生的流量。請從 R1 的公用介面對 SRV2 執行 ping。為確保你使用的是來源位址 198.51.100.2,請使用可明確指定來源位址的 ping 指令版本,例如 ping 203.0.113.30 source 198.51.100.2。
On R1, enter the following commands:
在 R1 上,輸入以下指令:
R1# ping 203.0.113.30 source 198.51.100.2
Type escape sequence to abort.
Sending 5, 100-byte ICMP Echos to 203.0.113.30, timeout is 2 seconds:
Packet sent with a source address of 198.51.100.2
!!!!!
Success rate is 100 percent (5/5), round-trip min/avg/max = 1/1/1 ms
The ping is successful.
ping 成功。
Verify that the access list 10 on R1 has not processed the ping traffic sent by the R1 router itself. The ping from R1 to SRV2 was successful. Display the access list 10 again and check whether the counters have changed for the fifth or any other entry.
驗證 R1 上的存取清單 10 並未處理由 R1 路由器自身送出的 ping 流量。從 R1 到 SRV2 的 ping 已成功。再次顯示存取清單 10,並檢查第五個或其他任何項目的計數器是否有變化。
On R1, enter the following command:
在 R1 上,輸入以下指令:
R1# show access-lists 10
Standard IP access list 10
    10 permit 10.10.1.10 (5 matches)
    20 deny   10.10.1.0, wildcard bits 0.0.0.255 (8 matches)
    30 permit 10.10.0.0, wildcard bits 0.0.255.255 (4 matches)
    40 deny   10.0.0.0, wildcard bits 0.255.255.255
    50 permit any
Notice that there are no changes in the match counters on any of the lines.
請注意任何一行的比對計數器都沒有變化。
So far, you have applied, examined, and verified access list 10, which was preconfigured on R1. Access list 10 permits traffic from every device in the 10.10.2.0 subnet. You will now modify access list 10 so that it allows traffic only from SRV1 on 10.10.2.0.
到目前為止,你已經套用、檢視並驗證了預先設定在 R1 上的存取清單 10。存取清單 10 允許來自 10.10.2.0 子網路中每一部裝置的流量。你現在將修改存取清單 10,使其只允許來自 10.10.2.0 上 SRV1 的流量。
You need to add two new entries to the access list 10. The first new entry should allow the traffic from SRV1 address 10.10.2.20/24. The second new entry should discard the traffic from all other IPv4 addresses in the 10.10.2.0/24 subnet. You will first add the entry which denies the traffic. At this point, to enter new access list statements, go to the global configuration mode and type in the new entry as you would have when you first configure an access list. Then verify that the entry was added using the show access-lists command. Look for the newly added entries and note down their sequence numbers.
你需要在存取清單 10 中加入兩個新項目。第一個新項目應允許來自 SRV1 位址 10.10.2.20/24 的流量。第二個新項目應捨棄來自 10.10.2.0/24 子網路中所有其他 IPv4 位址的流量。你會先加入拒絕流量的項目。此時,若要輸入新的存取清單陳述式,請進入全域設定模式,並如同你第一次設定存取清單時一樣輸入新項目。接著使用 show access-lists 指令驗證項目是否已加入,並找出新加入項目的序號,記錄下來。
On R1, enter the following commands:
在 R1 上,輸入以下指令:
R1# configure terminal
R1(config)# access-list 10 deny 10.10.2.0 0.0.0.255R1(config)# exit
R1# show access-lists 10
Standard IP access list 10
    10 permit 10.10.1.10 (5 matches)
    20 deny   10.10.1.0, wildcard bits 0.0.0.255 (8 matches)
    30 permit 10.10.0.0, wildcard bits 0.0.255.255 (4 matches)
    40 deny   10.0.0.0, wildcard bits 0.255.255.255
    50 permit any
 60 deny   10.10.2.0, wildcard bits 0.0.0.255
Note that the new deny statement has been added to the end of the access list and has the sequence number 60.
請注意,新的拒絕陳述式已加到存取清單末端,序號為 60。
You will now add the entry which allows traffic from SRV1 address 10.10.2.20. Simply type in the new entry as you would have when you first configured an access list. Note the Cisco IOS console message that will appear.
你現在將加入允許來自 SRV1 位址 10.10.2.20 流量的項目。只需如同你第一次設定存取清單時一樣輸入新項目即可。請留意會出現的 Cisco IOS 主控台訊息。
On R1, enter the following command
在 R1 上,輸入以下指令
R1# configure terminal
R1(config)# access-list 10 permit host 10.10.2.20
% Access rule can't be configured at higher sequence num as it is part of the existing rule at sequence num 30
When adding new statements to the access list, Cisco IOS will check whether there is already an entry with a lower sequence number that matches the same traffic and has the same instruction (permit or deny). If it finds an existing entry, it will not add the new statement. In the lab, access list entry with number 30 permits all traffic from all 10.10.0.0 subnets, in other words, it already matches the single address 10.10.2.20.
當你在存取清單中加入新陳述式時,Cisco IOS 會檢查是否已存在一個序號較小、比對相同流量且指令相同(允許或拒絕)的項目。若找到既有項目,就不會加入新陳述式。在本實驗中,編號 30 的存取清單項目允許來自所有 10.10.0.0 子網路的所有流量,換句話說,它已涵蓋單一位址 10.10.2.20。
Note that 10.10.2.0 0.0.0.255 statement that you successfully added is also already included in the "wider" 10.10.0.0 0.0.255.255 statement. However, the new statement denies traffic while the existing one permits it. When instructions differ for the statements with matching overlap, Cisco IOS does not generate the warning.
請注意,你成功加入的 10.10.2.0 0.0.0.255 陳述式,其實也已包含在較「廣泛」的 10.10.0.0 0.0.255.255 陳述式之中。然而,新陳述式是拒絕流量,而既有陳述式是允許流量。當有重疊比對範圍的陳述式指令不同時,Cisco IOS 不會產生警告。
Display the access list 10 again and verify that the access list does not include the new permit entry. Note that the newly added deny entry is appended to the end of the access list and has the sequence number 60.
再次顯示存取清單 10,並驗證清單中並未包含新的允許項目。請注意,新加入的拒絕項目已附加到存取清單末端,序號為 60。
On R1, enter the following commands:
在 R1 上,輸入以下指令:
R1(config)# exit
R1# show access-lists 10
Standard IP access list 10
    10 permit 10.10.1.10 (5 matches)
    20 deny   10.10.1.0, wildcard bits 0.0.0.255 (8 matches)
    30 permit 10.10.0.0, wildcard bits 0.0.255.255 (4 matches)
    40 deny   10.0.0.0, wildcard bits 0.255.255.255
    50 permit any
 60 deny   10.10.2.0, wildcard bits 0.0.0.255
Adding new entries just by configuring them as you do when you first define an access list, appends new entries to the end of the access list. Sometimes, this default behavior results in an incorrectly ordered sequence of entries.
以你第一次定義存取清單時的方式來設定新項目,會將新項目附加到存取清單的末端。有時這種預設行為會導致項目順序不正確。
In the lab, the default appending of new entries to the end of an access list will not produce the desired filtering effect. The new statement that blocks traffic from 10.10.2.0/24 subnet is the last entry in the list. Because it is the last entry in access list 10, traffic from SW2, whose address is 10.10.2.4, would not be blocked, because it would previously be permitted by the statement 30, which permits traffic from all 10.10.0.0/16 subnets. Recall that once there is a match in an access list, the corresponding entry is executed, and no further entries are processed. In other words, entry 30 will match traffic from 10.10.2.0/24 subnet before entry 60. From SW2 check the connectivity to SRV2 using the ping command.
在本實驗中,將新項目預設附加到存取清單末端並不會產生所需的過濾效果。阻擋來自 10.10.2.0/24 子網路流量的新陳述式是清單中的最後一個項目。由於它是存取清單 10 中的最後一個項目,來自 SW2(位址為 10.10.2.4)的流量將不會被阻擋,因為它之前已被陳述式 30(允許來自所有 10.10.0.0/16 子網路的流量)所允許。回想一下,一旦存取清單中出現比對,相對應的項目就會被執行,之後便不再處理其他項目。換句話說,項目 30 會在項目 60 之前比對到來自 10.10.2.0/24 子網路的流量。從 SW2 使用 ping 指令檢查與 SRV2 的連通性。
On SW2, enter the following command:
在 SW2 上,輸入以下指令:
SW2# ping 203.0.113.30
Type escape sequence to abort.
Sending 5, 100-byte ICMP Echos to 203.0.113.30, timeout is 2 seconds:
!!!!!
Success rate is 100 percent (5/5), round-trip min/avg/max = 1/202/1008 ms
The ping from SW2 is successful.
從 SW2 發出的 ping 成功。
Verify the statistics of the access list 10.
驗證存取清單 10 的統計資料。
On R1, enter the following command:
在 R1 上,輸入以下指令:
R1# show access-lists 10
Standard IP access list 10
    10 permit 10.10.1.10 (5 matches)
    20 deny   10.10.1.0, wildcard bits 0.0.0.255 (8 matches)
    30 permit 10.10.0.0, wildcard bits 0.0.255.255 (9 matches)
    40 deny   10.0.0.0, wildcard bits 0.255.255.255
    50 permit any
    60 deny   10.10.2.0, wildcard bits 0.0.0.255
Note that there are no matches for the entry number 60. But statistics were incremented for entry number 30.
請注意,編號 60 的項目沒有任何比對次數,但編號 30 的項目統計資料有增加。
You have to place new statements in the correct place in the existing access list, for them to have effect. After the first match occurs, the matching statement is executed and further ACL processing stops.
你必須將新陳述式放在既有存取清單中正確的位置,才能發揮效用。第一次比對發生後,符合的陳述式就會被執行,之後的 ACL 處理便會停止。
You will now modify access list 10 again to ensure the correct order of the entries. First, you will delete the added entry and then re-add both new entries, but this time you will influence where they will be placed in the access list.
你現在將再次修改存取清單 10,以確保項目順序正確。首先,你會刪除已加入的項目,然後重新加入這兩個新項目,但這次你會影響它們在存取清單中的放置位置。
To delete a statement from the numbered access lists, you will first enter into the specific configuration mode, called Named Access List configuration mode, using the ip access-list standard name command. The Named Access List configuration mode is a submode of the global configuration mode in Cisco IOS Software. To delete a specific statement, you need to know its sequence number in the access list. You will use no sequence-number command in the Named Access List configuration mode to delete statement number 60.
若要從編號式存取清單中刪除一個陳述式,你需要先使用 ip access-list standard name 指令進入名為「具名存取清單設定模式」(Named Access List configuration mode)的特定設定模式。在 Cisco IOS 軟體中,具名存取清單設定模式是全域設定模式的子模式。若要刪除特定陳述式,你需要知道它在存取清單中的序號。你將在具名存取清單設定模式中使用 no 序號指令,來刪除編號 60 的陳述式。
On R1, enter the following commands:
在 R1 上,輸入以下指令:
R1# configure terminal
R1(config)# ip access-list standard 10
R1(config-std-nacl)# no 60
Alternatively, you could delete the entire access list, using the global configuration mode command no access-list and then retype the statements. However, this procedure is more time consuming and error prone.
另一種方式是使用全域設定模式指令 no access-list 刪除整個存取清單,然後重新輸入所有陳述式。不過,這種做法較耗時且容易出錯。
The Named Access List configuration mode is indicated by the R1(config-std-nacl)# prompt. "nacl" in the prompt stands for the named access list. In fact, to enter the named access-list configuration mode, you used the ip access-list standard name command, which is a command used for named standard access lists. The ip access-list standard name command allows entering numbers as names and so provides an easier way to modify numbered access lists as well.
具名存取清單設定模式的提示字元為 R1(config-std-nacl)#。提示字元中的「nacl」代表具名存取清單(named access list)。事實上,若要進入具名存取清單設定模式,你使用了 ip access-list standard name 指令,這是用於具名標準存取清單的指令。ip access-list standard name 指令允許以數字作為名稱,因此也提供了一種更容易修改編號式存取清單的方式。
To verify if you have successfully deleted the statements, display the content of the access list 10. On R1, go back to the Privileged EXEC Mode and use the show access-lists command to display the content of the access list 10. Verify that entry 60 is no longer present.
若要驗證你是否已成功刪除陳述式,請顯示存取清單 10 的內容。在 R1 上,返回特權 EXEC 模式,並使用 show access-lists 指令顯示存取清單 10 的內容,驗證項目 60 已不再存在。
On R1, enter the following command:
在 R1 上,輸入以下指令:
R1(config-std-nacl)# end
R1# show access-lists 10
Standard IP access list 10
    10 permit 10.10.1.10 (5 matches)
    20 deny   10.10.1.0, wildcard bits 0.0.0.255 (8 matches)
    30 permit 10.10.0.0, wildcard bits 0.0.255.255 (9 matches)
    40 deny   10.0.0.0, wildcard bits 0.255.255.255
    50 permit any
The line 60 is deleted.
第 60 行已被刪除。
You now know that new entries must come before the existing entry number 30. The new entries allow traffic from SRV1 address 10.10.2.20 and deny traffic from other devices in the 10.10.2.0/24 subnet. The new entries do not overlap with entries 10 and 20, because entries 10 and 20 match traffic from another subnet,10.10.1.0/24.
你現在已知道新項目必須放在既有項目 30 之前。這兩個新項目分別允許來自 SRV1 位址 10.10.2.20 的流量,並拒絕來自 10.10.2.0/24 子網路中其他裝置的流量。這兩個新項目不會與項目 10 及 20 重疊,因為項目 10 及 20 比對的是另一個子網路 10.10.1.0/24 的流量。
You have several options for placing the new entries. They can come before entry 10, between entries 10 and 20 or between entries 20 and 30.
放置新項目有多種選擇。它們可以放在項目 10 之前、項目 10 與 20 之間,或項目 20 與 30 之間。
You will assign numbers 24 and 27 to new entries. An entry matching a single IPv4 address is more specific than an entry matching a subnet or a range of subnets. More specific entries are added first. Therefore, you will add the statement that permits traffic from 10.10.2.20/24 with sequence number 24 and the statement that denies traffic from the rest of the 10.10.2.0/24 subnet with sequence number 27. You are going to add entries in the Named Access List configuration mode.
你將為新項目指定編號 24 與 27。比對單一 IPv4 位址的項目比比對子網路或子網路範圍的項目更具體。較具體的項目應優先加入。因此,你將加入序號為 24、允許來自 10.10.2.20/24 流量的陳述式,以及序號為 27、拒絕來自 10.10.2.0/24 子網路其餘部分流量的陳述式。你將在具名存取清單設定模式中加入這些項目。
On R1, enter the following commands:
在 R1 上,輸入以下指令:
R1# configure terminal
R1(config)# ip access-list standard 10
R1(config-std-nacl)# 24 permit host 10.10.2.20
R1(config-std-nacl)# 27 deny 10.10.2.0 0.0.0.255
When adding new entries to an existing access list, it is a good practice to choose sequence numbers that are apart. Having sequence numbers apart will allow eventual new additions to the access list.
在既有存取清單中加入新項目時,最好選擇彼此間隔較大的序號。序號間隔較大可讓日後有空間加入新項目。
Verify that you have successfully modified the access lists. Check that the entries are ordered as you desired. In the privileged EXEC command mode, display the content of the access list 10 using show access-lists command. In the output, look for the newly added entries.
驗證你已成功修改存取清單,檢查項目是否依你所期望的順序排列。在特權 EXEC 指令模式下,使用 show access-lists 指令顯示存取清單 10 的內容。在輸出中尋找新加入的項目。
On R1, enter the following command:
在 R1 上,輸入以下指令:
R1(config-std-nacl)# end
R1# show access-lists 10
Standard IP access list 10
    10 permit 10.10.1.10 (5 matches)
 24 permit 10.10.2.20
    20 deny   10.10.1.0, wildcard bits 0.0.0.255 (8 matches)
 27 deny   10.10.2.0, wildcard bits 0.0.0.255
    30 permit 10.10.0.0, wildcard bits 0.0.255.255 (9 matches)
    40 deny   10.0.0.0, wildcard bits 0.255.255.255
    50 permit any
The entry 24 is listed ahead of the entry 20 in the output. The Cisco IOS Software reorders the commands so that the more specific entries come first. The two most specific entries in the lab are the entries that are matching single addresses of PC1 and SRV1.
輸出中,項目 24 排在項目 20 之前。Cisco IOS 軟體會重新排序指令,使較具體的項目排在前面。本實驗中兩個最具體的項目,是比對 PC1 與 SRV1 單一位址的項目。
You will now test the newly added entries. You expect only traffic from SRV1 to pass the access list. To test, using ping test connectivity to SRV2 from both SRV1 and SW2. First, check connectivity from SRV1.
你現在將測試新加入的項目。你預期只有來自 SRV1 的流量能通過存取清單。若要測試,請分別從 SRV1 與 SW2 使用 ping 測試與 SRV2 的連通性。首先,檢查來自 SRV1 的連通性。
On SRV1, enter the following command:
在 SRV1 上,輸入以下指令:
SRV1# ping 203.0.113.30
Type escape sequence to abort.
Sending 5, 100-byte ICMP Echos to ping 203.0.113.30, timeout is 2 seconds:
!!!!!
Success rate is 100 percent (5/5), round-trip min/avg/max = 1/1/1 ms
The ping is successful. The traffic from SRV1 passes the access list 10 filtering.
ping 成功。來自 SRV1 的流量通過了存取清單 10 的過濾。
Test whether the ping from SW2 to SRV2 is successful.
測試從 SW2 到 SRV2 的 ping 是否成功。
On SW2, enter the following command:
在 SW2 上,輸入以下指令:
SW2# ping 203.0.113.30
Type escape sequence to abort.
Sending 5, 100-byte ICMP Echos to 203.0.113.30, timeout is 2 seconds:
U.U.U
Success rate is 0 percent (0/5)
The ping from the SW2 is not successful.
從 SW2 發出的 ping 未成功。
To verify that access list 10 is filtering the traffic from 10.10.2.0 subnet, display its statistics. If the access list filters traffic as expected, you should see match statistics for the newly added entries.
若要驗證存取清單 10 正在過濾來自 10.10.2.0 子網路的流量,請顯示其統計資料。若存取清單如預期般過濾流量,你應該會看到新加入項目的比對統計資料。
On R1, enter the following command:
在 R1 上,輸入以下指令:
R1# show access-lists 10
Standard IP access list 10
    10 permit 10.10.1.10 (5 matches)
    24 permit 10.10.2.20 (5 matches)
    20 deny   10.10.1.0, wildcard bits 0.0.0.255 (8 matches)
    27 deny   10.10.2.0, wildcard bits 0.0.0.255 (8 matches)
    30 permit 10.10.0.0, wildcard bits 0.0.255.255 (9 matches)
    40 deny   10.0.0.0, wildcard bits 0.0.0.255
    50 permit any
There are matches on each of the new statements. You have successfully modified the access list.
每個新陳述式都有比對次數。你已成功修改此存取清單。
Task 2: Configure, Apply, and Verify Extended IPv4 Access Lists
任務 2:設定、套用並驗證延伸 IPv4 存取清單
Activity
活動
Use an extended access list if you wish to refine filtering of traffic from the 10.10.1.0 subnet. Standard access list 10 already filters the traffic from 10.10.1.0. The filtering of the standard access list 10 is more restrictive and overlaps with the filtering you wish to achieve with the extended access list. Therefore, you will first modify the standard access-list 10 on R1 to remove overlapping entries, sequence numbers 10 and 20. Access the console on R1 and enter the Named Access List configuration mode to delete the entries.
如果你想要精細化過濾來自 10.10.1.0 子網路的流量,可以使用延伸存取清單。標準存取清單 10 已經在過濾來自 10.10.1.0 的流量。標準存取清單 10 的過濾方式較嚴格,且與你想以延伸存取清單達成的過濾效果重疊。因此,你將先修改 R1 上的標準存取清單 10,移除重疊的項目,即序號 10 與 20。存取 R1 的主控台,並進入具名存取清單設定模式以刪除這些項目。
On R1, enter the following commands:
在 R1 上,輸入以下指令:
R1# configure terminal
R1(config)# ip access-list standard 10
R1(config-std-nacl)# no 10
R1(config-std-nacl)# no 20Display the access list 10 to verify that you have successfully deleted the entries.
顯示存取清單 10,驗證你已成功刪除這些項目。
On R1, enter the following commands:
在 R1 上,輸入以下指令:
R1(config-std-nacl)# end
R1# show access-lists 10
Standard IP access list 10
    24 permit 10.10.2.20 (5 matches)
    27 deny   10.10.2.0, wildcard bits 0.0.0.255 (8 matches)
    30 permit 10.10.0.0, wildcard bits 0.0.255.255 (9 matches)
    40 deny   10.0.0.0, wildcard bits 0.255.255.255
    50 permit any
Entries 10 and 20 are no longer present in the access list 10.
項目 10 與 20 已不再存在於存取清單 10 中。
Note that the standard access list 10 still filters traffic, because it is still applied to the Ethernet 0/3 interface of R1 in the outbound direction. Entries 24 and 27 filter traffic from the 10.10.2.0/24 subnet, while other entries process traffic from 10.0.0.0/8 subnets and other networks.
請注意,標準存取清單 10 仍在過濾流量,因為它仍套用在 R1 的 Ethernet 0/3 介面上,方向為出向。項目 24 與 27 過濾來自 10.10.2.0/24 子網路的流量,而其他項目則處理來自 10.0.0.0/8 子網路及其他網路的流量。
Verify that the traffic from the 10.10.1.0/24 subnet is not filtered anymore and that traffic from 10.10.2.0/24 is still filtered by access list 10. Test the connectivity to SRV2 from both subnets. Use the name of SRV2 instead of its IPv4 address. You can use either upper or lower case letters in the commands. In the lab topology, the SRV2 is configured as the DNS server and will resolve names of all the topology devices to their IPv4 addresses. First, test the connectivity from SW1 to SRV2.
驗證來自 10.10.1.0/24 子網路的流量不再被過濾,而來自 10.10.2.0/24 的流量仍被存取清單 10 過濾。測試這兩個子網路與 SRV2 的連通性,並使用 SRV2 的名稱而非其 IPv4 位址。指令中可使用大寫或小寫字母。在實驗拓樸中,SRV2 已設定為 DNS 伺服器,會將拓樸中所有裝置的名稱解析為其 IPv4 位址。首先,測試從 SW1 到 SRV2 的連通性。
On SW1, enter the following command:
在 SW1 上,輸入以下指令:
SW1# ping SRV2
Translating "SRV2"...domain server (203.0.113.30) [OK]

Type escape sequence to abort.
Sending 5, 100-byte ICMP Echos to 203.0.113.30, timeout is 2 seconds:
!!!!!
Success rate is 100 percent (5/5), round-trip min/avg/max = 1/1/1 ms
As expected, the ping from SW1 succeeds.
如預期,從 SW1 發出的 ping 成功。
Test the connectivity from SW2 to SRV2. Perform two tests, the first using SRV2 name and the second using SRV2 IPv4 address.
測試從 SW2 到 SRV2 的連通性。執行兩次測試,第一次使用 SRV2 的名稱,第二次使用 SRV2 的 IPv4 位址。
On SW2, enter the following commands:
在 SW2 上,輸入以下指令:
SW2# ping srv2
Translating "srv2"...domain server (203.0.113.30)
% Unrecognized host or address, or protocol not running.

SW2# ping 203.0.113.30
Type escape sequence to abort.
Sending 5, 100-byte ICMP Echos to 203.0.113.30, timeout is 2 seconds:
U.U.U
Success rate is 0 percent (0/5)
As expected, both ping tests from SW2 fail. The access list is blocking SW2 DNS requests and ECHO requests.
如預期,來自 SW2 的兩次 ping 測試都失敗。此存取清單正在阻擋 SW2 的 DNS 請求與 ECHO 請求。
Access the console on R1 and configure a named extended IPv4 ACL using the ip access-list extended name command. The ACL should be named "PC1_TELNET." Note how the configuration mode changes to the Named Access List configuration mode.
存取 R1 的主控台,使用 ip access-list extended name 指令設定一個具名延伸 IPv4 ACL。該 ACL 應命名為「PC1_TELNET」。請注意設定模式如何切換到具名存取清單設定模式。
The ACL should have these four statements:
此 ACL 應包含以下四個陳述式:
- The first should deny all UDP traffic.第一項應拒絕所有 UDP 流量。
- The second should permit TCP traffic from PC1 to any destination as long as the destination port is 23 (Telnet).第二項應允許從 PC1 到任何目的地、且目的連接埠為 23(Telnet)的 TCP 流量。
- The third should deny all other TCP traffic from PC1.第三項應拒絕來自 PC1 的所有其他 TCP 流量。
- The last should explicitly permit all IPv4 traffic.最後一項應明確允許所有 IPv4 流量。
On R1, enter the following commands:
在 R1 上,輸入以下指令:
R1# configure terminal
R1(config)# ip access-list extended PC1_TELNET
R1(config-ext-nacl)# deny udp any any
R1(config-ext-nacl)# permit tcp host 10.10.1.10 any eq 23
R1(config-ext-nacl)# deny tcp host 10.10.1.10 any
R1(config-ext-nacl)# permit ip any anyOn router R1, apply the PC1_TELNET access list to the Ethernet0/0 interface in the inbound direction and leave the configuration mode.
在路由器 R1 上,將 PC1_TELNET 存取清單套用到 Ethernet0/0 介面的入向方向,然後離開設定模式。
On R1, enter the following commands
在 R1 上,輸入以下指令
R1(config-ext-nacl)# exit
R1(config)# interface Ethernet 0/0
R1(config-if)# ip access-group PC1_TELNET in
R1(config-if)# endDisplay the entries of the PC1_TELNET access list using the show access-lists command. Double check the access list entries. Verify that PC1_TELNET access list has all four statements in the correct order. Any slight variation in its definition can result in unexpected filtering behavior.
使用 show access-lists 指令顯示 PC1_TELNET 存取清單的項目。仔細檢查存取清單項目,驗證 PC1_TELNET 存取清單是否依正確順序包含所有四個陳述式。定義上的任何微小差異都可能導致非預期的過濾行為。
On R1, enter the following command:
在 R1 上,輸入以下指令:
R1# show access-lists PC1_TELNET
Extended IP access list PC1_TELNET
 10 deny udp any any
 20 permit tcp host 10.10.1.10 any eq telnet
 30 deny tcp host 10.10.1.10 any
40 permit ip any anyThe outputs of either the show access-lists command or the show ip access-lists command do not display the implicit deny statement that is added at the end of every ACL. To make it visible, you must configure it explicitly. For instance, you would have to type in the deny any entry when defining a standard ACL or deny any any entry when defining the extended ACL.
無論是 show access-lists 指令還是 show ip access-lists 指令的輸出,都不會顯示每個 ACL 末端所加入的隱含拒絕陳述式。若要讓它顯示出來,你必須明確設定它。例如,在定義標準 ACL 時你必須輸入 deny any 項目,在定義延伸 ACL 時則須輸入 deny any any 項目。
Now you will test ACL filtering by creating all types of traffic that you specified in the ACL statements.
你現在將透過產生 ACL 陳述式中所指定的所有類型流量,來測試 ACL 過濾。
The first line of the ACL blocks all UDP traffic. In the lab topology, SRV2 is configured as the DNS server. Because DNS protocol uses the UDP as the transport protocol, the first line will block all DNS requests from subnet 10.10.1.0.
To verify the filtering of UDP traffic, access the console of PC1 and create traffic by checking the connectivity to router R2 using ping with the router’s name. Then check the connectivity again using router R2 IPv4 address.
ACL 的第一行會阻擋所有 UDP 流量。在實驗拓樸中,SRV2 已設定為 DNS 伺服器。由於 DNS 協定使用 UDP 作為傳輸協定,第一行將阻擋來自 10.10.1.0 子網路的所有 DNS 請求。
若要驗證 UDP 流量是否被過濾,請存取 PC1 的主控台,使用路由器名稱執行 ping 以檢查與路由器 R2 的連通性,藉此產生流量。接著再使用路由器 R2 的 IPv4 位址重新檢查連通性。
On PC1, enter the following commands:
在 PC1 上,輸入以下指令:
PC1# ping R2
Translating "R2"...domain server (203.0.113.30)
% Unrecognized host or address, or protocol not running.

PC1# ping 198.51.100.1
Type escape sequence to abort.
Sending 5, 100-byte ICMP Echos to 198.51.100.1, timeout is 2 seconds:
!!!!!
Success rate is 100 percent (5/5), round-trip min/avg/max = 1/1/1 ms
Ping using the name R2 fails because the PC1_TELNET extended access list discards all DNS requests as they use UDP as the Transport layer protocol. Substituting R2 name with its IPv4 address shows that there is connectivity to R2. The PC1_TELNET extended access list does not affect ICMP traffic used by the ping utility.
使用名稱 R2 執行的 ping 失敗,因為 PC1_TELNET 延伸存取清單捨棄了所有使用 UDP 作為傳輸層協定的 DNS 請求。將 R2 的名稱換成其 IPv4 位址後,則顯示與 R2 之間有連通性。PC1_TELNET 延伸存取清單不會影響 ping 工具所使用的 ICMP 流量。
Be careful when filtering traffic with access lists. Take care not to block services that are desired, such as DNS. Instead of blocking the entire protocol, like UDP, the extended access list allows you to give finer specification of port numbers and protocols to filter.
使用存取清單過濾流量時要格外小心,注意不要阻擋到你想要的服務,例如 DNS。延伸存取清單讓你可以更精細地指定連接埠號與協定來過濾流量,而不是直接封鎖整個協定(例如 UDP)。
The second line in the ACL explicitly permits Telnet traffic from PC1 to any destination. Verify that PC1 can successfully use Telnet to SRV2. Use the username admin and password Cisco123. Once you establish the telnet connection, at the SRV2 system prompt, use the exit command to terminate the connection.
ACL 中的第二行明確允許從 PC1 到任何目的地的 Telnet 流量。請驗證 PC1 是否能成功以 Telnet 連線到 SRV2。使用者名稱請用 admin,密碼請用 Cisco123。建立 telnet 連線後,在 SRV2 系統提示字元下使用 exit 指令終止連線。
On PC1, enter the following commands:
在 PC1 上,輸入以下指令:
PC1# telnet 203.0.113.30
Trying 203.0.113.30 ... Open

User Access Verification

Username: admin
Password:
SRV2> exit

[Connection to 203.0.113.30 closed by foreign host]The third statement in the PC1_TELNET access list denies all other TCP traffic from PC1. Verify that PC1 cannot use HTTP to reach SRV2. To simulate the HTTP connectivity, you can use the telnet utility and explicitly specify the destination port number to which you wish to connect, which is 80 for HTTP.
PC1_TELNET 存取清單中的第三筆敘述會拒絕來自 PC1 的所有其他 TCP 流量。請驗證 PC1 是否無法使用 HTTP 連線到 SRV2。為了模擬 HTTP 連線,你可以使用 telnet 工具,並明確指定你要連線的目的連接埠號,HTTP 的連接埠為 80。
On PC1, enter the following command:
在 PC1 上,輸入以下指令:
PC1# telnet 203.0.113.30 80
Trying 203.0.113.30, 80 ...
% Destination unreachable; gateway or host downTo verify that HTTP access is blocked by the extended access list PC1_TELNET, display the access list statistics.
為驗證 HTTP 存取確實被延伸存取清單 PC1_TELNET 封鎖,請顯示存取清單的統計資料。
On R1, enter the following command:
在 R1 上,輸入以下指令:
R1# show access-lists PC1_TELNET
Extended IP access list PC1_TELNET
    10 deny udp any any (1 match)
    20 permit tcp host 10.10.1.10 any eq telnet (39 matches)
    30 deny tcp host 10.10.1.10 any (1 match)
    40 permit ip any any (5 matches)
You can see the number of matches for the entry number 30. Note that other entries already have matches, as the result of previous tests using ping utility and telnet.
你可以看到第 30 個項目的相符次數。請注意,其他項目已經因為先前使用 ping 工具與 telnet 進行的測試而有相符紀錄。
The fourth line in the ACL, which explicitly permits all IPv4 traffic, should permit any non-UDP traffic from PC1. Verify that PC1 can ping the SRV1.
ACL 中的第四行明確允許所有 IPv4 流量,應允許來自 PC1 的任何非 UDP 流量。請驗證 PC1 是否能 ping 到 SRV1。
On PC1, enter the following command:
在 PC1 上,輸入以下指令:
PC1# ping 10.10.2.20
Type escape sequence to abort.
Sending 5, 100-byte ICMP Echos to 10.10.2.20, timeout is 2 seconds:
!!!!!
Success rate is 100 percent (5/5), round-trip min/avg/max = 1/1/1 ms
The first three lines of the PC1_TELNET access list do not explicitly specify the matching for the ICMP protocol. Hence, any ICMP traffic should be permitted by the fourth statement in the ACL, which explicitly permits all IPv4 traffic that does not match previous statements.
PC1_TELNET 存取清單的前三行並未明確指定符合 ICMP 通訊協定的條件。因此,任何 ICMP 流量都應會被 ACL 中第四筆明確允許所有未符合前面敘述之 IPv4 流量的敘述所允許。
The extended access list PC1_TELNET should not affect ICMP and TCP traffic coming from SRV1, whose address is 10.10.2.20. The access list that does affect traffic from the 10.10.2.0/24 subnet is the standard access list 10. The access list 10 allows traffic only from the SRV1 and denies traffic from all other devices in the 10.10.2.0/24 subnet. You will now access the console of SRV1 and first test connectivity to SRV2 and then to R2 using ping utility and device names. Afterwards, you will try to establish Telnet and HTTP connection to SRV2. For the Telnet connection, use the username admin and password Cisco123. Use exit command at the SRV2 system prompt to terminate the connection.
延伸存取清單 PC1_TELNET 不應影響來自 SRV1(位址為 10.10.2.20)的 ICMP 與 TCP 流量。真正會影響來自 10.10.2.0/24 子網路流量的是標準存取清單 10。存取清單 10 只允許來自 SRV1 的流量,並拒絕來自 10.10.2.0/24 子網路中其他所有裝置的流量。你現在要進入 SRV1 的主控台,先使用 ping 工具與裝置名稱測試到 SRV2 及 R2 的連線能力。接著,你要嘗試與 SRV2 建立 Telnet 與 HTTP 連線。Telnet 連線請使用使用者名稱 admin 與密碼 Cisco123。在 SRV2 系統提示字元下使用 exit 指令終止連線。
On SRV1, enter the following commands:
在 SRV1 上,輸入以下指令:
SRV1# ping srv2
Translating "srv2"...domain server (203.0.113.30) [OK]

Type escape sequence to abort.
Sending 5, 100-byte ICMP Echos to 203.0.113.30, timeout is 2 seconds:
!!!!!
Success rate is 100 percent (5/5), round-trip min/avg/max = 1/1/1 ms

SRV1# ping r2
Translating "r2"...domain server (203.0.113.30) [OK]

Type escape sequence to abort.
Sending 5, 100-byte ICMP Echos to 198.51.100.1, timeout is 2 seconds:
!!!!!
Success rate is 100 percent (5/5), round-trip min/avg/max = 1/1/1 ms

SRV1# telnet srv2
Translating "srv2"...domain server (203.0.113.30) [OK]
Trying srv2 (203.0.113.30)... Open


User Access Verification

Username: admin
Password:
SRV2> exit

[Connection to srv2 closed by foreign host]

SRV1# telnet srv2 80
Translating "srv2"...domain server (203.0.113.30) [OK]
Trying srv2 (203.0.113.30, 80)... Openexit
HTTP/1.1 400 Bad Request
Date: Thu, 10 Oct 2019 20:08:40 GMT
Server: cisco-IOS
Accept-Ranges: none

400 Bad Request
[Connection to srv2 closed by foreign host]
SRV1#
All the tests from SRV2 are successful. The traffic from the subnet 10.10.2.0/24 is not processed by the extended access list PC1_TELNET, which is applied for the inbound traffic on the Ethernet0/0 interface. Being able to establish an HTTP connection also verifies that HTTP request processing is enabled on SRV2.
來自 SRV2 的所有測試皆成功。來自 10.10.2.0/24 子網路的流量並未被延伸存取清單 PC1_TELNET 處理,該清單套用於 Ethernet0/0 介面的入向流量。能夠成功建立 HTTP 連線,也證實了 SRV2 上已啟用 HTTP 要求處理功能。
Display the statistics of both access list 10 and access list PC1_TELNET and observe the updated match counters that are associated with the activity you just performed.
顯示存取清單 10 與存取清單 PC1_TELNET 兩者的統計資料,觀察與你剛才所做操作相關聯的相符計數器更新情形。
On R1, enter the following command:
在 R1 上,輸入以下指令:
R1# show access-lists
Standard IP access list 10
    24 permit 10.10.2.20 (70 matches)
    27 deny   10.10.2.0, wildcard bits 0.0.0.255 (18 matches)
    30 permit 10.10.0.0, wildcard bits 0.0.255.255 (59 matches)
    40 deny   10.0.0.0, wildcard bits 0.0.0.255
    50 permit any
Extended IP access list PC1_TELNET
    10 deny udp any any (4 matches)
    20 permit tcp host 10.10.1.10 any eq telnet (39 matches)
    30 deny tcp host 10.10.1.10 any (1 matches)
    40 permit ip any any (10 matches)
Due to the dynamic nature of the lab environment, the match counters that you observe are likely to differ from what the example shows.
由於實驗環境具有動態性質,你所觀察到的相符計數器很可能與範例所示的不同。
ip access-list extended 99 command. What will happen when she enters this command?管理員想要設定延伸存取清單,並打算使用 ip access-list extended 99 指令。她輸入此指令後會發生什麼事?