Introduction
簡介
Port security restricts a switch port to a specific set of MAC addresses. You should configure it on all ports that connect to end devices.
連接埠安全性(port security)會將交換器連接埠限制為一組特定的 MAC 位址。你應該在所有連接終端裝置的連接埠上設定連接埠安全性。
In this activity, you will configure and verify port security. You will also set error-disabled port automatic recovery.
在此活動中,你將設定並驗證連接埠安全性,並設定錯誤停用(error-disabled)連接埠的自動復原。
Your lab environment command outputs may differ slightly from the ones demonstrated in the video example.
你實驗環境的指令輸出可能與影片範例所示略有不同。
Topology
拓樸
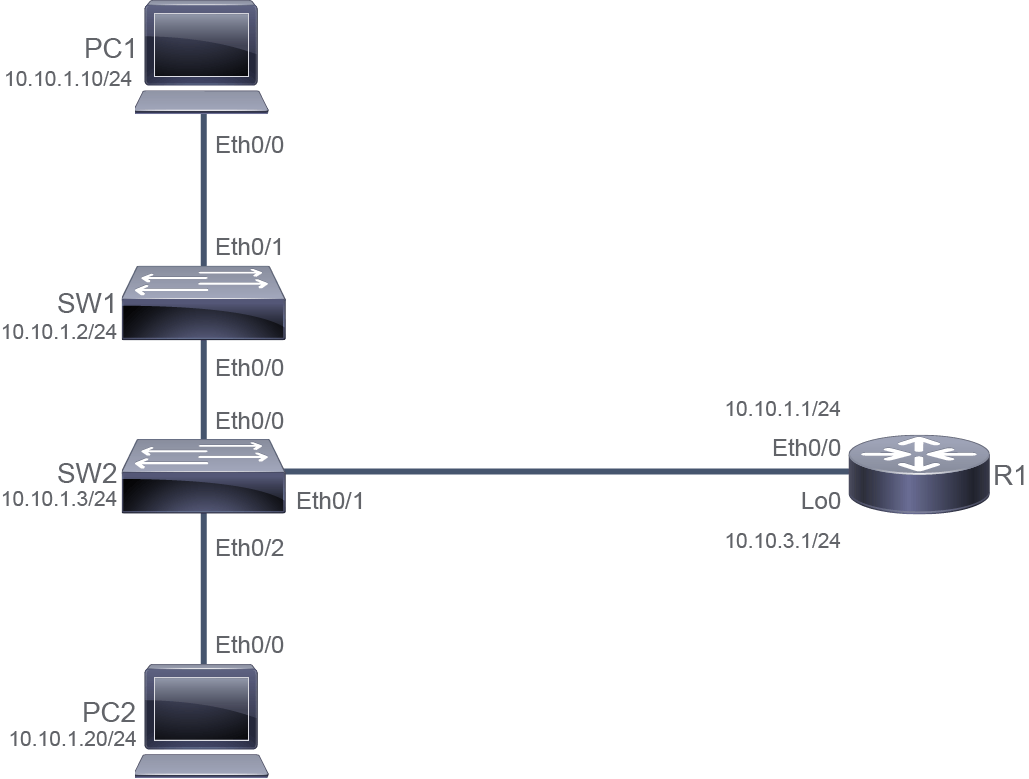
Job Aid
工作輔助資料
Device Information
裝置資訊
Device Information Table
裝置資訊表
Device 裝置 | Characteristic 特性 | Value 值 |
PC1 PC1 | IPv4 address IPv4 位址 | 10.10.1.10/24 10.10.1.10/24 |
PC1 PC1 | Default gateway 預設閘道 | 10.10.1.1 10.10.1.1 |
PC2 PC2 | IPv4 address IPv4 位址 | 10.10.1.20/24 10.10.1.20/24 |
PC2 PC2 | Default gateway 預設閘道 | 10.10.1.1 10.10.1.1 |
SW1 SW1 | VLAN 1 IPv4 address VLAN 1 IPv4 位址 | 10.10.1.2/24 10.10.1.2/24 |
SW1 SW1 | Default gateway 預設閘道 | 10.10.1.1 10.10.1.1 |
SW1 SW1 | Ethernet0/0 description Ethernet0/0 描述 | Link to SW2 連接到 SW2 |
SW1 SW1 | Ethernet0/1 description Ethernet0/1 描述 | Link to PC1 連接到 PC1 |
SW2 SW2 | VLAN 1 IPv4 address VLAN 1 IPv4 位址 | 10.10.1.3/24 10.10.1.3/24 |
SW2 SW2 | Default gateway 預設閘道 | 10.10.1.1 10.10.1.1 |
SW2 SW2 | Ethernet0/0 description Ethernet0/0 描述 | Link to SW1 連接到 SW1 |
SW2 SW2 | Ethernet0/1 description Ethernet0/1 描述 | Link to R1 連接到 R1 |
SW2 SW2 | Ethernet0/2 description Ethernet0/2 描述 | Link to PC2 連接到 PC2 |
R1 R1 | Ethernet0/0 description Ethernet0/0 描述 | Link to SW2 連接到 SW2 |
R1 R1 | Ethernet0/0 IPv4 address Ethernet0/0 IPv4 位址 | 10.10.1.1/24 10.10.1.1/24 |
R1 R1 | Loopback 0 IPv4 address Loopback 0 IPv4 位址 | 10.10.3.1/24 10.10.3.1/24 |
Task 1: Configure and Verify Port Security with Static Learning and Default Violation Mode on SW1
任務 1:在 SW1 上設定並驗證使用靜態學習與預設違規模式的連接埠安全性
Activity
活動
First, determine the MAC addresses of the Ethernet0/0 interface on PC1 and PC2.
首先,判斷 PC1 與 PC2 上 Ethernet0/0 介面的 MAC 位址。
The show interfaces command displays the MAC address of the interface along with a lot of other information. To reduce the amount of output, allowing you to focus on the line that contains the MAC address, you can pipe the show interface output to include a filter, as shown here.
show interfaces 指令會顯示介面的 MAC 位址以及其他大量資訊。為了減少輸出量,讓你能專注於包含 MAC 位址的那一行,你可以將 show interface 的輸出透過管線加上過濾器,如下所示。
One at a time, access the console connection to PC1 and PC2 and execute the show interfaces command.
依序連接到 PC1 與 PC2 的主控台連線,並執行 show interfaces 指令。
PC1#show interfaces Ethernet 0/0 | include address
  Hardware is AmdP2, address is aabb.cc00.0700 (bia aabb.cc00.0700)
Internet address is 10.10.1.10/24PC2#show interfaces Ethernet0/0 | include address
Hardware is AmdP2, address is aabb.cc00.0800 (bia aabb.cc00.0800)
Internet address is 10.10.1.20/24In the emulated environment of the lab, the MAC addresses are similar to each other. This similarity will make it easy to distinguish them as the steps of this discovery progress.
在此實驗室的模擬環境中,MAC 位址彼此相似。這種相似性會讓你在此 Discovery 的步驟進行時容易分辨它們。
Notice that the MAC address on the interface matches the burned in address (bia) shown; this is the MAC address that is hardcoded into the device’s network interface card (NIC).
請注意,介面上的 MAC 位址與所顯示的 burned in address(bia)相符;這是硬編碼在裝置網路介面卡(NIC)中的 MAC 位址。
Access the console of SW1 and enter the show mac address-table command to verify that SW1 sees the PC1 MAC address on its Ethernet 0/1 interface.
連接到 SW1 的主控台,輸入 show mac address-table 指令,驗證 SW1 是否在其 Ethernet 0/1 介面上看到 PC1 的 MAC 位址。
On SW1 enter the following:
在 SW1 上輸入以下內容:
SW1#show mac address-table
          Mac Address Table
-------------------------------------------
Vlan    Mac Address       Type        Ports
----    -----------       --------    -----
   1    aabb.cc00.0700    DYNAMIC     Et0/1
Total Mac Addresses for this criterion: 1
This output is consistent with the information you determined in the previous step. The MAC address that is associated with PC1 is seen on interface Ethernet0/1.
此輸出與你在前一步驟所判斷的資訊一致。與 PC1 相關聯的 MAC 位址是在 Ethernet0/1 介面上看到的。
You may also see the MAC address of R1 and PC2 in the table as well.
你也可能會在表格中看到 R1 與 PC2 的 MAC 位址。
On SW1, configure port security with static learning on the Ethernet0/1 interface. Use the MAC address of the PC1 that you determined in the previous steps.
在 SW1 上,於 Ethernet0/1 介面設定使用靜態學習的連接埠安全性。使用你在前面步驟中判斷出的 PC1 MAC 位址。
On SW1, enter the following commands:
在 SW1 上輸入以下指令:
SW1# configure terminal
Enter configuration commands, one per line.  End with CNTL/Z.
SW1(config)# interface Ethernet 0/1
SW1(config-if)# switchport mode access
SW1(config-if)# switchport port-security mac-address aabb.cc00.0700
SW1(config-if)# switchport port-security
SW1(config-if)# end
The MAC address specified for the static learning belongs to PC1. Therefore, the SW1 only allows that MAC address on Ethernet0/1. Also, it is best practice to enter the port security optional commands first, and then enable port security last, with the switchport port-securitycommand.
為靜態學習所指定的 MAC 位址屬於 PC1。因此,SW1 只允許該 MAC 位址出現在 Ethernet0/1 上。此外,最佳實務是先輸入連接埠安全性的選用指令,最後再以 switchport port-security 指令啟用連接埠安全性。
On SW1, verify the port security status.
在 SW1 上,驗證連接埠安全性狀態。
On SW1, enter the following command:
在 SW1 上輸入以下指令:
SW1# show port-security
Secure Port  MaxSecureAddr  CurrentAddr  SecurityViolation  Security Action
                (Count)       (Count)          (Count)
---------------------------------------------------------------------------
      Et0/1              1            1                  0         Shutdown
---------------------------------------------------------------------------
Total Addresses in System (excluding one mac per port)     : 0
Max Addresses limit in System (excluding one mac per port) : 4096On SW1, verify port security status of Ethernet0/1.
在 SW1 上,驗證 Ethernet0/1 的連接埠安全性狀態。
On SW1, enter the following command:
在 SW1 上輸入以下指令:
SW1# show port-security interface Ethernet0/1
Port Security              : Enabled
Port Status                : Secure-up
Violation Mode             : Shutdown
Aging Time                 : 0 mins
Aging Type                 : Absolute
SecureStatic Address Aging : Disabled
Maximum MAC Addresses      : 1
Total MAC Addresses        : 1
Configured MAC Addresses   : 1
Sticky MAC Addresses       : 0
Last Source Address:Vlan   : aabb.cc00.0700:1
Security Violation Count   : 0
In this output, you can see that port security is enabled on the Ethernet 0/1 interface. The current violation mode is shutdown, which is the default violation mode for port security in Cisco IOS. Also, note that the default number of maximum securely learned MAC addresses for port security is 1, as shown in this output. Lastly, the MAC address in your output may be different.
在此輸出中,你可以看到 Ethernet 0/1 介面已啟用連接埠安全性。目前的違規模式為 shutdown,這是 Cisco IOS 中連接埠安全性的預設違規模式。另外請注意,連接埠安全性中安全學習到的 MAC 位址預設最大數量為 1,如此輸出所示。最後,你輸出中的 MAC 位址可能不同。
On PC1, change the MAC address on Ethernet0/0 to eeee.eeee.eeee, with the mac-address eeee.eeee.eeee interface configuration command.
在 PC1 上,使用 mac-address eeee.eeee.eeee 介面設定指令,將 Ethernet0/0 上的 MAC 位址變更為 eeee.eeee.eeee。
On PC1, enter the following commands:
在 PC1 上輸入以下指令:
PC1# configure terminal
Enter configuration commands, one per line.  End with CNTL/Z.
PC1(config)# interface Ethernet 0/0
PC1(config-if)# mac-address eeee.eeee.eeee
PC1(config-if)# end
PC1#
When the MAC address on PC1 changes, SW1 will error-disable the port toward PC1. You should see the following log messages on the SW1 console:
當 PC1 上的 MAC 位址變更時,SW1 會將面向 PC1 的連接埠錯誤停用。你應該會在 SW1 主控台上看到以下記錄訊息:
*Apr 29 11:03:22.355: %PM-4-ERR_DISABLE: psecure-violation error detected on Et0/1, putting Et0/1 in err-disable state
*Apr 29 11:03:22.355: %PORT_SECURITY-2-PSECURE_VIOLATION: Security violation occurred, caused by MAC address eeee.eeee.eeee on port Ethernet0/1.
*Apr 29 11:03:23.358: %LINEPROTO-5-UPDOWN: Line protocol on Interface Ethernet0/1, changed state to down
*Apr 29 11:03:24.359: %LINK-3-UPDOWN: Interface Ethernet0/1, changed state to downOn SW1, verify the port security status of Ethernet0/1.
在 SW1 上,驗證 Ethernet0/1 的連接埠安全性狀態。
On SW1, enter the following command:
在 SW1 上輸入以下指令:
SW1# show port-security interface Ethernet0/1
Port Security              : Enabled
Port Status                : Secure-shutdown
Violation Mode             : Shutdown
Aging Time                 : 0 mins
Aging Type                 : Absolute
SecureStatic Address Aging : Disabled
Maximum MAC Addresses      : 1
Total MAC Addresses        : 1
Configured MAC Addresses   : 1
Sticky MAC Addresses       : 0
Last Source Address:Vlan   : eeee.eeee.eeee:1
Security Violation Count   : 1
SW1# show interfaces Ethernet0/1
Ethernet0/1 is down, line protocol is down (err-disabled)
 Hardware is AmdP2, address is aabb.cc00.0910 (bia aabb.cc00.0910)
  Description: Link to PC1
<... output omitted ...>
Interface Ethernet 0/1 was placed into the error-disabled state, because of a security violation. Note that only when security violation mode is set to shutdown, the interface is set to err-disabled state. In the output, you can see that port security incremented the security violation counter and the last offending MAC address that was seen on the interface Ethernet0/1 is eeee.eeee.eeee. To bring the interface back up, you have to shut down the interface and bring it back up.
由於發生安全違規,Ethernet 0/1 介面已被置於錯誤停用狀態。請注意,只有當安全違規模式設為 shutdown 時,介面才會被設為 err-disabled 狀態。在此輸出中,你可以看到連接埠安全性已將安全違規計數器遞增,且在 Ethernet0/1 介面上最後看到的違規 MAC 位址是 eeee.eeee.eeee。若要讓介面恢復運作,你必須將介面關閉再重新開啟。
On PC1, remove the configured MAC address from Ethernet0/0, returning it to its bia value, with the no mac-address command.
在 PC1 上,使用 no mac-address 指令移除 Ethernet0/0 上已設定的 MAC 位址,使其恢復為 bia 值。
On PC1, enter the following commands:
在 PC1 上輸入以下指令:
PC1# configure terminal
Enter configuration commands, one per line.  End with CNTL/Z.
PC1(config)# interface Ethernet 0/0
PC1(config-if)# no mac-address
PC1(config-if)# end
PC1 should now again use its default MAC address, which is also the address configured on SW1. You can verify PC1’s MAC address using the show interface Ethernet0/0 | include address command or the show interface Ethernet0/0 | include bia command.
PC1 現在應該再次使用其預設 MAC 位址,這也是在 SW1 上設定的位址。你可以使用 show interface Ethernet0/0 | include address 指令或 show interface Ethernet0/0 | include bia 指令來驗證 PC1 的 MAC 位址。
PC1# show interface Ethernet0/0 | include bia
  Hardware is AmdP2, address is aabb.cc00.0700 (bia aabb.cc00.0700)
By using the includebia filtering condition, you instruct the CLI interpreter to display only those lines of the command output that contain the word "bia". The output of the show interface command is otherwise verbose. Using the command output filtering in this case, you reduced the output to only one line. The MAC address in your output may be different.
使用 includebia 過濾條件,你可以指示 CLI 解譯器只顯示指令輸出中包含「bia」這個詞的行。show interface 指令的輸出原本相當冗長。在此情況下使用指令輸出過濾功能,你將輸出縮減為只有一行。你輸出中的 MAC 位址可能不同。
On SW1, verify the port security status of Ethernet0/1.
在 SW1 上,驗證 Ethernet0/1 的連接埠安全性狀態。
On SW1, enter the following command:
在 SW1 上輸入以下指令:
SW1# show port-security interface Ethernet0/1
Port Security                        : Enabled
Port Status                           : Secure-shutdown
Violation Mode                      : Shutdown
Aging Time                           : 0 mins
Aging Type                           : Absolute
SecureStatic Address Aging  : Disabled
Maximum MAC Addresses    : 1
Total MAC Addresses           : 1
Configured MAC Addresses   : 1
Sticky MAC Addresses         : 0
Last Source Address:Vlan     : eeee.eeee.eeee:1
Security Violation Count        : 1
Port Ethernet0/1 is still disabled by port security.
連接埠 Ethernet0/1 仍因連接埠安全性而處於停用狀態。
On SW1, enable Ethernet0/1 by shutting it down and then bringing it back up.
在 SW1 上,透過關閉再重新開啟的方式啟用 Ethernet0/1。
On SW1, enter the following command:
在 SW1 上輸入以下指令:
SW1# configure terminal
Enter configuration commands, one per line.  End with CNTL/Z.
SW1(config)# interface Ethernet0/1
SW1(config-if)# shutdown
*Apr 29 14:11:58.374: %LINK-5-CHANGED: Interface Ethernet0/1, changed state to administratively down
SW1(config-if)# no shutdown
*Apr 29 14:12:02.420: %LINK-3-UPDOWN: Interface Ethernet0/1, changed state to up
*Apr 29 14:12:03.424: %LINEPROTO-5-UPDOWN: Line protocol on Interface Ethernet0/1, changed state to up
SW1(config-if)# endOn SW1, verify the port security status of Ethernet0/1 again.
在 SW1 上,再次驗證 Ethernet0/1 的連接埠安全性狀態。
On SW1, enter the following command:
在 SW1 上輸入以下指令:
SW1# show port-security interface Ethernet0/1
Port Security              : Enabled
Port Status                : Secure-up
Violation Mode             : Shutdown
Aging Time                 : 0 mins
Aging Type                 : Absolute
SecureStatic Address Aging : Disabled
Maximum MAC Addresses      : 1
Total MAC Addresses        : 1
Configured MAC Addresses   : 1
Sticky MAC Addresses       : 0
Last Source Address:Vlan   : aabb.cc00.0700:1
Security Violation Count   : 0
Port Ethernet0/1 is operational now. Also you can see that the last learned MAC address is back to the one that you have configured statically. Lastly, by shutting down the interface and bringing it back up, the security violation counter has been reset.
連接埠 Ethernet0/1 現在已恢復運作。你也可以看到最後學習到的 MAC 位址已恢復為你先前靜態設定的位址。最後,透過關閉再重新開啟介面,安全違規計數器已被重設。
Task 2: Configure and Verify Port Security with Sticky Learning and Default Violation Mode on SW1
任務 2:在 SW1 上設定並驗證使用黏性學習與預設違規模式的連接埠安全性
Activity
活動
Static MAC address learning does not scale well. Instead, you can use sticky MAC address learning, where the switch will dynamically learn the MAC addresses and append them to the running configuration. If there are multiple MAC addresses possible on an interface, then you have to increase the maximum number of MAC address allowed on the interface, otherwise port security will block any additional MAC addresses.
靜態 MAC 位址學習的擴充性不佳。你可以改用黏性(sticky)MAC 位址學習,讓交換器動態學習 MAC 位址並將其附加到執行中設定中。如果一個介面上可能出現多個 MAC 位址,你就必須增加該介面允許的最大 MAC 位址數量,否則連接埠安全性將會封鎖任何額外的 MAC 位址。
On SW1, remove the previous port security configuration (be sure to use the MAC address that you configured). Then configure port security with sticky learning and allow a maximum of two MAC addresses on the Ethernet0/1 interface.
在 SW1 上,移除先前的連接埠安全性設定(請務必使用你先前設定的 MAC 位址)。接著設定使用黏性學習的連接埠安全性,並允許 Ethernet0/1 介面上最多出現兩個 MAC 位址。
On SW1, enter the following commands:
在 SW1 上輸入以下指令:
SW1# configure terminal
Enter configuration commands, one per line.  End with CNTL/Z.
SW1(config)# interface Ethernet 0/1
SW1(config-if)# no switchport port-security
SW1(config-if)# no switchport port-security mac-address aabb.cc00.0700
SW1(config-if)# switchport port-security maximum 2
SW1(config-if)# switchport port-security mac-address sticky
SW1(config-if)# switchport port-securitySW1(config-if)# end
When changing the port security, it is a best practice to first disable it, and enable it when you are done configuring all port security parameters.
變更連接埠安全性設定時,最佳實務是先停用它,等所有連接埠安全性參數都設定完成後再啟用。
On SW1, verify the port security status.
在 SW1 上,驗證連接埠安全性狀態。
On SW1, enter the following command:
在 SW1 上輸入以下指令:
SW1# show port-security
Secure Port  MaxSecureAddr  CurrentAddr  SecurityViolation  Security Action
                (Count)       (Count)          (Count)
---------------------------------------------------------------------------
      Et0/1              2            1                  0         Shutdown
---------------------------------------------------------------------------
Total Addresses in System (excluding one mac per port)     : 0
Max Addresses limit in System (excluding one mac per port) : 4096On SW1, verify which MAC address is learned on Ethernet0/1.
在 SW1 上,驗證在 Ethernet0/1 上學習到哪個 MAC 位址。
On SW1, enter the following command:
在 SW1 上輸入以下指令:
SW1# show port-security interface Ethernet 0/1
Port Security              : Enabled
Port Status                : Secure-up
Violation Mode             : Shutdown
Aging Time                 : 0 mins
Aging Type                 : Absolute
SecureStatic Address Aging : Disabled
Maximum MAC Addresses      : 2
Total MAC Addresses        : 1
Configured MAC Addresses   : 0
Sticky MAC Addresses       : 1
Last Source Address:Vlan   : aabb.cc00.0700:1
Security Violation Count : 0Also verify that the same MAC address is listed in the configuration of SW1.
同時驗證同一個 MAC 位址是否列在 SW1 的設定中。
SW1# show running-config interface Ethernet0/1
Building configuration...
Current configuration : 258 bytes
!
interface Ethernet0/1
 description Link to PC1
 switchport mode access
 switchport port-security maximum 2
 switchport port-security
 switchport port-security mac-address sticky
 switchport port-security mac-address sticky aabb.cc00.0700
 duplex auto
endSave the SW1 running configuration to the startup configuration.
將 SW1 的執行中設定儲存到啟動設定中。
On SW1, enter the following command:
在 SW1 上輸入以下指令:
SW1# copy running-config startup-config
Destination filename [startup-config]? Building configuration...
Compressed configuration from 1145 bytes to 768 bytes[OK]
Now that SW1 has learned the MAC address of PC1, you have to save the running configuration so that the learned MAC address stays in the configuration even if the switch reboots.
既然 SW1 已學習到 PC1 的 MAC 位址,你必須儲存執行中設定,即使交換器重新開機,學習到的 MAC 位址仍會保留在設定中。
On PC1, change the MAC address on Ethernet0/0 to eeee.eeee.eeee and try to ping the R1 10.10.1.1 address.
在 PC1 上,將 Ethernet0/0 上的 MAC 位址變更為 eeee.eeee.eeee,並嘗試 ping R1 的 10.10.1.1 位址。
On PC1, enter the following commands:
在 PC1 上輸入以下指令:
PC1# configure terminal
Enter configuration commands, one per line.  End with CNTL/Z.
PC1(config)# interface Ethernet0/0
PC1(config-if)# mac-address eeee.eeee.eeee
PC1(config-if)# do ping 10.10.1.1
Type escape sequence to abort.
Sending 5, 100-byte ICMP Echos to 10.10.1.1, timeout is 2 seconds:
!!!!!
Success rate is 100 percent (5/5), round-trip min/avg/max = 1/1/1 ms
PC1(config-if)# end
PC1#
As you can see from the output, the ping is successful, because the link between the SW1 and PC1 is still up and operational.
從輸出中可以看到,ping 成功了,因為 SW1 與 PC1 之間的連結仍然正常運作。
On SW1, verify the port security status of the Ethernet0/1 interface.
在 SW1 上,驗證 Ethernet0/1 介面的連接埠安全性狀態。
On SW1, enter the following command:
在 SW1 上輸入以下指令:
SW1# show port-security interface Ethernet0/1
Port Security              : Enabled
Port Status                : Secure-up
Violation Mode             : Shutdown
Aging Time                 : 0 mins
Aging Type                 : Absolute
SecureStatic Address Aging : Disabled
Maximum MAC Addresses      : 2
Total MAC Addresses        : 2
Configured MAC Addresses   : 0
Sticky MAC Addresses       : 2
Last Source Address:Vlan   : eeee.eeee.eeee:1
Security Violation Count   : 0
As you can see, SW1 did not place the port into the error disabled state, because SW1 allows a maximum of two securely learned MAC addresses on interface Ethernet0/1. Note that the last MAC address seen on the interface Ethernet0/1 is eeee.eeee.eeee.
如你所見,SW1 並未將連接埠置於錯誤停用狀態,因為 SW1 在 Ethernet0/1 介面上允許最多兩個安全學習到的 MAC 位址。請注意,Ethernet0/1 介面上最後看到的 MAC 位址是 eeee.eeee.eeee。
On SW1, verify learned secure MAC addresses on interface Ethernet0/1.
在 SW1 上,驗證 Ethernet0/1 介面上學習到的安全 MAC 位址。
SW1# show port-security interface Ethernet0/1 address
               Secure Mac Address Table
-----------------------------------------------------------------------------
Vlan    Mac Address       Type                          Ports   Remaining Age
                                                                   (mins)
----    -----------       ----                          -----   -------------
   1    aabb.cc00.0700    SecureSticky                  Et0/1        -
   1    eeee.eeee.eeee    SecureSticky                  Et0/1        -
-----------------------------------------------------------------------------
Total Addresses: 2
In this output, you can see that SW1 has two securely learned MAC addresses on interface Ethernet0/1. Both were learned via sticky MAC address learning.
在此輸出中,你可以看到 SW1 在 Ethernet0/1 介面上有兩個安全學習到的 MAC 位址,兩者都是透過黏性 MAC 位址學習取得的。
Also verify that the same MAC addresses are listed in the configuration of SW1.
同時驗證這些相同的 MAC 位址是否列在 SW1 的設定中。
SW1# show running-config interface Ethernet0/1
Building configuration...
Current configuration : 318 bytes
!
interface Ethernet0/1
 description Link to PC1
 switchport mode access
 switchport port-security maximum 2
 switchport port-security
 switchport port-security mac-address sticky
 switchport port-security mac-address sticky aabb.cc00.0700
 switchport port-security mac-address sticky eeee.eeee.eeee
 duplex auto
endOn PC1, change the MAC address on Ethernet0/0 to cccc.cccc.cccc and try to ping the R1 10.10.1.1 address.
在 PC1 上,將 Ethernet0/0 上的 MAC 位址變更為 cccc.cccc.cccc,並嘗試 ping R1 的 10.10.1.1 位址。
On PC1, enter the following commands:
在 PC1 上輸入以下指令:
PC1# configure terminal
Enter configuration commands, one per line.  End with CNTL/Z.
PC1(config)# interface Ethernet0/0
PC1(config-if)# mac-address cccc.cccc.cccc
PC1(config-if)# do ping 10.10.1.1
Type escape sequence to abort.
Sending 5, 100-byte ICMP Echos to 10.10.1.1, timeout is 2 seconds:
.....
Success rate is 0 percent (0/5)
PC1(config-if)# end
PC1#
As you can see from the output, the ping is unsuccessful. When the MAC address on PC1 changes, SW1 will error-disable the port toward PC1.
從輸出中可以看到,ping 失敗了。當 PC1 上的 MAC 位址變更時,SW1 會將面向 PC1 的連接埠錯誤停用。
You should see the following log messages on the SW1 console:
你應該會在 SW1 主控台上看到以下記錄訊息:
*Apr 29 14:21:38.653: %PM-4-ERR_DISABLE: psecure-violation error detected on Et0/1, putting Et0/1 in err-disable state
*Apr 29 14:21:38.653: %PORT_SECURITY-2-PSECURE_VIOLATION: Security violation occurred, caused by MAC address cccc.cccc.cccc on port Ethernet0/1.
*Apr 29 14:21:39.654: %LINEPROTO-5-UPDOWN: Line protocol on Interface Ethernet0/1, changed state to down
*Apr 29 14:21:40.654: %LINK-3-UPDOWN: Interface Ethernet0/1, changed state to downOn SW1, verify the port security status of Ethernet0/1.
在 SW1 上,驗證 Ethernet0/1 的連接埠安全性狀態。
On SW1, enter the following command:
在 SW1 上輸入以下指令:
SW1# show port-security interface Ethernet0/1
Port Security              : Enabled
Port Status                : Secure-shutdown
Violation Mode             : Shutdown
Aging Time                 : 0 mins
Aging Type                 : Absolute
SecureStatic Address Aging : Disabled
Maximum MAC Addresses      : 2
Total MAC Addresses        : 2
Configured MAC Addresses   : 0
Sticky MAC Addresses       : 2
Last Source Address:Vlan   : cccc.cccc.cccc:1
Security Violation Count   : 1
SW1# show interfaces Ethernet0/1
Ethernet0/1 is down, line protocol is down (err-disabled)
 Hardware is AmdP2, address is aabb.cc00.0910 (bia aabb.cc00.0910)
  Description: Link to PC1
<... output omitted ...>
Interface Ethernet 0/1 was placed into the error-disabled state, because of a security violation. Note that only when the security violation mode is set to shutdown, the interface is set to err-disabled state. In the output, you can see that port security incremented the security violation counter and the last offending MAC address that was seen on the interface Ethernet0/1 is cccc.cccc.cccc. To bring the interface back up, you have to shut down the interface and bring it back up.
由於發生安全違規,Ethernet 0/1 介面已被置於錯誤停用狀態。請注意,只有當安全違規模式設為 shutdown 時,介面才會被設為 err-disabled 狀態。在此輸出中,你可以看到連接埠安全性已將安全違規計數器遞增,且在 Ethernet0/1 介面上最後看到的違規 MAC 位址是 cccc.cccc.cccc。若要讓介面恢復運作,你必須將介面關閉再重新開啟。
Error-Disabled Port Automatic Recovery
錯誤停用連接埠自動復原
An error-disabled port will become operational after you shut it down and then bring it back up. To reduce the administrative overhead, an error-disabled port can be automatically re-enabled after the problem that is causing the error-disabled state is fixed.
錯誤停用的連接埠在你將其關閉再重新開啟後會恢復運作。為了減少管理負擔,錯誤停用的連接埠可以在造成錯誤停用狀態的問題排除後自動重新啟用。
Use the errdisable recovery causecause command to automatically re-enable a port that was error-disabled because of the specified cause. Use psecure-violation for port security violations. Use the errdisable recovery interval seconds command to automatically re-enable the port after a specified time. The default time interval is 300 seconds, and the minimum is 30 seconds. If the problem that caused the port to change into the error-disabled state is not resolved, the port will stay in the error-disabled state.
使用 errdisable recovery causecause 指令,可針對指定原因自動重新啟用因該原因而錯誤停用的連接埠。針對連接埠安全性違規,請使用 psecure-violation。使用 errdisable recovery interval seconds 指令,可在指定時間後自動重新啟用連接埠。預設時間間隔為 300 秒,最短為 30 秒。如果造成連接埠變為錯誤停用狀態的問題未解決,連接埠將繼續保持在錯誤停用狀態。
SW(config)# errdisable recovery cause cause
SW(config)# errdisable recovery interval seconds
You can verify where autorecovery is enabled by using the show errdisable recovery command. By default, the autorecovery feature is disabled.
你可以使用 show errdisable recovery 指令來驗證自動復原是否已啟用。預設情況下,自動復原功能是停用的。
Task 3: Configure Error-Disabled Port Automatic Recovery on SW1
任務 3:在 SW1 上設定錯誤停用連接埠自動復原
Activity
活動
On SW1, configure error-disabled automatic recovery by setting the cause to psecure-violation; also set the interval timer to 30 seconds.
在 SW1 上,將原因設為 psecure-violation,設定錯誤停用自動復原;同時將間隔計時器設為 30 秒。
On SW1, enter the following commands:
在 SW1 上輸入以下指令:
SW1# configure terminal
SW1(config)# errdisable recovery cause psecure-violation
SW1(config)# errdisable recovery interval 30
SW1(config)# end
Note that interface Ethernet0/1 is still in the error-disabled state.
請注意,Ethernet0/1 介面仍處於錯誤停用狀態。
On PC1, remove the configured MAC address from Ethernet0/0, returning it to its bia value, with the no mac-address command.
在 PC1 上,使用 no mac-address 指令移除 Ethernet0/0 上已設定的 MAC 位址,使其恢復為 bia 值。
In order for the Error-Disabled Port Automatic Recovery to work, you must remove the offending MAC address from PC1.
為了讓錯誤停用連接埠自動復原能夠運作,你必須移除 PC1 上導致違規的 MAC 位址。
On PC1, enter the following commands:
在 PC1 上輸入以下指令:
PC1# configure terminal
Enter configuration commands, one per line.  End with CNTL/Z.
PC1(config)# interface Ethernet 0/0
PC1(config-if)# no mac-address
PC1(config-if)# end
PC1 should now again use its default MAC address, which is also the address configured on SW1. You can verify PC1’s MAC address using the show interface Ethernet0/0 | include bia command.
PC1 現在應該再次使用其預設 MAC 位址,這也是在 SW1 上設定的位址。你可以使用 show interface Ethernet0/0 | include bia 指令來驗證 PC1 的 MAC 位址。
PC1# show interface Ethernet0/0 | include bia
Hardware is AmdP2, address is aabb.cc00.0700 (bia aabb.cc00.0700)After a few minutes, Ethernet0/1 will be recovered. You will see following log message on the SW1 console:
幾分鐘後,Ethernet0/1 會恢復運作。你會在 SW1 主控台上看到以下記錄訊息:
*Apr 29 14:36:38.541: %PM-4-ERR_RECOVER: Attempting to recover from psecure-violation err-disable state on Et0/1
*Apr 29 14:36:40.544: %LINK-3-UPDOWN: Interface Ethernet0/1, changed state to up
*Apr 29 14:36:41.545: %LINEPROTO-5-UPDOWN: Line protocol on Interface Ethernet0/1, changed state to upFrom PC1, ping R1 (10.10.1.1) to verify whether Ethernet0/1 on SW1 is operational.
從 PC1 ping R1(10.10.1.1),驗證 SW1 上的 Ethernet0/1 是否已恢復運作。
On PC1, enter the following command:
在 PC1 上輸入以下指令:
PC1# ping 10.10.1.1
Type escape sequence to abort.
Sending 5, 100-byte ICMP Echos to 10.10.1.1, timeout is 2 seconds:
!!!!!
Success rate is 100 percent (5/5), round-trip min/avg/max = 1/201/1004 msOn SW1, verify the port security status of Ethernet0/1.
在 SW1 上,驗證 Ethernet0/1 的連接埠安全性狀態。
On SW1, enter the following command:
在 SW1 上輸入以下指令:
SW1# show port-security interface Ethernet0/1
Port Security              : Enabled
Port Status                : Secure-up
Violation Mode             : Shutdown
Aging Time                 : 0 mins
Aging Type                 : Absolute
SecureStatic Address Aging : Disabled
Maximum MAC Addresses      : 2
Total MAC Addresses        : 2
Configured MAC Addresses   : 0
Sticky MAC Addresses       : 2
Last Source Address:Vlan   : aabb.cc00.0700:1
Security Violation Count   : 0
Interface Ethernet0/1 is again operational.
Ethernet0/1 介面再次恢復運作。
Task 4: Configure and Verify Port Security with Dynamic Learning and Protect Violation Mode on SW2
任務 4:在 SW2 上設定並驗證使用動態學習與 protect 違規模式的連接埠安全性
Activity
活動
On SW2, configure port security and set the security violation mode to protect with dynamic learning on the Ethernet0/2 interface.
在 SW2 上,於 Ethernet0/2 介面設定連接埠安全性,並將安全違規模式設為 protect,搭配動態學習。
On SW2, enter the following commands:
在 SW2 上輸入以下指令:
SW2# configure terminal
Enter configuration commands, one per line.  End with CNTL/Z.
SW2(config)# interface Ethernet 0/2
SW2(config-if)# switchport mode access
SW2(config-if)# switchport port-security violation protect
SW2(config-if)# switchport port-security
SW2(config-if)# end
Note that the protect security violation mode drops all the packets from the insecure hosts at the port-security process level but does not increment the security-violation count.
請注意,protect 安全違規模式會在連接埠安全性處理層級丟棄來自不安全主機的所有封包,但不會遞增安全違規計數。
On SW2, verify the port security status.
在 SW2 上,驗證連接埠安全性狀態。
On SW2, enter the following command:
在 SW2 上輸入以下指令:
SW2# show port-security
Secure Port  MaxSecureAddr  CurrentAddr  SecurityViolation  Security Action
                (Count)       (Count)          (Count)
---------------------------------------------------------------------------
      Et0/2              1            1                  0          Protect
---------------------------------------------------------------------------
Total Addresses in System (excluding one mac per port)     : 0
Max Addresses limit in System (excluding one mac per port) : 4096On SW2, verify the port security status of Ethernet0/2 and check all known secure MAC addresses on interface Ethernet0/2.
在 SW2 上,驗證 Ethernet0/2 的連接埠安全性狀態,並檢查 Ethernet0/2 介面上所有已知的安全 MAC 位址。
On SW2, enter the following command:
在 SW2 上輸入以下指令:
SW2# show port-security interface Ethernet0/2
Port Security              : Enabled
Port Status                : Secure-up
Violation Mode             : Protect
Aging Time                 : 0 mins
Aging Type                 : Absolute
SecureStatic Address Aging : Disabled
Maximum MAC Addresses      : 1
Total MAC Addresses        : 1
Configured MAC Addresses   : 0
Sticky MAC Addresses       : 0
Last Source Address:Vlan   : aabb.cc00.0800:1
Security Violation Count   : 0
In this output, you can see that port security is enabled on the Ethernet 0/2 interface. The current violation mode is protect.
在此輸出中,你可以看到 Ethernet 0/2 介面已啟用連接埠安全性。目前的違規模式為 protect。
Check all known secure MAC addresses on interface Ethernet0/2.
檢查 Ethernet0/2 介面上所有已知的安全 MAC 位址。
SW2# show port-security interface Ethernet0/2 address
               Secure Mac Address Table
-----------------------------------------------------------------------------
Vlan    Mac Address       Type                          Ports   Remaining Age
                                                                   (mins)
----    -----------       ----                          -----   -------------
 1    aabb.cc00.0800    SecureDynamic                 Et0/2        -
-----------------------------------------------------------------------------
Total Addresses: 1
You can see that MAC address aabb.cc00.0800 was learned on Ethernet0/2 interface via dynamic learning.
你可以看到 MAC 位址 aabb.cc00.0800 是透過動態學習在 Ethernet0/2 介面上學到的。
Note that MAC addresses may differ in your lab.
請注意,你實驗環境中的 MAC 位址可能不同。
On PC2, verify connectivity to R1, then change the MAC address on interface Ethernet0/0 to aaaa.aaaa.aaaa. Check connectivity to R1 again, and verify the status of the SW2 Ethernet 0/2 interface.
在 PC2 上,驗證與 R1 的連線,然後將介面 Ethernet0/0 上的 MAC 位址變更為 aaaa.aaaa.aaaa。再次檢查與 R1 的連線,並驗證 SW2 Ethernet 0/2 介面的狀態。
On PC2, enter the following commands:
在 PC2 上輸入以下指令:
PC2# ping 10.10.1.1
Type escape sequence to abort.
Sending 5, 100-byte ICMP Echos to 10.10.1.1, timeout is 2 seconds:
!!!!!
Success rate is 100 percent (5/5), round-trip min/avg/max = 1/202/1006 ms
PC2# configure terminal
Enter configuration commands, one per line.  End with CNTL/Z.
PC2(config)# interface Ethernet 0/0
PC2(config-if)# mac-address aaaa.aaaa.aaaa
PC2(config-if)# do ping 10.10.1.1
Type escape sequence to abort.
Sending 5, 100-byte ICMP Echos to 10.10.1.1, timeout is 2 seconds:
.....
Success rate is 0 percent (0/5)
PC2(config-if)# end
PC2#
In this output, you can see that PC2 can reach R1 10.10.1.1 IPv4 address. Notice, when you change the MAC address on PC2 the ping fails.
在此輸出中,你可以看到 PC2 能夠連上 R1 的 10.10.1.1 IPv4 位址。請注意,當你變更 PC2 上的 MAC 位址後,ping 就失敗了。
Verify the status of the SW2 Ethernet 0/2 interface. Notice that this time SW2 did not place the interface in the error disabled state.
驗證 SW2 Ethernet 0/2 介面的狀態。請注意,這次 SW2 並未將該介面置於錯誤停用狀態。
SW2# show interfaces Ethernet0/2
Ethernet0/2 is up, line protocol is up (connected)
  Hardware is AmdP2, address is aabb.cc00.0a20 (bia aabb.cc00.0a20)
  Description: Link to PC2
<... output omitted ...>On SW2, verify the port security status of Ethernet0/2.
在 SW2 上,驗證 Ethernet0/2 的連接埠安全性狀態。
On SW2, enter the following command:
在 SW2 上輸入以下指令:
SW2# show port-security interface Ethernet0/2
Port Security              : Enabled
Port Status                : Secure-up
Violation Mode             : Protect
Aging Time                 : 0 mins
Aging Type                 : Absolute
SecureStatic Address Aging : Disabled
Maximum MAC Addresses      : 1
Total MAC Addresses        : 1
Configured MAC Addresses   : 0
Sticky MAC Addresses       : 0
Last Source Address:Vlan   : aaaa.aaaa.aaaa:1
Security Violation Count   : 0
You can see that port security did not disable the interface. In this case, the interface is still up and operational. Port security only blocked the offending traffic, which came from the unsecured MAC address. Also, notice that security violation counter did not increment.
你可以看到連接埠安全性並未停用該介面。在此情況下,介面仍處於啟用並正常運作的狀態。連接埠安全性只封鎖了來自不安全 MAC 位址的違規流量。另外請注意,安全違規計數器並未遞增。
On PC2, remove the configured MAC address from Ethernet0/0, and verify connectivity to R1 IPv4 address 10.10.1.1.
在 PC2 上,移除 Ethernet0/0 上已設定的 MAC 位址,並驗證與 R1 IPv4 位址 10.10.1.1 的連線。
On PC2, enter the following commands:
在 PC2 上輸入以下指令:
PC2# configure terminal
Enter configuration commands, one per line.  End with CNTL/Z.
PC2(config)# interface Ethernet 0/0
PC2(config-if)# no mac-address
PC2(config-if)# do ping 10.10.1.1
Type escape sequence to abort.
Sending 5, 100-byte ICMP Echos to 10.10.1.1, timeout is 2 seconds:
!!!!!
Success rate is 100 percent (5/5), round-trip min/avg/max = 1/201/1005 ms
PC2(config-if)# end
Notice that PC2 has regained connectivity to the R1 when it got its original MAC address back.
請注意,當 PC2 恢復其原始 MAC 位址後,已重新獲得與 R1 的連線。
On SW2, verify the port security status of Ethernet0/2.
在 SW2 上,驗證 Ethernet0/2 的連接埠安全性狀態。
On SW2, enter the following command:
在 SW2 上輸入以下指令:
SW2# show port-security interface Ethernet0/2
Port Security              : Enabled
Port Status                : Secure-up
Violation Mode             : Protect
Aging Time                 : 0 mins
Aging Type                 : Absolute
SecureStatic Address Aging : Disabled
Maximum MAC Addresses      : 1
Total MAC Addresses        : 1
Configured MAC Addresses   : 0
Sticky MAC Addresses       : 0
Last Source Address:Vlan   : aabb.cc00.0800:1
Security Violation Count   : 0
Notice that nothing changed on the SW2 side, except for the last known address.
請注意,除了最後已知的位址外,SW2 這端沒有任何變化。
Task 5: Configure and Verify Port Security with Dynamic Learning and Restrict Violation Mode on SW2
任務 5:在 SW2 上設定並驗證使用動態學習與 restrict 違規模式的連接埠安全性
Activity
活動
On SW2, change the security violation mode to restrict on interface Ethernet0/2.
在 SW2 上,將 Ethernet0/2 介面的安全違規模式變更為 restrict。
On SW2, enter the following commands:
在 SW2 上輸入以下指令:
SW2# configure terminal
Enter configuration commands, one per line.  End with CNTL/Z.
SW2(config)# interface Ethernet 0/2
SW2(config-if)# switchport port-security violation restrict
SW2(config-if)# end
Note that the restrict security violation mode drops all the packets from the insecure hosts at the port-security process level and increments the security-violation count.
請注意,restrict 安全違規模式會在連接埠安全性處理層級丟棄來自不安全主機的所有封包,並遞增安全違規計數。
On SW2, verify the port security status.
在 SW2 上,驗證連接埠安全性狀態。
On SW2, enter the following command:
在 SW2 上輸入以下指令:
SW2# show port-security
Secure Port  MaxSecureAddr  CurrentAddr  SecurityViolation  Security Action
                (Count)       (Count)          (Count)
---------------------------------------------------------------------------
      Et0/2              1            1                  0          Restrict
---------------------------------------------------------------------------
Total Addresses in System (excluding one mac per port)     : 0
Max Addresses limit in System (excluding one mac per port) : 4096On SW2, verify the port security status of Ethernet0/2.
在 SW2 上,驗證 Ethernet0/2 的連接埠安全性狀態。
On SW2, enter the following command:
在 SW2 上輸入以下指令:
SW2# show port-security interface Ethernet0/2
Port Security              : Enabled
Port Status                : Secure-up
Violation Mode             : Restrict
Aging Time                 : 0 mins
Aging Type                 : Absolute
SecureStatic Address Aging : Disabled
Maximum MAC Addresses      : 1
Total MAC Addresses        : 1
Configured MAC Addresses   : 0
Sticky MAC Addresses       : 0
Last Source Address:Vlan   : aabb.cc00.0800:1
Security Violation Count   : 0
In this output, you can see that port security is enabled on the Ethernet 0/2 interface. The current violation mode is set to restrict.
在此輸出中,你可以看到 Ethernet 0/2 介面已啟用連接埠安全性。目前的違規模式已設為 restrict。
On PC2, verify connectivity to R1, then change the MAC address on Ethernet0/0 to aaaa.aaaa.aaaa. Check again connectivity to R1 and observe the output on SW2.
在 PC2 上,驗證與 R1 的連線,然後將 Ethernet0/0 上的 MAC 位址變更為 aaaa.aaaa.aaaa。再次檢查與 R1 的連線,並觀察 SW2 上的輸出。
On PC2, enter the following commands:
在 PC2 上輸入以下指令:
PC2# ping 10.10.1.1
Type escape sequence to abort.
Sending 5, 100-byte ICMP Echos to 10.10.1.1, timeout is 2 seconds:
!!!!!
Success rate is 100 percent (5/5), round-trip min/avg/max = 1/202/1006 ms
PC2# configure terminal
Enter configuration commands, one per line.  End with CNTL/Z.
PC2(config)# interface Ethernet 0/0
PC2(config-if)# mac-address aaaa.aaaa.aaaa
PC2(config-if)# do ping 10.10.1.1
Type escape sequence to abort.
Sending 5, 100-byte ICMP Echos to 10.10.1.1, timeout is 2 seconds:
.....
Success rate is 0 percent (0/5)
PC2(config-if)# end
PC2#
In this output, you can see that PC2 can reach R1 10.10.1.1 IPv4 address. Notice, when you change the MAC address on PC2 the ping fails.
在此輸出中,你可以看到 PC2 能夠連上 R1 的 10.10.1.1 IPv4 位址。請注意,當你變更 PC2 上的 MAC 位址後,ping 就失敗了。
Also, you should see that SW2 will start to log messages that a security violation has occurred.
此外,你應該會看到 SW2 開始記錄發生安全違規的訊息。
*Apr 29 14:48:48.924: %PORT_SECURITY-2-PSECURE_VIOLATION: Security violation occurred, caused by MAC address aaaa.aaaa.aaaa on port Ethernet0/2.
*Apr 29 14:48:54.450: %PORT_SECURITY-2-PSECURE_VIOLATION: Security violation occurred, caused by MAC address aaaa.aaaa.aaaa on port Ethernet0/2.
*Apr 29 14:49:00.467: %PORT_SECURITY-2-PSECURE_VIOLATION: Security violation occurred, caused by MAC address aaaa.aaaa.aaaa on port Ethernet0/2.
*Apr 29 14:49:07.809: %PORT_SECURITY-2-PSECURE_VIOLATION: Security violation occurred, caused by MAC address aaaa.aaaa.aaaa on port Ethernet0/2.On SW2, verify the port security status of Ethernet0/2.
在 SW2 上,驗證 Ethernet0/2 的連接埠安全性狀態。
On SW2, enter the following command:
在 SW2 上輸入以下指令:
SW2# show port-security interface Ethernet0/2
Port Security              : Enabled
Port Status                : Secure-up
Violation Mode             : Restrict
Aging Time                 : 0 mins
Aging Type                 : Absolute
SecureStatic Address Aging : Disabled
Maximum MAC Addresses      : 1
Total MAC Addresses        : 1
Configured MAC Addresses   : 0
Sticky MAC Addresses       : 0
Last Source Address:Vlan   : aaaa.aaaa.aaaa:1
Security Violation Count   : 10
You can see that port security did not error-disable the interface. In this case, the interface is still up and operational. Port security only blocked the offending traffic, which came from unsecured MAC addresses. Also, notice that SW2 incremented the security violation counter each time the security violation occurred.
你可以看到連接埠安全性並未將該介面錯誤停用。在此情況下,介面仍處於啟用並正常運作的狀態。連接埠安全性只封鎖了來自不安全 MAC 位址的違規流量。另外請注意,每次發生安全違規時,SW2 都會遞增安全違規計數器。
Note that the security violation counter may differ in your lab, because PC2 is simulated by a router and periodically sends Cisco Discovery Protocol messages by default.
請注意,你實驗環境中的安全違規計數器可能不同,因為 PC2 是以路由器模擬,並且預設會定期傳送 Cisco Discovery Protocol 訊息。
On PC2, remove the configured MAC address from Ethernet0/0 and verify connectivity to the R1 10.10.1.1 IPv4 address.
在 PC2 上,移除 Ethernet0/0 上已設定的 MAC 位址,並驗證與 R1 10.10.1.1 IPv4 位址的連線。
On PC2, enter the following commands:
在 PC2 上輸入以下指令:
PC2# configure terminal
Enter configuration commands, one per line.  End with CNTL/Z.
PC2(config)# interface Ethernet 0/0
PC2(config-if)# no mac-address
PC2(config-if)# do ping 10.10.1.1
Type escape sequence to abort.
Sending 5, 100-byte ICMP Echos to 10.10.1.1, timeout is 2 seconds:
!!!!!
Success rate is 100 percent (5/5), round-trip min/avg/max = 1/201/1005 ms
PC2(config-if)# end
Notice that PC2 has regained connectivity to the R1 when it got its original MAC address back.
請注意,當 PC2 恢復其原始 MAC 位址後,已重新獲得與 R1 的連線。
On SW2, verify the port security status of Ethernet0/2.
在 SW2 上,驗證 Ethernet0/2 的連接埠安全性狀態。
On SW2, enter the following command:
在 SW2 上輸入以下指令:
SW2# show port-security interface Ethernet0/2
Port Security              : Enabled
Port Status                : Secure-up
Violation Mode             : Restrict
Aging Time                 : 0 mins
Aging Type                 : Absolute
SecureStatic Address Aging : Disabled
Maximum MAC Addresses      : 1
Total MAC Addresses        : 1
Configured MAC Addresses   : 0
Sticky MAC Addresses       : 0
Last Source Address:Vlan   : aabb.cc00.0800:1
Security Violation Count   : 23
Notice that nothing changed on the SW2 side, except for the last known address. The only way to clear the security violation counter is to restart the router or shut down the port and bring it back up, as shown in the following example.
請注意,除了最後已知的位址外,SW2 這端沒有任何變化。清除安全違規計數器的唯一方法,是重新啟動路由器,或如以下範例所示,將連接埠關閉再重新開啟。
SW2# configure terminal
Enter configuration commands, one per line.  End with CNTL/Z.
SW2(config)# interface Ethernet0/2
SW2(config-if)# shutdown
*Apr 29 14:51:55.103: %LINK-5-CHANGED: Interface Ethernet0/2, changed state to administratively down
*Apr 29 14:51:56.104: %LINEPROTO-5-UPDOWN: Line protocol on Interface Ethernet0/2, changed state to down
SW2(config-if)# no shutdown
*Apr 29 14:51:59.357: %LINK-3-UPDOWN: Interface Ethernet0/2, changed state to up
*Apr 29 14:52:00.361: %LINEPROTO-5-UPDOWN: Line protocol on Interface Ethernet0/2, changed state to up
SW2(config-if)# do show port-security interface Ethernet0/2
Port Security              : Enabled
Port Status                : Secure-up
Violation Mode             : Restrict
Aging Time                 : 0 mins
Aging Type                 : Absolute
SecureStatic Address Aging : Disabled
Maximum MAC Addresses      : 1
Total MAC Addresses        : 1
Configured MAC Addresses   : 0
Sticky MAC Addresses       : 0
Last Source Address:Vlan   : aabb.cc00.0800:1
Security Violation Count   : 0