Introduction
簡介
This activity will guide you through the various aspects of securing administrative access to Cisco IOS devices. You will secure the access to the privileged EXEC mode and see the difference between enable password and enable secret. You will also secure access to the console port. You will enable remote access to the vty lines via Telnet and SSH. You will set SSH as the only acceptable remote access protocol.
本活動將引導你了解保護 Cisco IOS 裝置管理存取的各個面向。你將保護特權 EXEC 模式的存取,並了解 enable 密碼與 enable secret 之間的差異。你也將保護主控台埠的存取。你將透過 Telnet 與 SSH 啟用對 vty 線路的遠端存取,並將 SSH 設定為唯一可接受的遠端存取通訊協定。
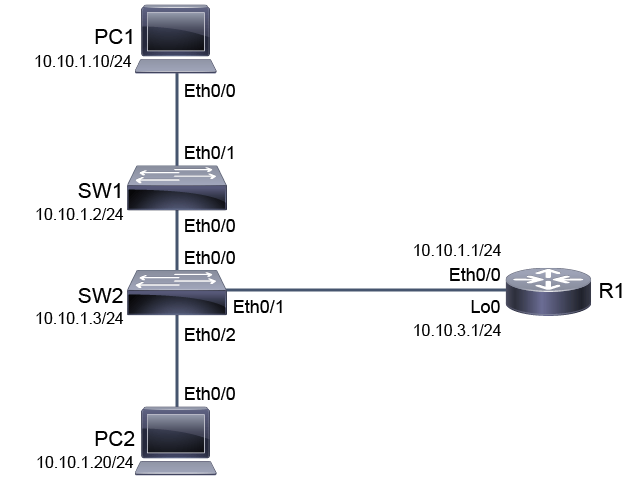
The devices are configured as represented in the topology diagram, including their IPv4 addresses. This activity will focus on R1. You will use other devices as sources of remote access connections.
裝置已依拓樸圖所示完成設定,包括其 IPv4 位址。本活動將聚焦於 R1,你將使用其他裝置作為遠端存取連線的來源。
Topology
拓樸
Job Aid
工作輔助資料
Device Information
裝置資訊
Device Information Table
裝置資訊表
Device 裝置 | Characteristic 特性 | Value 值 |
PC1 PC1 | IPv4 address IPv4 位址 | 10.10.1.10/24 10.10.1.10/24 |
PC1 PC1 | Default gateway 預設閘道 | 10.10.1.1 10.10.1.1 |
PC2 PC2 | IPv4 address IPv4 位址 | 10.10.1.20/24 10.10.1.20/24 |
PC2 PC2 | Default gateway 預設閘道 | 10.10.1.1 10.10.1.1 |
SW1 SW1 | VLAN 1 IPv4 address VLAN 1 IPv4 位址 | 10.10.1.2/24 10.10.1.2/24 |
SW1 SW1 | Default gateway 預設閘道 | 10.10.1.1 10.10.1.1 |
SW1 SW1 | Ethernet0/0 description Ethernet0/0 描述 | Link to SW2 連往 SW2 |
SW1 SW1 | Ethernet0/1 description Ethernet0/1 描述 | Link to PC1 連往 PC1 |
SW2 SW2 | VLAN 1 IPv4 address VLAN 1 IPv4 位址 | 10.10.1.3/24 10.10.1.3/24 |
SW2 SW2 | Default gateway 預設閘道 | 10.10.1.1 10.10.1.1 |
SW2 SW2 | Ethernet0/0 description Ethernet0/0 描述 | Link to SW1 連往 SW1 |
SW2 SW2 | Ethernet0/1 description Ethernet0/1 描述 | Link to R1 連往 R1 |
SW2 SW2 | Ethernet0/2 description Ethernet0/2 描述 | Link to PC2 連往 PC2 |
R1 R1 | Ethernet0/0 description Ethernet0/0 描述 | Link to SW2 連往 SW2 |
R1 R1 | Ethernet0/0 IPv4 address Ethernet0/0 IPv4 位址 | 10.10.1.1/24 10.10.1.1/24 |
R1 R1 | Loopback 0 IPv4 Loopback 0 IPv4 | 10.10.3.1/24 10.10.3.1/24 |
Task 1: Secure Access to Privileged EXEC Mode
任務 1:保護特權 EXEC 模式的存取
Activity
活動
On R1, access the privileged EXEC mode with the enable command and the global configuration mode with the configure terminal command.
在 R1 上,使用 enable 指令進入特權 EXEC 模式,並使用 configure terminal 指令進入全域設定模式。
On R1, enter the following commands:
在 R1 上輸入以下指令:
R1> enable
R1# configure terminal
Enter configuration commands, one per line.  End with CNTL/Z.
R1(config)#Set the enable password to Password123, and leave the configuration mode.
將 enable 密碼設為 Password123,然後離開設定模式。
On R1, enter the following commands:
在 R1 上輸入以下指令:
R1(config)# enable password Password123
R1(config)# end
R1#The enable password will now protect access to the privileged EXEC mode. Verify this fact by leaving the privileged EXEC with the disable command, then use enable again, and authenticate with the Password123 password.
enable 密碼現在將保護對特權 EXEC 模式的存取。透過使用 disable 指令離開特權 EXEC,再次使用 enable,並以 Password123 密碼進行驗證,以確認此點。
On R1, enter the following commands:
在 R1 上輸入以下指令:
R1# disable
R1> enable
Password: Password123
R1#View the enable password in the running configuration.
在執行中設定中檢視 enable 密碼。
On R1, enter the following command:
在 R1 上輸入以下指令:
R1# show running-config | include enable
enable password Password123
By default, the enable password is stored in the configuration as plaintext.
根據預設,enable 密碼是以明文儲存於設定中。
Configure the enable secret, set it to Secret123.
設定 enable secret,將其設為 Secret123。
On R1, enter the following commands:
在 R1 上輸入以下指令:
R1# configure terminal
Enter configuration commands, one per line.  End with CNTL/Z.
R1(config)# enable secret Secret123
R1(config)# end
R1#When both are present, the enable secret takes precedence over the enable password. Verify that this fact is correct.
當兩者同時存在時,enable secret 的優先權高於 enable 密碼。請驗證此點是否正確。
On R1, enter the following commands to first try the enable password (which won’t work) and then try the enable secret (which will work):
在 R1 上輸入以下指令,先嘗試 enable 密碼(將無法成功),再嘗試 enable secret(將可成功):
R1# disable
R1> enable
Password: Password123
Password: Secret123
R1#
The enable password was not accepted to access privileged EXEC mode. The enable secret was required.
enable 密碼未被接受用以存取特權 EXEC 模式,系統要求的是 enable secret。
View enable password and enable secret in the configuration.
在設定中檢視 enable 密碼與 enable secret。
On R1, enter the following command:
在 R1 上輸入以下指令:
R1# show running-config | include enable
enable secret 4 9h/bNbZRK8Hm9J2ONmwUdf0KoztPJewuR2NseOBKzM6
enable password Password123
The enable secret is always stored in a protected fashion in the configuration file. Cisco IOS Software on routers supports several encryption types. On production routers, you will most likely find encryption type 8 or type 9. Using encryption type 4 is not recommended due to security risks.
enable secret 在設定檔中一律以受保護的方式儲存。路由器上的 Cisco IOS 軟體支援多種加密類型。在正式環境的路由器上,你最常見到的會是加密類型 8 或類型 9。基於安全風險,不建議使用加密類型 4。
Enable the service password-encryption command in the configuration mode. Then revisit how the enable credentials appear in the running configuration.
在設定模式中啟用 service password-encryption 指令,然後重新檢視 enable 憑證在執行中設定中的顯示方式。
On R1, enter the following commands:
在 R1 上輸入以下指令:
R1# configure terminal
Enter configuration commands, one per line.  End with CNTL/Z.
R1(config)# service password-encryption
R1(config)# end
R1# show running-config | include enable
enable secret 4 9h/bNbZRK8Hm9J2ONmwUdf0KoztPJewuR2NseOBKzM6
enable password 7 03345A1815182E5E4A584B56
The enable password is now protected using the Cisco IOS type-7 encryption algorithm, which is used by default. The service password-encryption will also protect other cleartext passwords that may appear in the configuration file.
enable 密碼現在使用預設採用的 Cisco IOS 類型 7 加密演算法加以保護。service password-encryption 也會保護設定檔中其他可能出現的明文密碼。
Task 2: Secure Console and Remote Access
任務 2:保護主控台與遠端存取
Activity
活動
Enable a password on the R1 console (line console 0) by using the login command with the password command. Set the password to Console123.
使用 login 指令搭配 password 指令,在 R1 主控台(line console 0)上啟用密碼。將密碼設為 Console123。
On R1, enter the following commands:
在 R1 上輸入以下指令:
R1# configure terminal
Enter configuration commands, one per line.  End with CNTL/Z.
R1(config)# line console 0
R1(config-line)# login
% Login disabled on line 0, until 'password' is set
R1(config-line)# password Console123
R1(config-line)# end
R1#View the configuration that is now in place on "line con 0."
檢視目前套用在「line con 0」上的設定。
On R1, enter the following command:
在 R1 上輸入以下指令:
R1# show running-config | section line
line con 0
 password 7 080243401A16091243595F
 logging synchronous
 login
line aux 0
line vty 0 4
 login
 transport input all
Service password-encryption continues to encrypt new passwords as they are defined.
Service password-encryption 會持續加密新定義的密碼。
Verify the console password by logging out completely from the Cisco IOS CLI session on R1 and then logging back in. Continue by using the enable command to access the privileged EXEC mode.
透過完全登出 R1 的 Cisco IOS CLI 工作階段再重新登入,來驗證主控台密碼。接著使用 enable 指令進入特權 EXEC 模式。
On R1, enter the following commands:
在 R1 上輸入以下指令:
R1# logout

R1 con0 is now available

Press RETURN to get started.


User Access Verification

Password: Console123
R1> enable
Password: Secret123
R1#In a similar fashion, add a password to the five vty lines (line vty 0 4), setting the credential that is required for remote access to the CLI of R1 to VTYPass.
以類似方式,為五條 vty 線路(line vty 0 4)新增密碼,將遠端存取 R1 CLI 所需的憑證設為 VTYPass。
On R1, enter the following commands:
在 R1 上輸入以下指令:
R1# configure terminal
Enter configuration commands, one per line.  End with CNTL/Z.
R1(config)# line vty 0 4
R1(config-line)# login
% Login disabled on line 2, until 'password' is set
% Login disabled on line 3, until 'password' is set
% Login disabled on line 4, until 'password' is set
% Login disabled on line 5, until 'password' is set
% Login disabled on line 6, until 'password' is set
R1(config-line)# password VTYPass
R1(config-line)# end
R1#Verify that you can access the CLI of R1 via Telnet from other systems. Access the PC1 console and then access 10.10.1.1 via Telnet.
驗證你能否從其他系統透過 Telnet 存取 R1 的 CLI。進入 PC1 主控台,然後透過 Telnet 存取 10.10.1.1。
On PC1, enter the following commands:
在 PC1 上輸入以下指令:
PC1> telnet 10.10.1.1
Trying 10.10.1.1 ... Open

User Access Verification

Password: VTYPass
R1>
The prompt changed from PC1 to R1. You are currently accessing the PC1 console but using PC1 to remotely access the CLI of R1.
提示字元從 PC1 變成了 R1。你目前仍在存取 PC1 主控台,但正使用 PC1 遠端存取 R1 的 CLI。
Verify that you can use this remote connection to access the R1 privileged EXEC with the enable command and the Secret123 enable secret.
驗證你能否使用此遠端連線,透過 enable 指令與 Secret123 enable secret 進入 R1 的特權 EXEC。
On the PC1 console (that is connected to R1), enter the following commands:
在(連接至 R1 的)PC1 主控台上輸入以下指令:
R1> enable
Password: Secret123 Close the remote access connection using either the logout or exit command.
使用 logout 或 exit 指令關閉此遠端存取連線。
On the PC1 console while connected via Telnet to R1, enter the following commands:
在透過 Telnet 連接至 R1 的 PC1 主控台上輸入以下指令:
R1# logout
[Connection to 10.10.1.1 closed by foreign host]
PC1>
From the user or privileged EXEC, you can use the logout and exit commands interchangeably to terminate remote access connections.
在使用者或特權 EXEC 模式下,你可以交替使用 logout 與 exit 指令來終止遠端存取連線。
Return to the R1 console. You will now increase the sophistication of the login process. Instead of using simply a password for remote access, you will require a username and a password. The first step is to define a username in the configuration. Enter the configuration mode and then use ? to display the options that are available as you configure a username.
回到 R1 主控台。你接下來將提升登入流程的複雜度:遠端存取將不再只使用密碼,而是要求輸入使用者名稱與密碼。第一步是在設定中定義使用者名稱。進入設定模式,然後使用 ? 顯示設定使用者名稱時可用的選項。
On R1, enter the following commands:
在 R1 上輸入以下指令:
R1# configure terminal
Enter configuration commands, one per line.  End with CNTL/Z.
R1(config)# username ?
  WORD  User name
The next element of the command line is to specify the username as a freeform WORD.
指令列的下一個元素是指定一個自由格式的字串(WORD)作為使用者名稱。
Continue by specifying admin as the username followed by the ? to display the next set of options.
接著指定 admin 作為使用者名稱,並在其後加上 ? 顯示下一組選項。
On R1, enter the following command:
在 R1 上輸入以下指令:
R1(config)# username admin ?
  aaa                  AAA directive
  access-class         Restrict access by access-class
  autocommand          Automatically issue a command after the user logs in
  callback-dialstring  Callback dialstring
  callback-line        Associate a specific line with this callback
  callback-rotary      Associate a rotary group with this callback
  dnis                 Do not require password when obtained via DNIS
  nocallback-verify    Do not require authentication after callback
  noescape             Prevent the user from using an escape character
  nohangup             Do not disconnect after an automatic command
  nopassword           No password is required for the user to log in
  one-time             Specify that the username/password is valid for only one
                       time
  password             Specify the password for the user
  privilege            Set user privilege level
  secret               Specify the secret for the user
  user-maxlinks        Limit the user's number of inbound links
  view                 Set view name
There are several options available, but for this purpose, focus only on password and secret. Understand that the differences regarding the username command are the same as they are with the enable password and enable secret commands.
此處有多個可用選項,但本次只需聚焦於 password 與 secret。請理解 username 指令中的這些差異,與 enable password 及 enable secret 指令的差異是相同的。
Continue by specifying secret as the credential storage option and use the ? to display the next set of options.
接著指定 secret 作為憑證儲存選項,並使用 ? 顯示下一組選項。
On R1, enter the following command:
在 R1 上輸入以下指令:
R1(config)# username admin secret ?
  0     Specifies an UNENCRYPTED secret will follow
  4     Specifies a SHA256 ENCRYPTED secret will follow
  5     Specifies a MD5 ENCRYPTED secret will follow
  LINE  The UNENCRYPTED (cleartext) user secret
You can specify a 4 followed by the SHA-256-protected secret or a 5 followed by an MD5-protected secret. These options allow you to copy the protected secret from one configuration to another. There is also the option to specify a 0 followed by the cleartext secret. Specifying the 0 is optional and generally not used. In this case, you do not have a protected secret to work with. You will simply enter the cleartext secret next.
你可以指定 4,後接以 SHA-256 保護的 secret,或指定 5,後接以 MD5 保護的 secret。這些選項讓你能將受保護的 secret 從一份設定複製到另一份設定。另外也有選項可指定 0,後接明文 secret。指定 0 是選擇性的,通常不會使用。在這種情況下,你並沒有受保護的 secret 可用,因此接下來將直接輸入明文 secret。
Complete the definition of the username admin with the Cisco123secret.
以 Cisco123 secret 完成 admin 使用者名稱的定義。
On R1, enter the following command:
在 R1 上輸入以下指令:
R1(config)# username admin secret Cisco123Remain in configuration mode. Use the do command to execute the privileged EXEC show running-config command from within configuration mode. Send the output through the include filter specifying the user string.
保持在設定模式中。使用 do 指令,在設定模式中執行特權 EXEC 的 show running-config 指令,並將輸出透過 include 篩選器指定 user 字串。
On R1, enter the following command:
在 R1 上輸入以下指令:
R1(config)# do show running-config | include user
username admin secret 4 vwcGVdcUZcRMCyxaH2U9Y/PTujsnQWPSbt.LFG8lhTw
The username admin is now defined, and its password is stored in the configuration as a Cisco IOS type 4, SHA-256-protected secret.
使用者名稱 admin 現已定義完成,其密碼以 Cisco IOS 類型 4、SHA-256 保護的 secret 形式儲存在設定中。
Currently, the vty lines have the login command set without an argument. In this state, authentication is done using the password that is defined on the line itself. If the logincommand is enhanced with the local argument, then authentication will be accomplished using usernames that are stored in the local running configuration. Enter the vty line configuration mode and configure the login local command. Remove the previously configured password, using the no password command, then leave the configuration mode.
目前 vty 線路設定的是不帶引數的 login 指令。在此狀態下,驗證是使用線路本身所定義的密碼進行的。如果將 login指令加上 local 引數,則驗證會改用儲存在本地執行中設定中的使用者名稱來完成。進入 vty 線路設定模式並設定 login local 指令。使用 no password 指令移除先前設定的密碼,然後離開設定模式。
On R1, enter the following commands:
在 R1 上輸入以下指令:
R1(config)# line vty 0 4
R1(config-line)# login local
R1(config-line)# no passwordR1(config-line)# end
R1#Remote access authentication should now require a valid username and password. Access the PC1 console and connect via Telnet to R1 (10.10.1.1) to verify this fact.
遠端存取驗證現在應該會要求有效的使用者名稱與密碼。進入 PC1 主控台並透過 Telnet 連線至 R1(10.10.1.1),以驗證此點。
On PC1, enter the following commands:
在 PC1 上輸入以下指令:
PC1> telnet 10.10.1.1
Trying 10.10.1.1 ... Open

User Access Verification

Username: admin
Password: Cisco123
R1>Close the remote access connection using either the logout or exit command.
使用 logout 或 exit 指令關閉此遠端存取連線。
On the PC1 console while connected via Telnet to R1, enter the following commands:
在透過 Telnet 連接至 R1 的 PC1 主控台上輸入以下指令:
R1# logout
[Connection to 10.10.1.1 closed by foreign host]
PC1>
From the user or privileged EXEC, you can use the logout and exit commands interchangeably to terminate remote access connections.
在使用者或特權 EXEC 模式下,你可以交替使用 logout 與 exit 指令來終止遠端存取連線。
Task 3: Enable SSH
任務 3:啟用 SSH
Activity
活動
On R1, enable SSH. The prerequisite of SSH on Cisco IOS vty lines is having an RSA public-private key pair. The prerequisite to defining the key pair is to have a hostname and a domain name that are defined. R1 already has a hostname that is configured. Configure ccna.lab as the domain name, then generate a 2048-bit RSA public-private key pair.
在 R1 上啟用 SSH。在 Cisco IOS vty 線路上使用 SSH 的前提是必須擁有一組 RSA 公私鑰對。而要定義金鑰對,前提是必須先定義主機名稱與網域名稱。R1 已設定好主機名稱。請將網域名稱設為 ccna.lab,然後產生一組 2048 位元的 RSA 公私鑰對。
On R1, enter the following commands:
在 R1 上輸入以下指令:
R1# configure terminal
Enter configuration commands, one per line.  End with CNTL/Z.
R1(config)# ip domain-name ccna.lab
R1(config)# crypto key generate rsa
The name for the keys will be: R1.ccna.lab
Choose the size of the key modulus in the range of 360 to 4096 for your
  General Purpose Keys. Choosing a key modulus greater than 512 may take
  a few minutes.

How many bits in the modulus [512]: 2048
% Generating 2048 bit RSA keys, keys will be non-exportable...
[OK] (elapsed time was 0 seconds)

R1(config)#
*Apr 15 12:43:54.804: %SSH-5-ENABLED: SSH 1.99 has been enabled
Shortly after you generate the RSA key pair, SSH is automatically enabled on the router.
產生 RSA 金鑰對後不久,SSH 會自動在路由器上啟用。
Some security issues are associated with SSHv1. Limit the options to SSHv2 only, then leave the configuration mode.
SSHv1 存在一些安全性問題。請將選項限制為僅使用 SSHv2,然後離開設定模式。
On R1, enter the following commands:
在 R1 上輸入以下指令:
R1(config)# ip ssh version 2
R1(config)# end
R1#Both Telnet and SSH should now be options for remote access to R1. Access the PC1 console to verify this fact. First, connect via Telnet from PC1 to R1. Disconnect once you have connected.
現在 Telnet 與 SSH 都應該是遠端存取 R1 的可用選項。進入 PC1 主控台以驗證此點。首先從 PC1 透過 Telnet 連線至 R1,連線成功後即中斷連線。
On PC1, enter the following command:
在 PC1 上輸入以下指令:
PC1> telnet 10.10.1.1
Trying 10.10.1.1 ... Open

User Access Verification
Username: admin
Password: Cisco123

R1> exit
[Connection to 10.10.1.1 closed by foreign host]
PC1>Next, test an SSH connection from PC1 to R1, using the ssh -l username address command.
接著使用 ssh -l 使用者名稱 位址 指令,測試從 PC1 到 R1 的 SSH 連線。
On PC1, enter the following command:
在 PC1 上輸入以下指令:
PC1> ssh -l admin 10.10.1.1
Password: Cisco123
R1>
The ""l" is a hyphen with a lower-case "L" letter, not a hyphen with the number 1. Think lower-case "L" for "login."
這裡的「l」是連字號加上小寫字母「L」,不是連字號加上數字 1。可以聯想成小寫「L」代表「login」。
From this remote access connection, examine the vty configuration to understand why both Telnet and SSH are allowed. It is because "transport input all"is specified on the "line vty 0 4" configuration.
從這個遠端存取連線中,檢視 vty 設定,了解為何 Telnet 與 SSH 都被允許。這是因為「line vty 0 4」的設定中指定了「transport input all」。
On the PC1 console (that is connected to R1), enter the following command:
在(連接至 R1 的)PC1 主控台上輸入以下指令:
R1> enable
Password: Secret123
R1# show running-config | section line
line con 0
 password 7 080243401A16091243595F
 logging synchronous
 login
line aux 0
line vty 0 4
 password 7 0125323D6B0A151C
 login local
transport input allBecause SSH is superior to Telnet from a security perspective, change the transport input option from allto ssh under "line vty 0 4."
由於就安全性而言 SSH 優於 Telnet,請在「line vty 0 4」下,將 transport input 選項從 all改為 ssh。
On R1, enter the following commands:
在 R1 上輸入以下指令:
R1# configure terminal
Enter configuration commands, one per line.  End with CNTL/Z.
R1(config)# line vty 0 4
R1(config-line)# transport input ssh
R1(config-line)# endTerminate this SSH session to return to the local console of PC1.
終止此 SSH 工作階段,返回 PC1 的本地主控台。
On R1, enter the following command:
在 R1 上輸入以下指令:
R1# logout
[Connection to 10.10.1.1 closed by foreign host]
PC1>Attempt a Telnet session from PC1 to R1. Because the transport input is now set to SSH only, the Telnet attempt should be rejected.
嘗試從 PC1 對 R1 建立 Telnet 工作階段。由於 transport input 現在僅設為 SSH,因此該 Telnet 嘗試應該會被拒絕。
On PC1, enter the following command:
在 PC1 上輸入以下指令:
PC1> telnet 10.10.1.1
Trying 10.10.1.1 ...
% Connection refused by remote hostVerify that SSH is still valid for new remote access sessions. Try to connect with SSH one more time from PC1 to R1. Terminate the session after it successfully initiates.
驗證 SSH 對新的遠端存取工作階段仍然有效。再次嘗試從 PC1 以 SSH 連線至 R1,連線成功建立後即終止該工作階段。
On PC1, enter the following command:
在 PC1 上輸入以下指令:
PC1> ssh -l admin 10.10.1.1
Password: Cisco123
R1> logout
[Connection to 10.10.1.1 closed by foreign host]
PC1>
You have explored many options for securing administrative access on Cisco IOS devices during this activity. You used the enable password and the enable secret password to protect the privileged EXEC. You used service password encryption to provide simple protection to cleartext passwords. You implemented a simple password protection on the console and vty lines. You then went further with the vty lines, requiring a username and password for access and configuring SSH. Feel free to continue exploring these concepts independently within the lab environment.
在本活動中,你探索了許多在 Cisco IOS 裝置上保護管理存取的方式。你使用了 enable 密碼與 enable secret 密碼來保護特權 EXEC。你使用 service password-encryption 對明文密碼提供簡單的保護。你在主控台與 vty 線路上實作了簡單的密碼保護,接著更進一步在 vty 線路上要求使用者名稱與密碼才能存取,並設定了 SSH。歡迎在實驗環境中繼續自行探索這些概念。