Introduction
簡介
This activity will guide you through configuring a limit on remote access by using an ACL. You will also implement login and exec banners.
本活動將引導你使用 ACL 設定遠端存取的限制,你也將實作登入橫幅與執行橫幅。
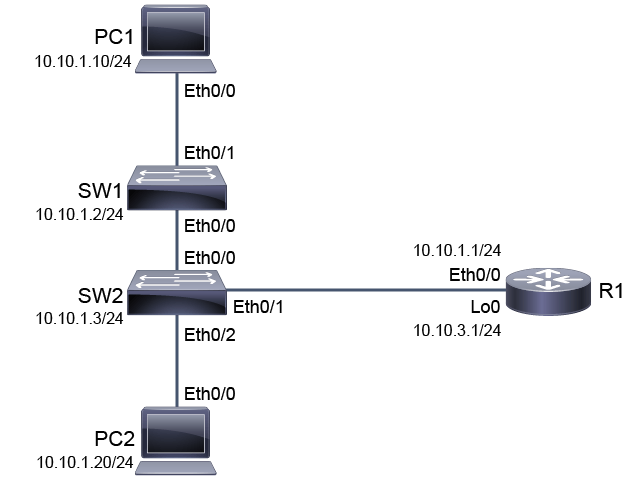
The devices are configured as represented in the topology diagram, including IPv4 addresses. This activity will focus on R1. Other devices will be used as sources of remote access connections.
裝置已依拓樸圖所示完成設定,包括 IPv4 位址。本活動將聚焦於 R1,其他裝置將作為遠端存取連線的來源。
Topology
拓樸
Job Aid
工作輔助資料
Device Information
裝置資訊
Device Information Table
裝置資訊表
Device 裝置 | Characteristic 特性 | Value 值 |
PC1 PC1 | IPv4 address IPv4 位址 | 10.10.1.10/24 10.10.1.10/24 |
PC1 PC1 | Default gateway 預設閘道 | 10.10.1.1 10.10.1.1 |
PC2 PC2 | IPv4 address IPv4 位址 | 10.10.1.20/24 10.10.1.20/24 |
PC2 PC2 | Default gateway 預設閘道 | 10.10.1.1 10.10.1.1 |
SW1 SW1 | VLAN 1 IPv4 address VLAN 1 IPv4 位址 | 10.10.1.2/24 10.10.1.2/24 |
SW1 SW1 | Default gateway 預設閘道 | 10.10.1.1 10.10.1.1 |
SW2 SW2 | VLAN 1 IPv4 address VLAN 1 IPv4 位址 | 10.10.1.3/24 10.10.1.3/24 |
SW2 SW2 | Default gateway 預設閘道 | 10.10.1.1 10.10.1.1 |
R1 R1 | Ethernet0/0 IPv4 address Ethernet0/0 IPv4 位址 | 10.10.1.1/24 10.10.1.1/24 |
R1 R1 | Loopback 0 IPv4 Loopback 0 IPv4 | 10.10.3.1/24 10.10.3.1/24 |
R1 R1 | Enable password Enable 密碼 | Password123 Password123 |
R1 R1 | Enable secret Enable secret | Secret123 Secret123 |
R1 R1 | Console password 主控台密碼 | Console123 Console123 |
R1 R1 | Vty 0 4 Line Password Vty 0 4 線路密碼 | VTYPass VTYPass |
R1 R1 | Username/Secret 使用者名稱/Secret | admin/Cisco123 admin/Cisco123 |
Task 1: Limit Remote Access with ACLs
任務 1:使用 ACL 限制遠端存取
Activity
活動
Explore the use of ACLs to control the source IPv4 addresses that are allowed to establish remote access sessions to a Cisco IOS device. Before defining new access lists, you should know which access lists exist on the device, to prevent accidental editing of an access list that is already defined. On R1, view the access lists that are in place. To access R1, use the Console123 console password and the Secret123 enable secret password.
探索如何使用 ACL 控制允許對 Cisco IOS 裝置建立遠端存取工作階段的來源 IPv4 位址。在定義新的存取清單之前,你應先了解裝置上已存在哪些存取清單,以避免不慎編輯到已定義的存取清單。在 R1 上,檢視目前已套用的存取清單。要存取 R1,請使用主控台密碼 Console123 與 enable secret 密碼 Secret123。
On R1, enter the following command:
在 R1 上輸入以下指令:
R1 con0 is now available

Press RETURN to get started.


User Access Verification

Password: Console123
R1> enable
Password: Secret123
R1# show access-lists
R1#
On R1, no access lists are configured.
在 R1 上,目前未設定任何存取清單。
Enter the global configuration mode and define a new access list number 1that permits PC1 (10.10.1.10) and PC2 (10.10.1.20) and explicitly denies all other addresses with the log option enabled.
進入全域設定模式,定義一個新的編號 1 存取清單,允許 PC1(10.10.1.10)與 PC2(10.10.1.20),並明確拒絕所有其他位址,同時啟用 log 選項。
On R1, enter the following commands:
在 R1 上輸入以下指令:
R1# configure terminal
Enter configuration commands, one per line.  End with CNTL/Z.
R1(config)# access-list 1 permit 10.10.1.10
R1(config)# access-list 1 permit 10.10.1.20
R1(config)# access-list 1 deny any logAssign access list 1 to the vty lines in the inbound direction using the access-class command, then leave the configuration mode.
使用 access-class 指令,將存取清單 1 以入向方向套用到 vty 線路上,然後離開設定模式。
On R1, enter the following commands:
在 R1 上輸入以下指令:
R1(config)# line vty 0 4
R1(config-line)# access-class 1 in
R1(config-line)# end
R1#One at a time, access the PC1, PC2, and SW1 consoles and attempt SSH sessions to R1 (10.10.1.1) , using the ssh -l username address command. The sessions should be successful from PC1 and PC2 but not from SW1. Terminate each session after it successfully initiates.
依序進入 PC1、PC2 與 SW1 的主控台,使用 ssh -l 使用者名稱 位址 指令嘗試對 R1(10.10.1.1)建立 SSH 工作階段。來自 PC1 與 PC2 的連線應會成功,但來自 SW1 的連線則不會。每個工作階段成功建立後即予以終止。
Note that in the ssh command, the ""l" is a hyphen with a lower-case "L" letter.
請注意,在 ssh 指令中,「l」是連字號加上小寫字母「L」。
On PC1, enter the following command:
在 PC1 上輸入以下指令:
PC1> ssh -l admin 10.10.1.1
Password: Cisco123
R1> logout
[Connection to 10.10.1.1 closed by foreign host]
PC1>
On PC2, enter the following command:
在 PC2 上輸入以下指令:
PC2> ssh -l admin 10.10.1.1
Password: Cisco123
R1> logout
[Connection to 10.10.1.1 closed by foreign host]
PC2>
On SW1, enter the following command:
在 SW1 上輸入以下指令:
SW1> ssh -l admin 10.10.1.1% Connection refused by remote host
SW1>Return to the R1 console. You should find a syslog message that is associated with the access attempt from SW1 that the explicit deny statement at the end of the access list denied.
回到 R1 主控台。你應該會看到一則與 SW1 存取嘗試相關的系統日誌訊息,顯示該嘗試已被存取清單結尾的明確拒絕陳述式拒絕。
The syslog message is displayed on the R1 console, as follows:
R1 主控台上會顯示如下的系統日誌訊息:
R1#
*Apr 20 13:03:18.445: %SEC-6-IPACCESSLOGNP: list 1 denied 0 10.10.1.2 -> 0.0.0.0, 1 packetOn R1, show access list 1, and verify the match counters on each line.
在 R1 上,顯示存取清單 1,並確認每一行的比對計數器。
On R1, enter the following command:
在 R1 上輸入以下指令:
R1# show access-lists 1
Standard IP access list 1
    10 permit 10.10.1.10 (2 matches)
    20 permit 10.10.1.20 (2 matches)
    30 deny   any log (1 match)
When an ACL is applied to the vty lines with the access-class command, each successful connection will increment the match counter on the associated permit statement by two while each rejected connection will only increment the match counter on the associated deny statement by one.
當 ACL 透過 access-class 指令套用到 vty 線路上時,每次成功的連線都會使相關允許陳述式的比對計數器增加 2,而每次遭拒絕的連線則只會使相關拒絕陳述式的比對計數器增加 1。
Task 2: Configure the Login and EXEC Banners
任務 2:設定登入橫幅與 EXEC 橫幅
Activity
活動
Another access control option that you will explore during this activity is the use of banner messages. The login banner is displayed before the user logs in, and the EXEC banner is displayed after a successful login. Start by configuring a login banner on R1.
本活動將探索的另一種存取控制方式,是使用橫幅訊息。登入橫幅會在使用者登入之前顯示,而 EXEC 橫幅則會在成功登入之後顯示。首先在 R1 上設定登入橫幅。
On R1, enter the configuration mode by entering the configure terminal command. Configure the login banner by entering the banner login x command. The "x" character is the delimiter indicating the start of the banner text. The next time this character appears is the end of the banner text—be sure to choose a delimiter character that does not appear in the banner text. You will be prompted to enter the banner text, ending it with the 'x' character. For the banner text, enter: Access for authorized users only.
Enter your valid credentials for access:
x
在 R1 上,輸入 configure terminal 指令進入設定模式。輸入 banner login x 指令來設定登入橫幅。字元「x」是分隔符號,用來標示橫幅文字的開始,下一次出現此字元時即代表橫幅文字結束,請務必選擇不會出現在橫幅文字中的分隔字元。系統會提示你輸入橫幅文字,並以「x」字元結束輸入。橫幅文字請輸入:Access for authorized users only.
Enter your valid credentials for access:
x
On R1, enter the following commands:
在 R1 上輸入以下指令:
R1# configure terminal
Enter configuration commands, one per line. End with CNTL/Z.
R1(config)# banner login x
Enter TEXT message. End with the character 'x'.
Access for authorized users only.
Enter your valid credentials for access:
xAlso, configure an EXEC banner on R1 and then leave the configuration mode. As the banner text, enter:
接著在 R1 上設定 EXEC 橫幅,然後離開設定模式。橫幅文字請輸入:
AUTHORIZED ACCESS ONLY!
If you are not authorized, LOGOUT IMMEDIATELY
x
On R1, enter the following commands:
在 R1 上輸入以下指令:
R1(config)# banner exec x
Enter TEXT message.  End with the character 'x'.
AUTHORIZED ACCESS ONLY!
If you are not authorized, LOGOUT IMMEDIATELY
x
R1(config)# end
R1#Access the PC1 console and execute an SSH connection to R1. You should see the login banner before entering the password, and you should see the EXEC banner after authentication and before the first user EXEC prompt is displayed. Log out of R1.
進入 PC1 主控台,並執行對 R1 的 SSH 連線。你應該會在輸入密碼之前看到登入橫幅,並在通過驗證之後、顯示第一個使用者 EXEC 提示字元之前看到 EXEC 橫幅。接著登出 R1。
On PC1, enter the following commands:
在 PC1 上輸入以下指令:
PC1> ssh -l admin 10.10.1.1
Access for authorized users only.
Enter your valid credentials for access:

Password: Cisco123

AUTHORIZED ACCESS ONLY!
If you are not authorized, LOGOUT IMMEDIATELY
R1> logout
[Connection to 10.10.1.1 closed by foreign host]
PC1>
You have explored how to limit remote access connections during this activity. You have limited authorized remote access systems with ACLs. You finished with a simple demonstration of the login and EXEC banners. Feel free to continue exploring these concepts independently within the lab environment.
在本活動中,你探索了如何限制遠端存取連線。你使用 ACL 限制了獲授權的遠端存取系統,最後透過簡單的示範了解登入橫幅與 EXEC 橫幅。歡迎在實驗環境中繼續自行探索這些概念。