Introduction
簡介
In this activity, you will learn about EXEC modes, CLI help, and the CLI error message. You will also learn how to manage the Cisco IOS configuration and how to improve user experience in the CLI.
在本活動中,你將學習使用者執行模式與特權執行模式(EXEC modes)、CLI 說明,以及 CLI 錯誤訊息。你也將學習如何管理 Cisco IOS 設定,以及如何改善 CLI 的使用體驗。
Interacting with the device using the CLI is only one of the available options. The other one is using a GUI, when the device's operating system provides one. GUIs may not always provide all features available at the CLI. For these reasons, network devices are typically accessed through a CLI. The CLI is less resource-intensive and very stable when compared to a GUI. However, to use the CLI, the user needs to know the underlying structure that controls the system.
使用 CLI 與裝置互動只是可用選項之一。另一個選項是使用圖形化使用者介面(GUI),前提是裝置的作業系統有提供。GUI 未必總能提供 CLI 可用的所有功能。基於這些原因,網路裝置通常是透過 CLI 存取的。相較於 GUI,CLI 消耗的資源較少,且非常穩定。不過,若要使用 CLI,使用者必須了解控制系統運作的底層架構。
Topology
拓樸
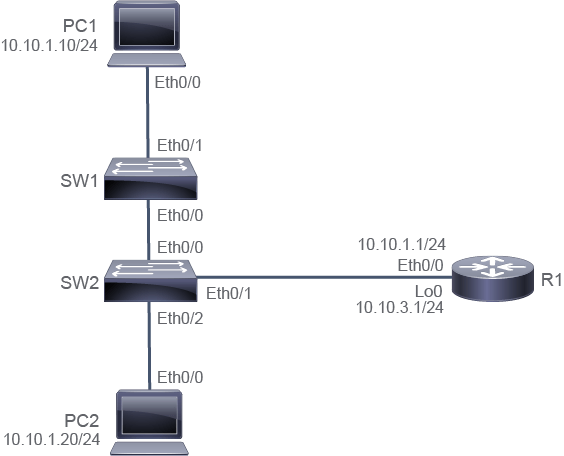
Job Aid
輔助資料
Device Information
裝置資訊
Device Information Table
裝置資訊表
Device 裝置 | Characteristic 特性 | Value 值 |
SW1 SW1 | Ethernet0/0 description Ethernet0/0 描述 | Link to SW2 連接至 SW2 |
SW1 SW1 | Ethernet0/1 description Ethernet0/1 描述 | Link to PC1 連接至 PC1 |
SW2 SW2 | Ethernet0/0 description Ethernet0/0 描述 | Link to SW1 連接至 SW1 |
SW2 SW2 | Ethernet0/1 description Ethernet0/1 描述 | Link to R1 連接至 R1 |
SW2 SW2 | Ethernet0/2 description Ethernet0/2 描述 | Link to PC2 連接至 PC2 |
R1 R1 | Ethernet0/0 description Ethernet0/0 描述 | Link to SW2 連接至 SW2 |
Task 1: Navigate Between EXEC Modes
任務 1:在 EXEC 模式之間切換
This activity will guide you through the commands that enable you to navigate between user EXEC and privileged EXEC operation modes of the Cisco IOS CLI. Also, it will show you the commands that can assist you when using the CLI.
本活動將帶領你操作可在 Cisco IOS CLI 的使用者執行模式與特權執行模式之間切換的指令。同時也會示範一些能在使用 CLI 時提供協助的指令。
Activity
活動
Access the console of SW2. Press Enter.
存取 SW2 的主控台。按下 Enter。
The greater-than symbol (>) at the end of the prompt is an indication that you are accessing the User EXEC Mode.
提示字元結尾的大於符號(>)表示你目前處於使用者執行模式。
SW2>Use the question mark (?) to view the list of commands that are available in user EXEC.
使用問號(?)檢視使用者執行模式下可用的指令清單。
When the display output pauses with the --More-- prompt, you can use the space bar to display the next page of the output.
當顯示畫面暫停並出現 --More-- 提示時,你可以按空白鍵來顯示下一頁的輸出內容。
The available commands you see when entering ? are for this particular version of Cisco IOS. Other versions may have some different commands.
輸入 ? 時你所看到的可用指令,是針對這個特定版本的 Cisco IOS。其他版本可能會有些許不同的指令。
SW2> ?
Exec commands:
  access-enable    Create a temporary Access-List entry
  access-profile   Apply user-profile to interface
  clear            Reset functions
  connect          Open a terminal connection
  crypto           Encryption related commands.
  disable          Turn off privileged commands
  <... output omitted ...>
  mtrace           Trace reverse multicast path from destination to source
  name-connection  Name an existing network connection
 --More-- bar>
  pad              Open a X.29 PAD connection
  ping             Send echo messages
  <... output omitted ...>
  where            List active connections
x3 Set X.3 parameters on PADAs you can see, when you are presented with the --More-- prompt, you can use the space bar to scroll through the output page by page.
如你所見,當出現 --More-- 提示時,你可以使用 空白 鍵逐頁捲動輸出內容。
You can also use the Enter key to scroll forward just one line. Another option is to cancel the remaining output. The method to cancel the remaining output depends on the device and operating system version. Sometimes, you need to press Ctrl-C, and sometimes you need to press Q. On SW2, you can press any key other than the space bar or the Enter key. Give it a try.
你也可以使用Enter 鍵一次只往前捲動一行。另一種選擇是取消剩餘的輸出內容。取消剩餘輸出的方式因裝置與作業系統版本而異。有時你需要按Ctrl-C,有時則需要按Q。在 SW2 上,你可以按下空白鍵或Enter 鍵以外的任何按鍵。試試看。
SW2> ?
Exec commands:
  access-enable    Create a temporary Access-List entry
  access-profile   Apply user-profile to interface
  clear            Reset functions
  connect          Open a terminal connection
  crypto           Encryption related commands.
  disable          Turn off privileged commands
  <... output omitted ...>
  mtrace           Trace reverse multicast path from destination to source
  name-connection  Name an existing network connection
--More--
  pad              Open a X.29 PAD connection
--More--
  ping             Send echo messages
--More--
SW2>
Entering EXEC Mode
進入 EXEC 模式
As a security feature, Cisco IOS Software separates EXEC sessions into the following two access levels:
作為一項安全機制,Cisco IOS 軟體將 EXEC 工作階段區分為以下兩種存取層級:
- User EXEC Mode allows you to execute only a limited number of basic monitoring commands. When in EXEC mode, the prompt ends with the greater than or right angle bracket (>) symbol. For example, when you are in EXEC mode on a device with the hostname DTW_Switch, the prompt would be DTW_Switch>.使用者執行模式只允許你執行數量有限的基本監控指令。在使用者執行模式下,提示字元結尾為大於或右角括號(>)符號。舉例來說,若裝置主機名稱為 DTW_Switch,在使用者執行模式下的提示字元會顯示為 DTW_Switch>。
- Privileged EXEC Modeallows you to execute all device commands, such as those that you would use for configuration and management. It can be password protected to allow only authorized users to access the device. When you are in Privileged EXEC Mode, the prompt ends with the octothorpe or pound sign (#). For example, when you are in privileged EXEC mode on a device with the hostname DTW_Switch, the prompt would look like DTW_Switch#. To change from the User EXEC Mode to the Privileged EXEC Mode, enter the
enablecommand at the hostname> prompt. To return to the User EXEC Mode, enter thedisablecommand at the hostname# prompt.特權執行模式允許你執行所有裝置指令,例如用於設定與管理的指令。此模式可以設定密碼保護,只允許經授權的使用者存取裝置。在特權執行模式下,提示字元結尾為井字號(#)。舉例來說,若裝置主機名稱為 DTW_Switch,在特權執行模式下的提示字元會顯示為 DTW_Switch#。若要從使用者執行模式切換到特權執行模式,請在 hostname> 提示字元下輸入enable指令。若要返回使用者執行模式,請在 hostname# 提示字元下輸入disable指令。
By default, no authentication is required to access the User EXEC Mode from the console. You can enter the User EXEC mode by simply pressing the Enter key. However, if access control (login authentication) is configured, you will be prompted to enter a username and a password before you can continue to the User EXEC Mode. It is a good practice to ensure that authentication is configured during the initial configuration.
根據預設,從主控台存取使用者執行模式不需要任何驗證。你只需按下Enter 鍵即可進入使用者執行模式。不過,若已設定存取控制(登入驗證),系統會先提示你輸入使用者名稱與密碼,才能繼續進入使用者執行模式。建議在初始設定時就設定好驗證,這是良好的做法。
Entering the question mark (?) in the Privileged EXEC Mode reveals many more command options compared to entering the question mark (?) command in the User EXEC Mode. This feature is referred to as context-sensitive help.
在特權執行模式下輸入問號(?),相較於在使用者執行模式下輸入問號(?)指令,會顯示更多的指令選項。這項功能稱為上下文相關說明。
User EXEC Mode Summary
使用者執行模式摘要
- User EXEC Mode provides limited insight into device status and configuration.使用者執行模式僅提供有限的裝置狀態與設定資訊。
- Because the User EXEC Mode offers only a limited number of basic monitoring commands, User EXEC Mode is sometimes referred to as view-only mode.由於使用者執行模式只提供數量有限的基本監控指令,因此有時也被稱為唯讀模式。
- This mode does not allow reloading of the device.此模式不允許重新載入裝置。
- Given its limited capabilities, this mode is useful for basic operations.由於功能有限,此模式適用於基本操作。
Privileged EXEC Mode Summary
特權執行模式摘要
- Privileged EXEC mode provides a detailed examination of a device and enables configuration and debugging.特權執行模式提供對裝置的詳細檢視,並可進行設定與偵錯。
- Privileged EXEC mode provides critical commands, such as commands related to configuration and management.特權執行模式提供關鍵指令,例如與設定和管理相關的指令。
- To change from the User EXEC Mode to the Privileged EXEC Mode, enter the
enablecommand at the hostname> prompt.若要從使用者執行模式切換到特權執行模式,請在 hostname> 提示字元下輸入enable指令。 - You can protect access to the Privileged EXEC Mode. If the enable password or the enable secret is configured, the CLI will prompt you to enter the configured password before allowing you to proceed.你可以保護特權執行模式的存取。若已設定 enable password 或 enable secret,CLI 會提示你輸入設定的密碼後才允許繼續。
- When the correct password is entered, the device prompt changes to hostname#.輸入正確密碼後,裝置提示字元會變為 hostname#。
- To return to the User EXEC Mode, enter the
disablecommand at the hostname# prompt.若要返回使用者執行模式,請在 hostname# 提示字元下輸入disable指令。
Use the enablecommand to access the Privileged EXEC Mode.
使用 enable指令進入特權執行模式。
The last character in the prompt has changed to the octothorpe or pound sign (#). This symbol indicates that you are in the Privileged EXEC Mode.
提示字元的最後一個字元已變為井字號(#)。此符號表示你目前處於特權執行模式。
SW2> enable
SW2#Use the ? command again to display the list of commands that are available to you under the Privileged EXEC Mode. Use the space bar to scroll through the entire list of the output.
再次使用 ? 指令,顯示特權執行模式下可用的指令清單。使用 空白 鍵捲動檢視完整的輸出清單。
SW2# ?
Exec commands:
  access-enable    Create a temporary Access-List entry
  access-profile   Apply user-profile to interface
  access-template  Create a temporary Access-List entry
  archive          manage archive files
  beep             Blocks Extensible Exchange Protocol commands
  calendar         Manage the hardware calendar
  cd               Change current directory
  clear            Reset functions
  clock            Manage the system clock
  cns              CNS agents
 configure        Enter configuration mode
  connect          Open a terminal connection
  <... output omitted ...>
  enable           Turn on privileged commands
  eou              EAPoUDP
--More--
  erase            Erase a filesystem
<... output omitted ...>Use the disable command to return to the User EXEC Mode.
使用 disable 指令返回使用者執行模式。
SW2# disable
SW2>EXEC Modes
EXEC 模式
Task 2: Explore CLI Help
任務 2:探索 CLI 說明
This session will guide you through using the question mark (?) command, which is the command-listing feature of the Cisco IOS CLI. It will also demonstrate how you can take advantage of the tab completion feature of the Cisco IOS CLI. The lab is prepared with the devices represented in the topology, but for this task, you will only use the SW2. You will also examine CLI error messages.
本節將帶領你使用問號(?)指令,這是 Cisco IOS CLI 的指令列表功能。同時也會示範如何運用 Cisco IOS CLI 的Tab 補齊功能。本實驗已備妥拓樸中所呈現的所有裝置,但在本任務中,你只會用到 SW2。你也將檢視 CLI 錯誤訊息。
Activity
活動
On SW2, use the enable command to access the Privileged EXEC Mode.
在 SW2 上,使用 enable 指令進入特權執行模式。
SW2> enable
SW2#Use the question mark (?) to display all commands that are available under the Privileged EXEC Mode.
使用問號(?)顯示特權執行模式下所有可用的指令。
Use the space bar to scroll through the entire list of the output.
使用空白鍵捲動檢視完整的輸出清單。
SW2# ?
Exec commands:
  access-enable    Create a temporary Access-List entry
  access-profile   Apply user-profile to interface
  access-template  Create a temporary Access-List entry
  archive          manage archive files
  beep             Blocks Extensible Exchange Protocol commands
  calendar         Manage the hardware calendar
  cd               Change current directory
  clear            Reset functions
  clock            Manage the system clock
  cns              CNS agents
  configure        Enter configuration mode
  connect          Open a terminal connection
  <... output omitted ...>
  enable           Turn on privileged commands
  eou              EAPoUDP
--More--   bar>
<... output omitted ...>CLI Help
CLI 說明
When you get to know a new program or interface, you usually take advantage of the program's help features. Cisco IOS Software includes extensive command-line help functions, including context-sensitive help. There are two basic types of CLI help features that the Cisco IOS devices provide: context-sensitive help and error message notification. Context-sensitive help offers assistance when you are trying to determine the proper command and syntax. To access it, use the question mark (?) command. For example, you know that the command you would like to use starts with the letters sh, but you are not sure what follows. Enter sh? and the CLI will list all commands that start with sh and that are available in the current operation mode. You can also use the context-sensitive help to figure out the complete syntax for a command.
當你認識一個新程式或介面時,通常會善用該程式的說明功能。Cisco IOS 軟體提供豐富的命令列說明功能,包括上下文相關說明。Cisco IOS 裝置提供兩種基本的 CLI 說明功能:上下文相關說明與錯誤訊息通知。上下文相關說明可在你試圖判斷正確指令與語法時提供協助。要使用它,請輸入問號(?)指令。舉例來說,假設你知道想使用的指令是以字母 sh 開頭,但不確定後面接什麼。輸入 sh?,CLI 就會列出目前操作模式下所有以 sh 開頭且可用的指令。你也可以利用上下文相關說明來判斷某個指令的完整語法。
Another feature of the context-sensitive help is listing all available commands for the current CLI mode. The listing can be used when you are unsure of the name of a command or you want to see if Cisco IOS Software supports a particular command in a particular mode. To use context-sensitive help in this way, enter the question mark (?) at any prompt.
上下文相關說明的另一項功能,是列出目前 CLI 模式下所有可用的指令。當你不確定某個指令名稱,或想確認 Cisco IOS 軟體在特定模式下是否支援某個指令時,可以使用這項列表功能。要以這種方式使用上下文相關說明,只需在任何提示字元下輸入問號(?)。
The second type of CLI help feature is the error message notification. When you enter a command in the CLI, before executing it, its syntax is checked. If the command syntax is not correct, you will be notified of an error that reads, "Invalid input detected at '^' marker." In addition to the text message, the caret symbol (^) will display under the command you typed in, exactly below the place in the command at which the first error is detected. Basically, Cisco IOS Software is saying, "I understood what you typed up to this point."
第二種 CLI 說明功能是錯誤訊息通知。當你在 CLI 中輸入指令後,系統會在執行前先檢查其語法。若指令語法不正確,你會收到錯誤通知,內容為「Invalid input detected at '^' marker.」。除了文字訊息外,插入符號(^)還會顯示在你所輸入指令的下方,精確標示出第一個偵測到錯誤之處的正下方位置。基本上,Cisco IOS 軟體是在說:「我理解你輸入的內容,一直到這個位置為止。」
You may also receive an error message about an ambiguous command. This type of error occurs when you type in the abbreviated version of the command, but the abbreviation matches multiple commands. In Cisco IOS Software, when you type enough letters to match exactly one command, you may press the Enter key, without completing the command. Because there is no other command that starts with these letters, Cisco IOS Software will know exactly which command you had in mind and will execute the command. For example, there are multiple commands that start with the letter "c," but only one command that begins with "clo." If you press Enter after entering only c, you receive an "ambiguous command" error message. On the other hand, if you enter clo and press Enter, you do not receive a message that the command is ambiguous because there is only the clock command that starts with "clo." Although, you would receive an "Incomplete command" error message because the clock does not complete the command. The "Incomplete command" message indicates that you did not enter all elements required by the command syntax and that Cisco IOS Software does not have enough information to interpret what you were requesting.
你也可能收到關於模糊指令的錯誤訊息。當你輸入指令的縮寫版本,但該縮寫同時符合多個指令時,就會發生這類錯誤。在 Cisco IOS 軟體中,當你輸入足夠的字母以唯一對應到一個指令時,即可按下Enter 鍵,而不必輸入完整指令。由於沒有其他指令以這些字母開頭,Cisco IOS 軟體就能準確判斷你所指的是哪個指令並加以執行。舉例來說,有多個指令以字母「c」開頭,但只有一個指令以「clo」開頭。如果你只輸入 c 後就按下Enter,會收到「ambiguous command」(模糊指令)錯誤訊息。反之,若你輸入 clo 後按下Enter,則不會收到模糊指令的訊息,因為只有 clock 這個指令以「clo」開頭。不過,你會收到「Incomplete command」(不完整指令)錯誤訊息,因為單靠 clock 並不能構成完整指令。「Incomplete command」訊息表示你尚未輸入該指令語法所要求的全部元素,Cisco IOS 軟體沒有足夠資訊來解讀你的要求。
Type of CLI Help CLI 說明類型 | Description 說明 |
Context-sensitive help 上下文相關說明 | Provides a list of commands or the arguments that are associated with a specific command. 提供與特定指令相關的指令清單或引數。 |
Error notification message 錯誤通知訊息 | Identifies problems with commands that you have entered so that you can alter or correct them. 找出你所輸入指令的問題,讓你能加以修改或更正。 |
How to use context-sensitive help
如何使用上下文相關說明
- Command Words Help指令關鍵字說明
- To get help with command words, enter the sequence of characters that you know and follow it immediately by a question mark. Make sure not to include any spaces before the question mark. The Cisco IOS CLI displays a list of commands starting with the characters that you entered. For example, enter
s?to get a list of commands that start with the letter s.若要取得指令關鍵字的說明,請輸入你已知的字元序列,並緊接著輸入問號,注意問號前不要有任何空格。Cisco IOS CLI 會顯示所有以你輸入的字元開頭的指令清單。舉例來說,輸入s?即可取得所有以字母 s 開頭的指令清單。
- Command Syntax Help指令語法說明
- To get help with command syntax, enter a question mark after the command word or words, where you would otherwise enter another keyword or an argument. Include a space before the question mark. For example, enter
show ?to get a list of the command options and syntax for theshowcommand. The Cisco IOS CLI displays a list of available command options. characters might appear in the list. They stand for carriage return and indicate that you should press Enter. You can access command syntax help after any word or command option to help you complete the command.若要取得指令語法的說明,請在指令字詞之後(也就是原本要輸入其他關鍵字或引數的位置)輸入問號。問號前要加一個空格。舉例來說,輸入show ?即可取得show指令的選項與語法清單。Cisco IOS CLI 會顯示可用指令選項的清單。清單中可能會出現一些字元,代表換行(carriage return),表示你應按下Enter。你可以在任何字詞或指令選項之後使用指令語法說明,協助你完成該指令。
List only the commands that start with the letter "s" by entering s? at the line prompt.
在提示字元下輸入 s? ,只列出以字母「s」開頭的指令。
SW2# s?
*s=show
sdlc        send    set        setup
show        slip    spec-file  ssh
start-chat  systat
The output shows (look at the *s = show in the first line of the output) that there is an exception to the normal command parsing rules. The CLI will interpret the letter "s" all by itself as "show," although more than one command starts with the letter "s." This feature is specific to the device and the operating system version. While it will work on SW2 in this lab, it may not work on all devices. Abbreviating "show" with the characters "sh" will be useful on more Cisco IOS devices.
輸出結果顯示(請看輸出第一行的 *s = show)指令剖析的一般規則有一項例外。CLI 會單獨把字母「s」解讀為「show」,即使有不只一個指令是以字母「s」開頭。此功能因裝置與作業系統版本而異。雖然在本實驗的 SW2 上可以運作,但不見得適用於所有裝置。使用「sh」這幾個字元來縮寫「show」,在較多 Cisco IOS 裝置上都能通用。
Try out the Tab completion feature.
試試 Tab 補齊功能。
Like command abbreviation, Tab completion works as long as you have entered enough characters to remove ambiguity. Type sh and then press the Tab key. Next, use the backspace to erase the resulting command.
與指令縮寫相同,只要你輸入的字元足以消除模糊性,Tab 補齊就能運作。輸入 sh,然後按Tab 鍵。接著,使用倒退鍵清除結果指令。
The CLI parser expands the unambiguous abbreviation into the full command.
CLI 剖析器會將沒有歧義的縮寫展開為完整指令。
SW2# sh
SW2# showYou may find the Tab completion helpful because it prevents you from repeating the attempts to use commands that are ambiguously abbreviated. The Tab completion is especially useful when you are writing long commands using abbreviations.
你會發現 Tab 補齊很有幫助,因為它能避免你反覆嘗試使用模糊縮寫的指令。當你以縮寫方式輸入較長的指令時,Tab 補齊格外實用。
If there are multiple matches for the abbreviation you entered, the Tab completion will not work. If you are not sure why you can always use the question mark assistance (?) to determine why your entry is ambiguous. To try this on your own, abbreviate the configure command by entering the letters "con" and press the Tab key.
如果你輸入的縮寫有多個相符項目,Tab 補齊就無法運作。若你不確定原因,隨時可以使用問號說明(?)來判斷你輸入的內容為何模糊。試著自己動手:輸入字母「con」來縮寫 configure 指令,然後按Tab 鍵。
When you used the Tab to complete the command abbreviation "con," it did not work. The command parser simply redisplayed "con." Using the question mark (?) at this point shows that there are two commands that begin with "con." To be unambiguous, you must use at least "conf" as your abbreviation for configure.
當你用 Tab 補齊指令縮寫「con」時,並沒有成功。指令解析器只是再次顯示「con」。此時使用問號(?)可以看到有兩個指令以「con」開頭。為了避免歧義,configure 的縮寫至少必須寫成「conf」。
SW2# con
SW2# con?
configure  connect
SW2# conYou will not proceed to the Global Configuration Mode during this session. Use the Backspace key to delete the "con" letters.
在本節中你不會進入全域設定模式。使用 Backspace 鍵刪除「con」這幾個字母。
You have just demonstrated that the question mark (?) and the Tab completion work for commands.
你剛才已示範問號(?)與 Tab 補齊功能都適用於指令。
The question mark (?) and the Tab completion are also helpful when you want to display the arguments requested by the syntax. For example, if you wish to display all arguments that you can or should use with the show command, use the question mark (?) after the word show. Be careful to separate the question mark with a space.
問號(?)與Tab 補齊,在你想顯示語法所要求的引數時同樣很有幫助。舉例來說,若你想顯示 show 指令可用或應該搭配使用的所有引數,可在 show 這個字之後輸入問號(?)。請注意在問號前要加一個空格。
SW2# show ?
  aaa                Show AAA values
  access-expression  List access expression
  <... output omitted ...>
--More" bar> <... output omitted ...>As with commands, you can combine explicit characters followed by the question mark to display a subset of the argument options.
如同指令一樣,你也可以結合明確字元與問號,來顯示引數選項的子集合。
For example, use show r? to display all show command options that start with the letter "r."
舉例來說,使用 show r? 即可顯示所有以字母「r」開頭的 show 指令選項。
SW2# show r?
radius     region     registry        reload
resource   rhosts     rib             rif
route-map route-tag running-config Experiment with the command abbreviation and Tab completion until you feel comfortable using them.
練習使用指令縮寫與 Tab 補齊,直到你能熟練運用為止。
You can look at the example of abbreviating the command and using Tab to determine the arguments for the show running-config command. Feel free to experiment independently.
你可以參考範例,練習縮寫指令並使用 Tab 來判斷 show running-config 指令的引數。歡迎自行嘗試練習。
SW2# sh
SW2# show run
SW2# show running-config
Building configuration...

Current configuration : 885 bytes
!
version 15.1
service timestamps debug datetime msec
service timestamps log datetime msec
no service password-encryption
service compress-config
<... output omitted ...>CLI Error Messages
CLI 錯誤訊息
The following is an overview of CLI error messages and their interpretations. If you access the SW1 console and use the enable command to access the Privileged EXEC Mode, you can try the following examples as you go along.
以下是 CLI 錯誤訊息及其解讀方式的概覽。如果你存取 SW1 主控台並使用 enable 指令進入特權執行模式,就可以照著以下範例逐步嘗試。
You did not enter enough characters.
你輸入的字元不夠多。
SW1# c
% Ambiguous command:'c'
Required arguments or keywords were omitted at the end of the command.
指令結尾缺少必要的引數或關鍵字。
SW1# clock set
% Incomplete command
SW1# clock set 19:50:00
% Incomplete command
The caret (^) indicates the first element in the command CLI cannot interpret.
插入符號(^)標示出 CLI 無法解讀的指令中的第一個元素。
SW1# clock set 19:50:00 25 6
                           ^
% Invalid input detected at "^" marker
Use the ? command to follow the correct syntax and set the system clock.
使用 ? 指令依循正確語法,並設定系統時鐘。
SW1# clock set 19:50:00 25 6 ?
% Unrecognized command
SW1# clock set 19:50:00 25 Jun
% Incomplete command.

SW1# clock set 19:50:00 25 Jun ?
  <1993-2035>  Year

SW1# clock set 19:50:00 25 Jun 2019 ?
SW1# clock set 19:50:00 25 Jun 2019
SW1#
*Jun 25 19:50:00.000: %SYS-6-CLOCKUPDATE: System clock has been updated from 04:33:42 PST Wed Oct 7 2015 to 19:50:00 PST Tue Jun 25 2019, configured from console by console.The three types of console error messages are:
主控台錯誤訊息共有以下三種類型:
- Ambiguous command模糊指令(Ambiguous command)
- Incomplete command不完整指令(Incomplete command)
- Incorrect command錯誤指令(Incorrect command)
Error Message 錯誤訊息 | Meaning 意義 | How to Get Help 如何取得說明 |
% Ambiguous command % Ambiguous command | You did not enter enough characters for your device to uniquely recognize the command. 你輸入的字元不足以讓裝置唯一辨識該指令。 | Repeat the entry, followed by the question mark ? Make sure there are no spaces. The CLI displays possible keywords that you can enter with the command.重新輸入該內容,並在後面加上問號 ?,注意不要有空格。CLI 會顯示可搭配該指令使用的可能關鍵字。 |
% Incomplete command % Incomplete command | You did not enter all keywords or values that are required by this command. 你尚未輸入該指令所需的全部關鍵字或值。 | Repeat the entry, followed by a space and the question mark ?.重新輸入該內容,並在後面加上一個空格與問號 ?。 |
% Invalid input detected at "^" marker % Invalid input detected at "^" marker | You entered the command incorrectly. The ^ marks the first element with the error. 你輸入的指令有誤。^ 標示出出現錯誤的第一個元素。 | Enter the question mark ? to display all commands or command options that you can use.輸入問號 ?,即可顯示所有可用的指令或指令選項。 |
You can use context-sensitive help to determine the syntax of a particular command. For example, if the device clock needs to be set, but you are unsure of the clock command syntax, the context-sensitive help provides a means to check the syntax.
你可以使用上下文相關說明來判斷特定指令的語法。舉例來說,若需要設定裝置時鐘,但不確定 clock 指令的語法,上下文相關說明就能提供檢查語法的方式。
Context-sensitive help supplies the entire command even if you enter just the first characters of the command, such as cl?.
即使你只輸入指令的前幾個字元,例如 cl?,上下文相關說明也會顯示完整的指令。
If you enter the command clock but an error message is displayed, indicating that the command is incomplete, enter the ? command (preceded by a space) to determine which arguments are required for the command. In the clock ? example, the help output shows that the keyword set is required after clock.
如果你輸入 clock 指令,卻出現錯誤訊息,指出指令不完整,請輸入 ? 指令(前面加一個空格),以判斷該指令需要哪些引數。在 clock ? 範例中,說明輸出顯示 clock 之後需要 set 這個關鍵字。
If you enter the command clock set but another error message appears, indicating that the command is still incomplete, press the Up Arrow key to repeat the command entry. Then add a space and enter the question mark (?) to display a list of arguments that you can use for the command.
如果你輸入指令 clock set,卻出現另一則錯誤訊息,指出指令仍不完整,請按上方向鍵以重新叫出該指令。接著加一個空格並輸入問號(?),即可顯示可搭配該指令使用的引數清單。
After the last command recall, the example shows that the administrator used the ? to reveal additional arguments, which involve entering the current time using the correct format for the day, month, and year.
在上次叫出指令後,範例顯示管理員使用了 ? 來顯示更多引數,這些引數需要以正確格式輸入當前日、月、年的時間。
The example continues to illustrate how to set the device clock.
範例接著示範如何設定裝置時鐘。
If after entering the current time you still see the Cisco IOS Software error message indicating that the command that you have entered is incomplete, recall the command, add a space, and enter the ? command to display a list of arguments that are available. In this example, enter the day, month, and year using the correct format. Then press Enter to execute the command.
如果輸入目前時間後,仍看到 Cisco IOS 軟體顯示指令不完整的錯誤訊息,請叫出該指令,加一個空格,並輸入 ? 指令以顯示可用的引數清單。在此範例中,請以正確格式輸入日、月、年,然後按Enter 執行該指令。
Syntax checking uses the caret symbol (^) as an error-location indicator. It appears at the command string where the user has first entered an incorrect command, keyword, or argument. The error-location indicator and interactive help system provide a way to find and correct syntax errors easily. In the clock example, the caret symbol indicates that the month was entered incorrectly as a number. The parser is expecting the month to be spelled out.
語法檢查使用插入符號(^)作為錯誤位置指標。它會出現在指令字串中使用者第一次輸入錯誤指令、關鍵字或引數的位置。錯誤位置指標與互動式說明系統提供了一種能輕鬆找出並修正語法錯誤的方式。在 clock 範例中,插入符號指出「月」被誤輸入為數字。剖析器預期「月」應以英文拼寫方式輸入。
Task 3: Manage Cisco IOS Configuration
任務 3:管理 Cisco IOS 設定
Now you will examine the startup and running configurations of a Cisco IOS device. The lab is prepared with the devices that are represented in the topology, but for this task, you will only use SW2. In the end, you will erase the configuration of SW2. The lab system will be correctly configured the next time you initialize the lab.
現在你將檢視 Cisco IOS 裝置的啟動設定與執行中設定。本實驗已備妥拓樸中所呈現的裝置,但在本任務中,你只會用到 SW2。最後,你會清除 SW2 的設定。下次重新初始化實驗時,實驗系統會恢復正確的設定。
When you first access a device for the first time, the prompt includes the hostname that is already configured on the device. You will modify the hostname configuration parameter on the switch as you experiment with the startup and running configurations.
當你第一次存取裝置時,提示字元會顯示裝置上已設定好的主機名稱。在你嘗試操作啟動設定與執行中設定的過程中,你將修改交換器上的主機名稱設定參數。
Activity
活動
On SW2, enter the Global Configuration Mode and change the hostname of the switch to "Temp" and then return to the Privileged EXEC Mode. To change the device hostname, use the hostname device-name command. Try using the Tab completion with the hostname command and note the result. Then, exit the configuration mode by using the end command.
在 SW2 上進入全域設定模式,把交換器的主機名稱改為「Temp」,然後回到特權執行模式。要變更裝置主機名稱,請使用 hostname device-name 指令。試著在 hostname 指令上使用 Tab 補齊,並觀察結果。接著使用 end 指令離開設定模式。
Immediately after you change the hostname on the switch, the system prompt reflects the new name.
你一變更交換器上的主機名稱,系統提示字元就會立即反映出新的名稱。
SW2# configure terminal
Enter configuration commands, one per line.  End with CNTL/Z.
SW2(config)# hostname Temp
Temp(config)# end
Temp#
By changing the hostname, you have modified the running configuration of the switch. The startup configuration has not changed.
透過變更主機名稱,你已修改了交換器的執行中設定。啟動設定並未改變。
Tab completion was available for the show commands but not for the hostname command. The hostname command takes as the argument a freeform variable. In other words, what follows after the hostname word, can be almost anything. There is no way for the Cisco IOS parser to guess what you wish this string to be.
Tab 補齊在 show 指令上可用,但在 hostname 指令上則不可用。hostname 指令所接受的引數是一個自由格式的變數。換句話說,接在 hostname 這個字之後的內容,幾乎可以是任何字串,Cisco IOS 剖析器無法猜出你想要輸入的字串內容。
Examine what is configured in the running configuration, but use the include filter to show only the lines that include the string "hostname." The filtering commands of the CLI are introduced after you type in the command by typing the pipe character |. The pipe character separates the main command from the filtering specification. The filtering criteria are specified by choosing a filtering parameter and a filtering expression. The filtering syntax will be described in more detail later, and in this task, you will explore the usage of the include filtering option. The include filtering parameter displays only those lines of the output that contain the specified filtering expression.
檢視執行中設定的內容,但使用 include 過濾器只顯示包含字串「hostname」的行。CLI 的過濾指令是在輸入完指令後,接著輸入管線字元 | 來加入。管線字元將主指令與過濾規格分開。過濾條件由過濾參數與過濾表達式組成。過濾語法稍後會有更詳細的說明;在本任務中,你將練習 include 過濾選項的用法。include 過濾參數只顯示輸出中包含指定過濾表達式的行。
Insisting on the usage of the Tab completion and the question mark contextual help intends to remind you that these options are always available to you. They will not be demonstrated any further in this task, but feel free to take advantage of them at any time.
反覆要求使用 Tab 補齊與問號上下文相關說明,是為了提醒你這些功能隨時可用。本任務後續不會再特別示範,但你可以隨時多加利用。
Temp# sh
Temp# show r?
radius     region     registry        reload
resource   rhosts     rib             rif
route-map  route-tag  running-config

Temp# show run
Temp# show running-config | inc
Temp# show running-config | include hostname
hostname Temp
Only one line in the running configuration includes the string "hostname" and it is the hostname command that sets the name of the device to "Temp."
執行中設定裡只有一行包含字串「hostname」,正是那條將裝置名稱設為「Temp」的 hostname 指令。
Managing Cisco IOS Configuration
管理 Cisco IOS 設定
When a switch or a router starts, it looks for a configuration file in the NVRAM of the device. NVRAM is the memory component in the device hardware that retains stored information (for example, it is nonvolatile) even after the device is powered down. The configuration file that is stored in the NVRAM is called the startup-config file. If there is no startup-config file in NVRAM, which is the case when you buy new equipment, the router or switch enters the setup utility and loads a default configuration. The setup utility also prompts you for specific configuration information to create a basic configuration for the device. You can also interrupt the setup utility and start configuring the device manually on your own.
交換器或路由器啟動時,會在裝置的 NVRAM 中尋找設定檔。NVRAM 是裝置硬體中的一個記憶體元件,即使裝置斷電後(也就是非揮發性),仍會保留所儲存的資訊。儲存在 NVRAM 中的設定檔稱為啟動設定(startup-config)檔。若 NVRAM 中沒有啟動設定檔案,例如購買全新設備時,路由器或交換器就會進入設定精靈,並載入預設設定。設定精靈也會提示你輸入特定的設定資訊,以便為裝置建立基本設定。你也可以中斷設定精靈,自行手動開始設定裝置。
Once the device has started, the system copies the startup configuration to RAM. The configuration file in RAM is called the running-config file. As you make configuration changes, the system stores them in the running configuration. It is important to understand that RAM does not retain stored information when the device is powered off or rebooted. If a change is made to the running configuration, it should be copied to the nonvolatile memory to be retained after a reboot. One way you can do that is to use the copy running-config startup-config command to store the changes in the startup-config file in the NVRAM.
裝置啟動後,系統會將啟動設定複製到 RAM。RAM 中的設定檔稱為執行中設定(running-config)檔。當你進行設定變更時,系統會將這些變更儲存到執行中設定裡。務必了解,裝置斷電或重新開機時,RAM 並不會保留所儲存的資訊。若你對執行中設定做了變更,就應將其複製到非揮發性記憶體,才能在重新開機後保留下來。其中一種方式,是使用 copy running-config startup-config 指令,將變更儲存到 NVRAM 中的啟動設定檔案。
In addition to NVRAM and RAM, Cisco devices have a ROM and flash memory. ROM is a form of permanent storage. This type of memory contains a microcode for basic functions to start and maintain the router. ROM is nonvolatile, so it maintains the memory contents even when the power is turned off.
除了 NVRAM 與 RAM 之外,Cisco 裝置還具有 ROM 與快閃記憶體。ROM 是一種永久儲存裝置。這類記憶體包含用於啟動與維護路由器基本功能的微碼。ROM 是非揮發性的,因此即使斷電,仍會保留記憶體內容。
ROM contains:
ROM 內含:
- The bootstrap code, which is used to bring up the router during initialization啟動程式碼(bootstrap code),用於在初始化期間啟動路由器
- Power on self-test (POST) microcode, which is used to test the basic functionality of the router hardware and determine which components are present開機自我測試(POST)微碼,用於測試路由器硬體的基本功能,並判斷有哪些元件存在
- ROM monitor includes a low-level operating system that is normally used for manufacturing, testing, troubleshooting, and password recovery. In ROM monitor mode, the router has no routing or IP capabilities.ROM 監控器包含一套低階作業系統,通常用於製造、測試、疑難排解與密碼救援。在 ROM 監控模式下,路由器不具備路由或 IP 功能。
Flash memory is similar to a hard drive in that the information that the system stores there is retained even when the device is powered off. Cisco IOS Software is stored in flash memory. Flash memory may also store backup configuration files and additional device-related files.
快閃記憶體類似硬碟,系統儲存於其中的資訊即使裝置斷電也會保留。Cisco IOS 軟體就儲存在快閃記憶體中。快閃記憶體也可能儲存備份設定檔以及其他與裝置相關的檔案。
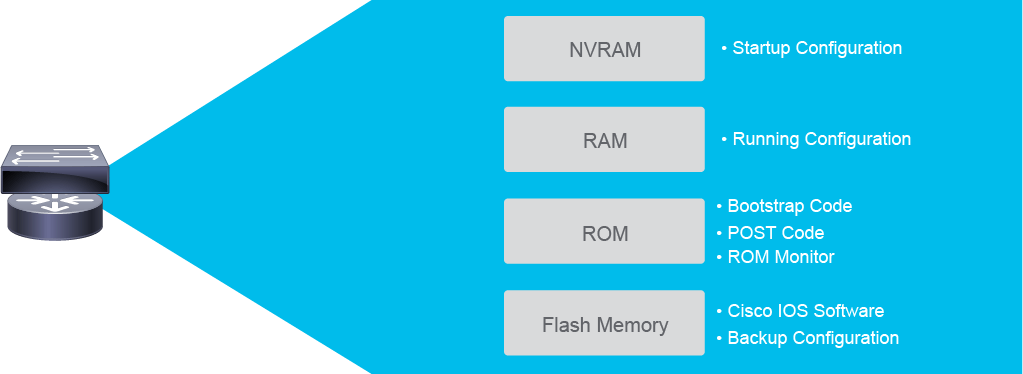
To view the configuration files, use the show command, followed by the name of the file that stores the configuration. For example, if you want to view the running configuration, type show running-config. Remember, running-config is the name of the file that stores the running configuration. For the device to retain the running configuration, store it to NVRAM. You can replace the startup-config file that already resides in NVRAM with the running configuration. Use the copy command, followed by the names of the source and destination files. The complete command is copy running-config startup-config. Review the table for additional commonly used Cisco IOS commands.
若要檢視設定檔案,可使用 show 指令,後面接上儲存該設定的檔案名稱。舉例來說,若要檢視執行中設定,輸入 show running-config。請記住,running-config 是儲存執行中設定的檔案名稱。若要讓裝置保留執行中設定,需將其儲存到 NVRAM。你可以用執行中設定取代已存在於 NVRAM 中的啟動設定檔。使用 copy 指令,後面接上來源與目的檔案的名稱。完整指令為 copy running-config startup-config。請參閱下表以了解其他常用的 Cisco IOS 指令。
Common Cisco IOS Management
常見的 Cisco IOS 管理指令
Command 指令 | Function 功能 |
show running-configshow running-config | Displays the current running configuration. You can also use filters. For example, you can use the show running-config interface GigabitEthernet0/1command to display only the interface GigabitEthernet0/1 running configuration.顯示目前的執行中設定。你也可以搭配使用篩選器,例如使用 show running-config interface GigabitEthernet0/1指令,只顯示 GigabitEthernet0/1 介面的執行中設定。 |
show startup-configshow startup-config | Displays the startup configuration stored in NVRAM. 顯示儲存在 NVRAM 中的啟動設定。 |
configure terminalconfigure terminal | Enters the Global Configuration Mode, where you can interactively change the configuration in RAM (the running-config), using console or remote terminal access. 進入全域設定模式,你可以透過主控台或遠端終端機存取,以互動方式變更 RAM 中的設定(執行中設定)。 |
copy running-config startup-configcopy running-config startup-config | Saves the running configuration to startup-config file in NVRAM. 將執行中設定儲存到 NVRAM 中的啟動設定檔。 |
copy startup-config running-configcopy startup-config running-config | Startup configuration from NVRAM is merged into the running configuration. 將 NVRAM 中的啟動設定併入執行中設定。 |
erase startup-configerase startup-config | Deletes the saved startup-config file in NVRAM. 刪除儲存在 NVRAM 中的啟動設定檔。 |
You can also use the copy command to copy configuration files and Cisco IOS Software files from a switch or a router to other network locations, such as a server and vice versa, using FTP, Secure Copy Protocol (SCP), HTTP, TFTP, and other protocols.
你也可以使用 copy 指令,透過 FTP、安全複製通訊協定(SCP)、HTTP、TFTP 等通訊協定,將設定檔與 Cisco IOS 軟體檔案從交換器或路由器複製到其他網路位置(例如伺服器),反之亦然。
For example, in the copy running-config tftp: command, the system copies the running configuration in RAM to a TFTP server. To remember the copy command syntax, you might find the mnemonic copy from to useful. To complete copying, you must supply additional network information about the TFTP server—namely, its IP address or name. You must also specify the name of the destination file to which you are copying. During the copying process, a series of exclamation marks show the progress of the upload.
舉例來說,在 copy running-config tftp: 指令中,系統會將 RAM 中的執行中設定複製到 TFTP 伺服器。要記住 copy 指令的語法,你可以善用 copy from to(從……複製到……)這個記憶口訣。要完成複製,你必須提供 TFTP 伺服器的其他網路資訊,也就是其 IP 位址或名稱。你還必須指定要複製到的目的檔案名稱。複製過程中,一連串的驚嘆號會顯示上傳的進度。
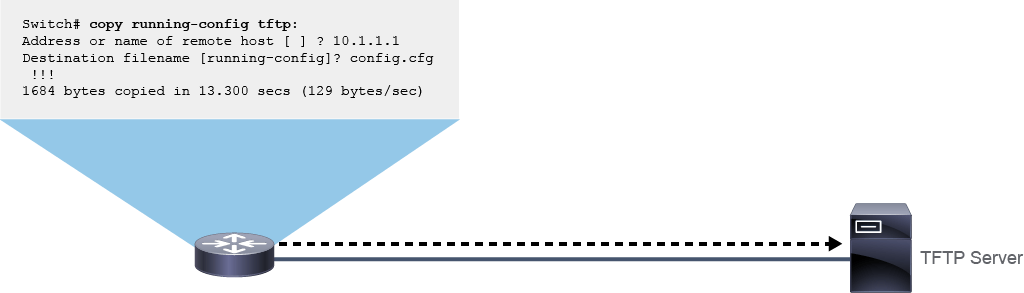
Copying configuration files from a switch or a router to a server are useful for backing up the configuration files and for centralizing the file management.
將設定檔從交換器或路由器複製到伺服器,有助於備份設定檔並集中管理檔案。
Copying configuration files from an external server to the running configuration in RAM or to the startup configuration file in NVRAM of the router or switch is useful for restoring backups.
將設定檔從外部伺服器複製到路由器或交換器 RAM 中的執行中設定,或 NVRAM 中的啟動設定檔案,對於還原備份很有幫助。
To create a device configuration backup, you should copy the configuration files to another device, such as a dedicated server.
若要建立裝置設定備份,應將設定檔複製到另一台裝置,例如專用的伺服器。
When you copy a configuration into RAM, regardless of the source, the copied configuration merges with the existing configuration in RAM. It does not overwrite it. New parameters are added, and changes to existing parameters overwrite the old ones. Configuration parameters in RAM for which there is no corresponding parameter in the source file remain unaffected.
當你將設定複製到 RAM 中時,無論來源為何,複製進來的設定都會與 RAM 中既有的設定合併,而不會覆蓋整份設定。新的參數會被新增,而既有參數的變更會覆蓋舊值。至於 RAM 中那些在來源檔案裡沒有對應參數的設定,則不受影響。
Display the startup configuration filtered using the include filter to show only the lines that include the string "hostname."
使用 include 篩選器,顯示已篩選的啟動設定,只列出包含字串「hostname」的行。
When you make changes to the running configuration, it does not affect the startup configuration. The startup configuration still has the hostname SW2.
當你對執行中設定做出變更時,並不會影響啟動設定。啟動設定的主機名稱仍是 SW2。
Temp# show startup-config | include hostnamehostname SW2Use the reload command to reboot the switch. This action will cause the switch to lose the running configuration and load the startup configuration at the restart.
使用 reload 指令重新開機交換器。此動作會使交換器遺失執行中設定,並在重新啟動時載入啟動設定。
Answer No if you are asked to save the modified configuration. The goal is to demonstrate how to return to the old configuration. If you save the modified configuration, the system will overwrite the old startup configuration.
若系統詢問是否要儲存已修改的設定,請回答No。這是為了示範如何回復到舊的設定。若你儲存了已修改的設定,系統就會覆蓋舊的啟動設定。
After the reload, the hostname has returned to SW2, as you can see from the prompt.
重新載入後,如提示字元所示,主機名稱已恢復為 SW2。
Temp# reload

System configuration has been modified. Save? [yes/no]: no
Proceed with reload? [confirm]
<... output omitted ...>
Press RETURN to get started!
<... output omitted ...>
SW2>
To save the changes made to the running configuration, you have to copy the running configuration over the startup configuration.
若要儲存對執行中設定所做的變更,你必須將執行中設定複製並覆蓋到啟動設定上。
Change the hostname one more time.
再次變更主機名稱。
This time, set the hostname to "ThisWillStick."
這次,將主機名稱設為「ThisWillStick」。
On SW2, enter the following commands:
在 SW2 上輸入以下指令:
SW2> enable
SW2# configure terminal
Enter configuration commands, one per line.  End with CNTL/Z.
SW2(config)# hostname ThisWillStick
ThisWillStick(config)# end
ThisWillStick#Copy the running configuration over the startup configuration.
將執行中設定複製並覆蓋到啟動設定上。
On ThisWillStick, enter the following commands:
在 ThisWillStick 上輸入以下指令:
ThisWillStick# copy running-config startup-config
Destination filename [startup-config]?
Building configuration...
Compressed configuration from 936 bytes to 641 bytes[OK]
ThisWillStick#
After this copy operation, the changed hostname is saved in the startup configuration and will now "survive" the reload event.
完成這項複製作業後,變更後的主機名稱就會儲存在啟動設定中,並在重新載入後「保留下來」。
Use the reload command again, and verify that the new hostname endures the reboot.
再次使用 reload 指令,並確認新的主機名稱在重新開機後仍然保留。
On ThisWillStick, enter the following commands:
在 ThisWillStick 上輸入以下指令:
ThisWillStick# reload
Proceed with reload? [confirm]
<... output omitted ...>
Press RETURN to get started!
<... output omitted ...>
ThisWillStick>
The hostname is, ThisWillStick.
主機名稱為 ThisWillStick。
Now erase the startup configuration with the erase startup-config command. This command cannot be shortened.
現在使用 erase startup-config 指令清除啟動設定。此指令不能縮寫。
On ThisWillStick, enter the following commands:
在 ThisWillStick 上輸入以下指令:
ThisWillStick> enable
ThisWillStick# erase startup-config
Erasing the nvram filesystem will remove all configuration files! Continue? [confirm]
[OK]
Erase of nvram: complete
*Jun  25 00:40:12.990: %SYS-7-NV_BLOCK_INIT: Initialized the geometry of nvram
ThisWillStick#Verify that the system actually erased the startup configuration using show startup-config command.
使用 show startup-config 指令,驗證系統確實已清除啟動設定。
On ThisWillStick, enter the following commands:
在 ThisWillStick 上輸入以下指令:
ThisWillStick# show startup-config
startup-config is not presentReload the switch.
重新載入交換器。
After the reload, the switch will attempt to read the startup configuration and find it missing. This situation will essentially set the switch back to the factory default state. Do not worry. When the lab is reinitialized, the lab system will appropriately set all device configurations.
重新載入後,交換器會嘗試讀取啟動設定,卻發現它已不存在。這種情況基本上會讓交換器回到出廠預設狀態。別擔心,當實驗重新初始化時,實驗系統會適當地重新設定所有裝置。
On ThisWillStick, enter the following commands:
在 ThisWillStick 上輸入以下指令:
ThisWillStick# reload
Proceed with reload? [confirm]
<... output omitted ...>
Press RETURN to get started!
Switch>Verify that the hostname parameter in the running configuration has the default value (Switch).
驗證執行中設定裡的主機名稱參數是否為預設值(Switch)。
On Switch, enter the following commands:
在 Switch 上輸入以下指令:
Switch> enable
Switch# show running-config | include hostname
hostname Switch
Switch#
Cisco IOS Configuration Commands
Cisco IOS 設定指令
Task 4: Improve User Experience in the CLI
任務 4:改善 CLI 使用體驗
In this session, you will practice using terminal history. Recalling recently entered commands is useful because it reduces typing. Once you recall a command, you can simply press Enter to use the exact same command, or you can modify it. The lab is prepared with the devices that are represented in the topology, but for this session, you will only use R1.
在本節中,你將練習使用終端機歷程。回憶最近輸入過的指令十分有用,因為可以減少打字。叫回一個指令後,你可以直接按Enter 鍵重複執行同一指令,或加以修改。本實驗已備妥拓樸中所呈現的裝置,但在本節中,你只會用到 R1。
The prompt displays the hostname that is configured on the device. You will modify this parameter of the router configuration as you experiment with the startup and running configurations.
提示字元會顯示裝置上已設定的主機名稱。在你嘗試操作啟動設定與執行中設定的過程中,你將修改路由器設定的這項參數。
Activity
活動
On R1, use the enable command to access the Privileged EXEC Mode.
在 R1 上,使用 enable 指令進入特權執行模式。
R1> enable
R1#Enter the sequence of commands that are shown below.
輸入以下所示的一系列指令。
The sequence is rather arbitrary. It includes three EXEC Mode commands and two Global Configuration Mode commands. Do not worry that the commands are new to you. You are typing the sequence of the commands only to fill the terminal history.
這個指令序列相當隨意,包含三個 EXEC 模式指令與兩個全域設定模式指令。不用擔心這些指令對你來說是全新的,你輸入這些指令只是為了填入終端機歷程。
show ip route(in Privileged EXEC Mode)show ip route(於特權執行模式中)show clock(in Privileged EXEC Mode)show clock(於特權執行模式中)show ip interface brief(in Privileged EXEC Mode)show ip interface brief(於特權執行模式中)configure terminal(to go in Global Configuration Mode)configure terminal(進入全域設定模式)clock timezone EST 0(in Global Configuration Mode)clock timezone EST 0(於全域設定模式中)no ip domain-lookup(in Global Configuration Mode)no ip domain-lookup(於全域設定模式中)
On R1, enter the following commands:
在 R1 上輸入以下指令:
R1# show ip route
Codes: L - local, C - connected, S - static, R - RIP, M - mobile, B - BGP
       D - EIGRP, EX - EIGRP external, O - OSPF, IA - OSPF inter area
       N1 - OSPF NSSA external type 1, N2 - OSPF NSSA external type 2
       E1 - OSPF external type 1, E2 - OSPF external type 2
       i - IS-IS, su - IS-IS summary, L1 - IS-IS level-1, L2 - IS-IS level-2
       ia - IS-IS inter area, * - candidate default, U - per-user static route
       o - ODR, P - periodic downloaded static route, H - NHRP, l - LISP
       + - replicated route, % - next hop override

Gateway of last resort is not set

      10.0.0.0/8 is variably subnetted, 4 subnets, 2 masks
C        10.10.1.0/24 is directly connected, Ethernet0/0
L        10.10.1.1/32 is directly connected, Ethernet0/0
C        10.10.3.0/24 is directly connected, Loopback0
L        10.10.3.1/32 is directly connected, Loopback0
R1# show clock*00:47:02.857 PST Tue Jun 25 2019R1# show ip interface brief
Interface IP-Address OK? Method Status Protocol
Ethernet0/0 10.10.1.1 YES NVRAM up up
Ethernet0/1 unassigned YES NVRAM administratively down down
Ethernet0/2 unassigned YES NVRAM administratively down down
Ethernet0/3 unassigned YES NVRAM administratively down down
Serial1/0 unassigned YES NVRAM administratively down down
Serial1/1 unassigned YES NVRAM administratively down down
Serial1/2 unassigned YES NVRAM administratively down down
Serial1/3 unassigned YES NVRAM administratively down down
Loopback0 10.10.3.1 YES NVRAM up up R1# configure terminal
Enter configuration commands, one per line. End with CNTL/Z.
R1(config)# clock timezone EST 0
*Jun 25 08:48:41.931: %SYS-6-CLOCKUPDATE: System clock has been updated from 00:48:41 PST Tue Jun 25 2019 to 08:48:41 EST Tue Jun 25 2019, configured from console by console.
R1(config)# no ip domain-lookup The time and date that you see in your output are different than the output presented here.
你輸出中看到的時間與日期,與此處呈現的輸出並不相同。
Improving User Experience in the CLI
改善 CLI 使用體驗
The Cisco IOS CLI includes many features that make the configuration and verification process easier and faster. These features include command-line editing keys, command history, and filtering parameters.
Cisco IOS CLI 包含許多能讓設定與驗證流程更輕鬆快速的功能,包括命令列編輯按鍵、指令歷程,以及篩選參數。
Command-Line Editing Keys
命令列編輯按鍵
Command-line editing keys are shortcuts and hotkeys that the CLI provides. Use these shortcuts and hotkeys to move the cursor around on the command line for corrections or changes. Use them also to make configuring, monitoring, and troubleshooting easier. The table describes each of the shortcuts for command-line editing and controlling command entry.
命令列編輯按鍵是 CLI 所提供的捷徑鍵與快速鍵。使用這些捷徑鍵與快速鍵,可在命令列上移動游標以進行修正或變更,也能讓設定、監控與疑難排解變得更輕鬆。下表列出各個用於命令列編輯與控制指令輸入的捷徑鍵。
Command-Line Editing Key Sequence 命令列編輯按鍵組合 | Description 說明 |
Ctrl-A Ctrl-A | Moves the cursor to the beginning of the command line 將游標移至命令列開頭 |
Ctrl-C Ctrl-C | Aborts the current command and exits the configuration mode 中止目前指令並離開設定模式 |
Ctrl-E Ctrl-E | Moves the cursor to the end of the command line 將游標移至命令列結尾 |
Esc-B Esc-B | Moves the cursor back one word 將游標往回移動一個單字 |
Esc-F Esc-F | Moves the cursor forward one word 將游標往前移動一個單字 |
Ctrl-B Ctrl-B | Moves the cursor back one character 將游標往回移動一個字元 |
Ctrl-F Ctrl-F | Moves the cursor forward one character 將游標往前移動一個字元 |
Ctrl-D Ctrl-D | Deletes a single character at the cursor 刪除游標所在位置的單一字元 |
Backspace Backspace | Removes one character to the left of the cursor 刪除游標左側的一個字元 |
Ctrl-R Ctrl-R | Redisplays the current command line 重新顯示目前的命令列 |
Ctrl-U Ctrl-U | Erases a line 清除整行 |
Ctrl-W Ctrl-W | Erases a word to the left of the cursor 刪除游標左側的一個單字 |
Ctrl-Z Ctrl-Z | Ends the configuration mode and returns to the EXEC prompt 結束設定模式並返回 EXEC 提示字元 |
Tab Tab | Completes a partially entered command if enough characters have been entered to make it unambiguous 在已輸入足夠字元、能唯一識別指令的情況下,補齊部分輸入的指令 |
Ctrl-Shift-6 Ctrl-Shift-6 | Allows the user to interrupt a Cisco IOS process such as ping or traceroute 讓使用者能中斷 ping 或 traceroute 等 Cisco IOS 處理程序 |
Ctrl-P or Up Arrow Ctrl-P 或上方向鍵 | Recalls last (previous) commands 叫出最後(前一個)輸入的指令 |
Ctrl-N or Down Arrow Ctrl-N 或下方向鍵 | Recalls more recent commands 叫出較新近輸入的指令 |
Command History
指令歷程
The Cisco CLI provides a history or record of commands that users have entered. You will find this feature, called the command history, particularly useful when recalling long or complex commands or entries.
Cisco CLI 提供使用者已輸入指令的歷程紀錄。在叫回較長或較複雜的指令或項目時,這項稱為指令歷程的功能將特別實用。
With the command history feature, you can complete the following tasks:
透過指令歷程功能,你可以完成以下工作:
- Display the contents of the command buffer: By default, the command history is enabled, and the system records the last ten command lines in its history buffer.顯示指令緩衝區的內容:根據預設,指令歷程功能是啟用的,系統會在歷程緩衝區中記錄最近十行指令。
- Set the command history buffer size:To change the number of command lines that the system will record during the current terminal session only, use the
terminal historycommand in user EXEC mode.設定指令歷程緩衝區大小:若只想在目前的終端機工作階段中變更系統所記錄的指令行數,請在使用者執行模式下使用terminal history指令。 - Recall previously entered commands that are stored in the history buffer:There is one buffer for EXEC modes and another one for the configuration modes.To recall commands in the history buffer, press Ctrl-P or the Up Arrow key.The command output begins with the most recent command. Repeat the key sequence to recall successively older commands.叫回儲存在歷程緩衝區中先前輸入的指令:EXEC 模式有一個緩衝區,設定模式則有另一個。要叫回歷程緩衝區中的指令,請按Ctrl-P 或上方向鍵。指令輸出會從最近的指令開始顯示。重複相同按鍵組合,即可依序叫回較舊的指令。
To return to more recent commands in the history buffer (after recalling older commands with Ctrl-P or the Up Arrow key), press Ctrl-N or the Down Arrow key. Repeat the key sequence to recall more recent commands successively.
若要在(使用 Ctrl-P 或上方向鍵叫回較舊指令後)返回較新的指令,請按Ctrl-N 或下方向鍵。重複相同按鍵組合,即可依序叫回較新的指令。
On most computers, there are additional select and copy functions available. Copy a previous command string, then paste or insert it as the current command entry, and press Enter.
在大部分電腦上,還有其他選取與複製的功能可用。複製先前的指令字串,再貼上或插入為目前的指令內容,然後按Enter。
When you use
showcommands such asshow running-config, Cisco IOS Software automatically pauses when displaying the output after a specified number of lines. The process of displaying the output pauses, and Cisco IOS Software displays "--More--." It then waits for user input to continue with the display process. You can press the Spacebar key to display another set of subsequent lines or press Enter to display a single line.當你使用
show指令,例如show running-config時,Cisco IOS 軟體會在顯示指定行數的輸出後自動暫停。輸出顯示過程會暫停,並顯示「--More--」,接著等待使用者輸入以繼續顯示流程。你可以按空白鍵顯示接下來的一批輸出行,或按 Enter 只顯示一行。 - Set the number of lines on the current terminal screen:You can use the
terminal lengthcommand, followed by a number, to control the number of lines that the CLI displays without pausing during the output. A value of zero prevents the router from pausing between screens of output. By default, the value is set to 24.設定目前終端機畫面的行數:你可以使用terminal length指令,後面接上數字,來控制 CLI 在輸出過程中不暫停可顯示的行數。設為零可讓路由器在各畫面輸出間不暫停。預設值為 24。
Now, while remaining in the configuration mode, use the Up Arrowand Down Arrow keys to scroll through the terminal history buffer.
接著,在維持設定模式的情況下,使用向上鍵與向下鍵來捲動終端機的歷程緩衝區。
Note that you do not see the EXEC commands. There is a separate terminal history buffer for the configuration and EXEC modes.
請注意,你看不到 EXEC 指令。設定模式與 EXEC 模式各有獨立的終端機歷程緩衝區。
Leave the configuration mode (use end, exit, or press Ctrl-Z) to return to the Privileged EXEC Mode.
離開設定模式(使用 end、exit,或按 Ctrl-Z)回到特權執行模式。
Again, use the Up Arrow and Down Arrow keys to show that you can recall previous commands.
再次使用 向上鍵 與 向下鍵 來說明你可以叫回先前的指令。
Recall the show ip route command and press the Enter key to resubmit it without any edits.
叫回 show ip route 指令,並按 Enter 鍵,不做任何修改地重新送出該指令。
It is a common exercise to revisit show commands. The show commands display operational status and enable you to follow on the effect of the configuration changes you make on the Cisco IOS device.
重複使用 show 指令是很常見的做法。show 指令會顯示運作狀態,讓你能追蹤你在 Cisco IOS 裝置上所做設定變更所造成的效果。
Now type the following command, snow ip interface brief, purposely mistyping "show" as "snow."
現在輸入以下指令 snow ip interface brief,故意把「show」打錯成「snow」。
R1# snow ip interface brief
      ^
% Invalid input detected at '^' marker.
Managing typos is one of the best uses of the terminal history and the command-line editing tools.
處理打字錯誤,是終端機歷程與命令列編輯工具最實用的用途之一。
Follow this sequence to quickly and easily correct the typographical error and resubmit the corrected command:
依照以下步驟,快速輕鬆地更正打字錯誤,並重新送出更正後的指令:
- Press the Up Arrow key once to retrieve the previous command.按一次上方向鍵,取回前一個指令。
- Press Ctrl-A to move the cursor to the beginning of the line.按Ctrl-A,將游標移至該行開頭。
- Press the Right Arrow twice to move the cursor to the right of the incorrect letter "n."按兩次右方向鍵,將游標移至錯誤字母「n」的右側。
- Press Backspace to erase the letter "n."按Backspace,刪除字母「n」。
- Press h to insert the correct letter "h."按h,插入正確的字母「h」。
- Press Enter to resubmit the corrected command.按Enter,重新送出更正後的指令。
Return to the Global Configuration Mode.
返回全域設定模式。
R1# configure terminal
Enter configuration commands, one per line.  End with CNTL/Z.
R1(config)#Configure the description of interface Serial 1/0 to " Link to SP1" and enable the interface by overriding the default shutdown command.
將 Serial 1/0 介面的描述設定為「Link to SP1」,並透過覆寫預設的 shutdown 指令來啟用該介面。
R1(config)# interface Serial 1/0
R1(config-if)# description Link to SP1
R1(config-if)# no shutdown
*Jun 25 08:51:13.776: %LINK-3-UPDOWN: Interface Serial1/0, changed state to up
*Jun 25 08:51:14.780: %LINEPROTO-5-UPDOWN: Line protocol on Interface Serial1/0, changed state to up
R1(config-if)#Repeat a similar configuration for interface Serial 1/1.
對 Serial 1/1 介面重複類似的設定。
The following process can make this task relatively easy:
以下流程可讓這項任務變得相對輕鬆:
- Press the Up Arrow key three times to recall the interface command. Edit Serial 1/0 to be 1/1 and press the Enter key to resubmit the edited command.按三次上方向鍵,叫回 interface 指令。將 Serial 1/0 編輯為 1/1,然後按Enter 鍵重新送出編輯後的指令。
- Press the Up Arrow key three times to recall the description command. Edit SP1 to be SP2 and press the Enter key to resubmit the edited command.按三次上方向鍵,叫回 description 指令。將 SP1 編輯為 SP2,然後按Enter 鍵重新送出編輯後的指令。
- Press the Up Arrow key three times to recall the
no shutdowncommand, and press the Enter key to resubmit the command without any editing.按三次上方向鍵,叫回no shutdown指令,然後按Enter 鍵,不做任何編輯地重新送出該指令。
The resulting sequence should look like the following example:
最終的操作順序應如以下範例所示:
R1(config)# interface Serial 1/1
R1(config-if)# description Link to SP2
R1(config-if)# no shutdown
*Jun 25 09:02:22.638: %LINK-3-UPDOWN: Interface Serial1/1, changed state to up
*Jun 25 09:02:23.642: %LINEPROTO-5-UPDOWN: Line protocol on Interface Serial1/1, changed state to up
R1(config-if)#Leave the configuration mode using end, exit (two times), or pressing Ctrl-Z to return to the privileged EXEC.
使用 end、exit(兩次)或按 Ctrl-Z 離開設定模式,回到特權執行模式。
Optionally, you can save the running configuration to the startup configuration, but it is not necessary in the automated lab environment.
你可以選擇性地將執行中設定儲存到啟動設定,但在自動化實驗環境中並非必要。
Filtering Parameters
篩選參數
Another useful feature that improves the user experience in the CLI is the filtering of show outputs. Using filtering, you can display only the parts of show outputs that you are interested in. You can filter outputs by typing the pipe (|) character after a show command, followed by a filtering parameter and a filtering expression. The table describes filtering parameters that are available for output filtering. The filtering expression is case-sensitive and must match exactly. For example, it must not have extra spaces.
另一項能改善 CLI 使用體驗的實用功能,是對 show 輸出進行篩選。透過篩選,你可以只顯示 show 輸出中你感興趣的部分。你可以在 show 指令後輸入管線(|)字元,再接上篩選參數與篩選運算式,來篩選輸出結果。下表列出可用於輸出篩選的篩選參數。篩選運算式區分大小寫,且必須完全相符,例如不能有多餘的空格。
Parameter 參數 | Description 說明 |
beginbegin | Shows all output lines, starting with the line that matches the filtering expression 顯示所有輸出行,從符合篩選運算式的那一行開始 |
excludeexclude | Excludes all output lines that match the filtering expression 排除所有符合篩選運算式的輸出行 |
includeinclude | Includes all output lines that match the filtering expression 包含所有符合篩選運算式的輸出行 |
sectionsection | Shows the entire section that starts with the filtering expression 顯示以篩選運算式開頭的整個區段 |
On the R1 router, use the begin and include options with the show running-config command and filtering expression interface.
在 R1 路由器上,搭配 show running-config 指令使用 begin 與 include 選項,過濾表達式為 interface。
You should see the following output when using the begin option:
使用 begin 選項時,你應該會看到以下輸出:
R1# show running-config | begin interface
interface Loopback0
 ip address 10.10.3.1 255.255.255.0
!
interface Ethernet0/0
 description Link to SW2
 ip address 10.10.1.1 255.255.255.0
!
interface Ethernet0/1
 no ip address
 shutdown
!
interface Ethernet0/2
 no ip address
 shutdown
!
interface Ethernet0/3
 no ip address
 shutdown
!
interface Serial1/0
 description Link to SP1
 no ip address
 serial restart-delay 0
!
interface Serial1/1
 description Link to SP2
 no ip address
 serial restart-delay 0
!
interface Serial1/2
 no ip address
 shutdown
 serial restart-delay 0
!
interface Serial1/3
 no ip address
 shutdown
 serial restart-delay 0
!
ip forward-protocol nd
!
!
no ip http server
no ip http secure-server
!
!
!
!
control-plane
!
!
!
!
!
!
!
line con 0
 logging synchronous
line aux 0
line vty 0 4
 login
 transport input all
!
!
end
You should see the following output when using the include option:
使用 include 選項時,你應會看到以下輸出:
R1# show running-config | include interface
interface Loopback0
interface Ethernet0/0
interface Ethernet0/1
interface Ethernet0/2
interface Ethernet0/3
interface Serial1/0
interface Serial1/1
interface Serial1/2
interface Serial1/3On the R1 router, use the section option with the show running-config command and filtering expression interface.
在 R1 路由器上,搭配 show running-config 指令使用 section 選項,過濾表達式為 interface。
You should see the following output when using the section option:
使用 section 選項時,你應該會看到以下輸出:
R1# show running-config | section interface
interface Loopback0
 ip address 10.10.3.1 255.255.255.0
interface Ethernet0/0
 description Link to SW2
 ip address 10.10.1.1 255.255.255.0
interface Ethernet0/1
 no ip address
 shutdown
interface Ethernet0/2
 no ip address
 shutdown
interface Ethernet0/3
 no ip address
 shutdown
interface Serial1/0
 description Link to SP1
 no ip address
 serial restart-delay 0
interface Serial1/1
 description Link to SP2
 no ip address
 serial restart-delay 0
interface Serial1/2
 no ip address
 shutdown
 serial restart-delay 0
interface Serial1/3
 no ip address
 shutdown
serial restart-delay 0On the R1 router, use the exclude option with the show running-config command and filtering expression !.
在 R1 路由器上,搭配 show running-config 指令使用 exclude 選項,過濾表達式為 !。
You should see the following output when using the exclude option:
使用 exclude 選項時,你應該會看到以下輸出:
R1# show running-config | exclude !
Building configuration...

Current configuration : 1223 bytes
version 15.2
service timestamps debug datetime msec
service timestamps log datetime msec
no service password-encryption
hostname R1
boot-start-marker
boot-end-marker
no aaa new-model
clock timezone EST 0 0
mmi polling-interval 60
no mmi auto-configure
no mmi pvc
mmi snmp-timeout 180


no ip domain lookup
ip cef
no ipv6 cef
multilink bundle-name authenticated
redundancy
interface Loopback0
 ip address 10.10.3.1 255.255.255.0
interface Ethernet0/0
 description Link to SW2
 ip address 10.10.1.1 255.255.255.0
interface Ethernet0/1
 no ip address
 shutdown
interface Ethernet0/2
 no ip address
 shutdown
interface Ethernet0/3
 no ip address
 shutdown
interface Serial1/0
 description Link to SP1
 no ip address
 serial restart-delay 0
interface Serial1/1
 description Link to SP2
 no ip address
 serial restart-delay 0
interface Serial1/2
 no ip address
 shutdown
 serial restart-delay 0
interface Serial1/3
 no ip address
 shutdown
 serial restart-delay 0
ip forward-protocol nd
no ip http server
no ip http secure-server
control-plane
line con 0
 logging synchronous
line aux 0
line vty 0 4
 login
 transport input all
end
Filtering Parameters
篩選參數
show command output to display all output lines starting with the line that matches the filtering expression?使用哪一個參數搭配 show 指令輸出,可顯示從符合篩選運算式的那一行開始的所有輸出行?