Introduction
簡介
Network devices generate syslog messages to convey important information about events within the network. Syslog messages have time stamps that are associated with them. For these time stamps to be of value for security analysis, the clocks on all the network devices must be in sync. NTP is the preferred method to achieve synchronization.
網路裝置會產生 syslog 訊息,傳達網路中重要事件的相關資訊。syslog 訊息都會附帶時間戳記。若要讓這些時間戳記對安全分析有價值,所有網路裝置的時鐘就必須同步。NTP 是達成同步的首選方法。
This discovery lab will guide you through configuring and verifying NTP services on Cisco IOS devices. The lab is prepared as depicted in the topology diagram and the connectivity table.
本探索實驗將引導你在 Cisco IOS 裝置上設定並驗證 NTP 服務。實驗已依拓樸圖與連線表準備完成。
Topology
拓樸
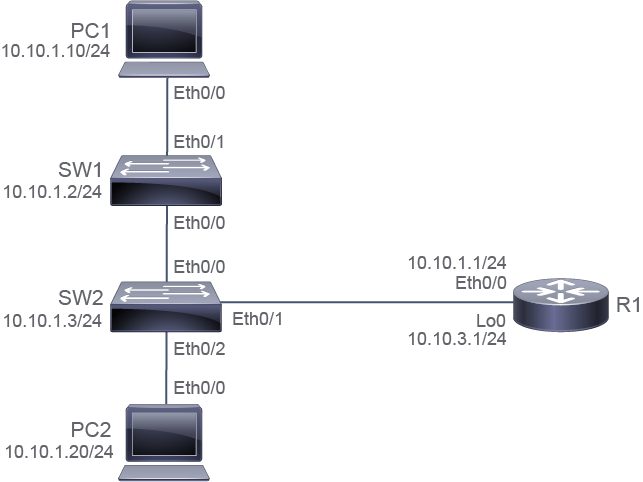
Job Aid
工作輔助資料
Device Information
裝置資訊
Device Information Table
裝置資訊表
Device 裝置 | Characteristic 特性 | Value 值 |
PC1 PC1 | IPv4 address IPv4 位址 | 10.10.1.10/24 10.10.1.10/24 |
PC1 PC1 | Default gateway 預設閘道 | 10.10.1.1 10.10.1.1 |
PC2 PC2 | IPv4 address IPv4 位址 | 10.10.1.20/24 10.10.1.20/24 |
PC2 PC2 | Default gateway 預設閘道 | 10.10.1.1 10.10.1.1 |
SW1 SW1 | VLAN 1 IPv4 address VLAN 1 IPv4 位址 | 10.10.1.2/24 10.10.1.2/24 |
SW1 SW1 | Default gateway 預設閘道 | 10.10.1.1 10.10.1.1 |
SW2 SW2 | VLAN 1 IPv4 address VLAN 1 IPv4 位址 | 10.10.1.3/24 10.10.1.3/24 |
SW2 SW2 | Default gateway 預設閘道 | 10.10.1.1 10.10.1.1 |
R1 R1 | Ethernet0/0 IPv4 address Ethernet0/0 IPv4 位址 | 10.10.1.1/24 10.10.1.1/24 |
R1 R1 | Loopback 0 IPv4 Loopback 0 IPv4 | 10.10.3.1/24 10.10.3.1/24 |
R1 R1 | Loopback 10 IPv4 Loopback 10 IPv4 | Not Configured 尚未設定 |
Task 1: Configure and Verify NTP
任務 1:設定與驗證 NTP
Activity
活動
Start by reviewing the clocks on SW1, SW2, and R1. You will find that in the emulated lab environment, the clocks are actually synchronized by default.
先檢視 SW1、SW2 與 R1 的時鐘。你會發現在模擬實驗環境中,這些時鐘預設就已經是同步的。
On SW1, enter this command:
在 SW1 上,輸入以下指令:
SW1# show clock
*21:08:06.910 PST Sun Apr 14 2019
On SW2, enter this command:
在 SW2 上,輸入以下指令:
SW2# show clock
*21:08:28.614 PST Sun Apr 14 2019
On R1, enter this command:
在 R1 上,輸入以下指令:
R1# show clock
*21:08:31.879 PST Sun Apr 14 2019
The difference in time is only the time it took you to switch from one console to the next and enter the show clock command.
時間上的差異只是你從一個主控台切換到下一個主控台,並輸入 show clock 指令所花的時間。
Of course, the times that this output and the following output examples depict will differ from what you can see in the lab environment.
當然,這段輸出以及後續輸出範例所顯示的時間,會與你在實驗環境中看到的不同。
Notice the asterisk (*) at the beginning of the first line of the show clock command output. This is an example of an "authoritative" flag. The system clock keeps an "authoritative" flag that indicates whether the time is authoritative (believed to be accurate). If the system clock has been set by a timing source such as NTP, the flag is set.
請注意 show clock 指令輸出第一行開頭的星號(*)。這是「權威性」旗標的一個範例。系統時鐘會保留一個「權威性」旗標,指出時間是否具有權威性(被認為是準確的)。如果系統時鐘是由 NTP 等計時來源設定,該旗標就會被設定。
The next table lists the authoritative flags and describes their significance:
下表列出各種權威性旗標並說明其意義:
Symbol 符號 | Description 說明 |
* (asterisk) *(星號) | Time is not authoritative. 時間不具權威性。 |
(blank) (空白) | Time is authoritative. 時間具有權威性。 |
. (point) .(點) | Time is authoritative, but NTP is not synchronized. 時間具有權威性,但 NTP 尚未同步。 |
Access the R1 console and create Loopback 10 interface with the 10.10.4.1/24 IPv4 address. Next, configure R1 as an NTP server by enabling the master clock status with stratum 3. Use Loopback 10 interface as the source interface for NTP messages.
進入 R1 主控台,建立 IPv4 位址為 10.10.4.1/24 的 Loopback 10 介面。接著,將 R1 設定為 NTP 伺服器,啟用 stratum 3 的主時鐘狀態。使用 Loopback 10 介面作為 NTP 訊息的來源介面。
On R1, enter these commands:
在 R1 上,輸入以下指令:
R1# configure terminal
Enter configuration commands, one per line.  End with CNTL/Z.
R1(config)# interface Loopback 10
R1(config-if)# ip address 10.10.4.1 255.255.255.0
R1(config-if)# exit
R1(config)# ntp master 3
R1(config)# ntp source Loopback 10
R1(config)# end
R1#
The stratum value is a number from 1 to 15. The lowest stratum value indicates a higher NTP priority. It also indicates the NTP stratum number that the system will claim. By configuring the Loopback interface as the source interface for NTP messages, you ensure that the NTP service is reachable as long as the devices have a route to it. If a physical interface is used as the source interface of the NTP messages, then the NTP service will be available only as long as the status of the interface stays in the up/up state.
stratum 值是介於 1 到 15 之間的數字。stratum 值越低,代表 NTP 優先順序越高,同時也代表系統自身會宣稱的 NTP stratum 編號。將 Loopback 介面設定為 NTP 訊息的來源介面,可確保只要裝置有路由可達,NTP 服務就能保持可用。若使用實體介面作為 NTP 訊息的來源介面,則 NTP 服務只有在該介面維持 up/up 狀態時才可用。
Configure SW1 to use R1 (10.10.4.1) as its NTP server.
將 SW1 設定為使用 R1(10.10.4.1)作為其 NTP 伺服器。
On SW1, enter these commands:
在 SW1 上,輸入以下指令:
SW1# configure terminal
Enter configuration commands, one per line.  End with CNTL/Z.
SW1(config)# ntp server 10.10.4.1
SW1(config)# end
SW1#Display the current NTP associations and NTP status on SW1.
顯示 SW1 目前的 NTP 關聯與 NTP 狀態。
On SW1, enter these commands:
在 SW1 上,輸入以下指令:
SW1# show ntp associations
  address         ref clock       st   when   poll reach  delay  offset  disp
*~10.10.4.1       127.127.1.1      3      4     64     7  0.000   0.000 3.723
 * sys.peer, # selected, + candidate, - outlyer, x falseticker, ~ configured

SW1# show ntp status
Clock is synchronized, stratum 4, reference is 10.10.4.1
nominal freq is 250.0000 Hz, actual freq is 250.0000 Hz, precision is 2**10
ntp uptime is 14300 (1/100 of seconds), resolution is 4000
reference time is E05E90D7.8AC08490 (21:10:47.542 PST Sun Apr 14 2019)
clock offset is 0.0000 msec, root delay is 1.00 msec
root dispersion is 6383.72 msec, peer dispersion is 3.72 msec
loopfilter state is 'CTRL' (Normal Controlled Loop), drift is 0.000000000 s/s
system poll interval is 64, last update was 141 sec ago.
The show ntp associations command displays these significant fields:
show ntp associations 指令會顯示以下重要欄位:
- The asterisk (*) field: The peer that is synchronized to this peer星號(*)欄位:與此對等裝置同步的對等裝置
- The tilde (~) field:The peer that is statically configured波浪號(~)欄位:以靜態方式設定的對等裝置
- The address field: The address of the peeraddress(位址)欄位:對等裝置的位址
- The st field: The stratum setting for the peerst 欄位:該對等裝置的 stratum 設定值
The show ntp status command displays these significant fields:
show ntp status 指令會顯示以下重要欄位:
- The synchronized field: The system that is synchronized to an NTP peersynchronized(已同步)欄位:已與某個 NTP 對等裝置同步的系統
- The stratum field: The NTP stratum of this systemstratum 欄位:本系統的 NTP stratum
- The reference field: The address of the peer to which a clock is synchronizedreference(參考)欄位:時鐘所同步之對等裝置的位址
The show ntp associations command displays the address of the device that provides the reference clock, and the reference device stratum.. The show ntp status displays whether the device clock is synchronized, the NTP stratum of the device, and the address of the device that provides the reference clock.
show ntp associations 指令會顯示提供參考時鐘的裝置位址,以及該參考裝置的 stratum。show ntp status 則會顯示該裝置的時鐘是否已同步、該裝置的 NTP stratum,以及提供參考時鐘之裝置的位址。
Configure SW2 to use R1 (10.10.4.1) as its NTP server.
將 SW2 設定為使用 R1(10.10.4.1)作為其 NTP 伺服器。
On SW2, enter these commands:
在 SW2 上,輸入以下指令:
SW2# configure terminal
Enter configuration commands, one per line.  End with CNTL/Z.
SW2(config)# ntp server 10.10.4.1
SW2(config)# end
SW2#Display the current NTP associations and NTP status on SW2.
顯示 SW2 目前的 NTP 關聯與 NTP 狀態。
On SW2, enter these commands:
在 SW2 上,輸入以下指令:
SW2# show ntp associations
  address         ref clock       st   when   poll reach  delay  offset   disp
*~10.10.4.1       127.127.1.1      3      6     64     1  0.000   0.000 189.46
 * sys.peer, # selected, + candidate, - outlyer, x falseticker, ~ configured

SW2# show ntp status
Clock is synchronized, stratum 4, reference is 10.10.4.1
nominal freq is 250.0000 Hz, actual freq is 250.0000 Hz, precision is 2**10
ntp uptime is 1300 (1/100 of seconds), resolution is 4000
reference time is E05E923E.926E9920 (21:16:46.572 PST Sun Apr 14 2019)
clock offset is 0.0000 msec, root delay is 0.00 msec
root dispersion is 416.69 msec, peer dispersion is 189.46 msec
loopfilter state is 'CTRL' (Normal Controlled Loop), drift is 0.000000000 s/s
system poll interval is 64, last update was 2 sec ago.One at a time, access the SW1, SW2 and R1 consoles and display their clocks.
依序進入 SW1、SW2 與 R1 的主控台,顯示它們的時鐘。
On SW1, enter this command:
在 SW1 上,輸入以下指令:
SW1# show clock
21:18:51.291 PST Sun Apr 14 2019
On SW2, enter this command:
在 SW2 上,輸入以下指令:
SW2# show clock
21:18:54.556 PST Sun Apr 14 2019
On R1, enter this command:
在 R1 上,輸入以下指令:
R1# show clock
21:18:57.603 PST Sun Apr 14 2019
The clocks of all devices are synchronized. The difference in time is due to the time that you spend switching between consoles and executing the show clock command.
所有裝置的時鐘皆已同步。時間上的差異是因為你在各主控台之間切換並執行 show clock 指令所花費的時間。
On R1, configure the Central Europe Time (CET) time zone, enable daylight saving time, and return to the privileged EXEC mode.
在 R1 上,設定中歐時間(CET)時區,啟用日光節約時間,並返回特權 EXEC 模式。
On R1, enter these commands:
在 R1 上,輸入以下指令:
R1# configure terminal
R1(config)# clock timezone CET 1
Apr 15 05:19:42.471: %SYS-6-CLOCKUPDATE: System clock has been updated from 21:19:42 PST Sun Apr 14 2019 to 06:19:42 CET Mon Apr 15 2019, configured from console by console.
R1(config)# clock summer-time CEST recurring
Apr 15 05:19:50.015: %SYS-6-CLOCKUPDATE: System clock has been updated from 06:19:50 CET Mon Apr 15 2019 to 07:19:50 CEST Mon Apr 15 2019, configured from console by console.
R1(config)# end
R1#Display the current time on R1 and observe that the time zone has changed.
顯示 R1 目前的時間,並觀察時區是否已變更。
On R1, enter this command:
在 R1 上,輸入以下指令:
R1# show clock
07:22:07.082 CEST Mon Apr 15 2019
Notice that clock settings now reflect local time, because CEST is 2 hours ahead of UTC.
請注意,時鐘設定現在已反映出當地時間,因為 CEST 比 UTC 快 2 小時。