Introduction
簡介
After completing this activity, you will know how to define a RADIUS server and how to enable SNMP and syslog on a Cisco Catalyst 9800 WLC.
完成此活動後,您將了解如何定義 RADIUS 伺服器,以及如何在 Cisco Catalyst 9800 WLC 上啟用 SNMP 及 syslog。
Topology
拓樸
Job Aids
工作輔助資料
Device Information
裝置資訊
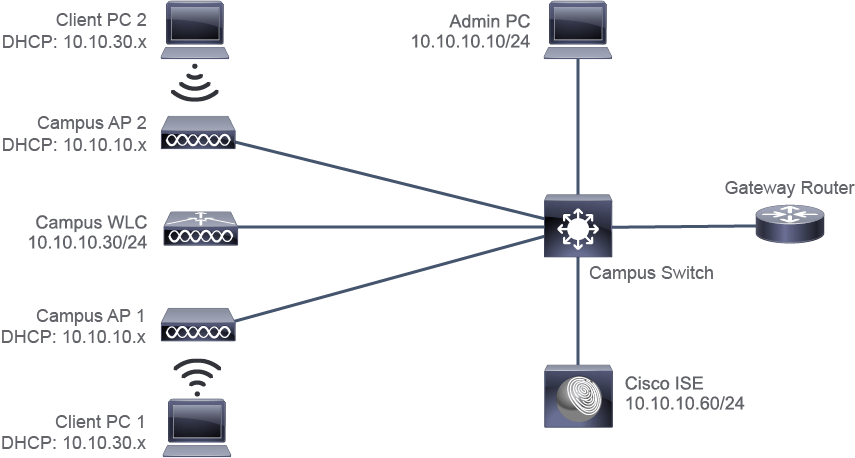
Device 裝置 | Username/Password 使用者名稱/密碼 | Management IP Address 管理 IP 位址 | Employee Network (VLAN 30, WLAN employee) IP Addresses 員工網路(VLAN 30、WLAN employee)IP 位址 |
Admin PC 管理 PC | 10.10.10.10/24 10.10.10.10/24 | ||
Client PC 1 用戶端 PC 1 | DHCP: 10.10.30.x/24 DHCP:10.10.30.x/24 | ||
Client PC 2 用戶端 PC 2 | DHCP: 10.10.30.x/24 DHCP:10.10.30.x/24 | ||
Campus WLC Campus WLC | admin/1234QWer admin/1234QWer | 10.10.10.30/24 10.10.10.30/24 | 10.10.30.30/24 10.10.30.30/24 |
Campus AP 1 Campus AP 1 | DHCP: 10.10.10.x/24 DHCP:10.10.10.x/24 | ||
Campus AP 2 Campus AP 2 | DHCP: 10.10.10.x/24 DHCP:10.10.10.x/24 | ||
Cisco ISE Cisco ISE | 10.10.10.60/24 10.10.10.60/24 | ||
Gateway Router 閘道路由器 | 10.10.10.1/24 10.10.10.1/24 | 10.10.30.1/24 10.10.30.1/24 |
SNMP v3 Server
SNMP v3 伺服器
SNMP Host SNMP 主機 | v3 User v3 使用者 | ||
IPv4/IPv6 Address IPv4/IPv6 位址 | 10.10.10.50 10.10.10.50 | User Name 使用者名稱 | mgmt mgmt |
Version 版本 | V3 V3 | Security Mode 安全模式 | AuthPriv AuthPriv |
V3 Users V3 使用者 | mgmt mgmt | Authentication Protocol 驗證通訊協定 | SHA SHA |
Port 連接埠 | 162 162 | Authentication Password 驗證密碼 | Cisco123 Cisco123 |
Type 類型 | traps traps | Privacy Protocol 加密通訊協定 | AES256 AES256 |
Security Level 安全等級 | priv priv | Privacy Password 加密密碼 | Cisco123 Cisco123 |
Task 1: Define a RADIUS Server
任務 1:定義 RADIUS 伺服器
A Cisco WLC can use a RADIUS server for centralized authentication, authorization, and accounting (AAA). This allows the simple and scalable deployment of features such as centralized username and password management, and user- and device-based authentication, including IEEE 802.1X, Web Authentication, and MAC Address Bypass (MAB).
Cisco WLC 可使用 RADIUS 伺服器進行集中式的驗證、授權與記帳(AAA)。這讓集中式使用者名稱與密碼管理,以及以使用者與裝置為基礎的驗證(包括 IEEE 802.1X、網頁驗證與 MAC 位址略過(MAB))等功能得以簡單且具擴充性地部署。
In such a scenario, you will configure authentication and authorization-related settings, including usernames, passwords, and downloadable access control lists (dACLs) on Cisco ISE. The WLC will then interact with Cisco ISE using RADIUS to exchange such information. Therefore, when using a RADIUS server such as Cisco ISE, the first step on the WLC is to add the RADIUS server.
在此情境中,您會在 Cisco ISE 上設定與驗證及授權相關的設定,包括使用者名稱、密碼,以及可下載的存取控制清單(dACL)。WLC 接著會透過 RADIUS 與 Cisco ISE 互動以交換這些資訊。因此,當使用 Cisco ISE 這類 RADIUS 伺服器時,WLC 上的第一步就是新增 RADIUS 伺服器。
You will learn how to add a RADIUS server to a Cisco Catalyst 9800 WLC, and how to configure a AAA authentication method list, so that you can deploy features such as centralized authentication of wireless users.
您將學習如何在 Cisco Catalyst 9800 WLC 上新增 RADIUS 伺服器,以及如何設定 AAA 驗證方法清單,以便部署無線使用者集中式驗證等功能。
Activity
活動
Click the Play icon in the middle of the screen or the Play button on the player below the simulation screen to begin the simulation.
按一下畫面中央的播放圖示,或按一下模擬畫面下方播放器上的播放按鈕,開始模擬。
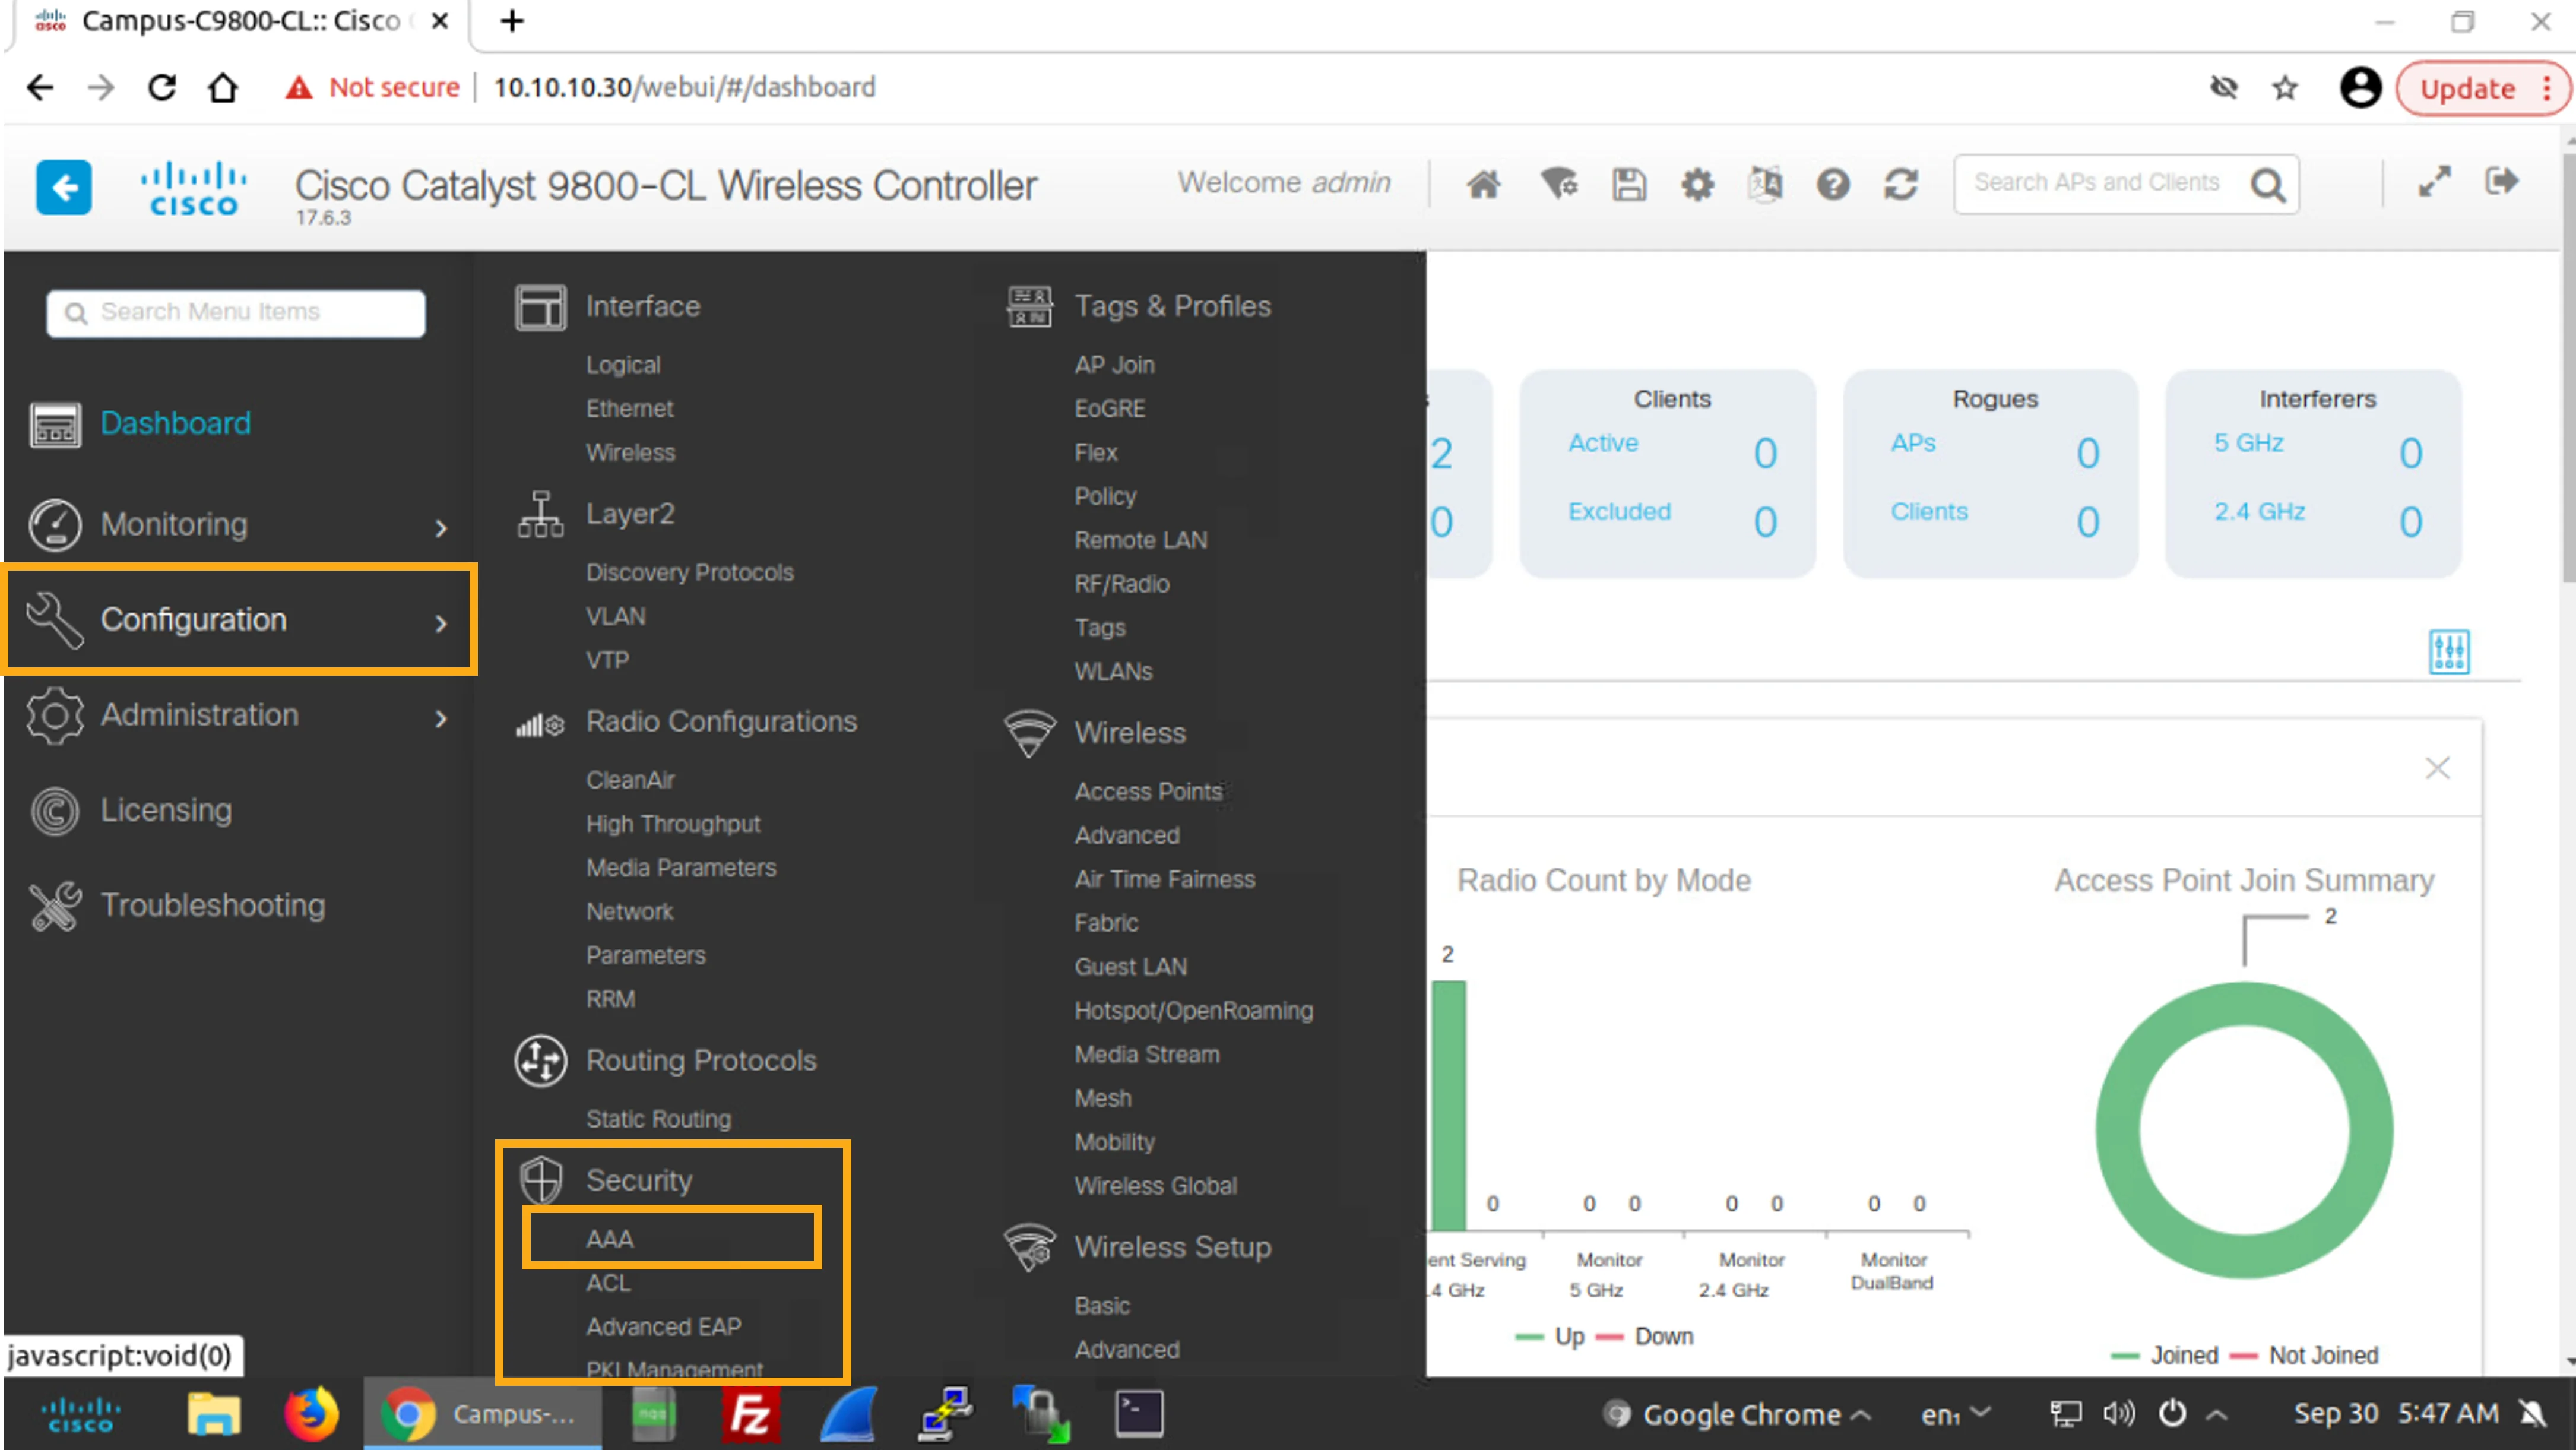
On the Admin PC, in the Campus WLC web GUI, choose Configuration > Security > AAA.
在管理 PC 上,於 Campus WLC 網頁 GUI 中,選擇Configuration > Security > AAA。
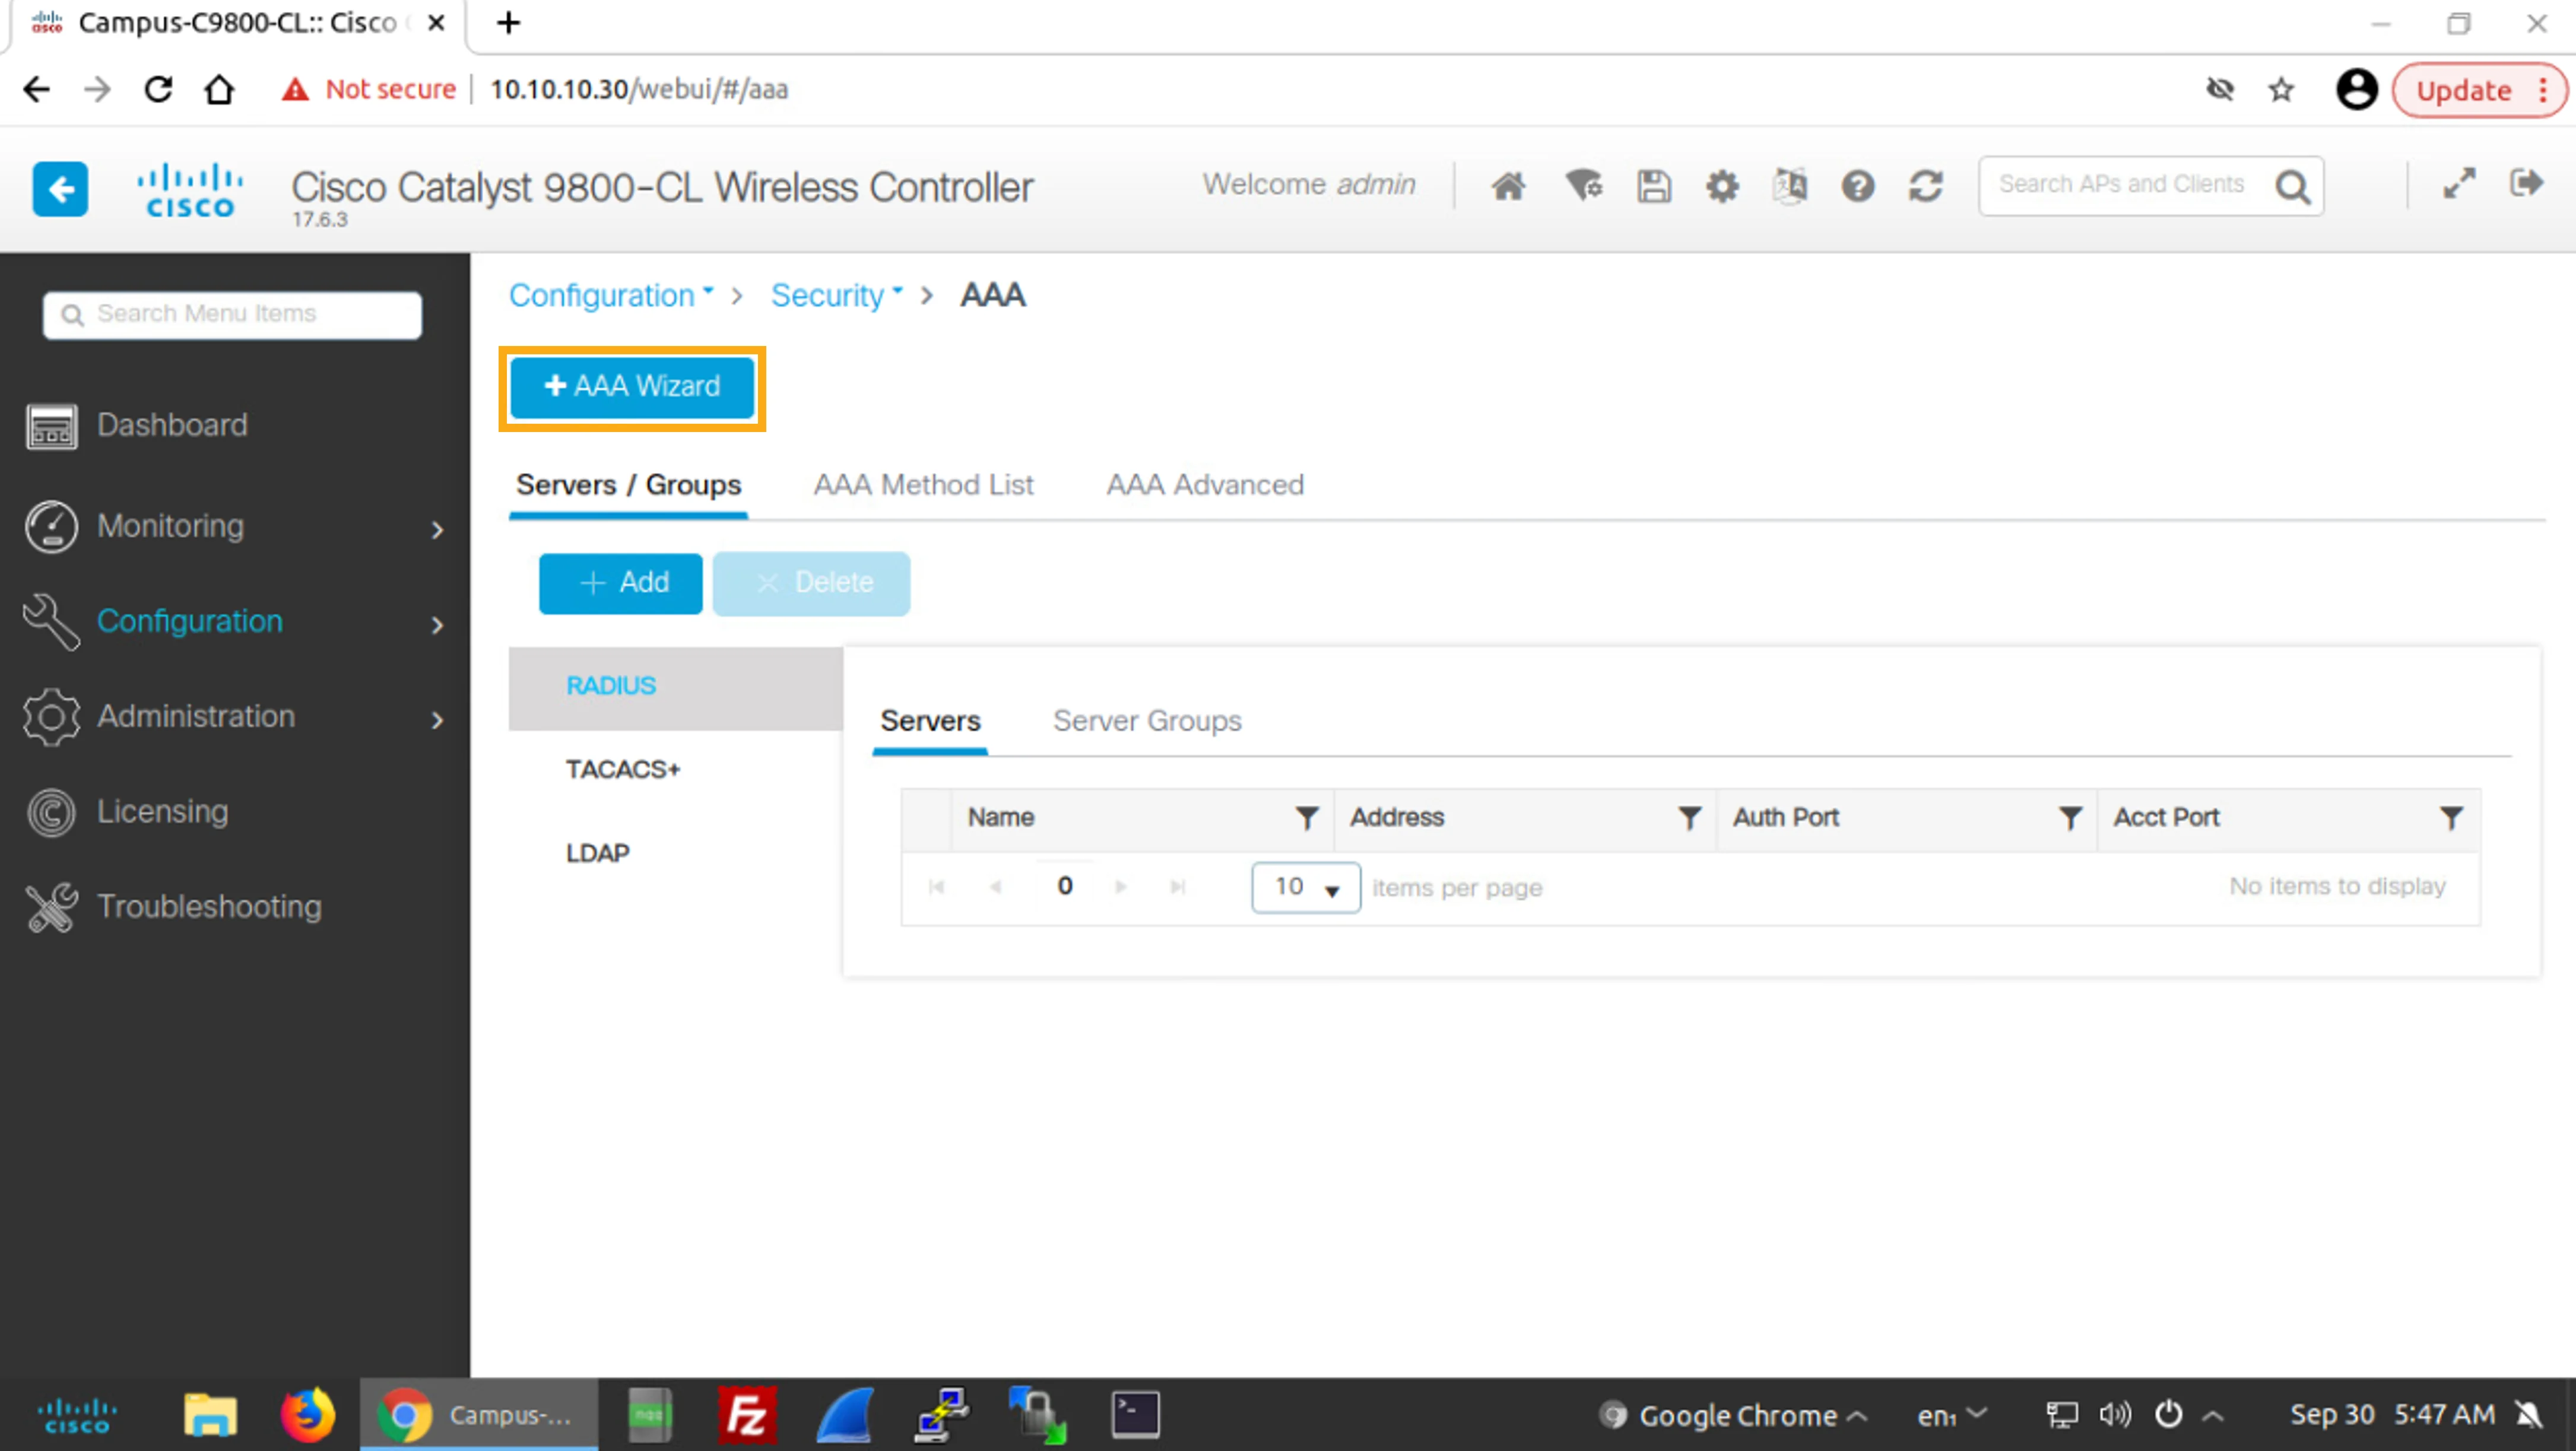
Click the +AAA Wizard button to start the AAA configuration wizard.
按一下+AAA Wizard按鈕以啟動 AAA 設定精靈。
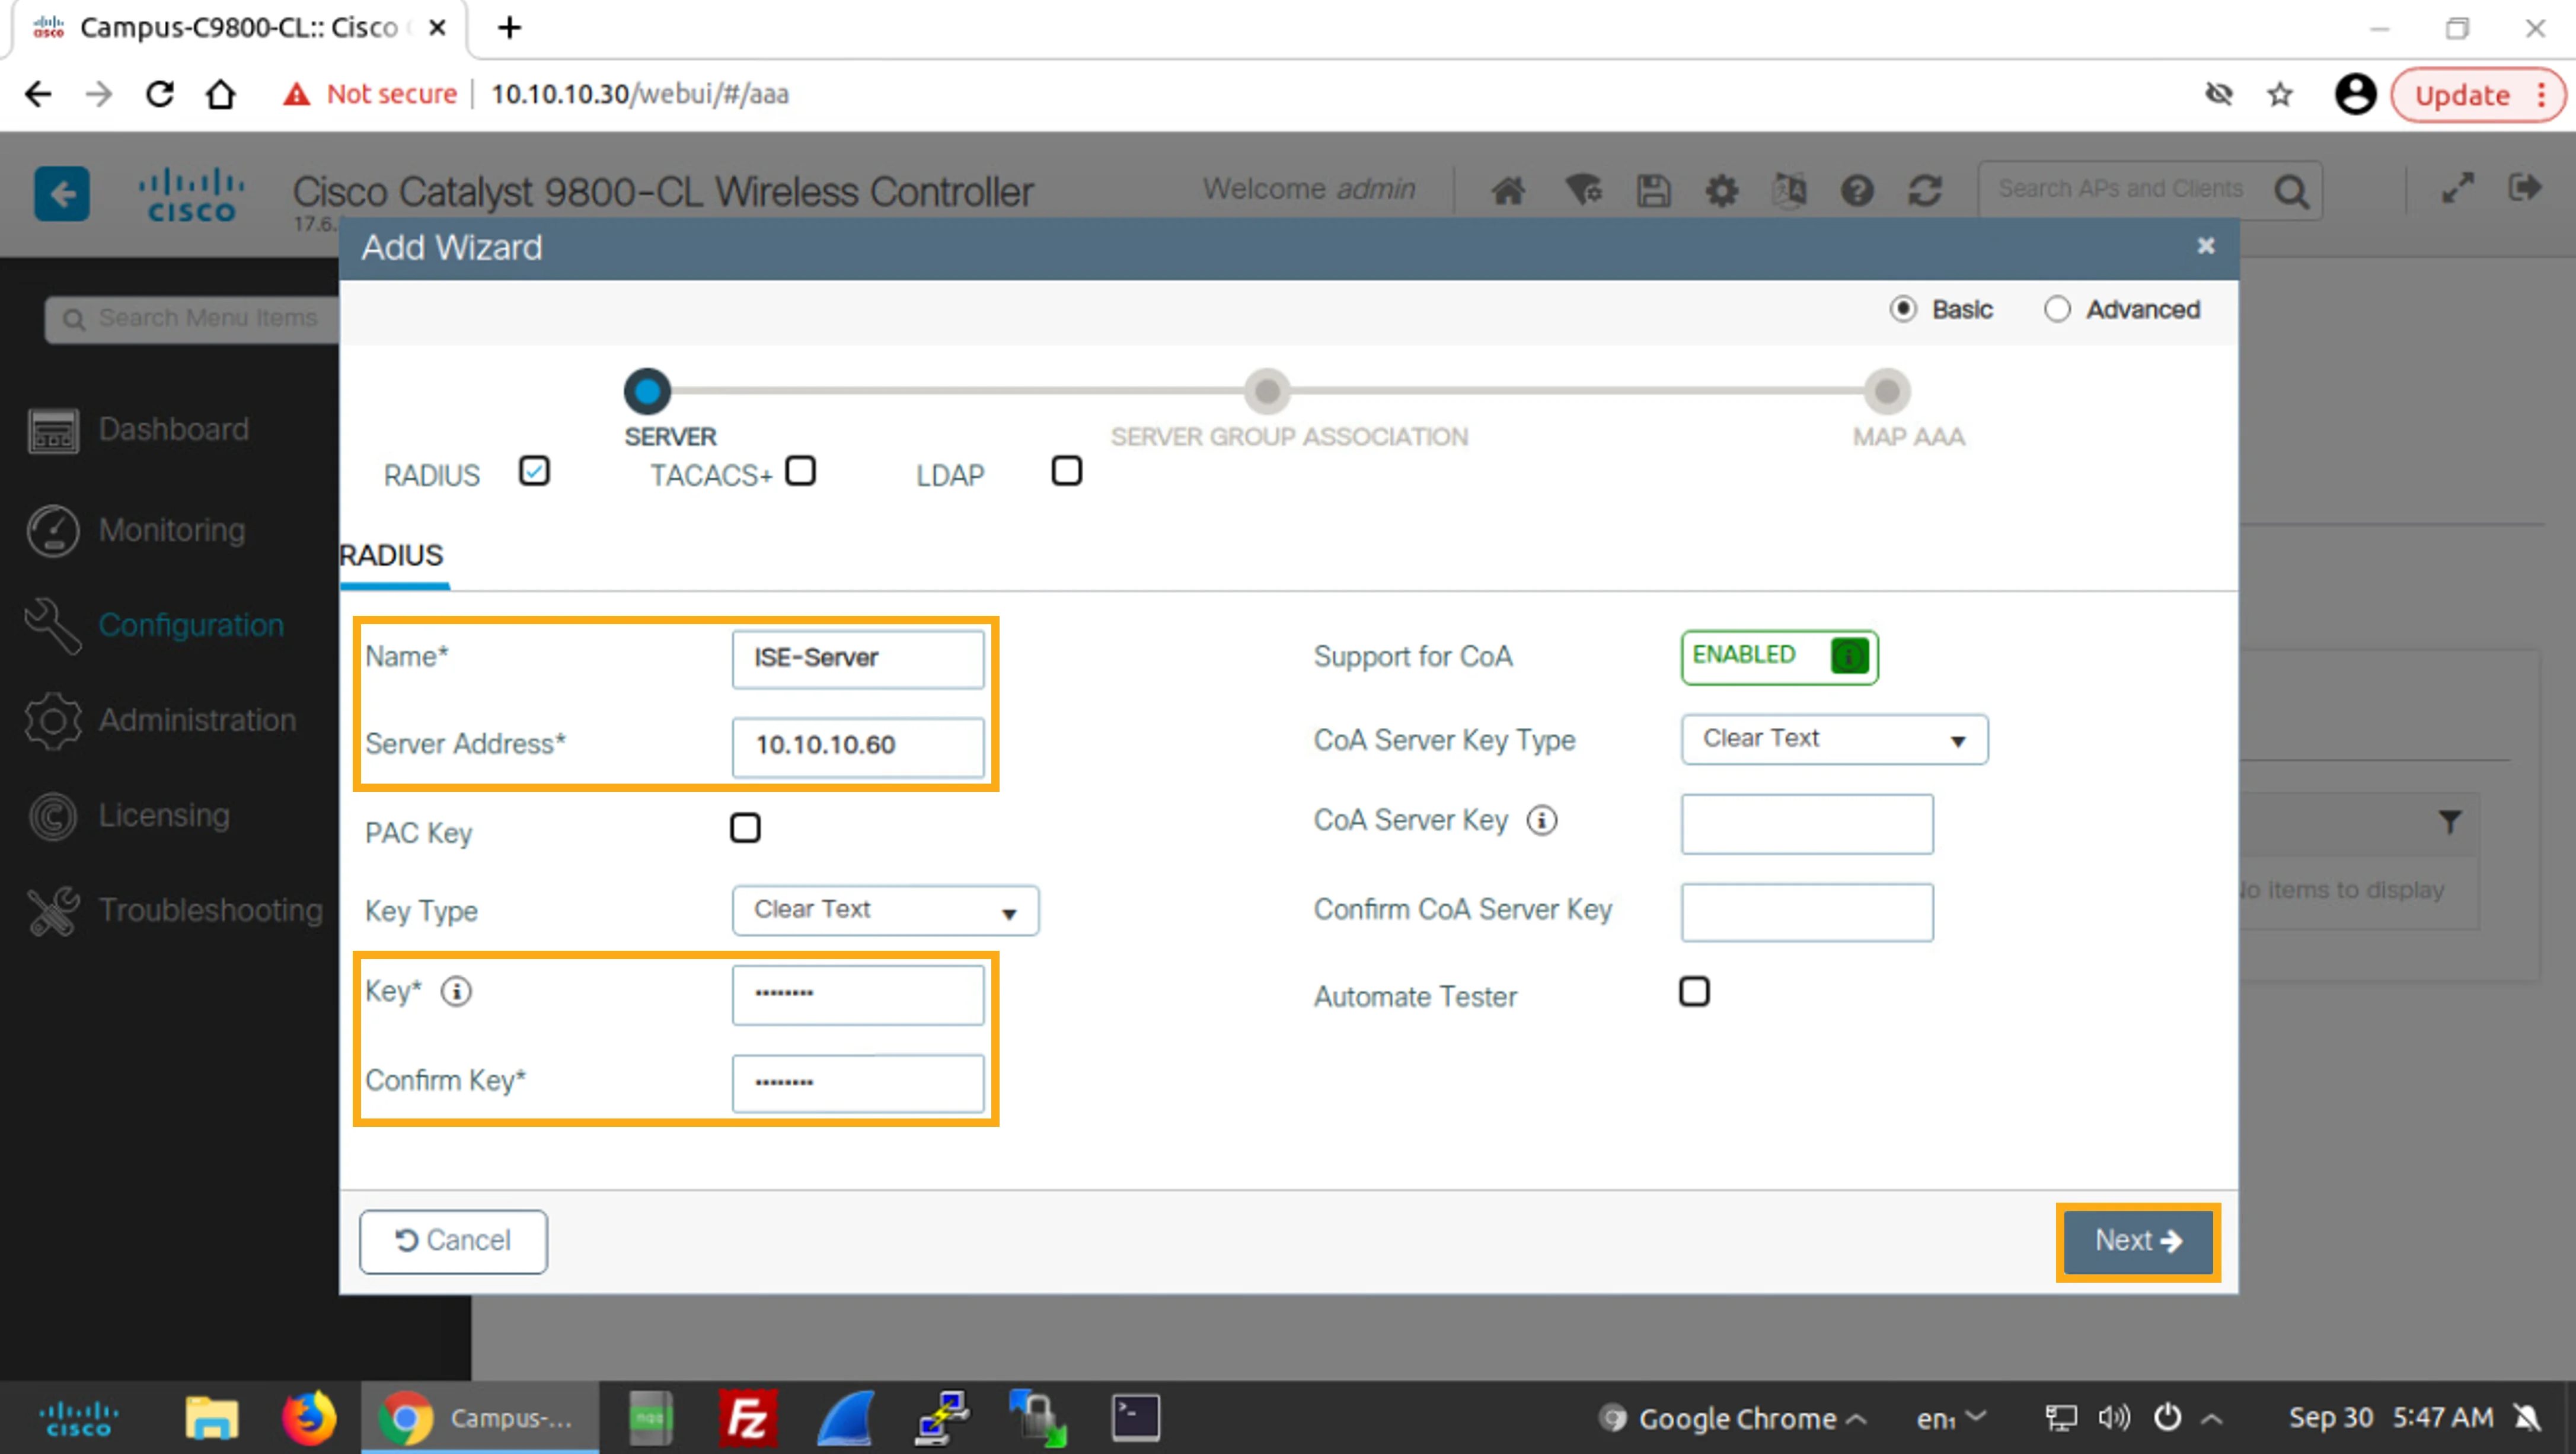
On the first page of the wizard, in the SERVER section, configure a AAA server with the following settings:
在精靈的第一頁,於SERVER區段中,依下列設定值設定 AAA 伺服器:
Name Name | ISE-Server ISE-Server |
Server Address Server Address | 10.10.10.60 10.10.10.60 |
Key Key | Cisco123 Cisco123 |
Confirm Key Confirm Key | Cisco123 Cisco123 |
Then click Next to continue with the wizard.
接著按一下Next以繼續精靈流程。
In particular, perform the following procedure to configure the Cisco ISE server:
具體來說,請執行下列程序以設定 Cisco ISE 伺服器:
- Click in the Name input field and enter ISE-Server for the RADIUS server name.按一下Name輸入欄位,輸入 ISE-Server 作為 RADIUS 伺服器名稱。
- Click to the Server Address input field and enter 10.10.10.60 for the server IP address.按一下Server Address輸入欄位,輸入 10.10.10.60 作為伺服器 IP 位址。
- Click in the Key input field and enter Cisco123 for the communication key.按一下Key輸入欄位,輸入 Cisco123 作為通訊金鑰。
- Click in the Confirm Key input field and enter Cisco123 again.按一下Confirm Key輸入欄位,再次輸入 Cisco123。
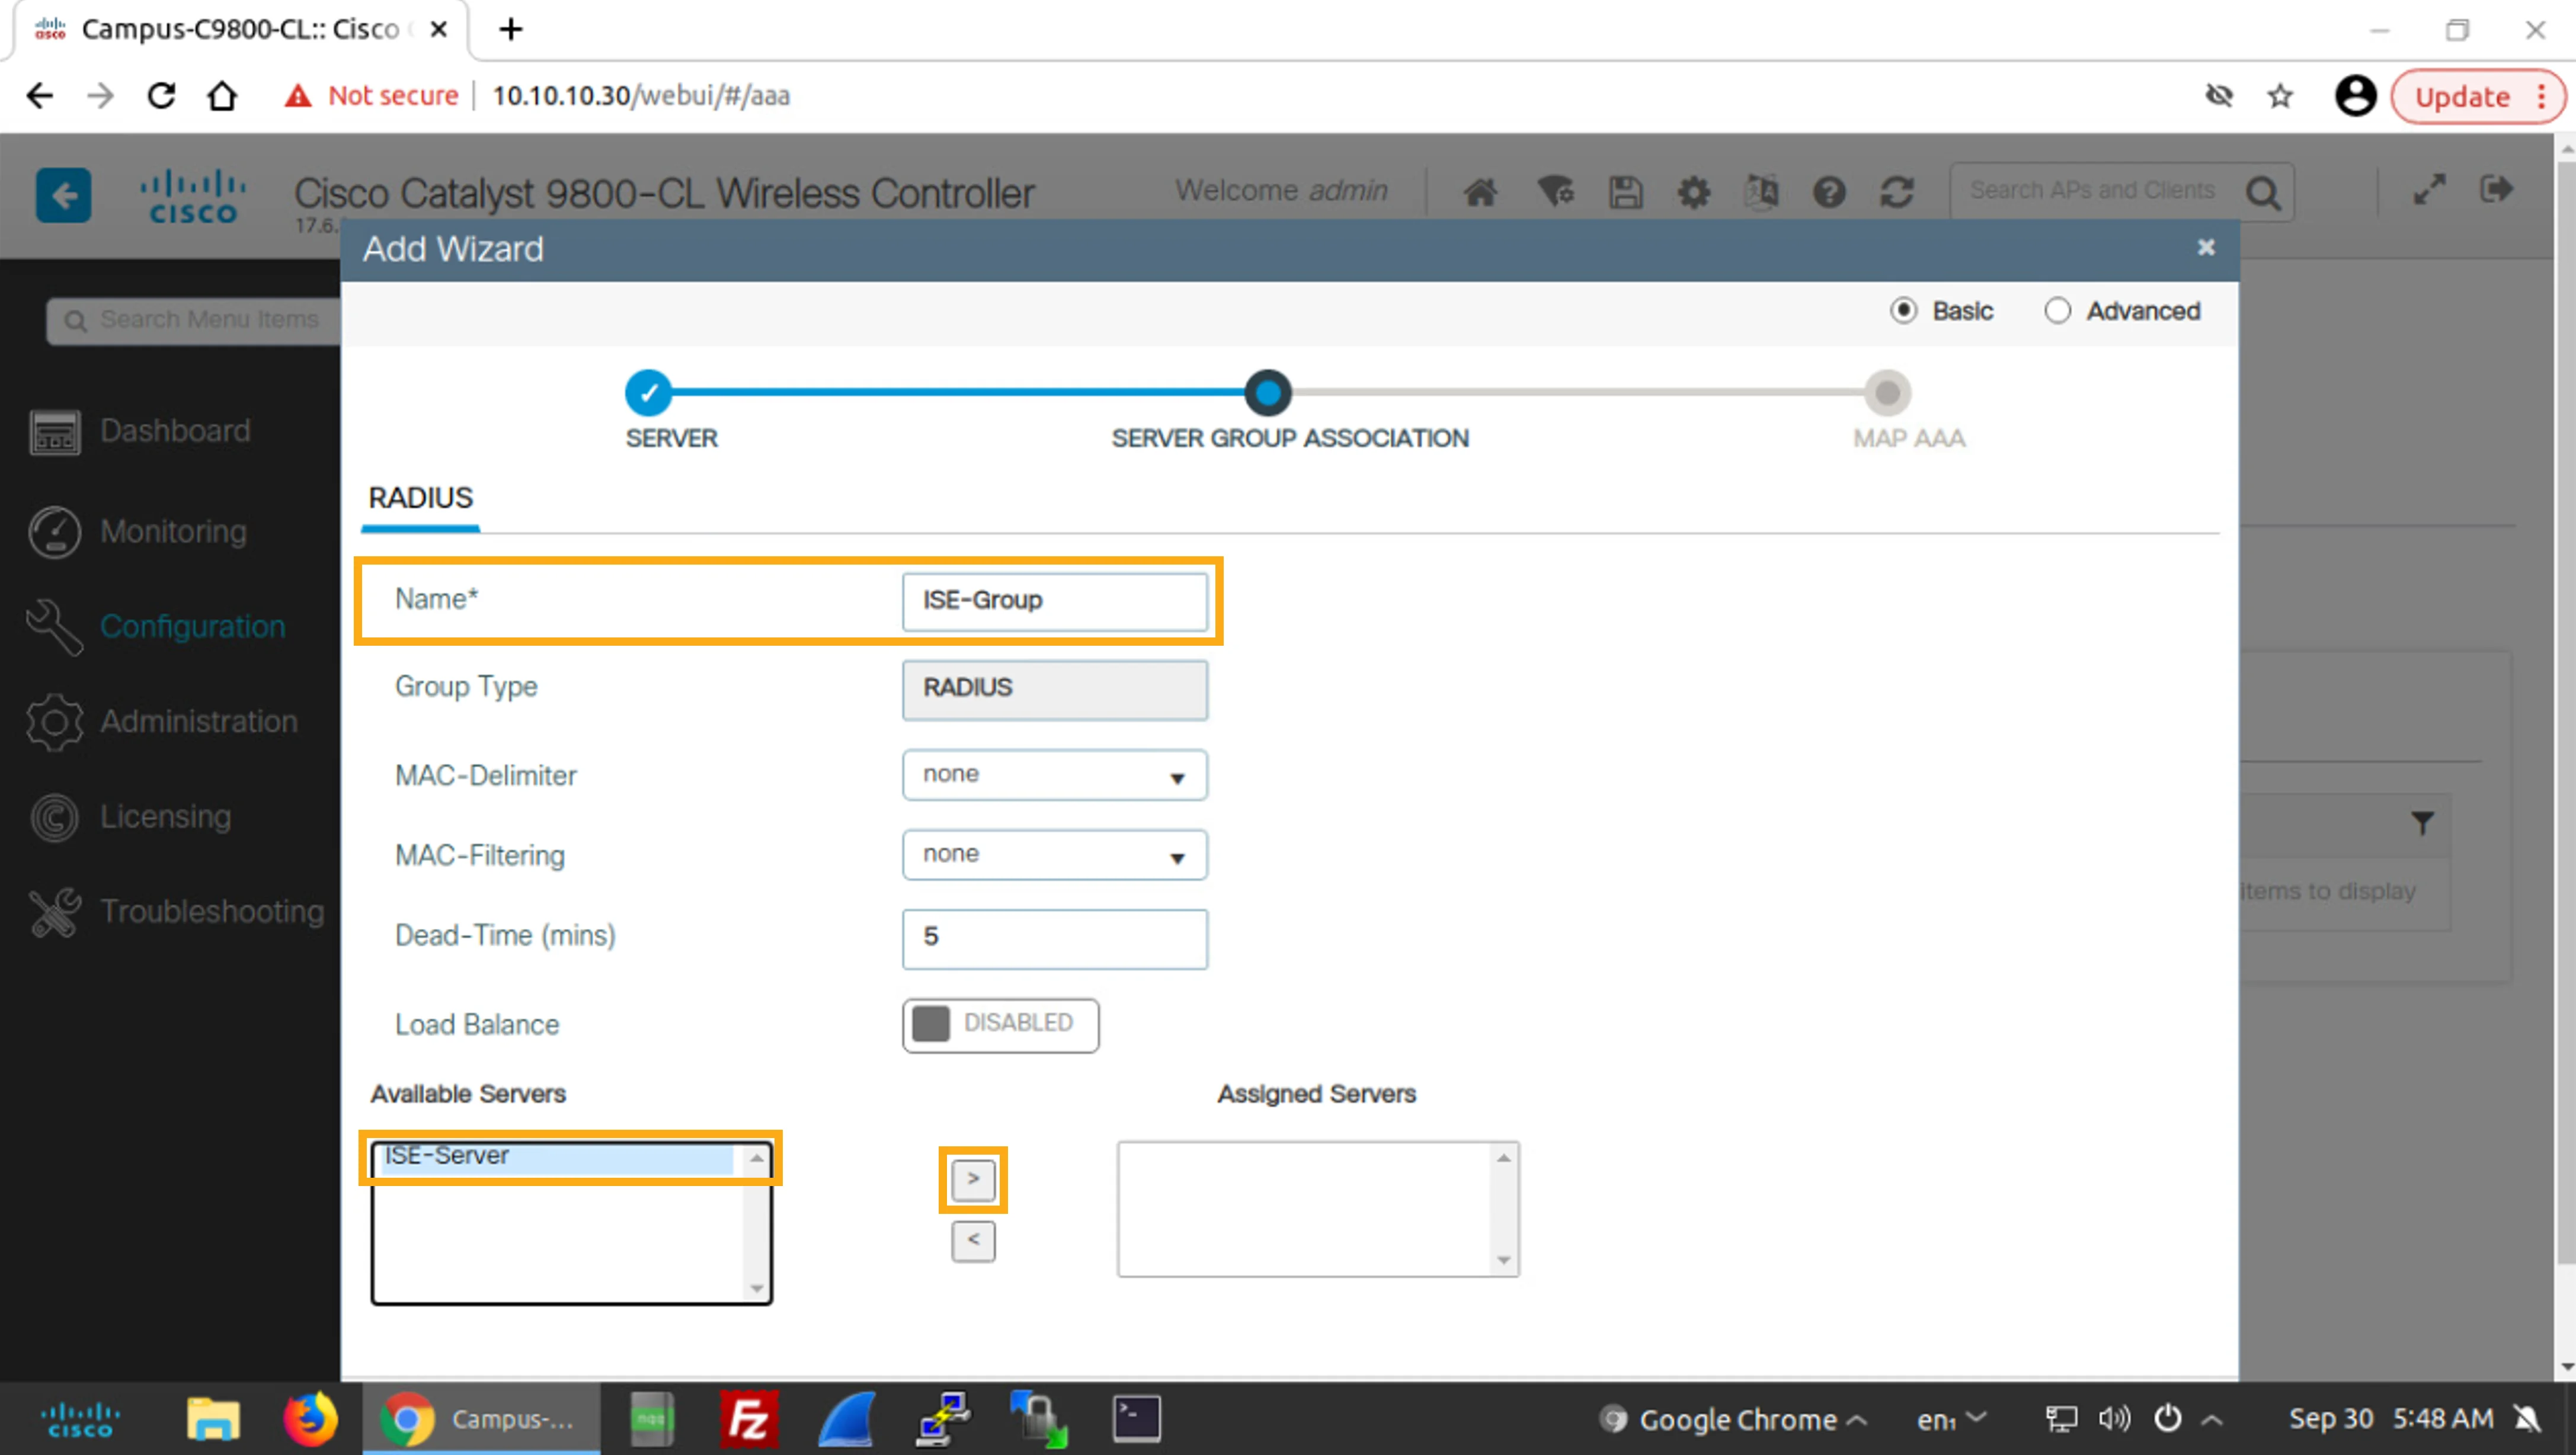
On the second page of the wizard, in the SERVER GROUP ASSOCIATION section, configure a server group called ISE-Group and assign the previously configured AAA server (ISE-Server) to the group.
在精靈的第二頁,於SERVER GROUP ASSOCIATION區段中,設定名為 ISE-Group 的伺服器群組,並將先前設定的 AAA 伺服器(ISE-Server)指派給此群組。
In particular, perform the following procedure to configure the server group:
具體來說,請執行下列程序以設定伺服器群組:
- Click in the Name input field and enter ISE-Group for the server group name.按一下Name輸入欄位,輸入 ISE-Group 作為伺服器群組名稱。
- From the Available Servers list, click ISE-Server to choose this server.在Available Servers清單中,按一下 ISE-Server 以選取此伺服器。
- Click the arrow (>) that points to the right to move the ISE-Server to the Assigned Servers list.按一下向右指的箭頭(>),將 ISE-Server 移到Assigned Servers清單。
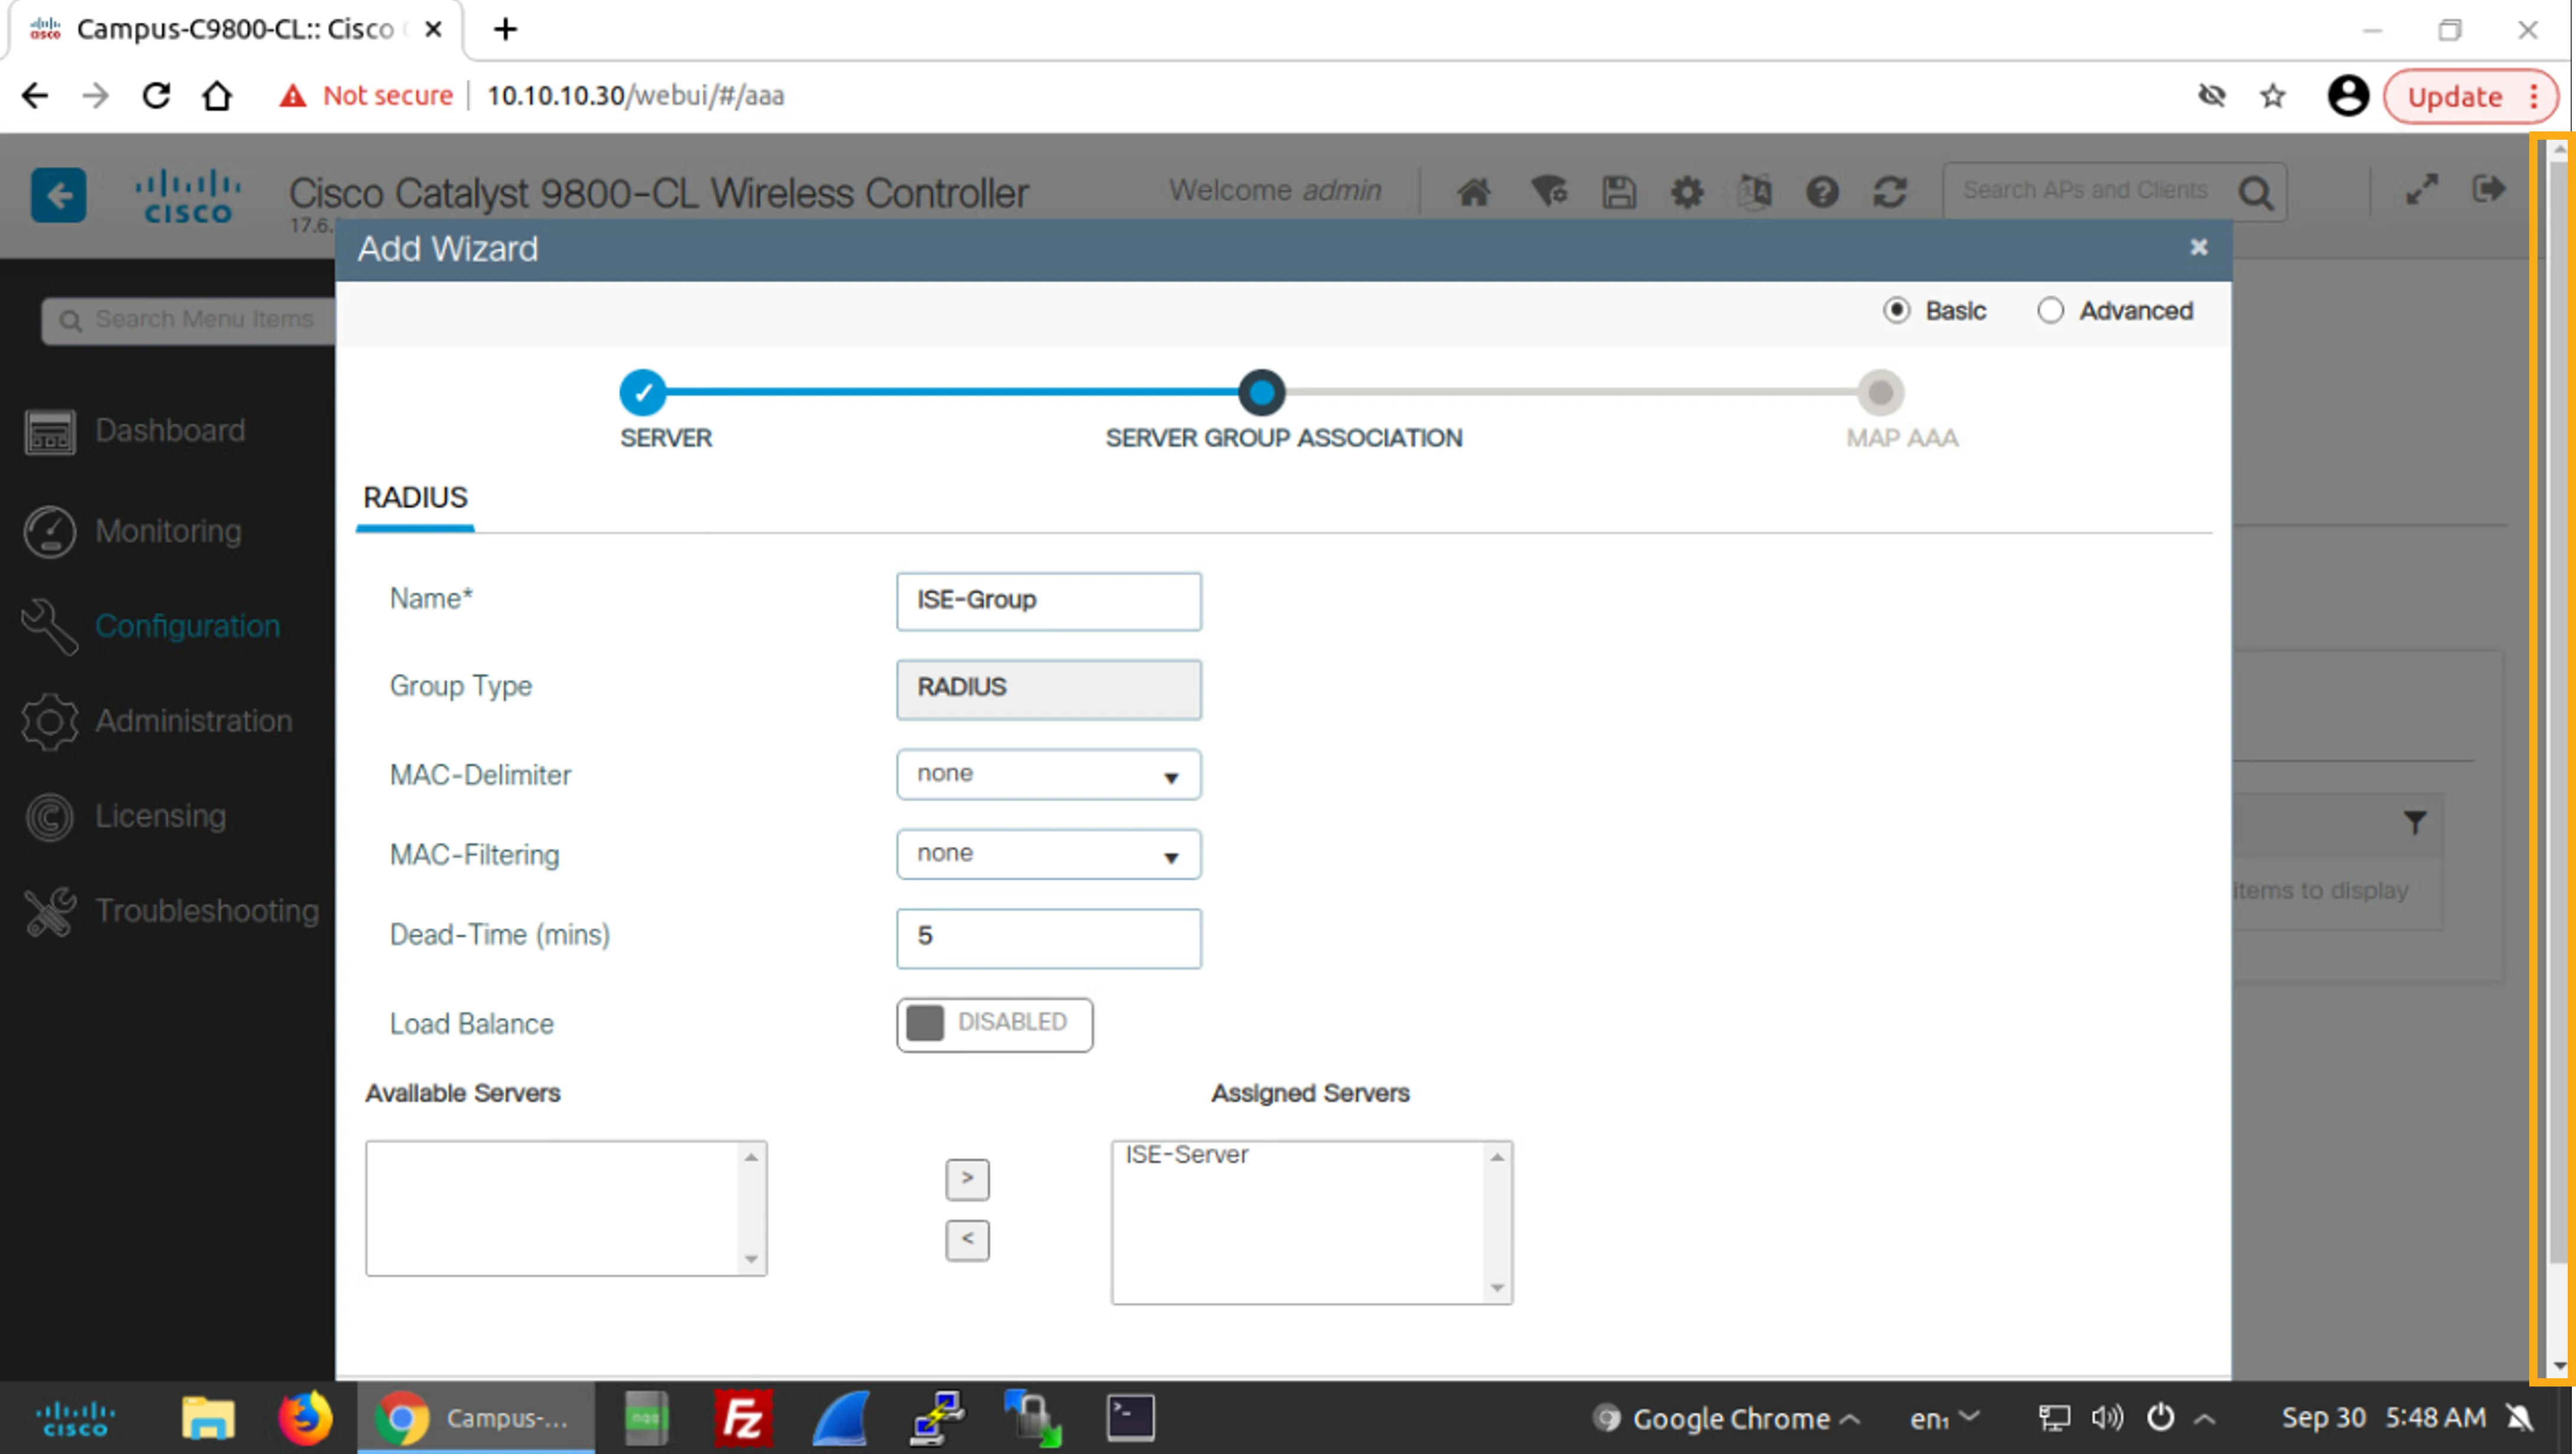
Click in the scroll bar area to the right to scroll down and click Next to continue with the wizard.
按一下右側捲軸區域向下捲動,再按一下Next以繼續精靈流程。
Click in the scroll bar area to the right to move down the page so you can see the Next button.
按一下右側捲軸區域向下移動頁面,讓您能看到Next按鈕。
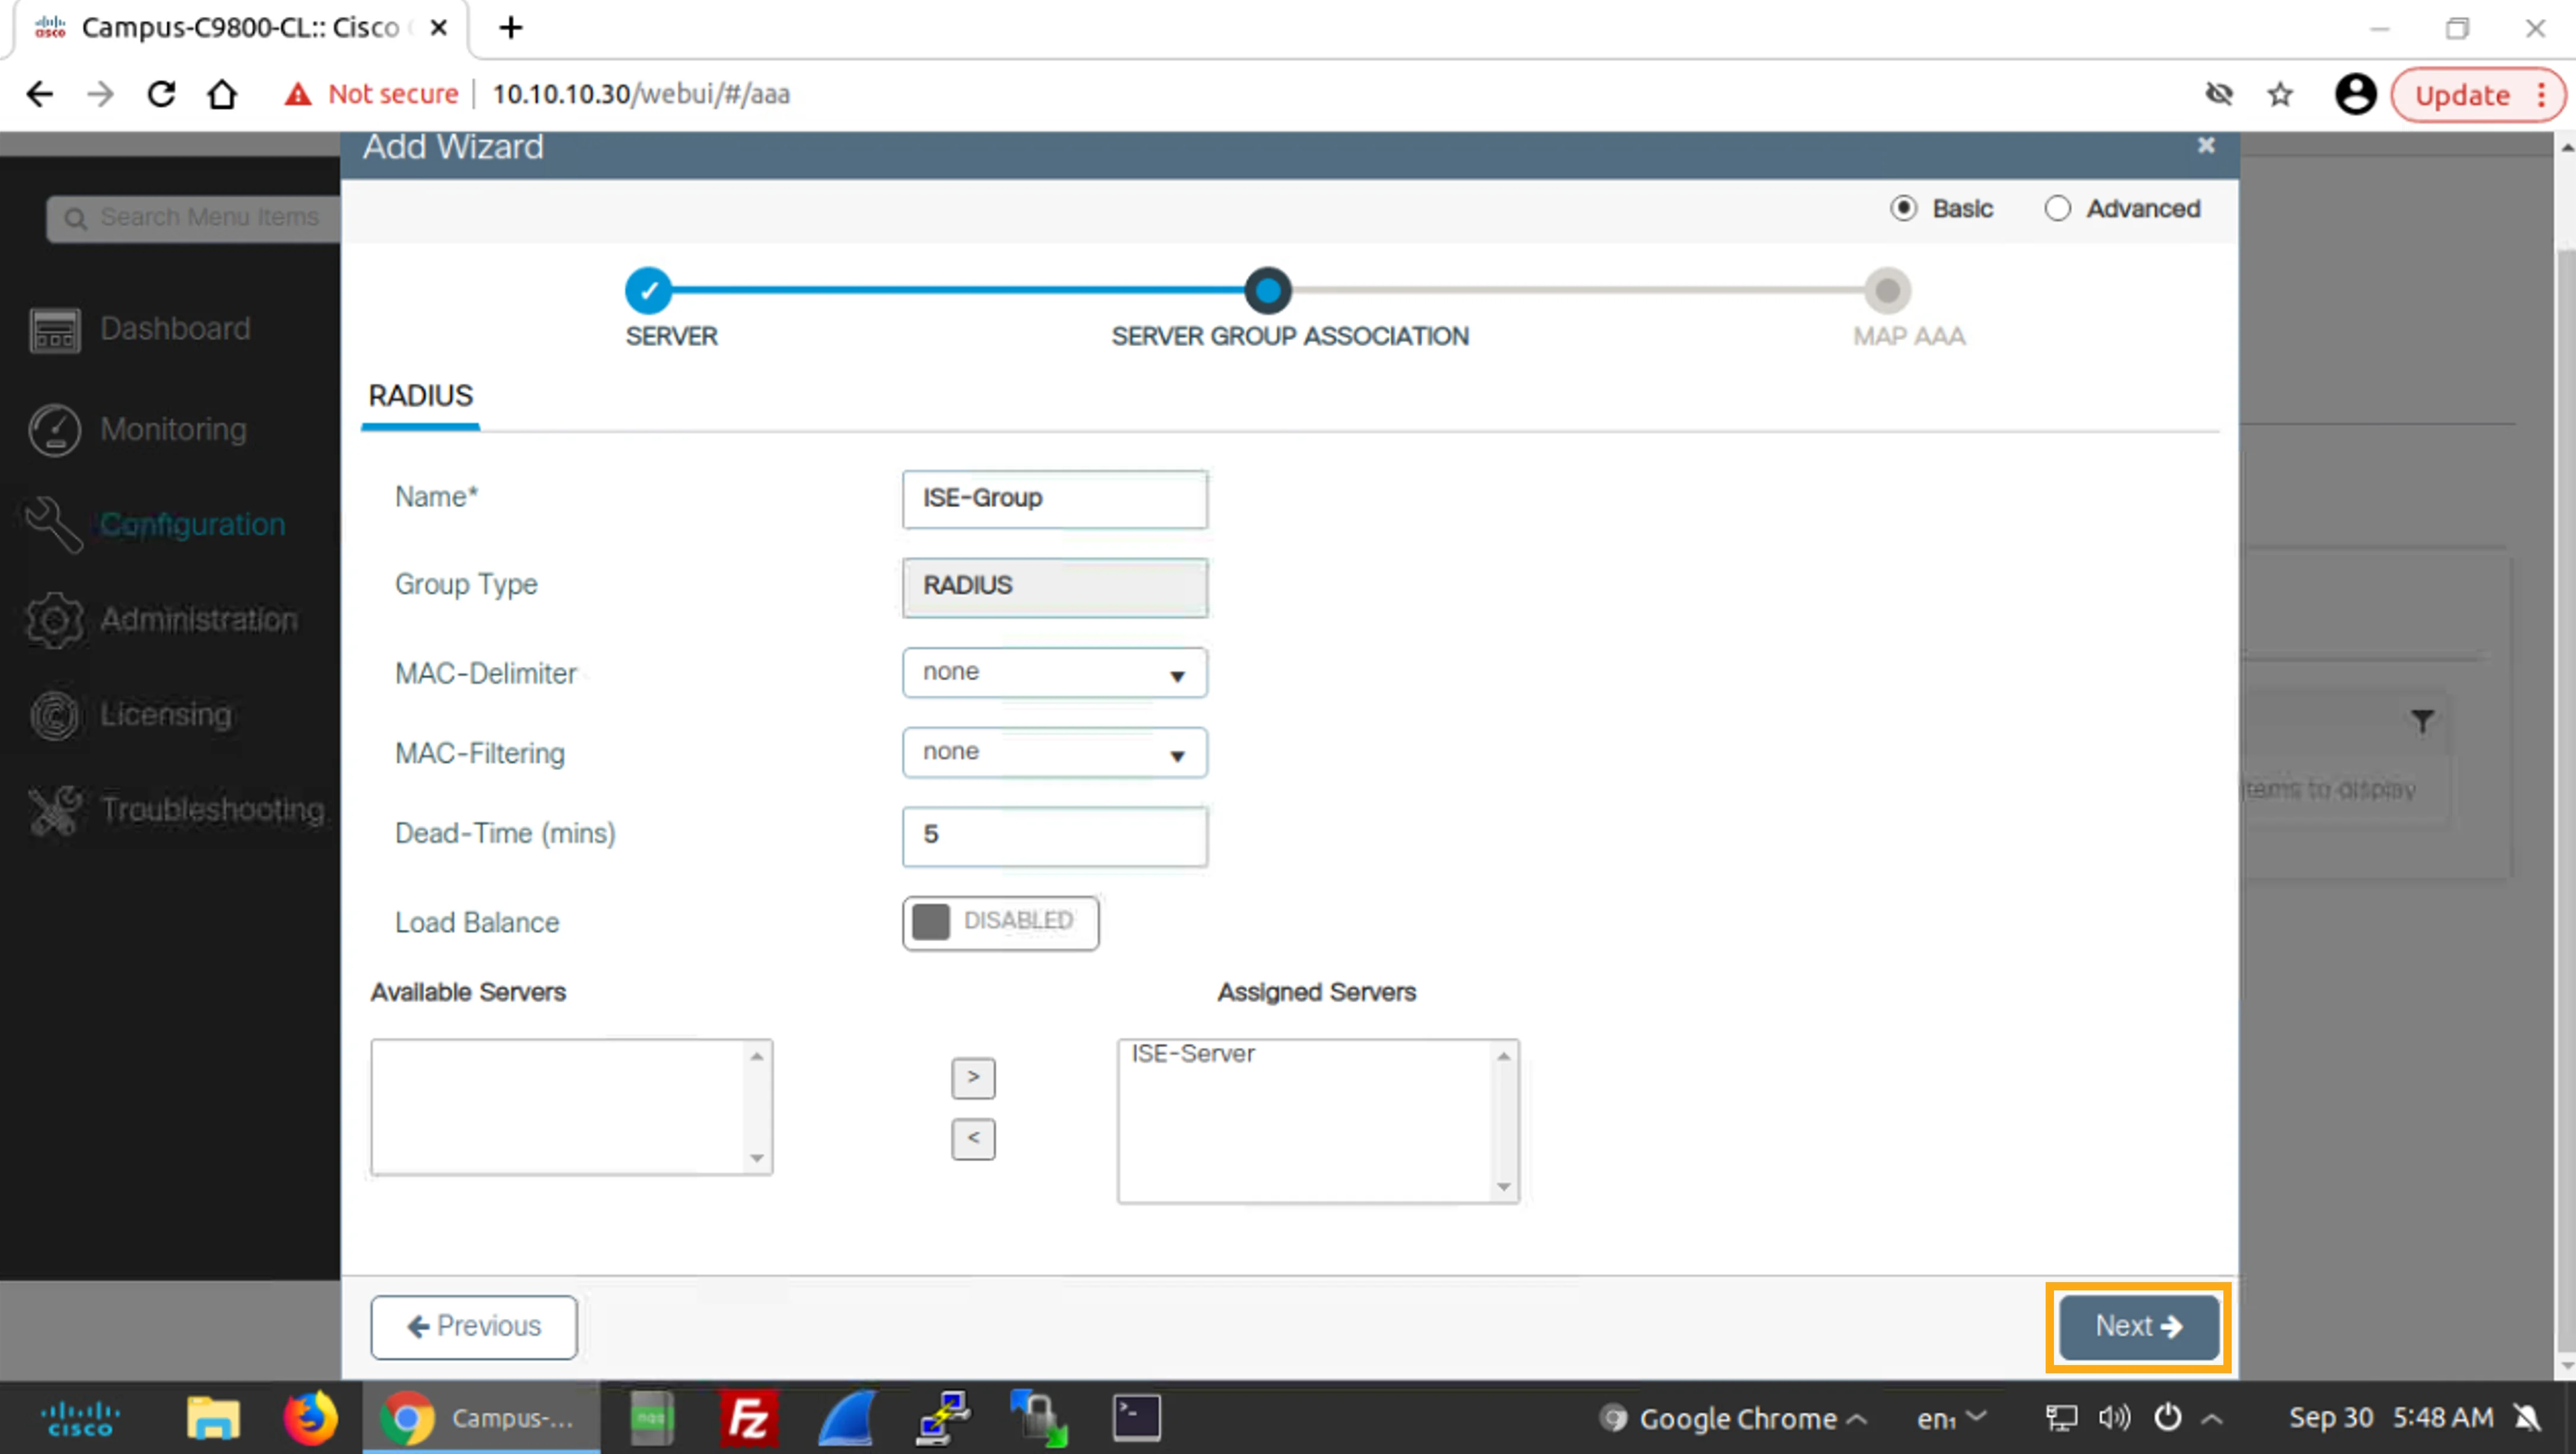
Click Next.
按一下Next。
On the last page of the wizard, in the MAP AAA section, configure a method list for Authentication only and exclude Authorization and Accounting, Name the list dot1x-auth, set the type to dot1x, and assign the previously configured server group (ISE-Group) to the method list.
在精靈的最後一頁,於MAP AAA區段中,僅設定Authentication的方法清單,排除Authorization與Accounting。將清單命名為 dot1x-auth,類型設為 dot1x,並將先前設定的伺服器群組(ISE-Group)指派給此方法清單。
In particular, perform the following procedure to configure the method list:
具體來說,請執行下列程序以設定方法清單:
- Uncheck Authorization and Accounting.取消勾選Authorization與Accounting。
- Click in the Method List Name input field and enter dot1x-auth for the method list name.按一下Method List Name輸入欄位,輸入 dot1x-auth 作為方法清單名稱。
- In the Type drop-down list, choose dot1x.在Type下拉式清單中選擇 dot1x。
- From the Available Server Groups list, click ISE-Group to choose this group.在Available Server Groups清單中,按一下 ISE-Group 以選取此群組。
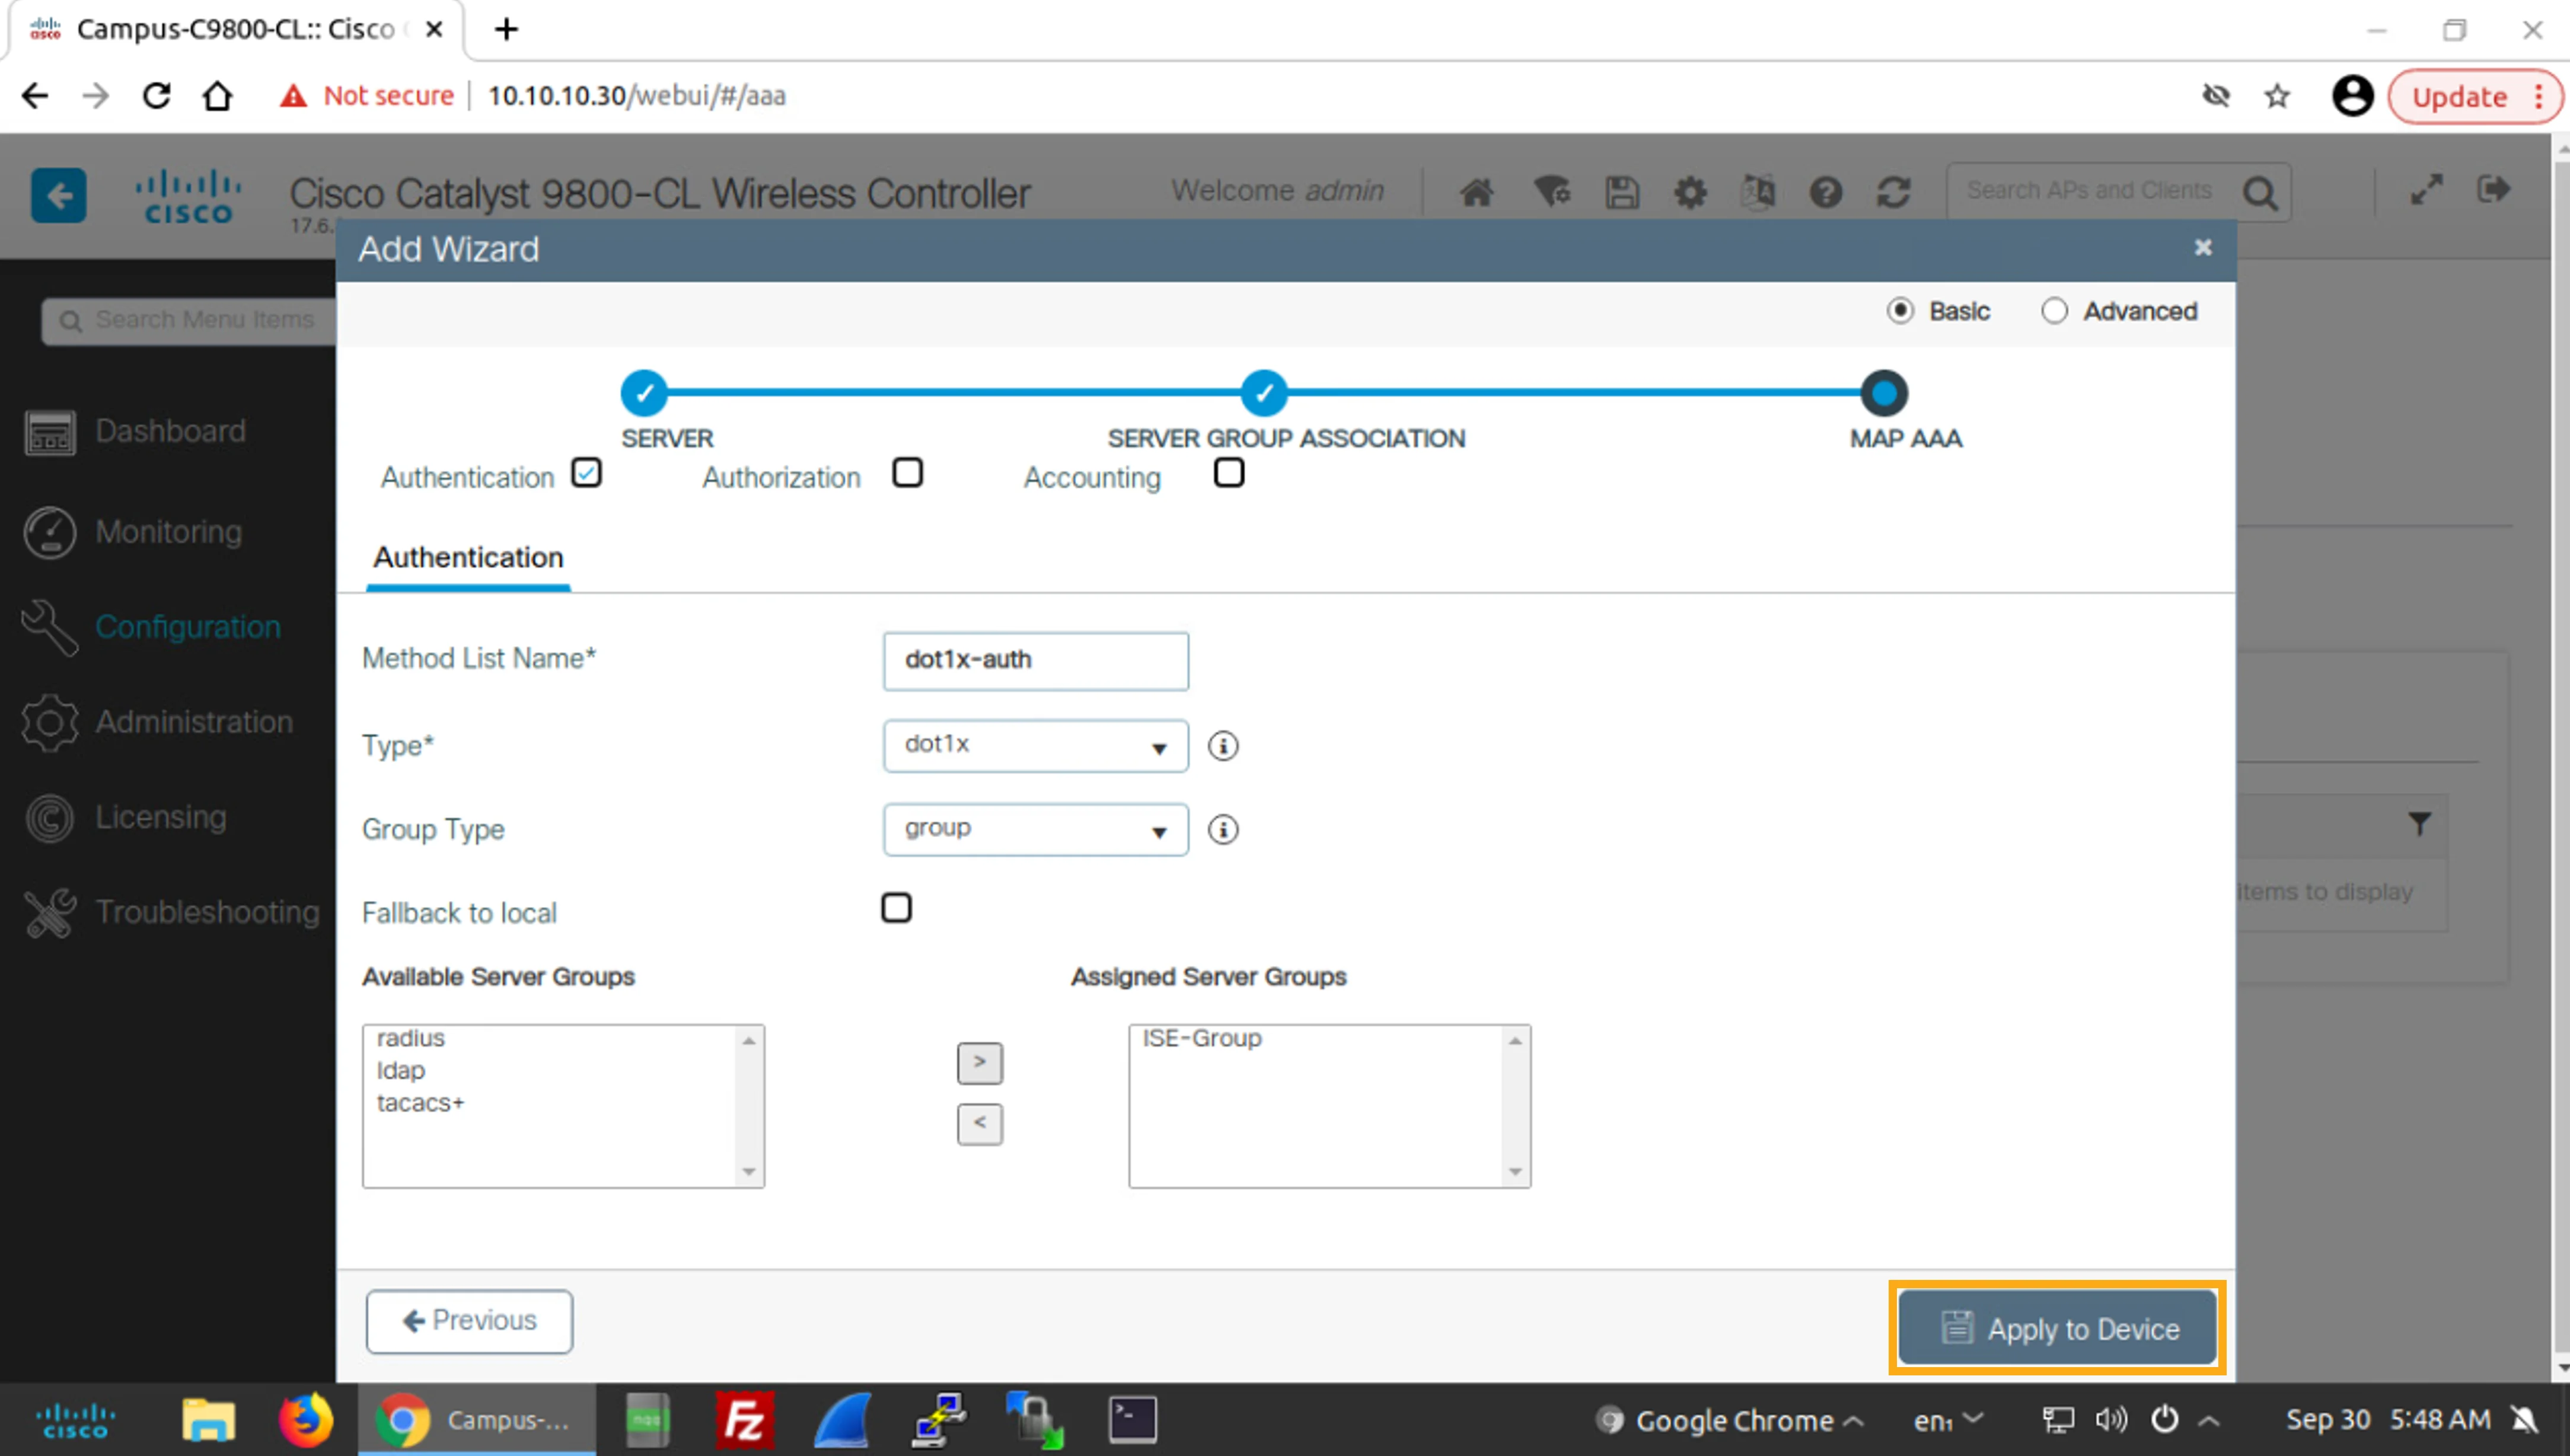
- Click the arrow (>) that points to the right to move the ISE-Group to the Assigned Server Groups list.按一下向右指的箭頭(>),將 ISE-Group 移到Assigned Server Groups清單。
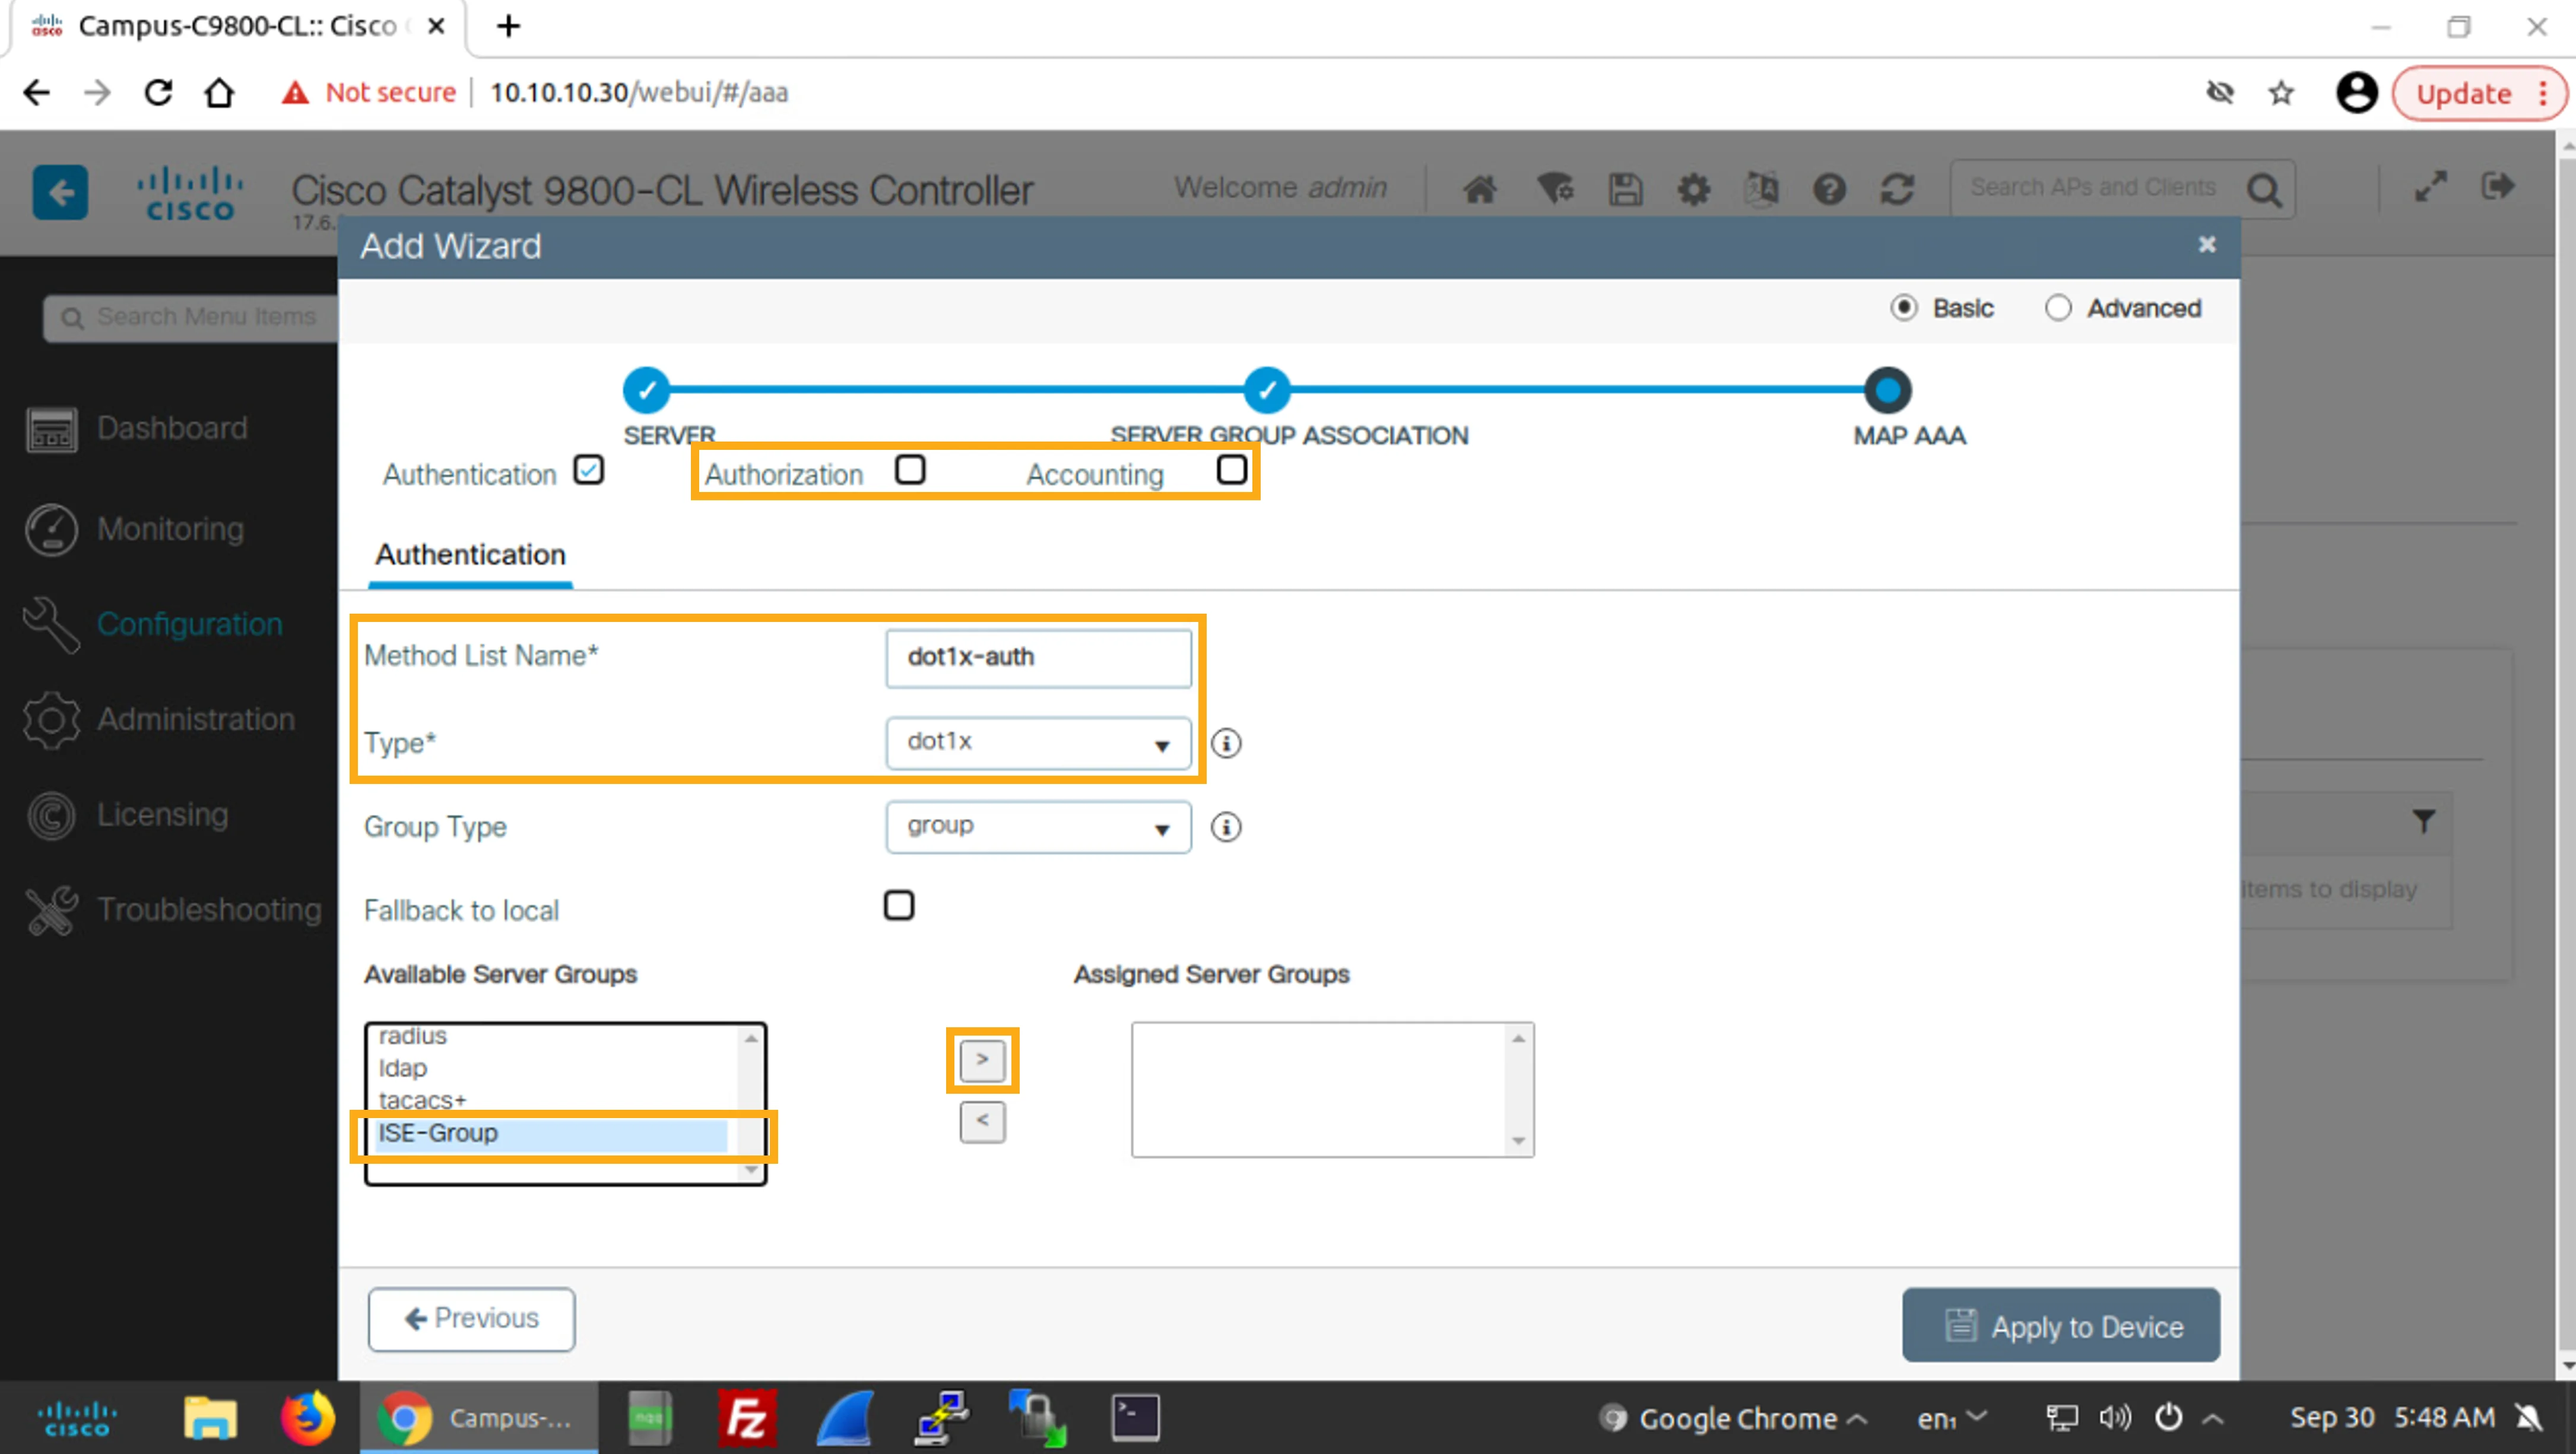
ClickApply to Device to save the AAA configuration.
按一下Apply to Device以儲存 AAA 設定。
Verify AAA Server Configuration
驗證 AAA 伺服器設定
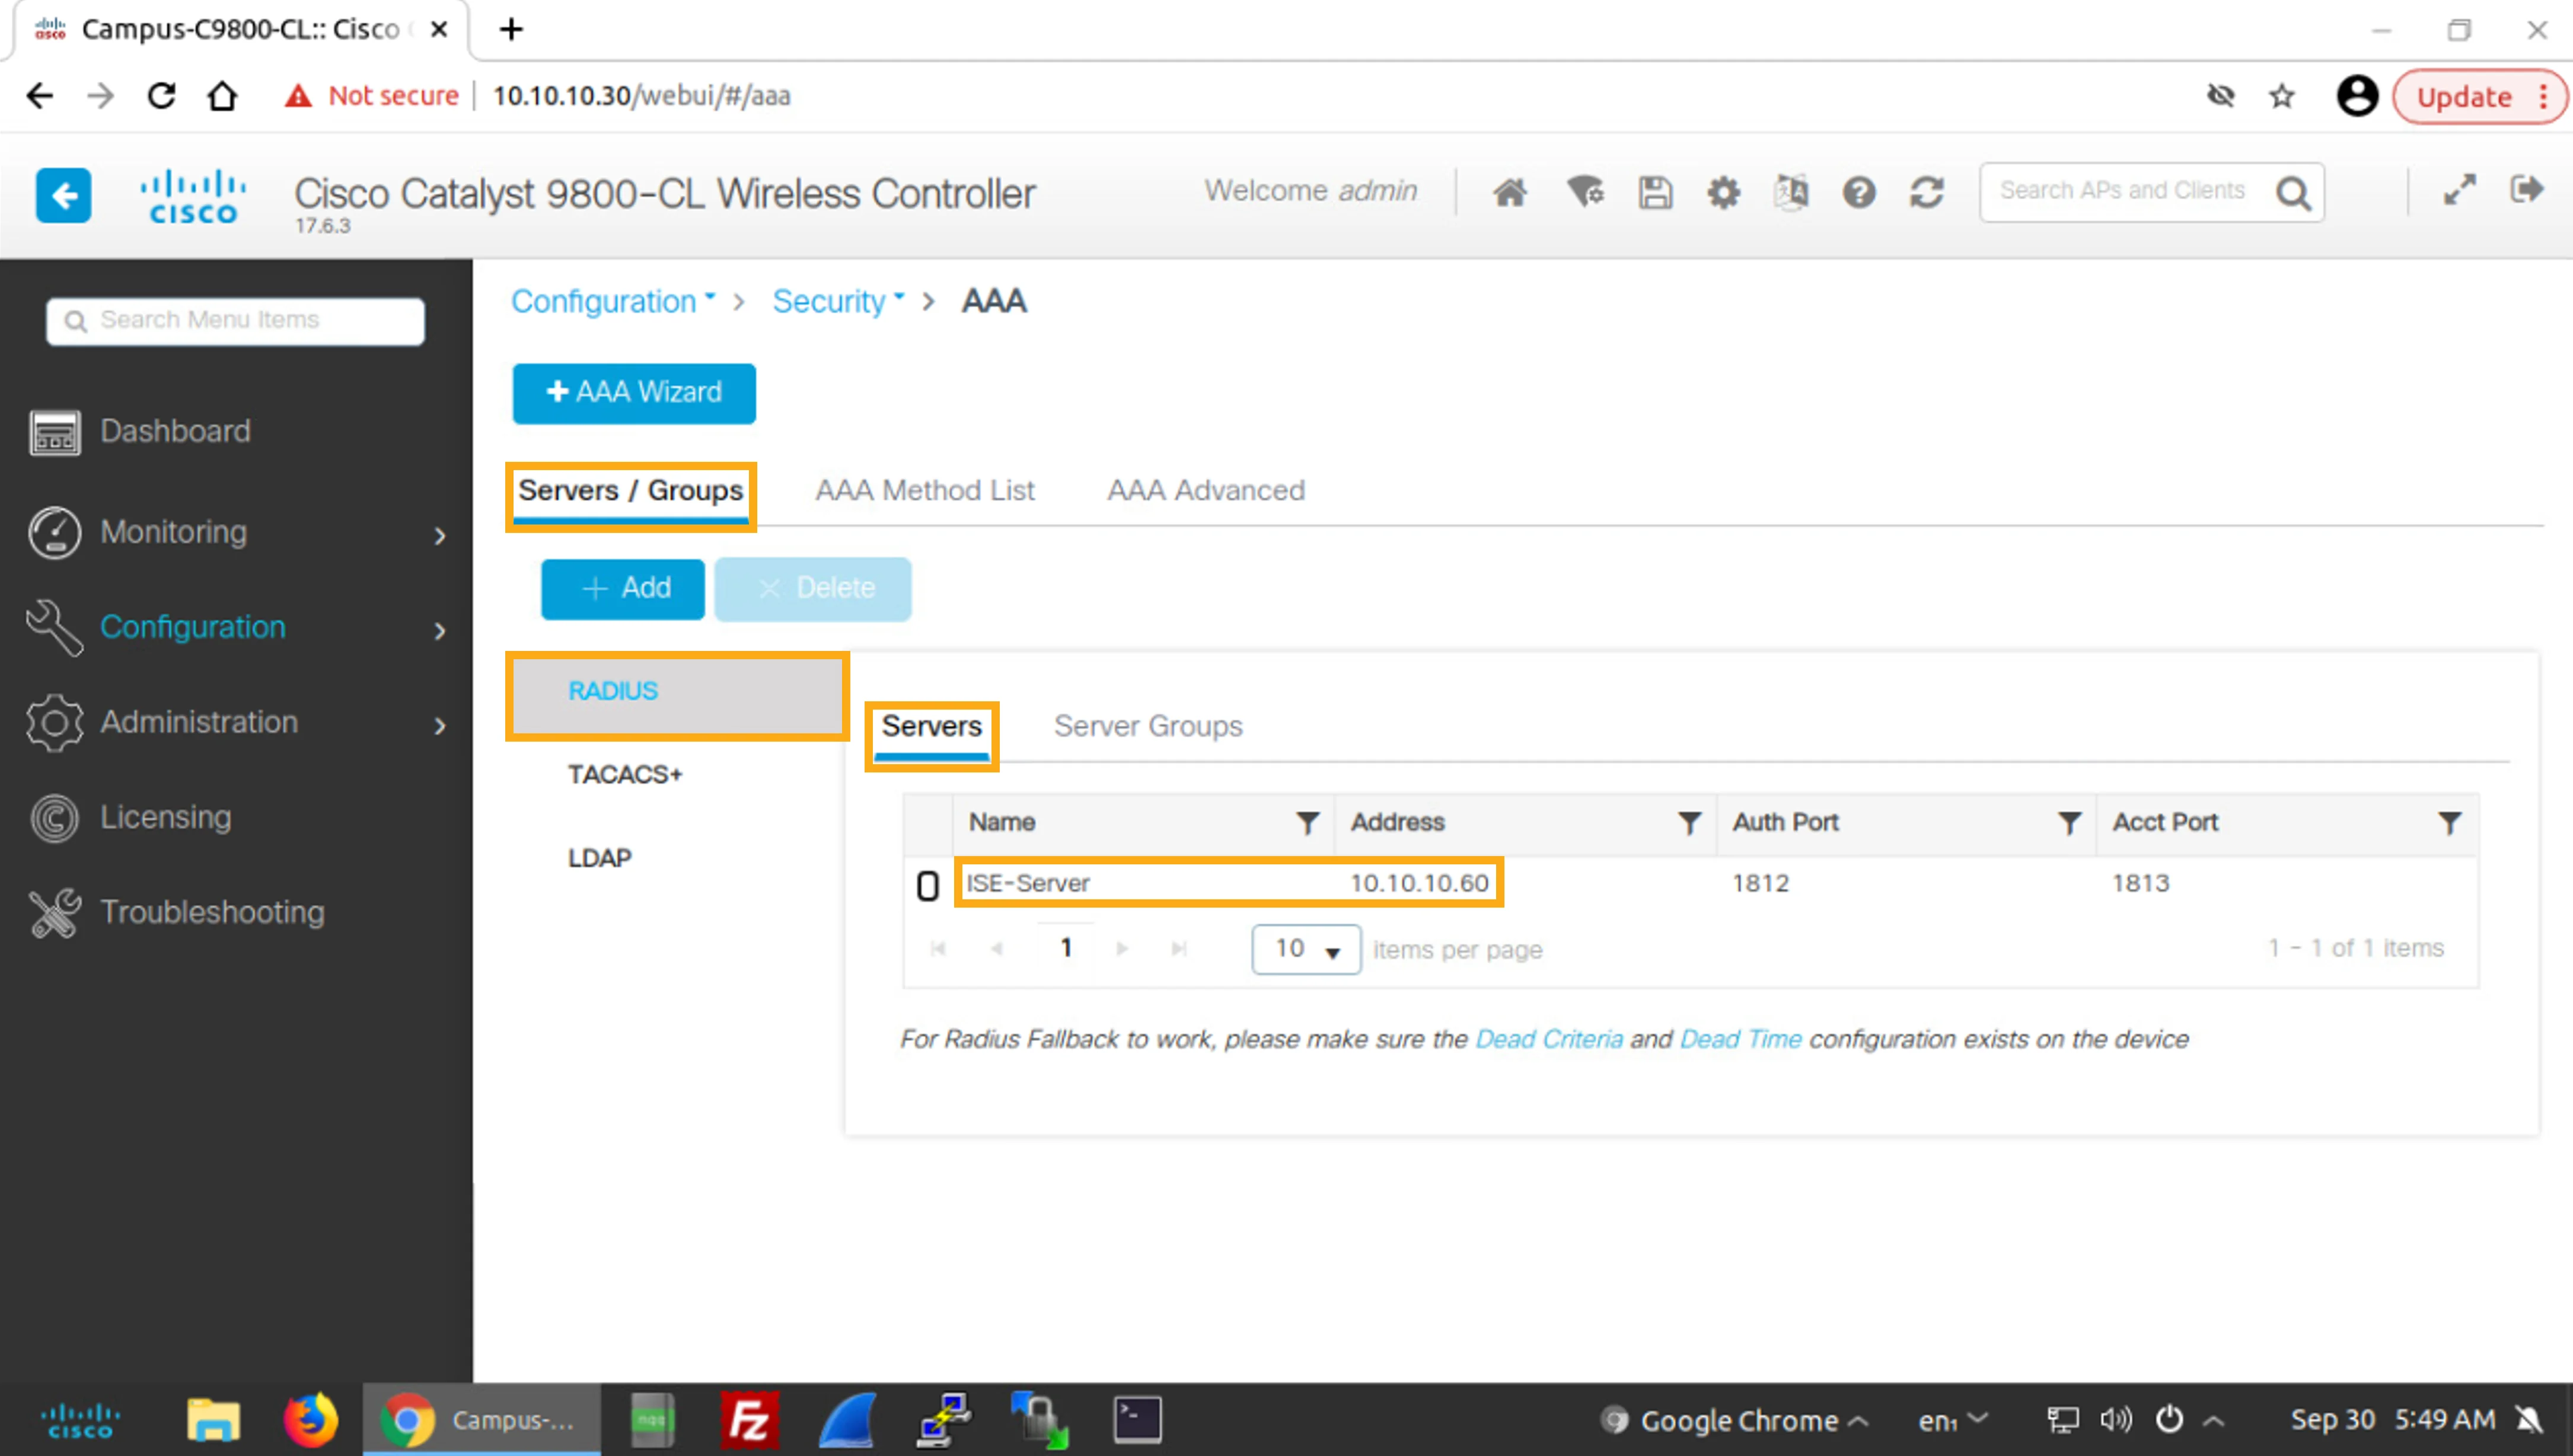
After applying the configuration using the wizard, you are taken back to the Configuration > Security > AAA page. You will now verify that the wizard correctly added the Server, Server Group, and AAA Method List.
使用精靈套用設定後,畫面會回到Configuration > Security > AAA頁面。您現在要驗證精靈是否正確新增了Server、Server Group與AAA Method List。
In the Servers / Groups tab, under RADIUS, in the Servers tab, verify that you can see the AAA server called ISE-Server and that its IP address is 10.10.10.60.
在Servers / Groups索引標籤下的RADIUS中,於Servers索引標籤下,驗證您可以看到名為 ISE-Server 的 AAA 伺服器,且其 IP 位址為 10.10.10.60。
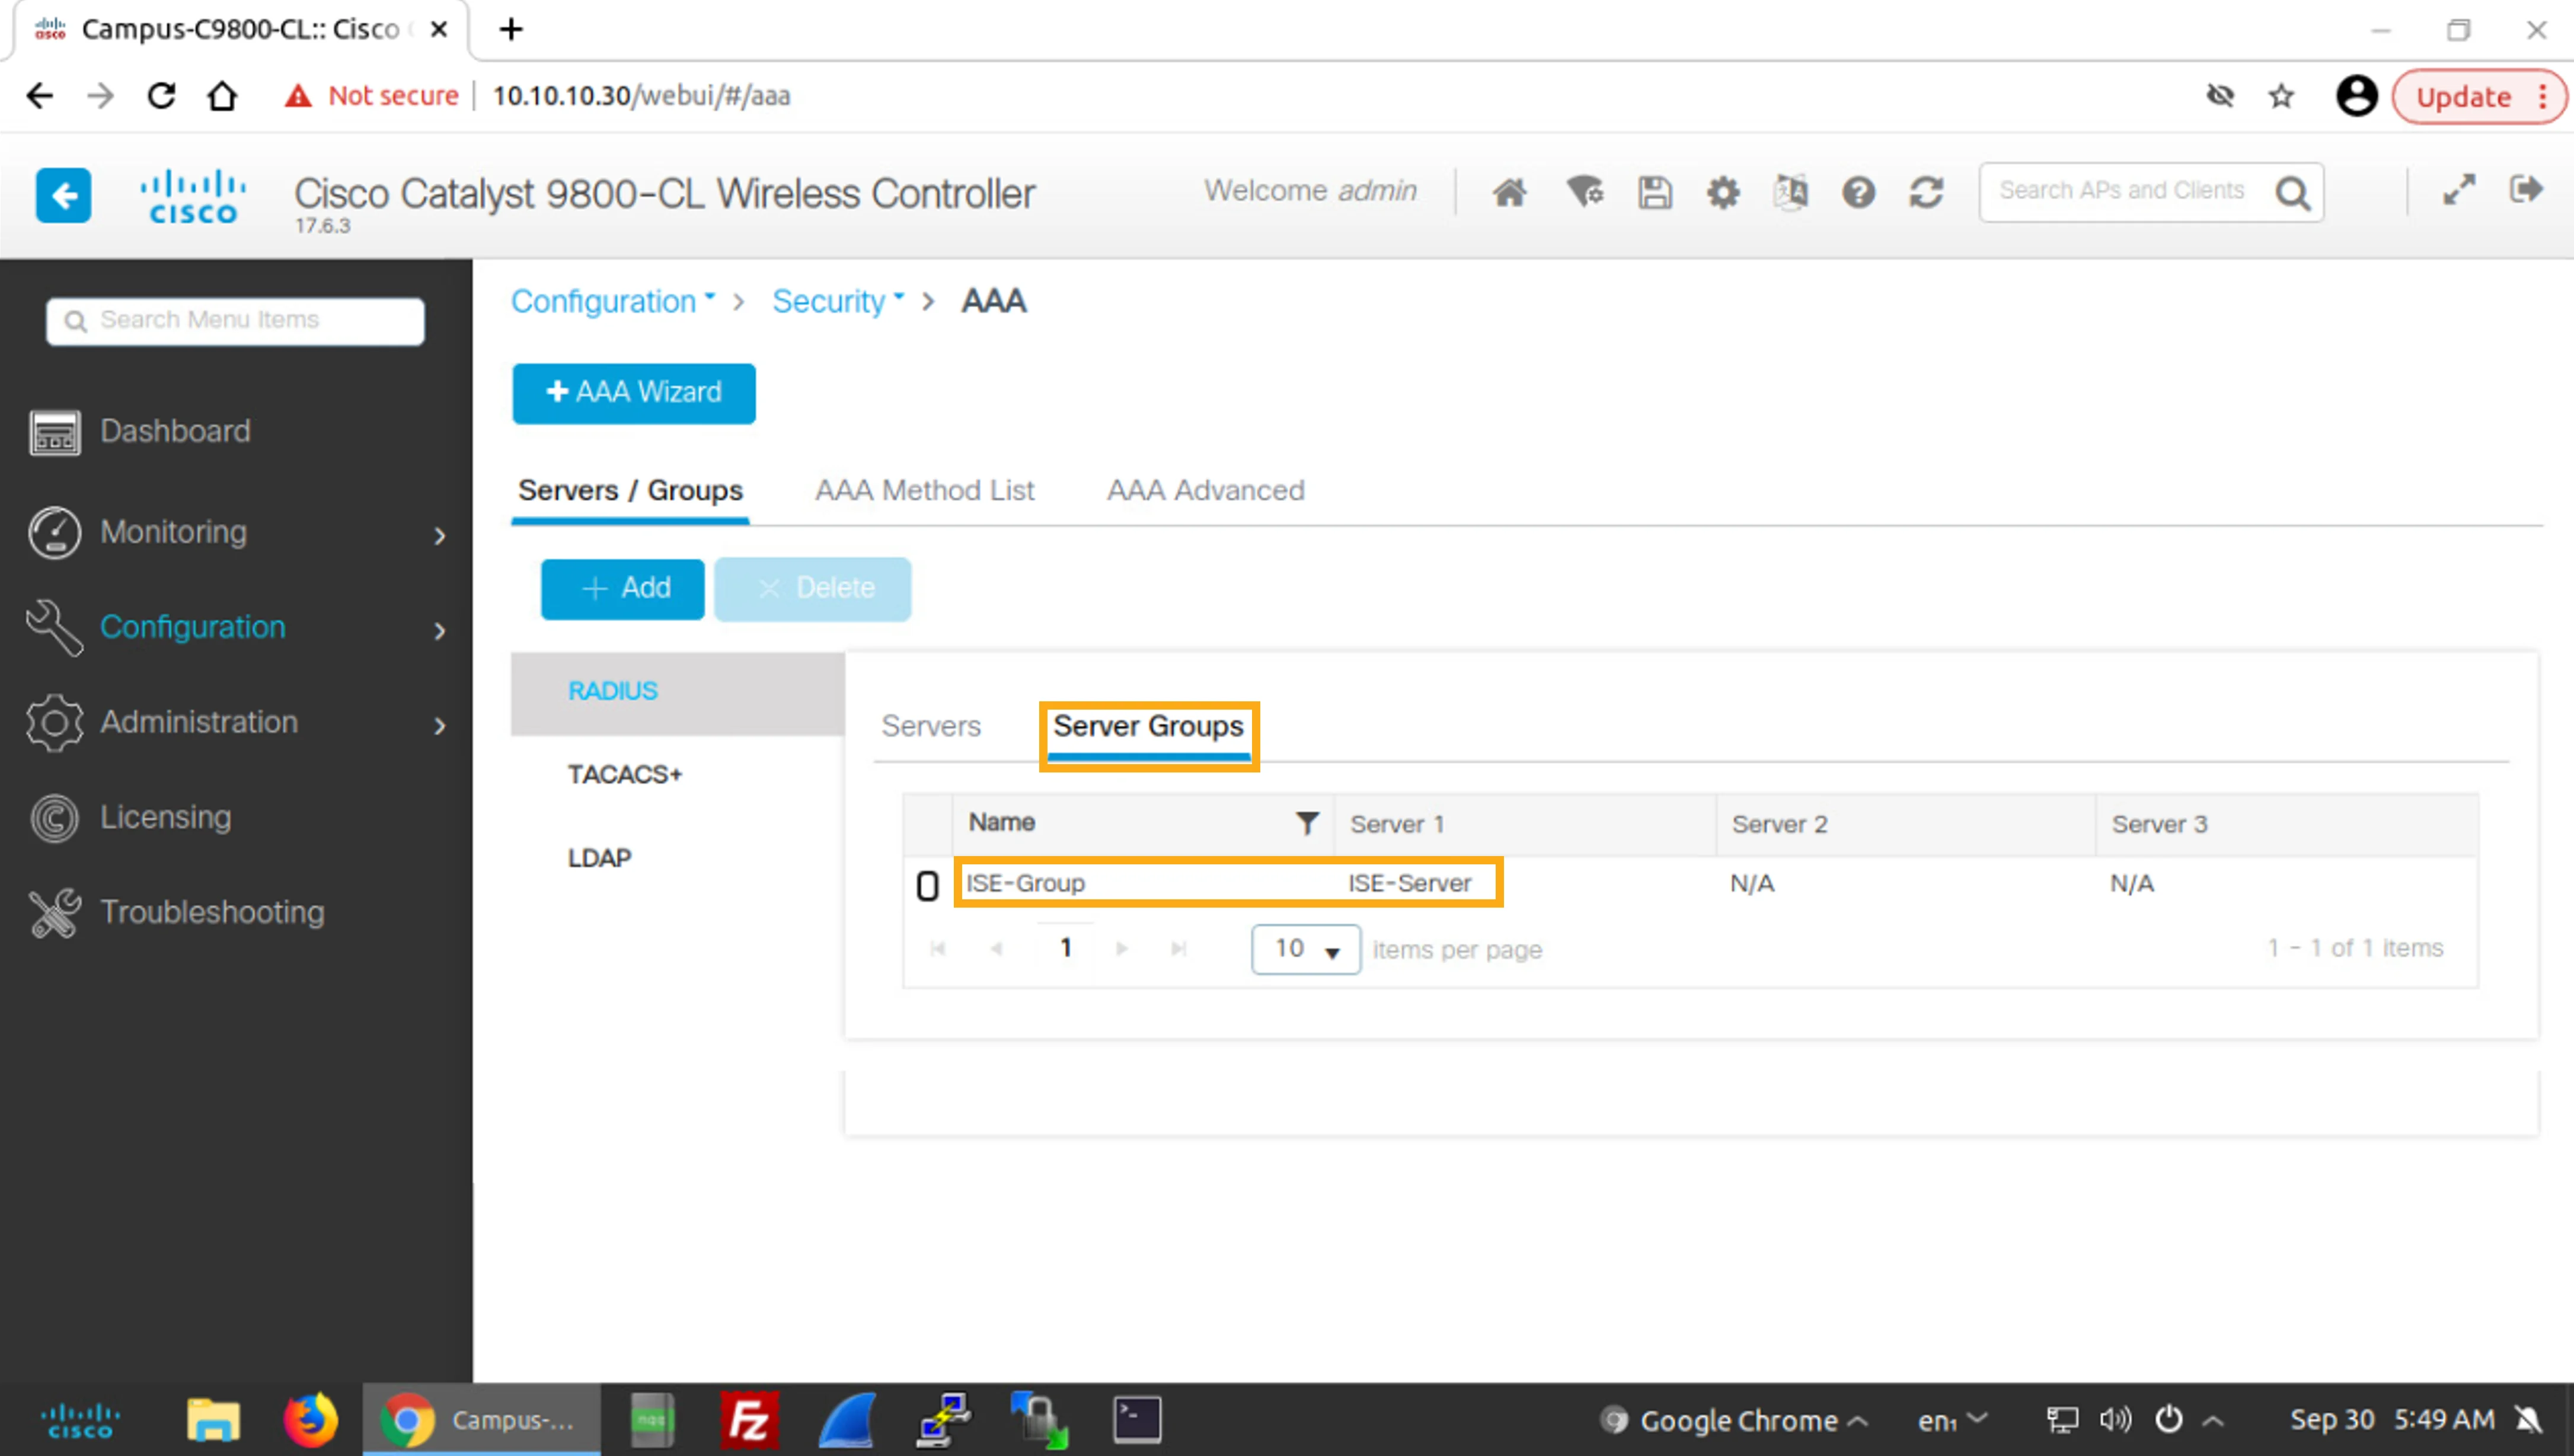
Click the Server Groups tab and verify that you can see the server group called ISE-Group and that the group includes the AAA server named ISE-Server.
按一下Server Groups索引標籤,驗證您可以看到名為 ISE-Group 的伺服器群組,且該群組包含名為 ISE-Server 的 AAA 伺服器。
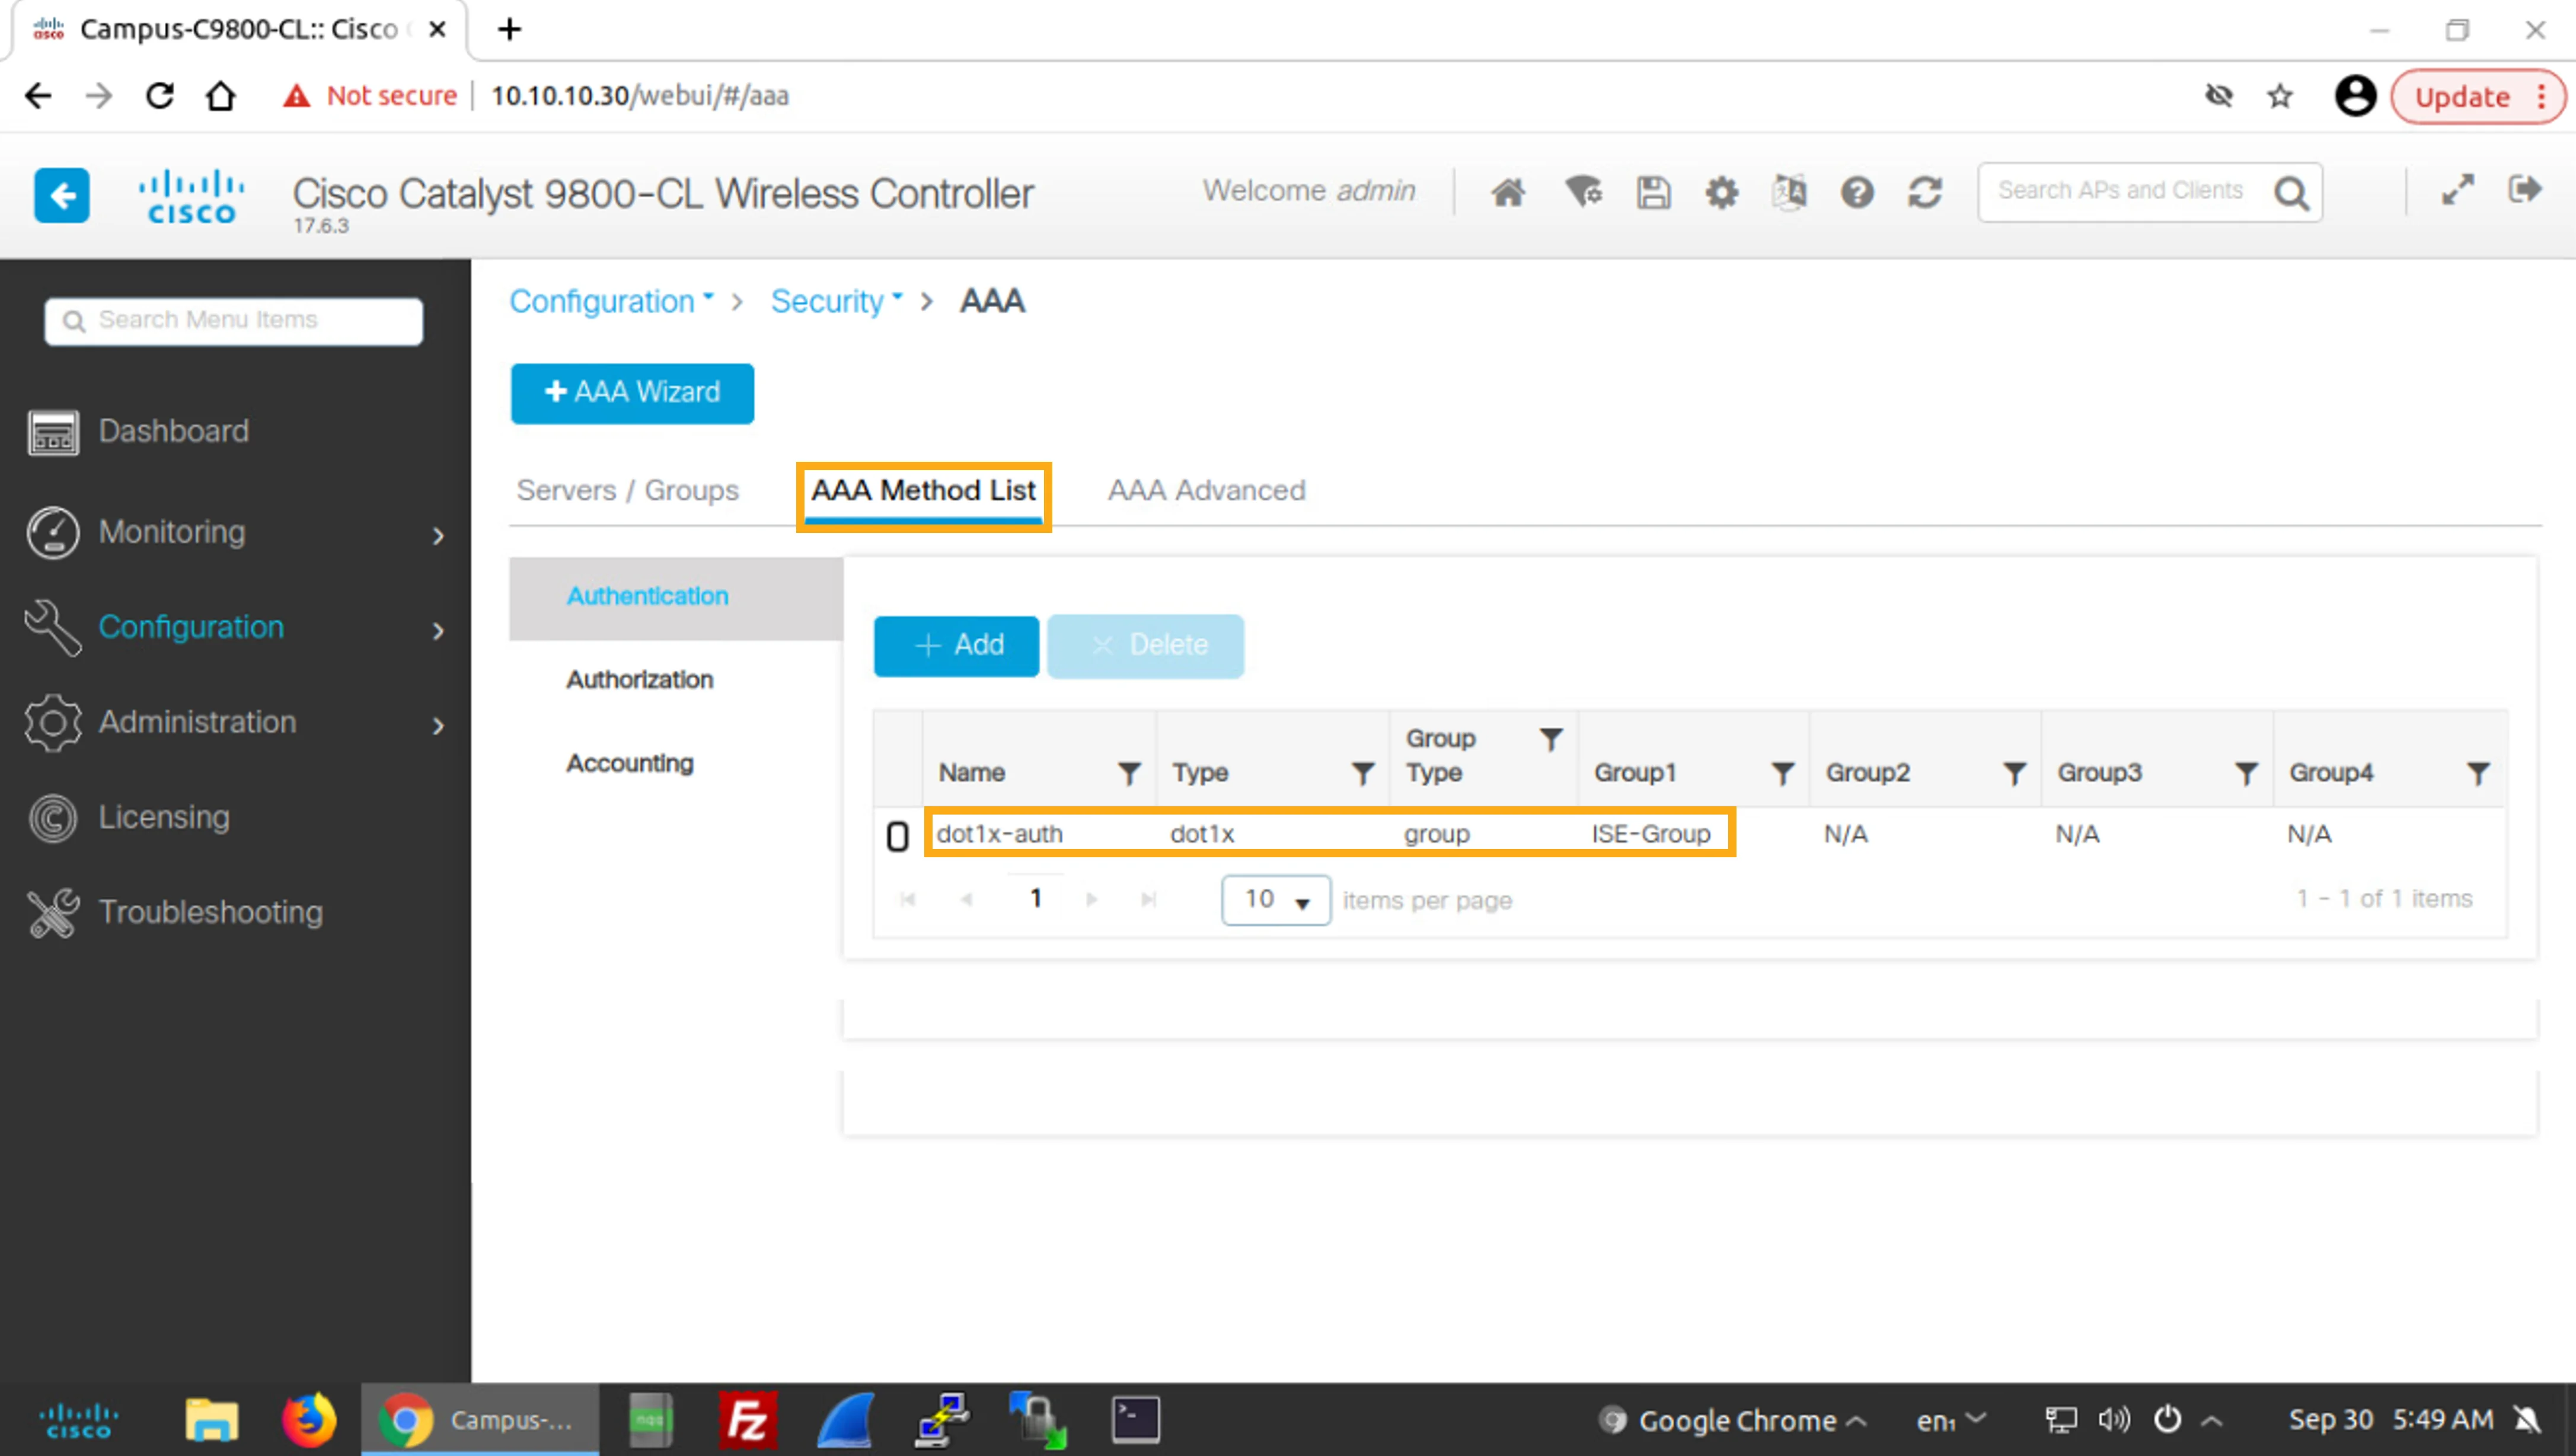
Click the AAA Method List tab and verify that you can see the AAA Method List called dot1x-auth, that its type is dot1x, and that the associated group is the server group named ISE-Group.
按一下AAA Method List索引標籤,驗證您可以看到名為 dot1x-auth 的AAA Method List,其類型為 dot1x,且關聯的群組為名為 ISE-Group 的伺服器群組。
Task 2: Enable SNMP and Syslog
任務 2:啟用 SNMP 及 Syslog
Although manually configuring a single WLC using the GUI works very well, a GUI is not a scalable solution for managing deployments with a larger number of WLCs. A simple way to manage larger networks is to use the SNMP and a centralized management console. In terms of logging, you can use a centralized syslog server to collect all logging information at a single device.
雖然透過 GUI 手動設定單一 WLC 效果很好,但對於管理較多台 WLC 的部署而言,GUI 並非具擴充性的解決方案。管理較大型網路的簡單方式是使用 SNMP 搭配集中式管理主控台。就記錄而言,您可以使用集中式 syslog 伺服器,將所有記錄資訊彙整到單一裝置。
You will learn how to enable SNMP and syslog on a Cisco Catalyst 9800 WLC.
您將學習如何在 Cisco Catalyst 9800 WLC 上啟用 SNMP 及 syslog。
Activity
活動
Enable SNMP on the Campus WLC
在 Campus WLC 上啟用 SNMP
You will first enable SNMP on the Campus WLC.
您首先要在 Campus WLC 上啟用 SNMP。
On the Administration > Management > SNMP page, enable SNMP.
在Administration > Management > SNMP頁面上啟用 SNMP。
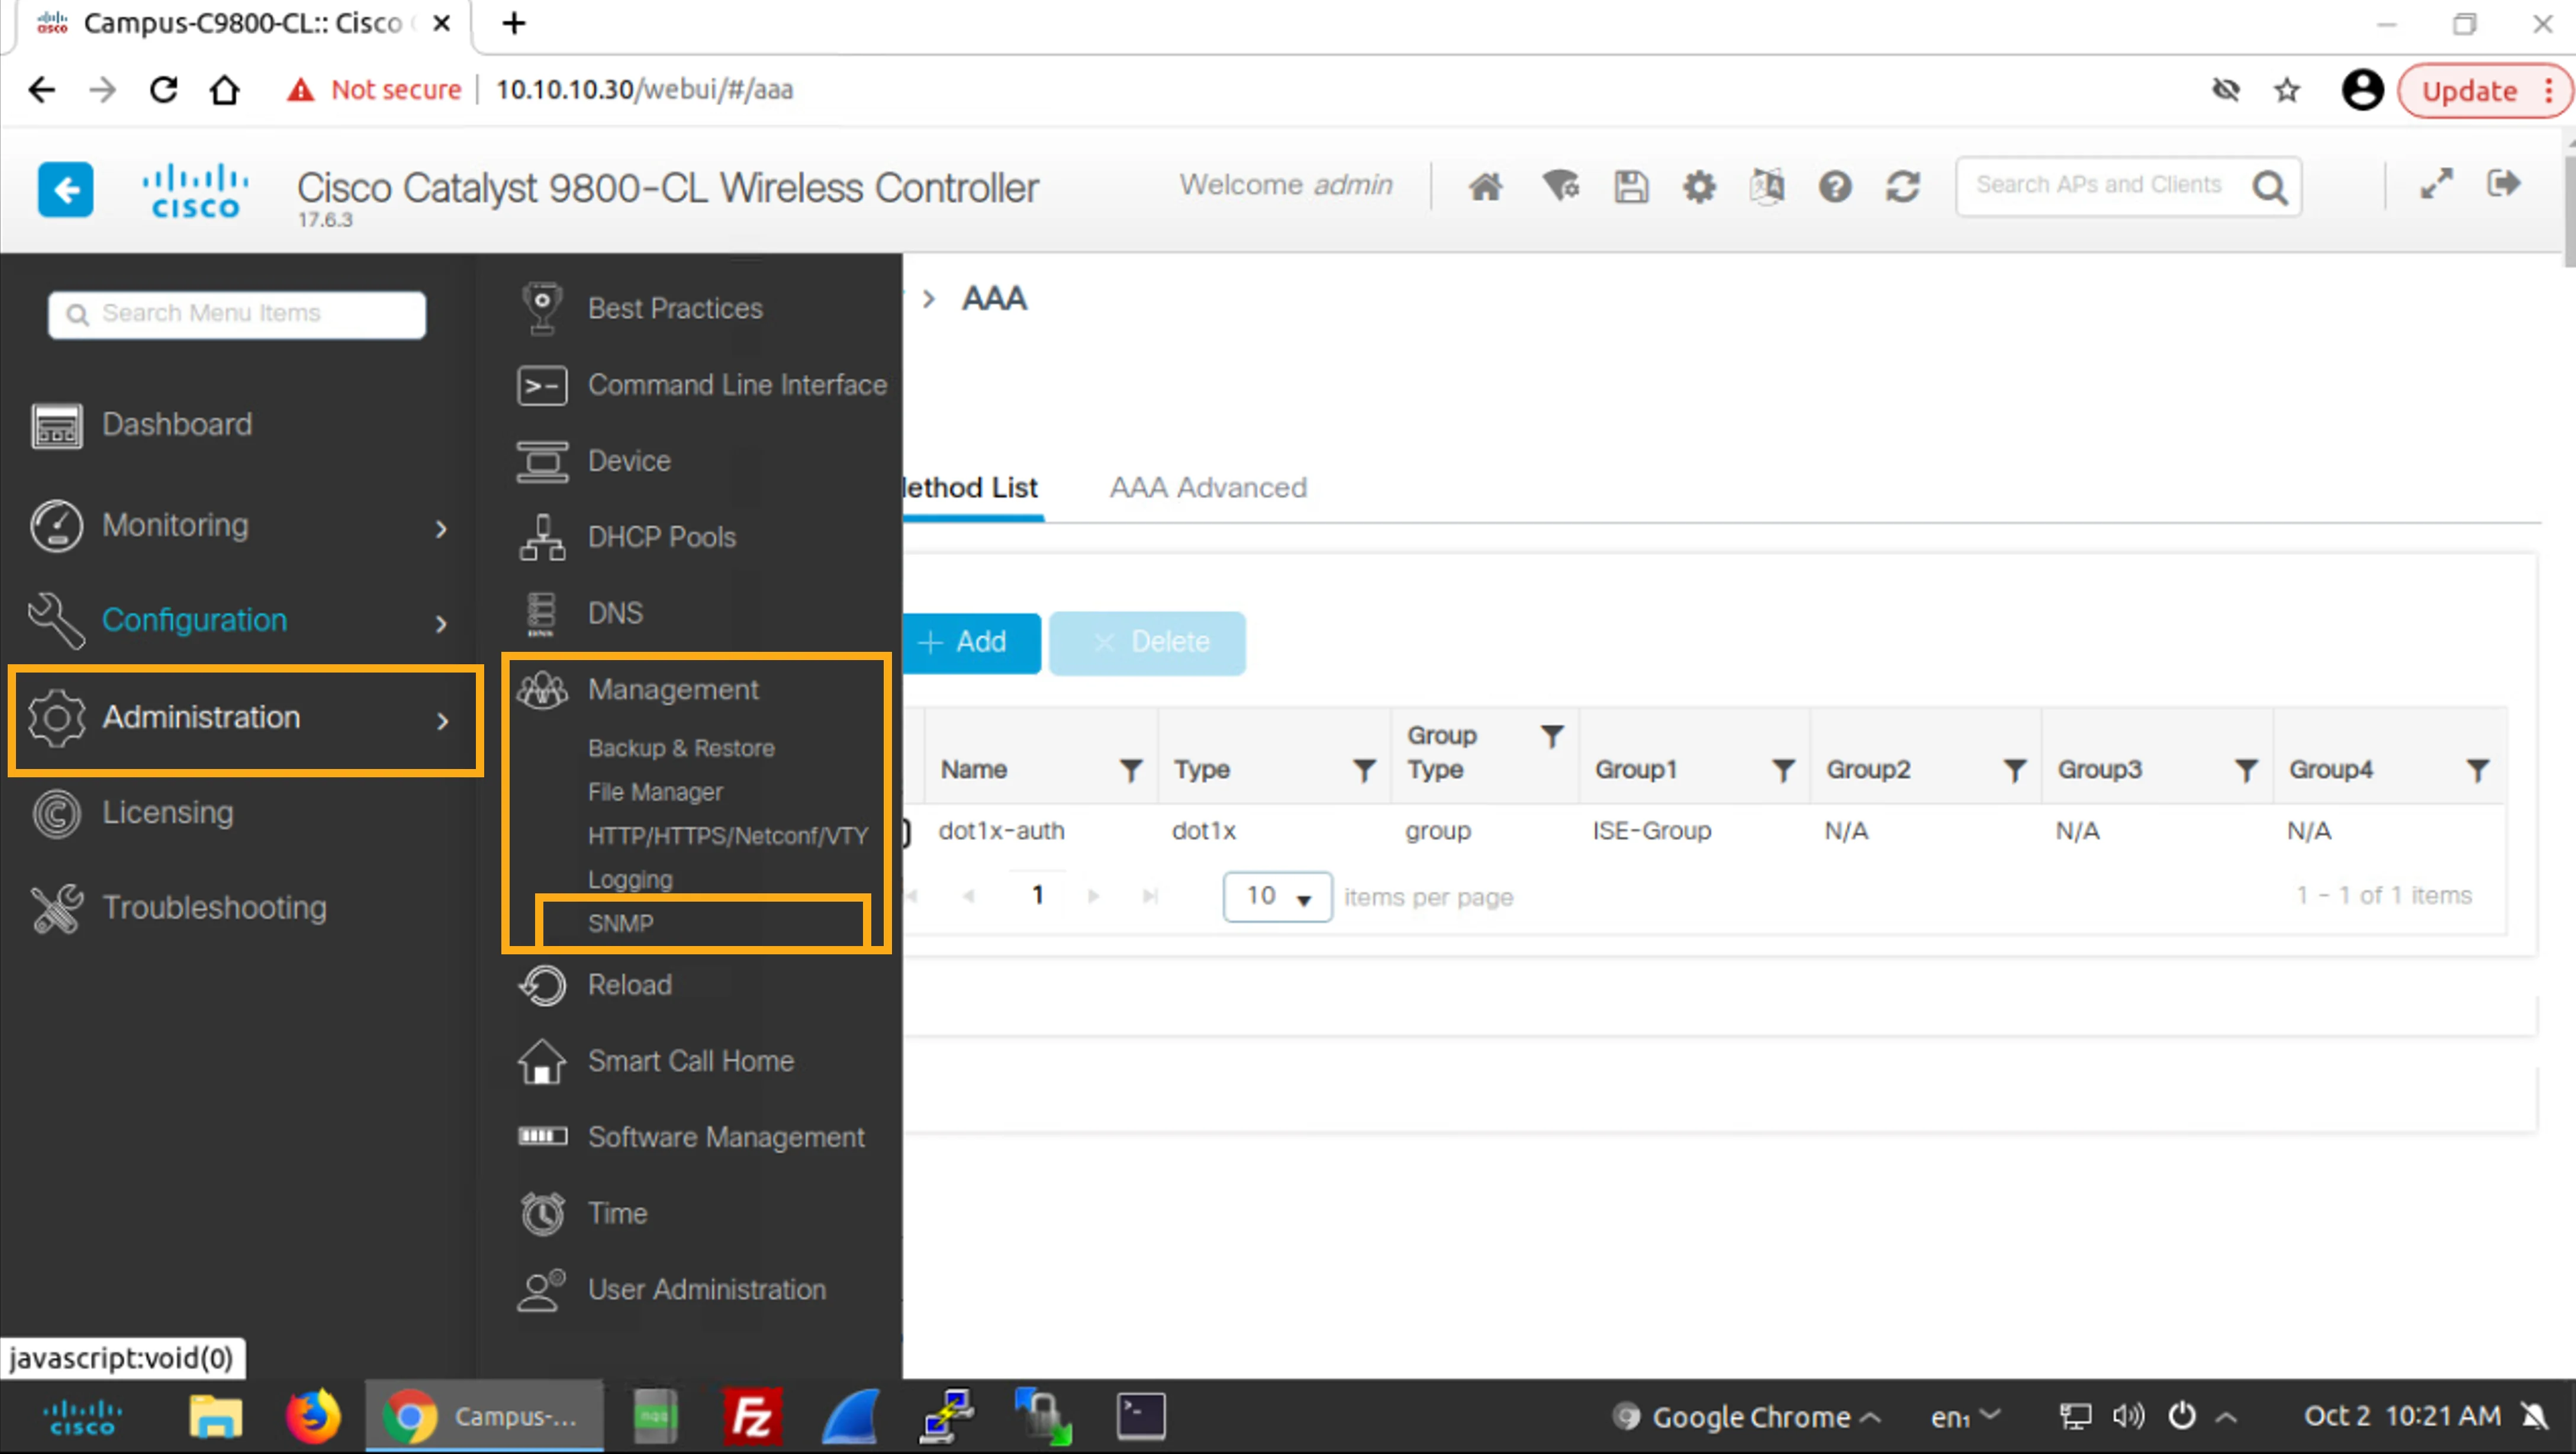
In the Campus WLC web GUI, choose Administration > Management > SNMP.
在 Campus WLC 網頁 GUI 中,選擇Administration > Management > SNMP。
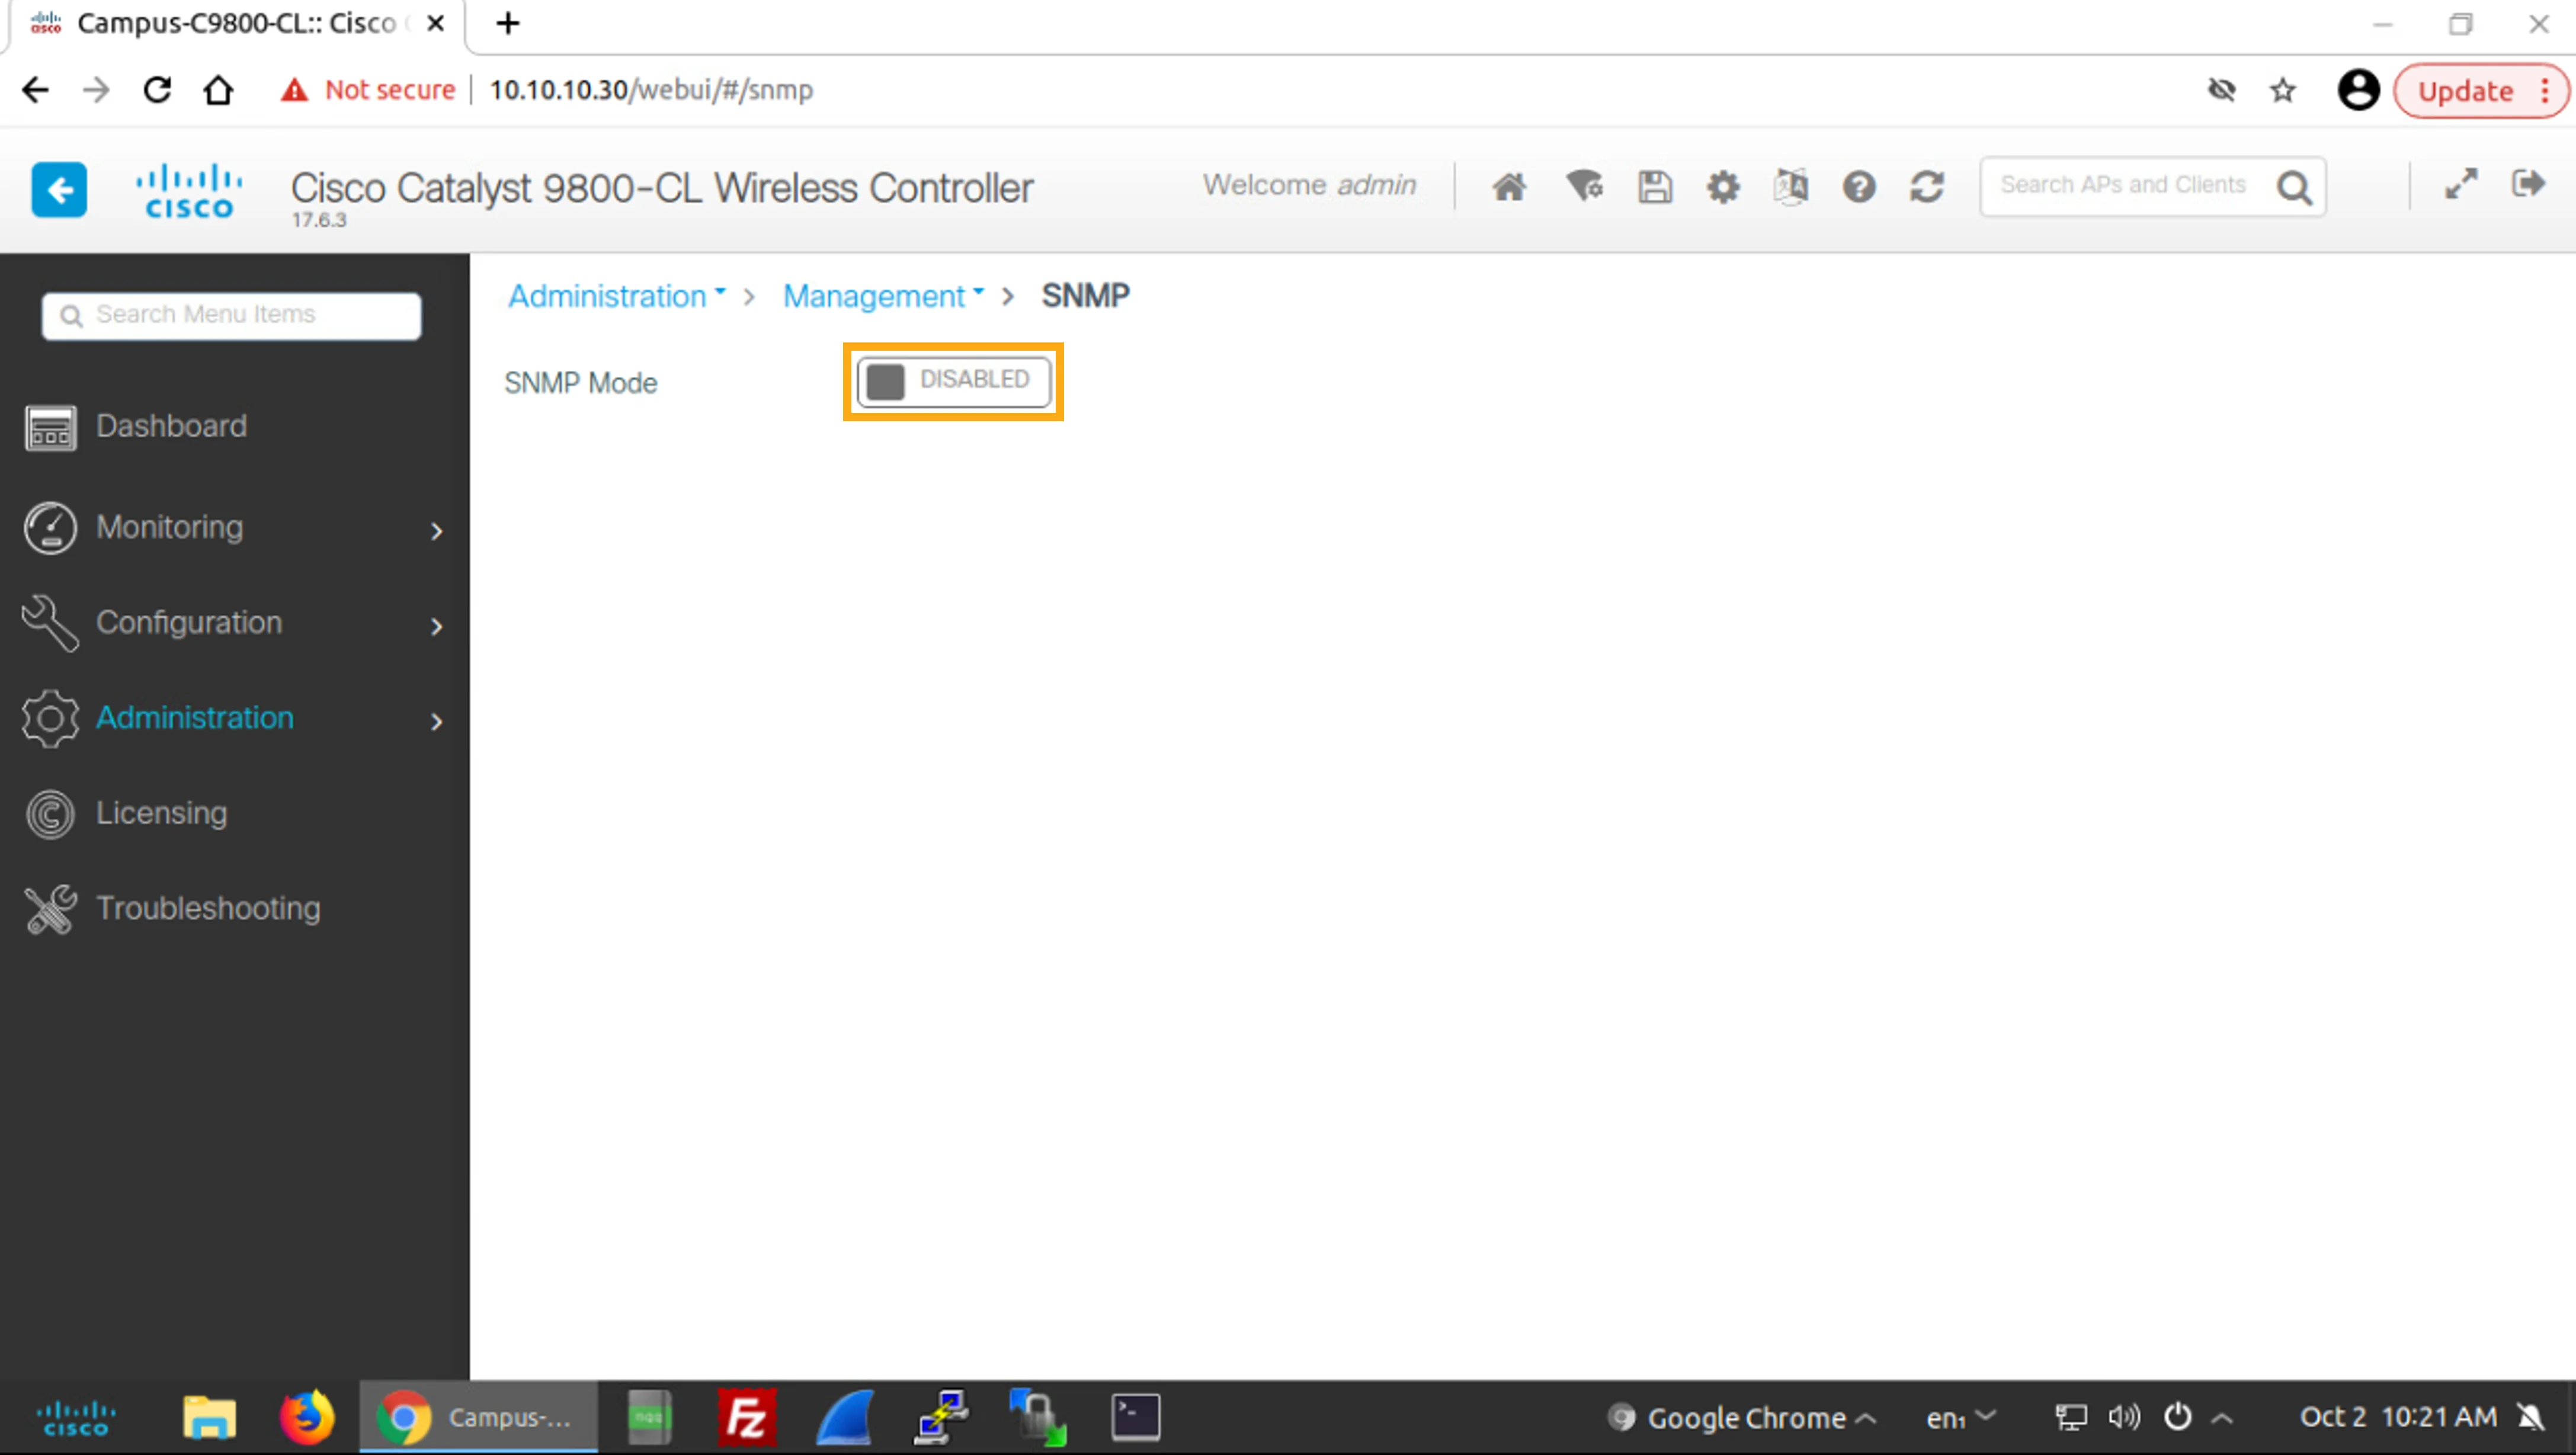
To enable SNMP, click the slider that currently says DISABLED.
若要啟用 SNMP,請按一下目前顯示DISABLED的滑動開關。
Configure General SNMP Settings
設定一般 SNMP 設定
You will now set general SNMP information and enable SNMP traps.
您現在要設定一般 SNMP 資訊並啟用 SNMP traps。
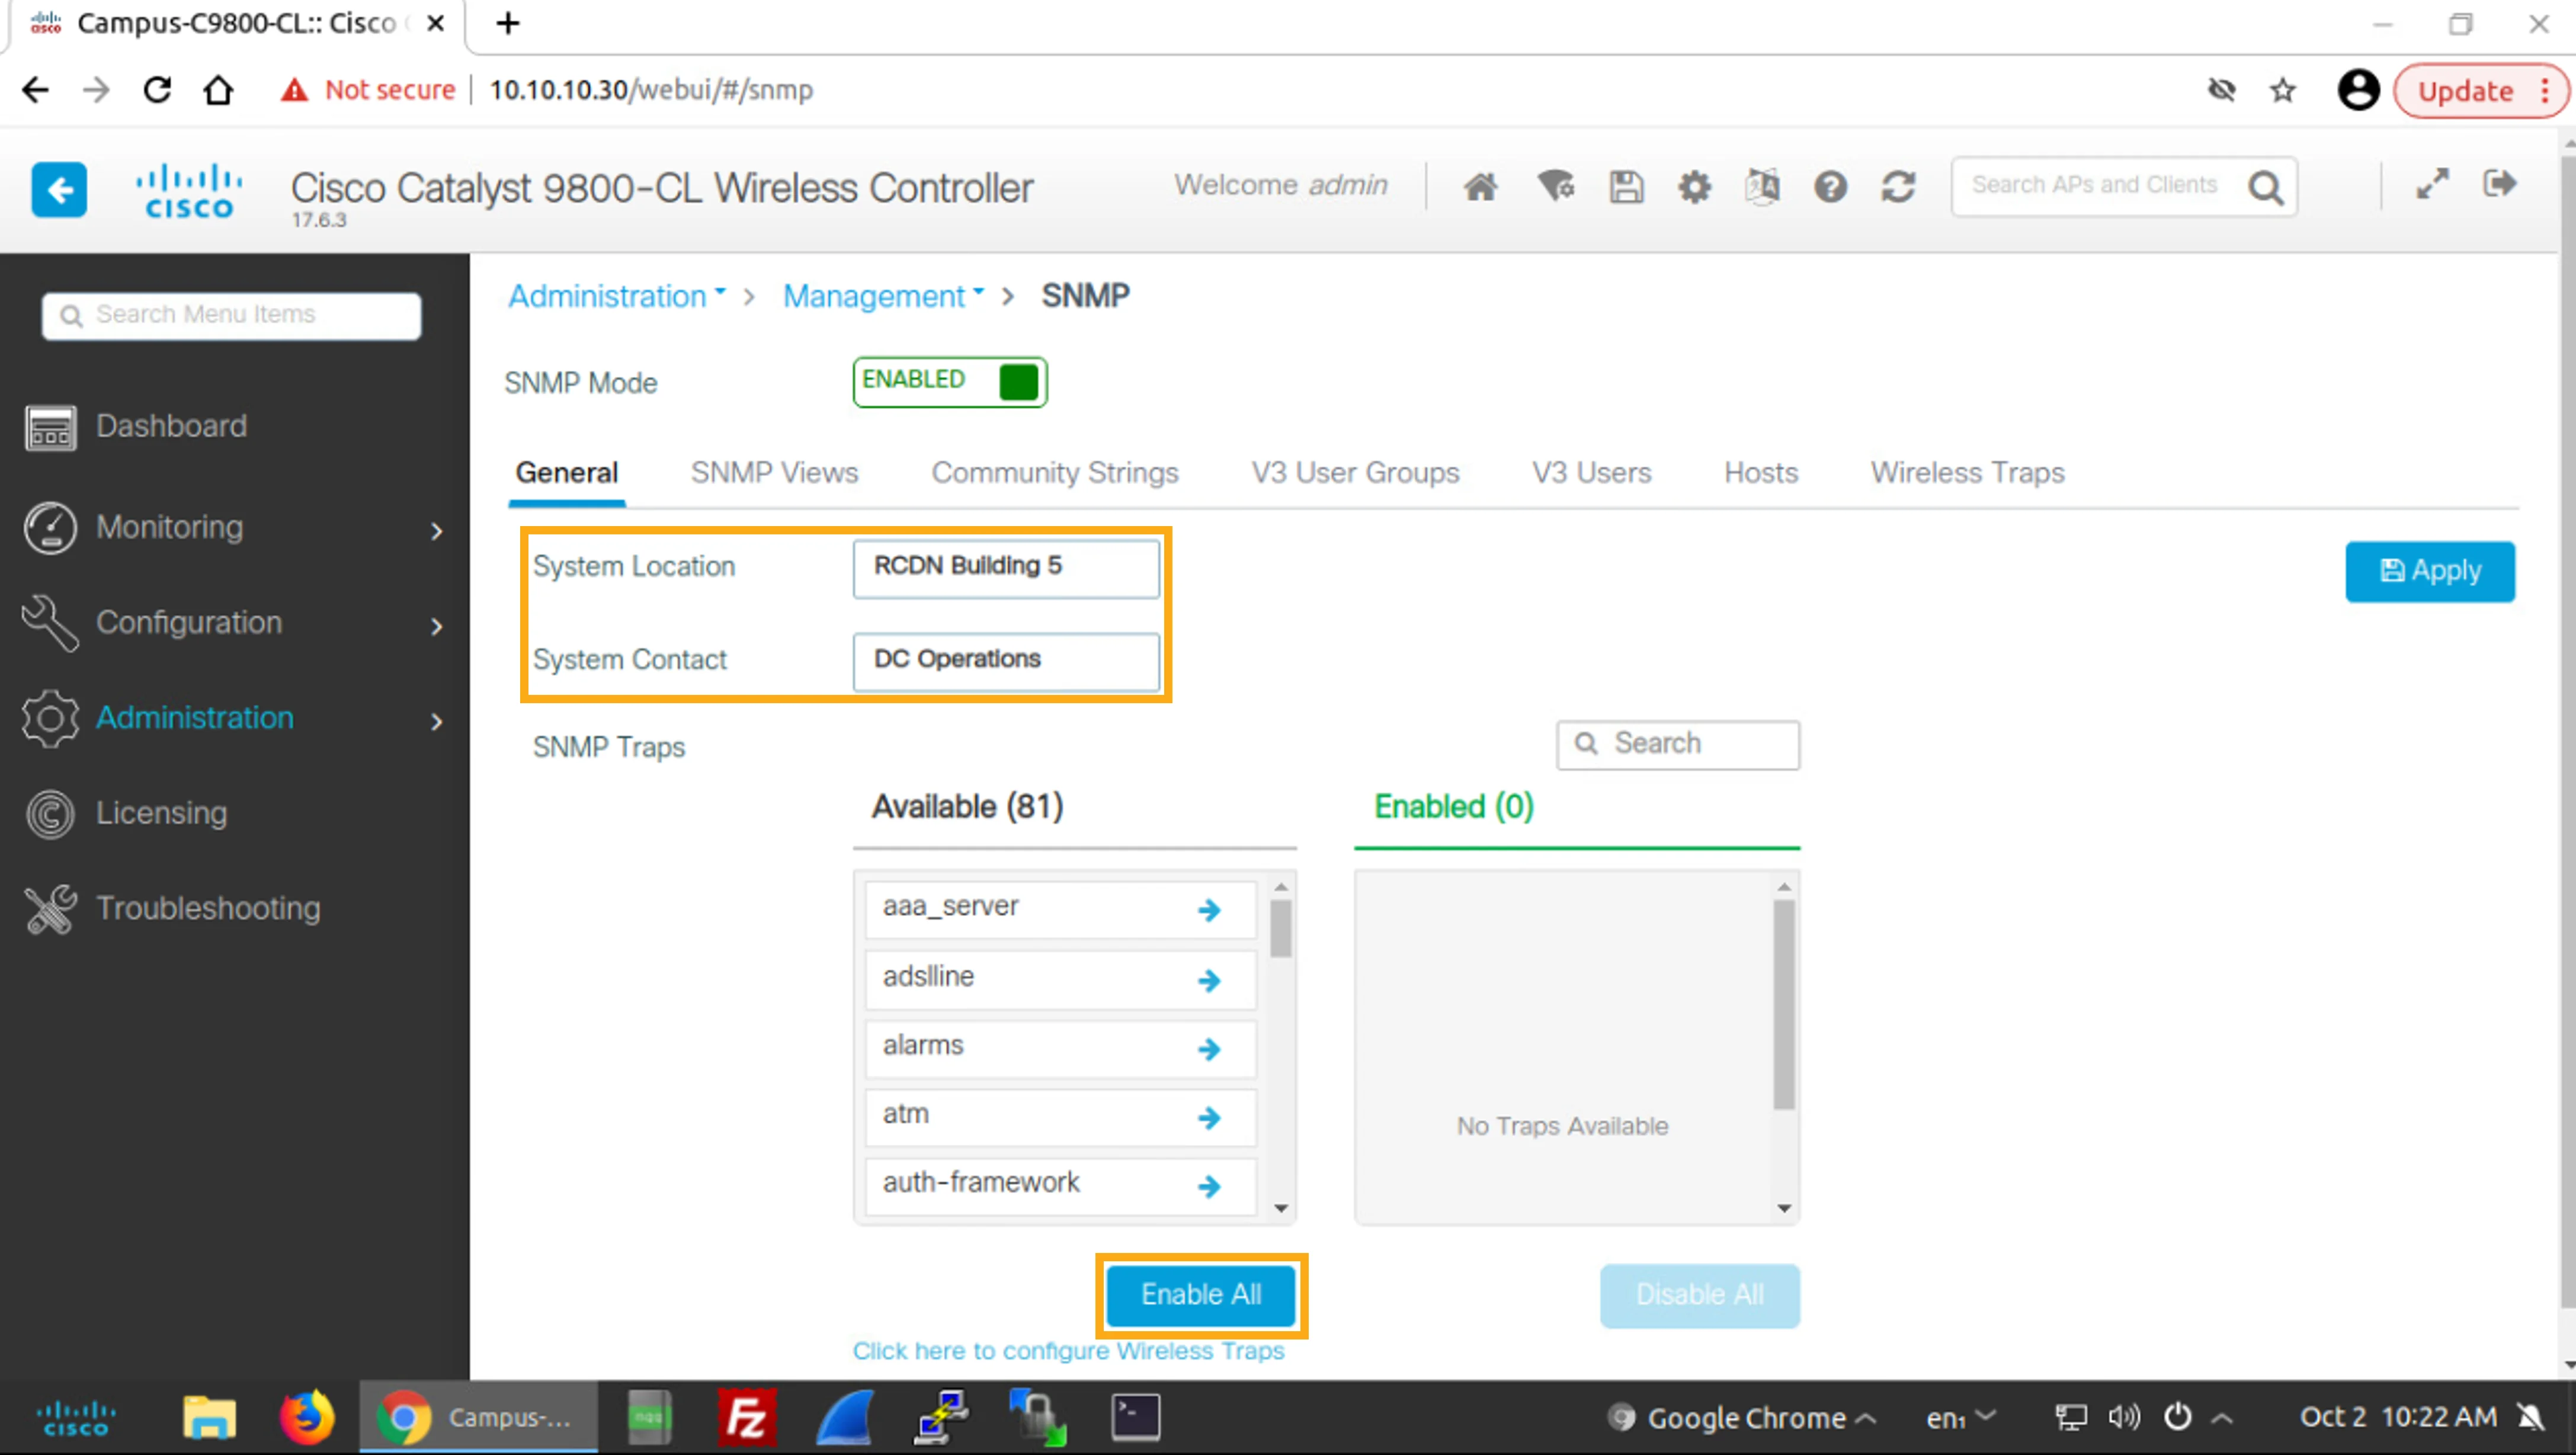
In the General tab, set the following general SNMP settings:
在General索引標籤中,設定下列一般 SNMP 設定:
System Location System Location | RCDN Building 5 RCDN Building 5 |
System Contact System Contact | DC Operations DC Operations |
Available SNMP Traps Available SNMP Traps | Enable All Enable All |
In the General tab, set the SNMP System Location to RCDN Building 5 and the System Contact to DC Operations. Click Enable All to enable all SNMP traps that are shown in the Available list.
在General索引標籤中,將 SNMP 的System Location設為 RCDN Building 5,System Contact設為 DC Operations。按一下Enable All以啟用Available清單中顯示的所有 SNMP traps。
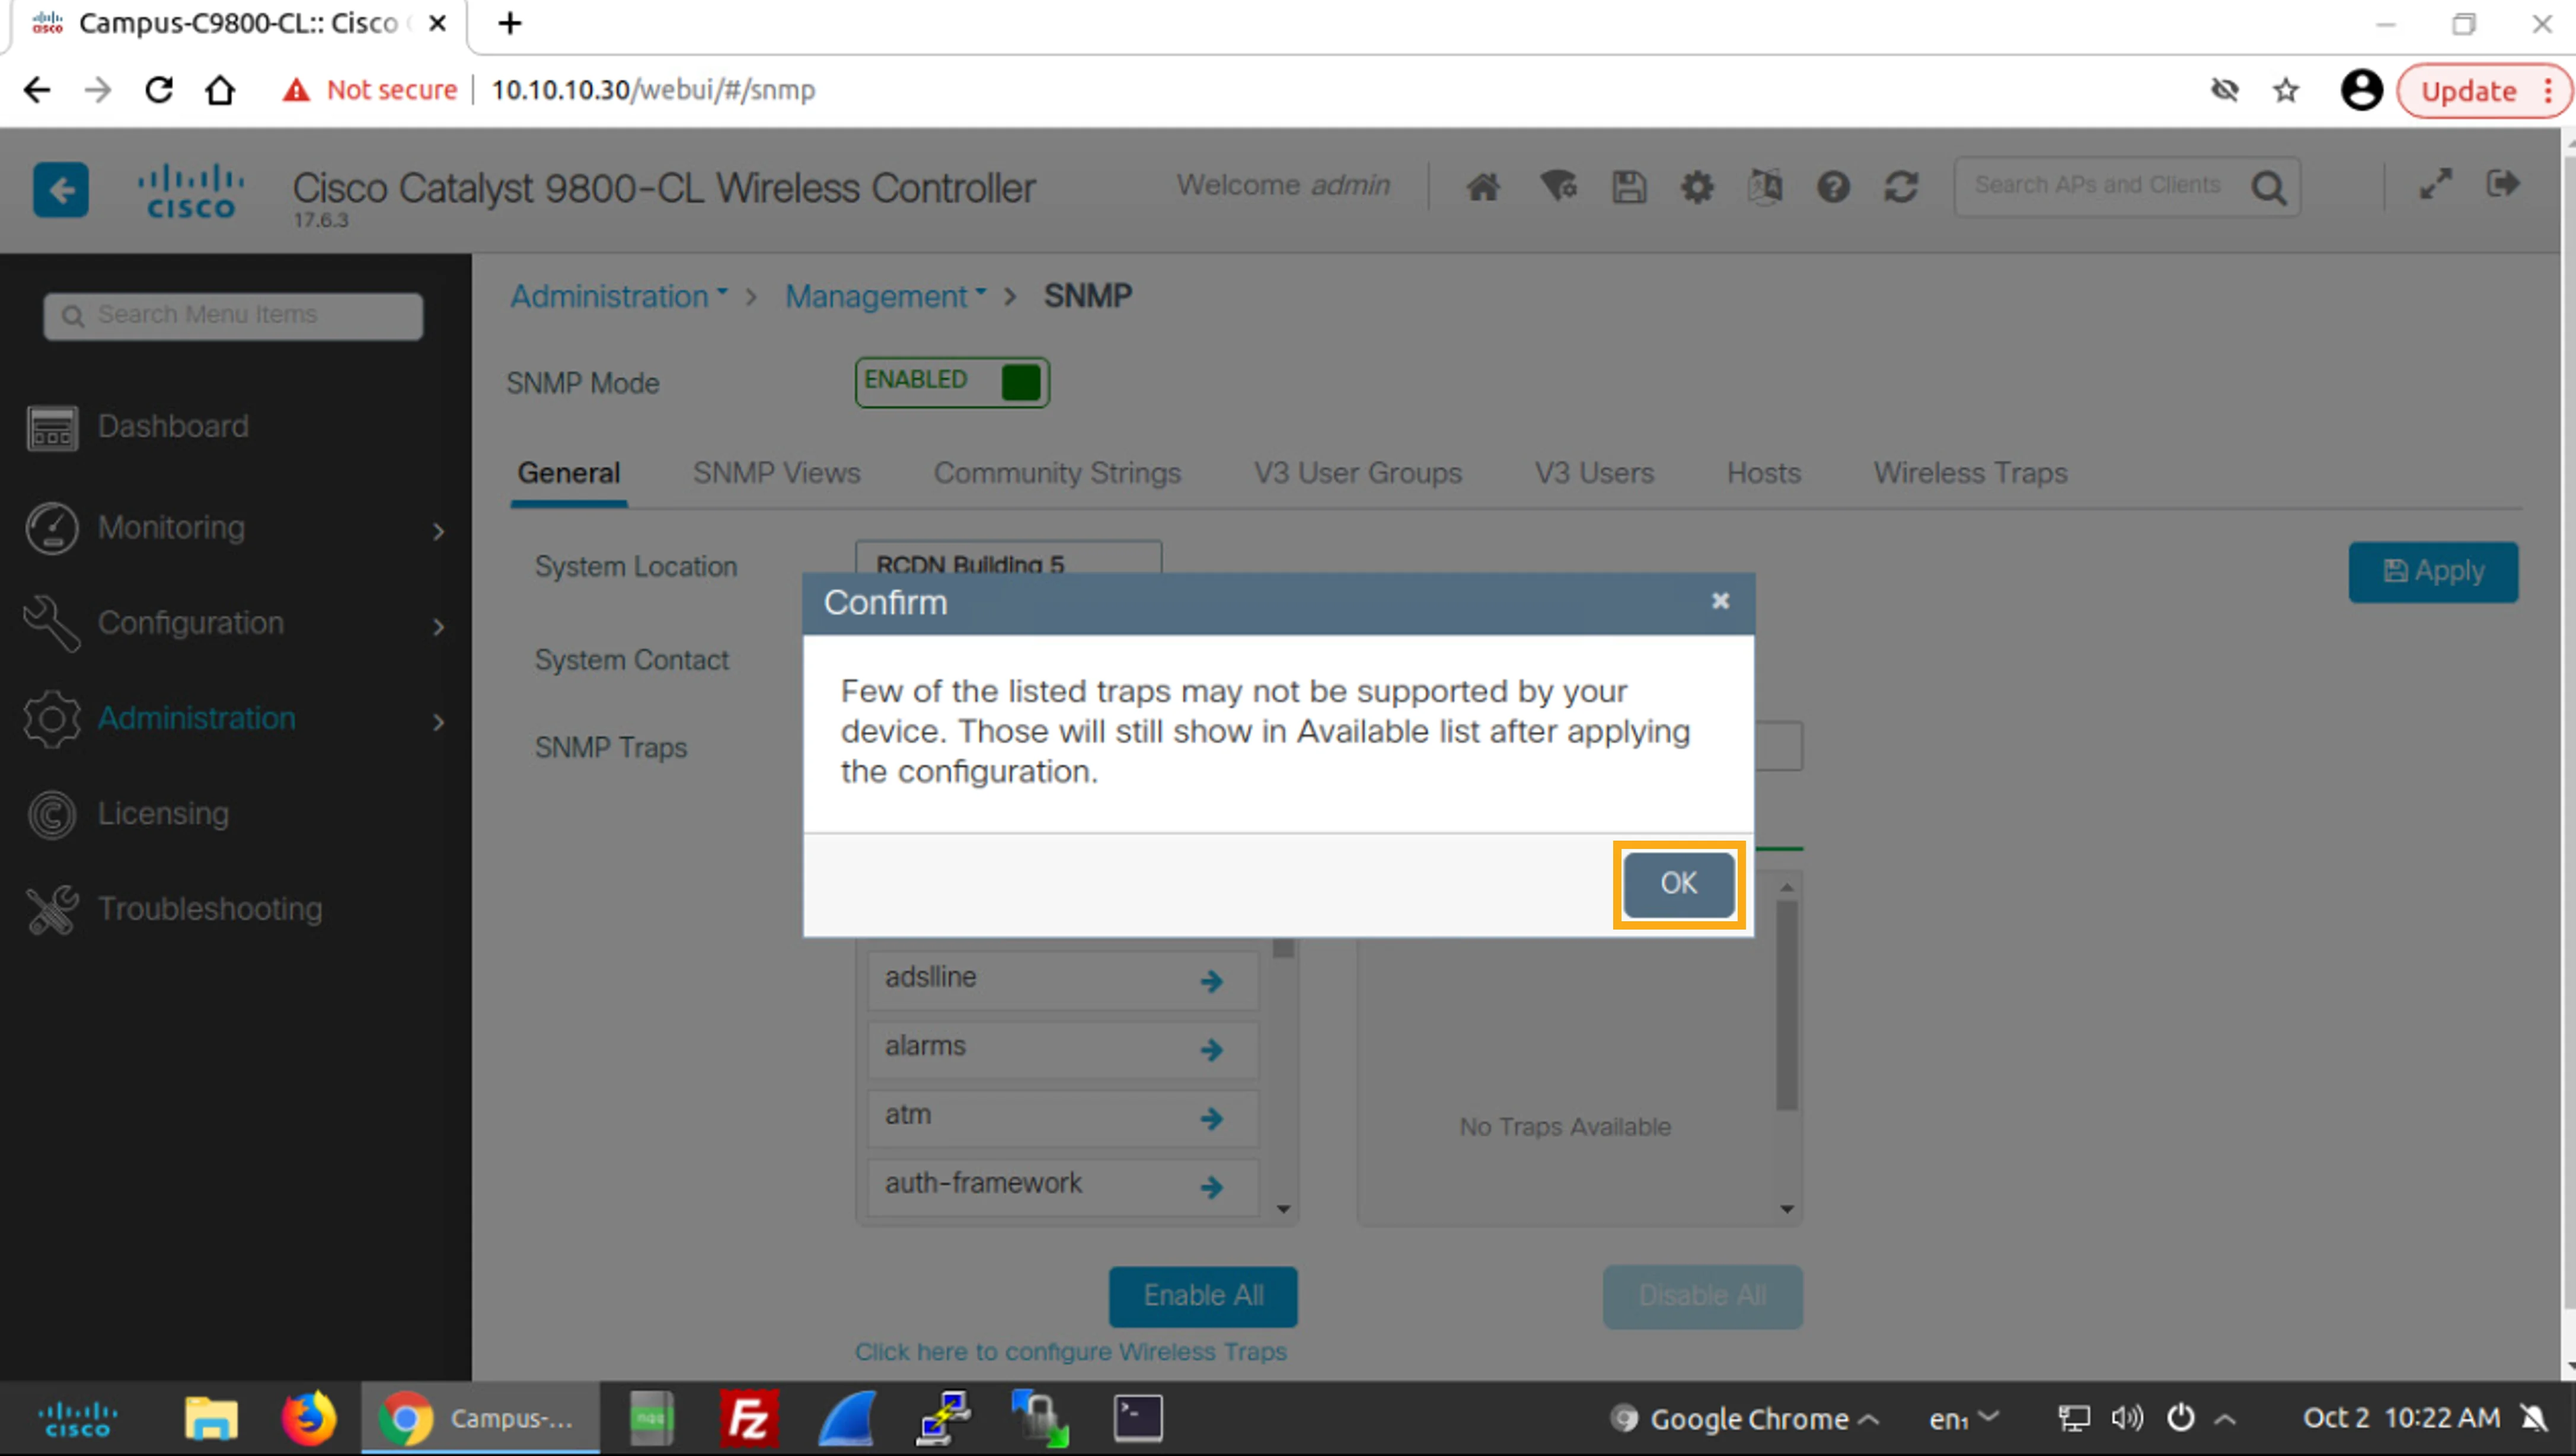
Click OK to confirm the message that indicates that the device may not support some of the listed traps and therefore those traps will not remain in the list of enabled SNMP traps after you apply the configuration.
按一下OK確認訊息,該訊息指出此裝置可能不支援清單中所列的部分 traps,因此套用設定後,這些 traps 將不會保留在已啟用的 SNMP traps 清單中。
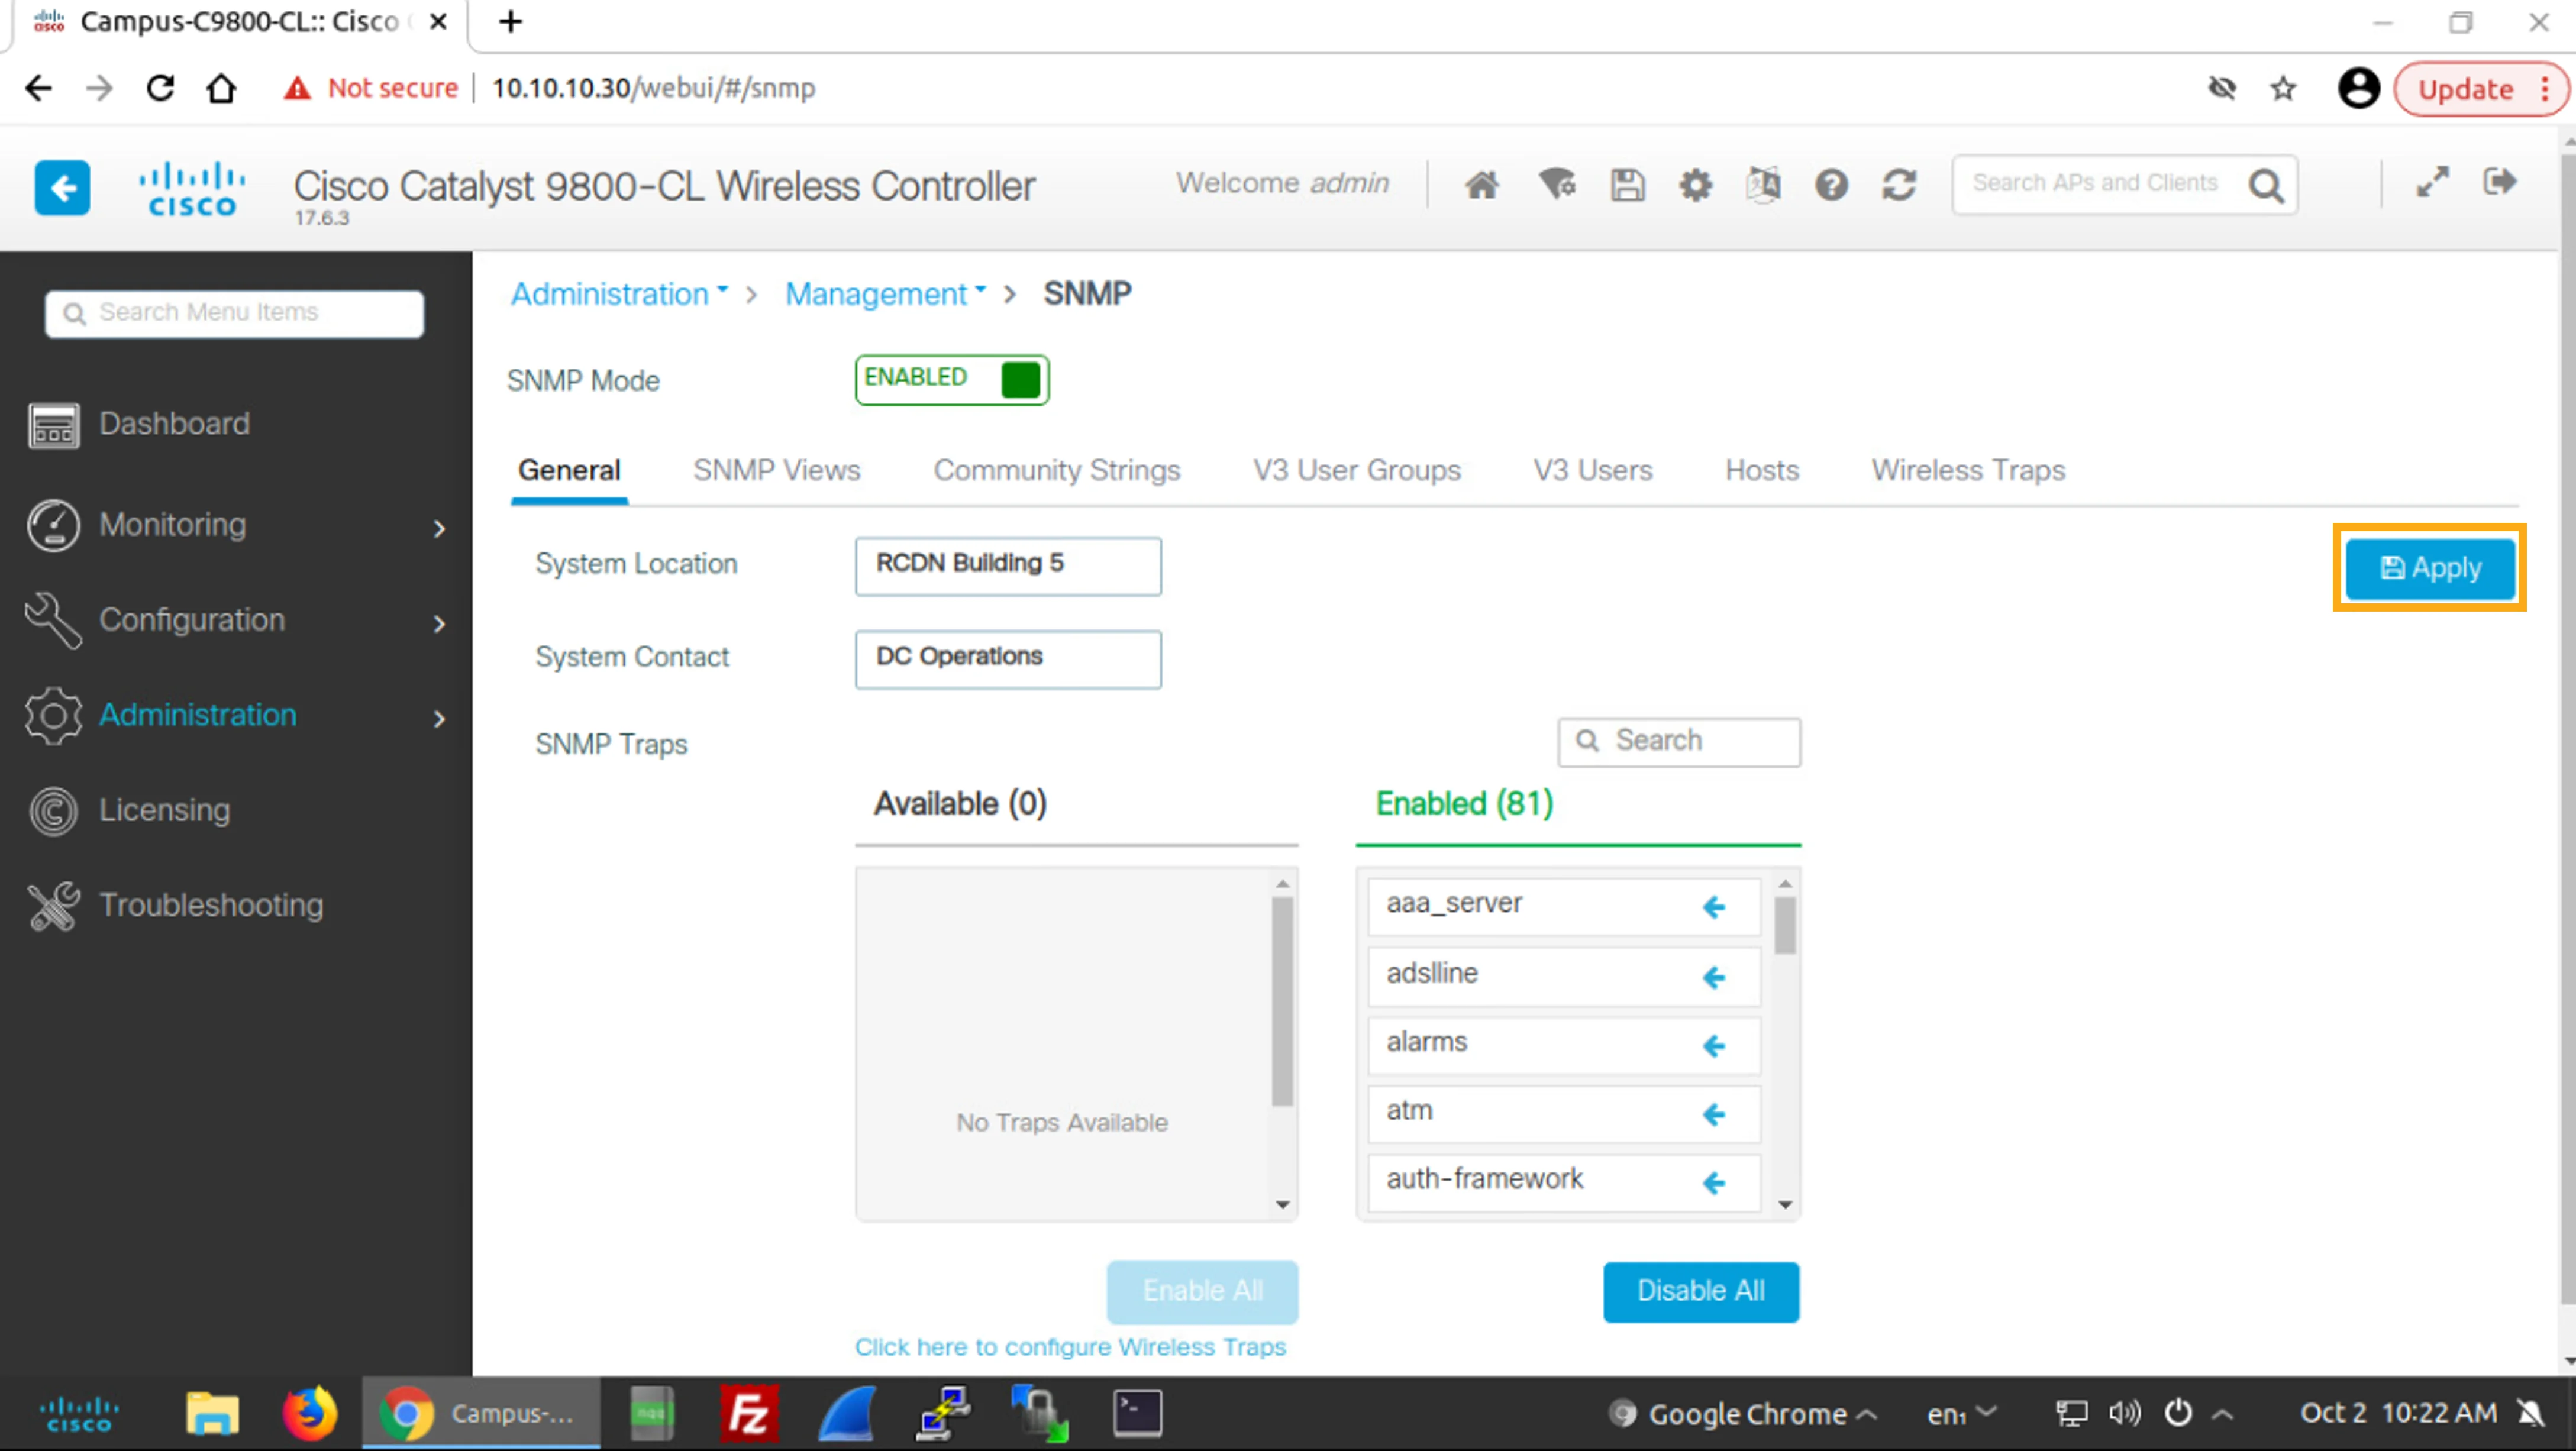
Click Apply to apply the configuration to the Campus WLC.
按一下Apply將設定套用到 Campus WLC。
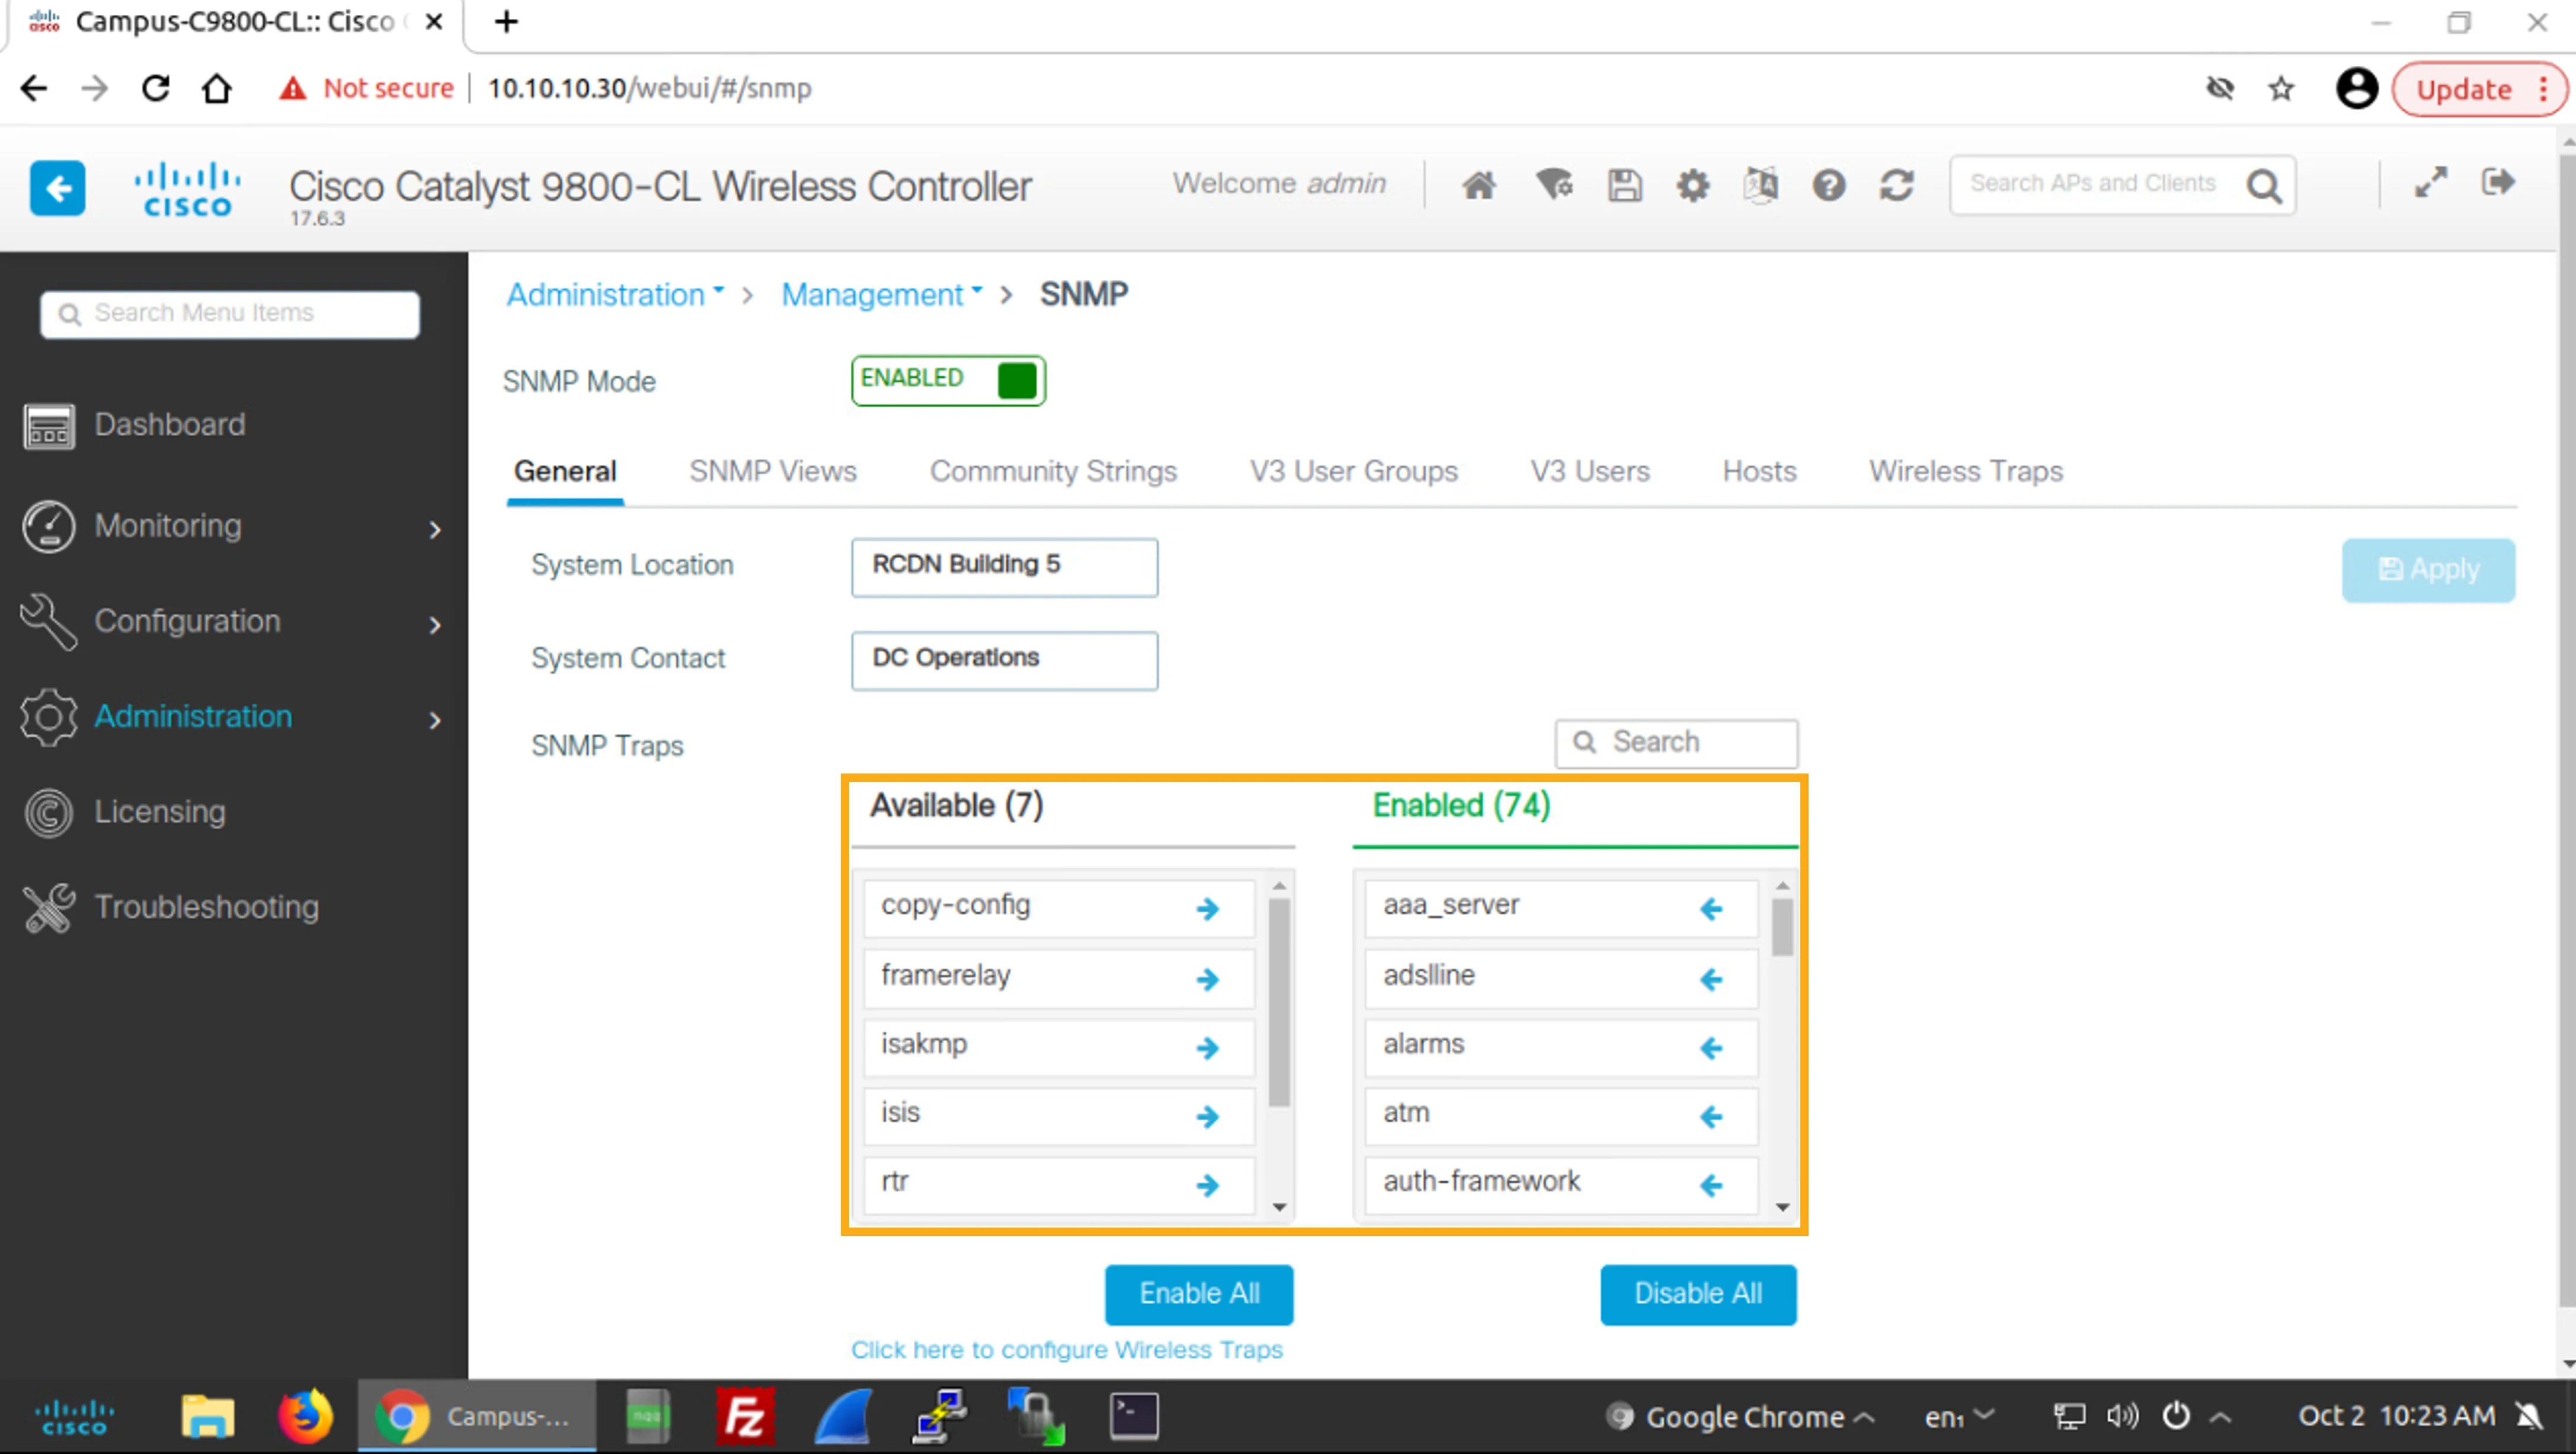
You will notice that seven SNMP traps have been moved from the list of enabled SNMP traps back to the list of the available SNMP traps after you applied the configuration. This WLC does not support these seven SNMP traps and therefore cannot they be enabled.
您會注意到,套用設定後,有七個 SNMP traps 從已啟用的 SNMP traps 清單移回可用的 SNMP traps 清單。此 WLC 不支援這七個 SNMP traps,因此無法啟用。
Add an SNMP Server to the Campus WLC
在 Campus WLC 上新增 SNMP 伺服器
In the next steps, you will add an SNMP version 3 server. In the GUI, SNMP hosts are referred to as hosts. As part of the configuration, you will add an SNMP version 3 user. The Cisco Catalyst 9800 WLC web GUI will automatically add the user to an SNMP version 3 user group that corresponds with the security mode of the user. If such a group does not yet exist, the group is automatically added. In particular, you will add an SNMP version 3 user with a security mode of AuthPriv. This mode enables authentication and privacy (that is, encryption) services. After you add the user, an SNMP version 3 user group called SnmpAuthPrivGroup will be added automatically, and the user will be automatically added to this group.
接下來的步驟中,您將新增一台 SNMP version 3 伺服器。在 GUI 中,SNMP 主機稱為 hosts。作為設定的一部分,您將新增一個 SNMP version 3 使用者。Cisco Catalyst 9800 WLC 網頁 GUI 會自動將該使用者加入與其安全模式相對應的 SNMP version 3 使用者群組。若該群組尚不存在,系統會自動新增該群組。具體來說,您將新增一個安全模式為 AuthPriv 的 SNMP version 3 使用者。此模式可啟用驗證與加密(即隱私保護)服務。新增使用者後,系統會自動新增名為 SnmpAuthPrivGroup 的 SNMP version 3 使用者群組,且該使用者會自動加入此群組。
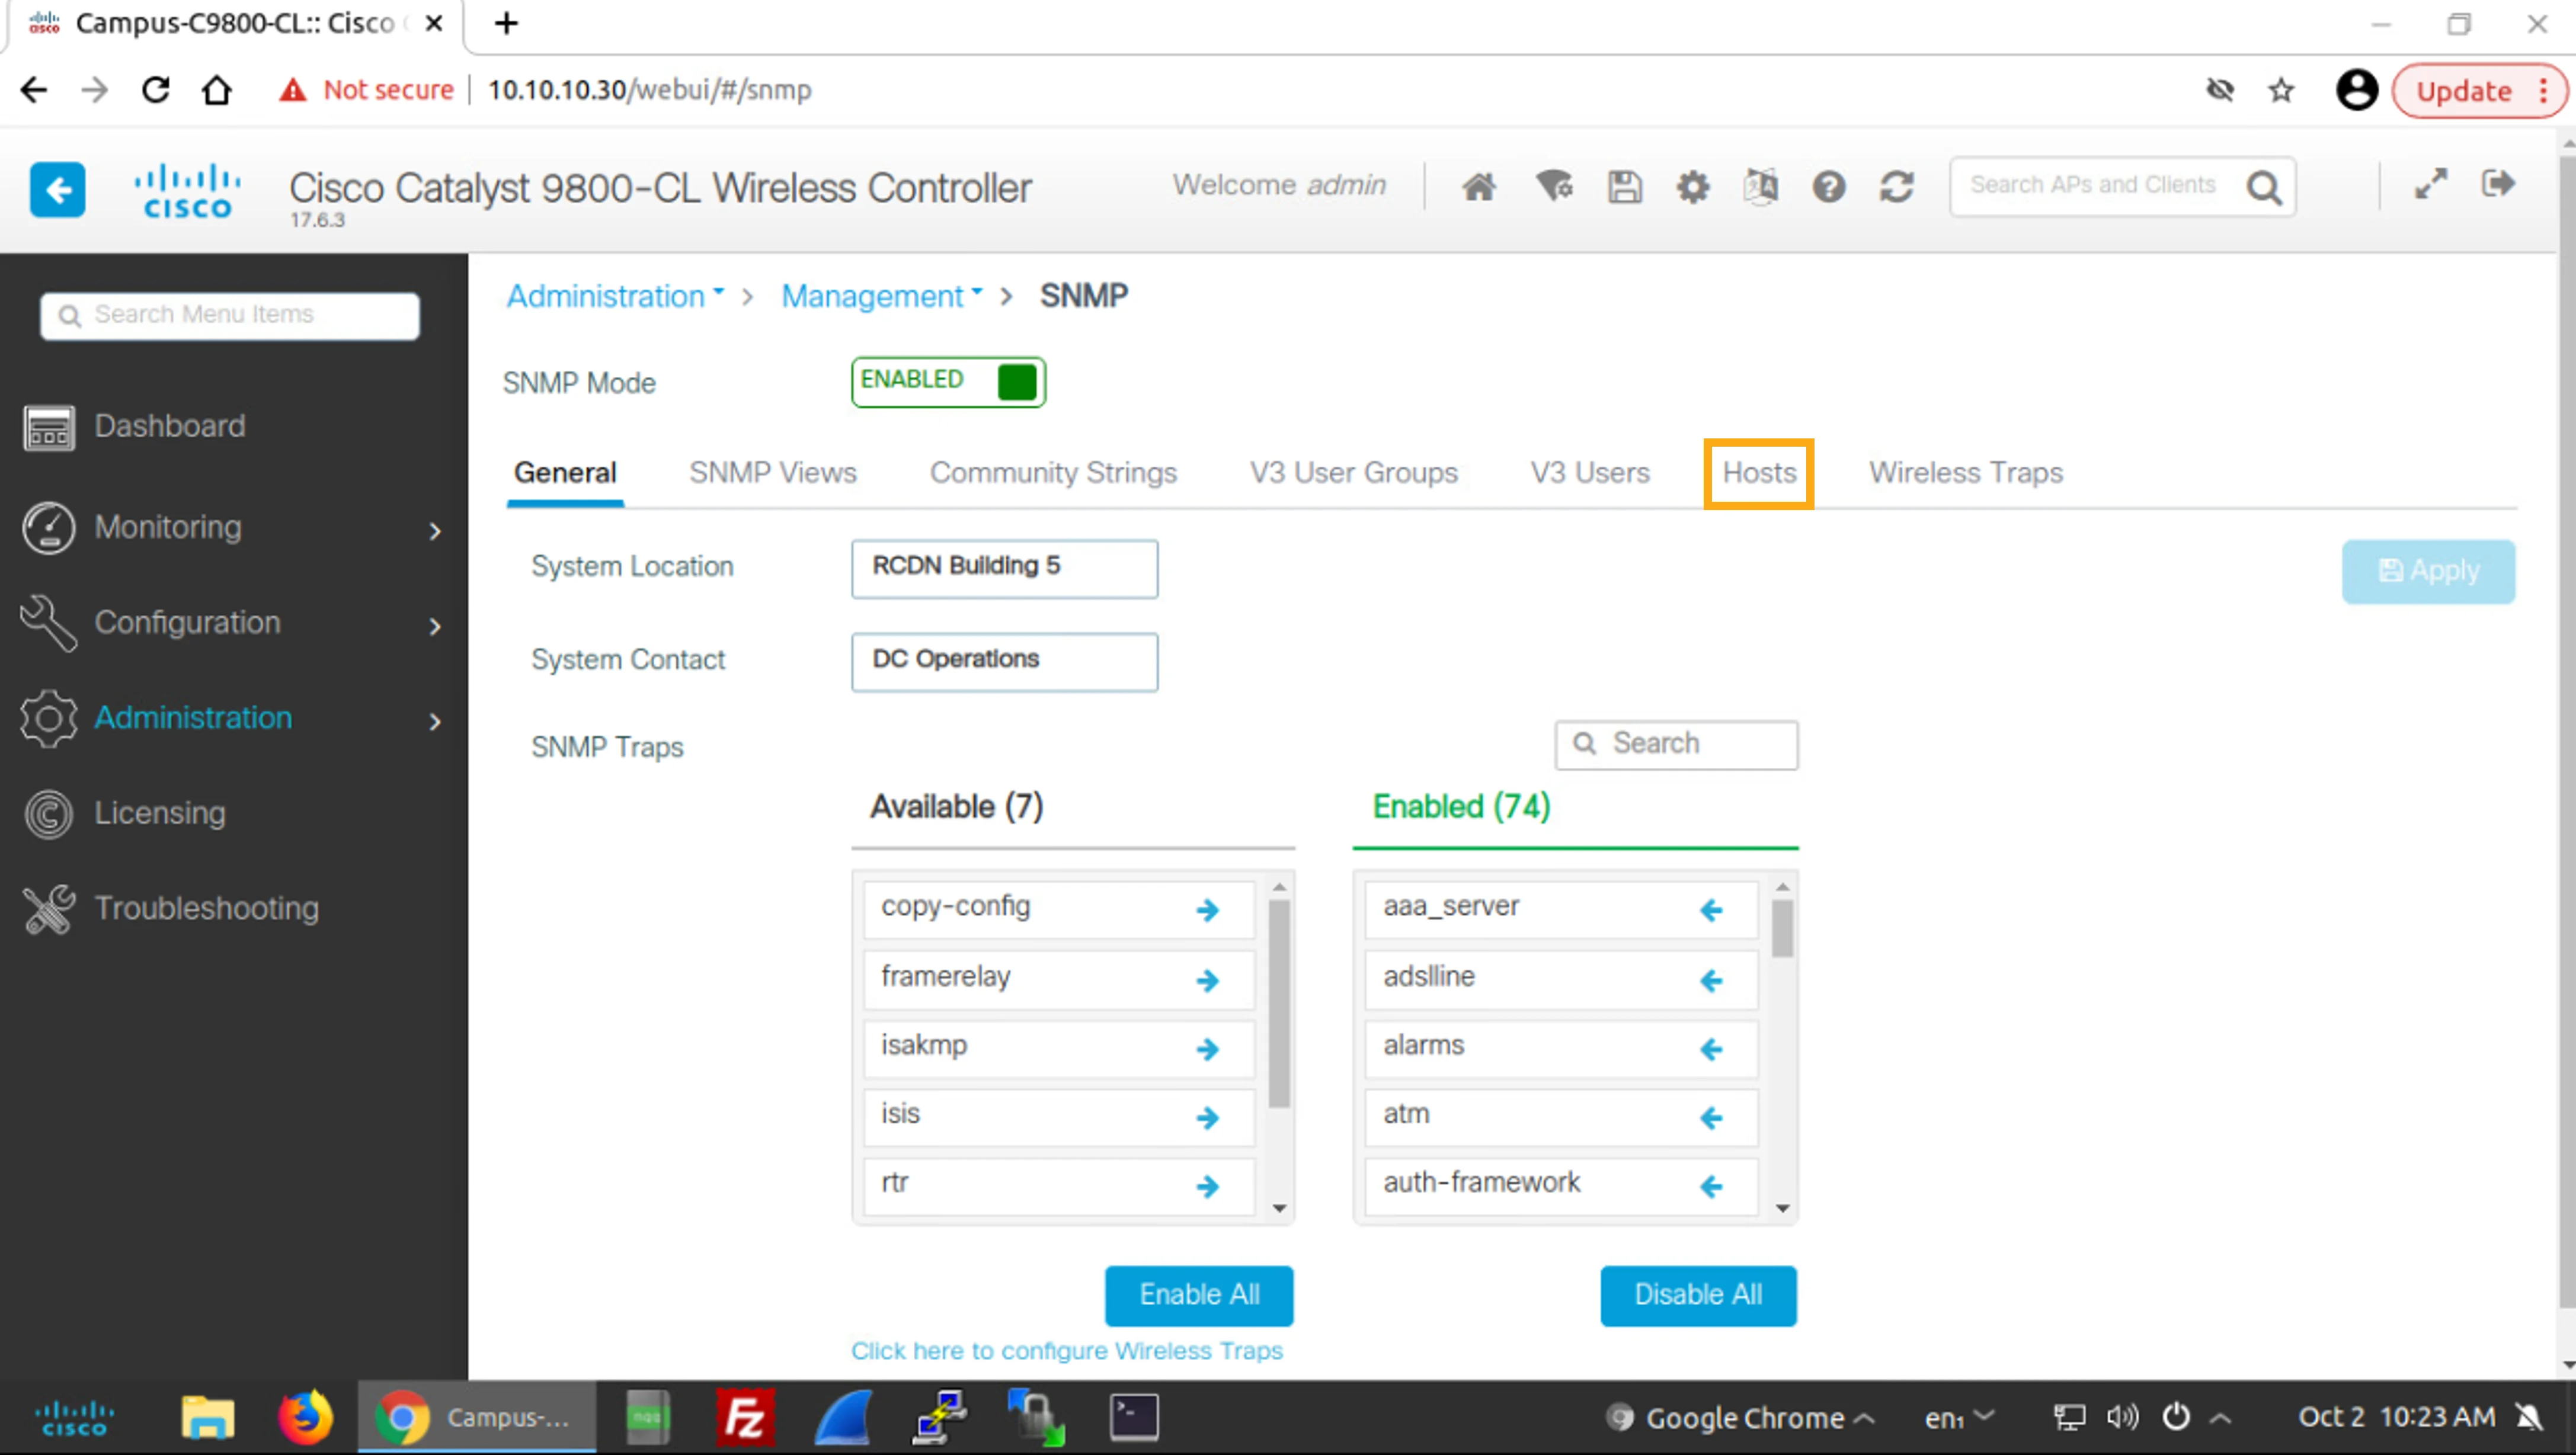
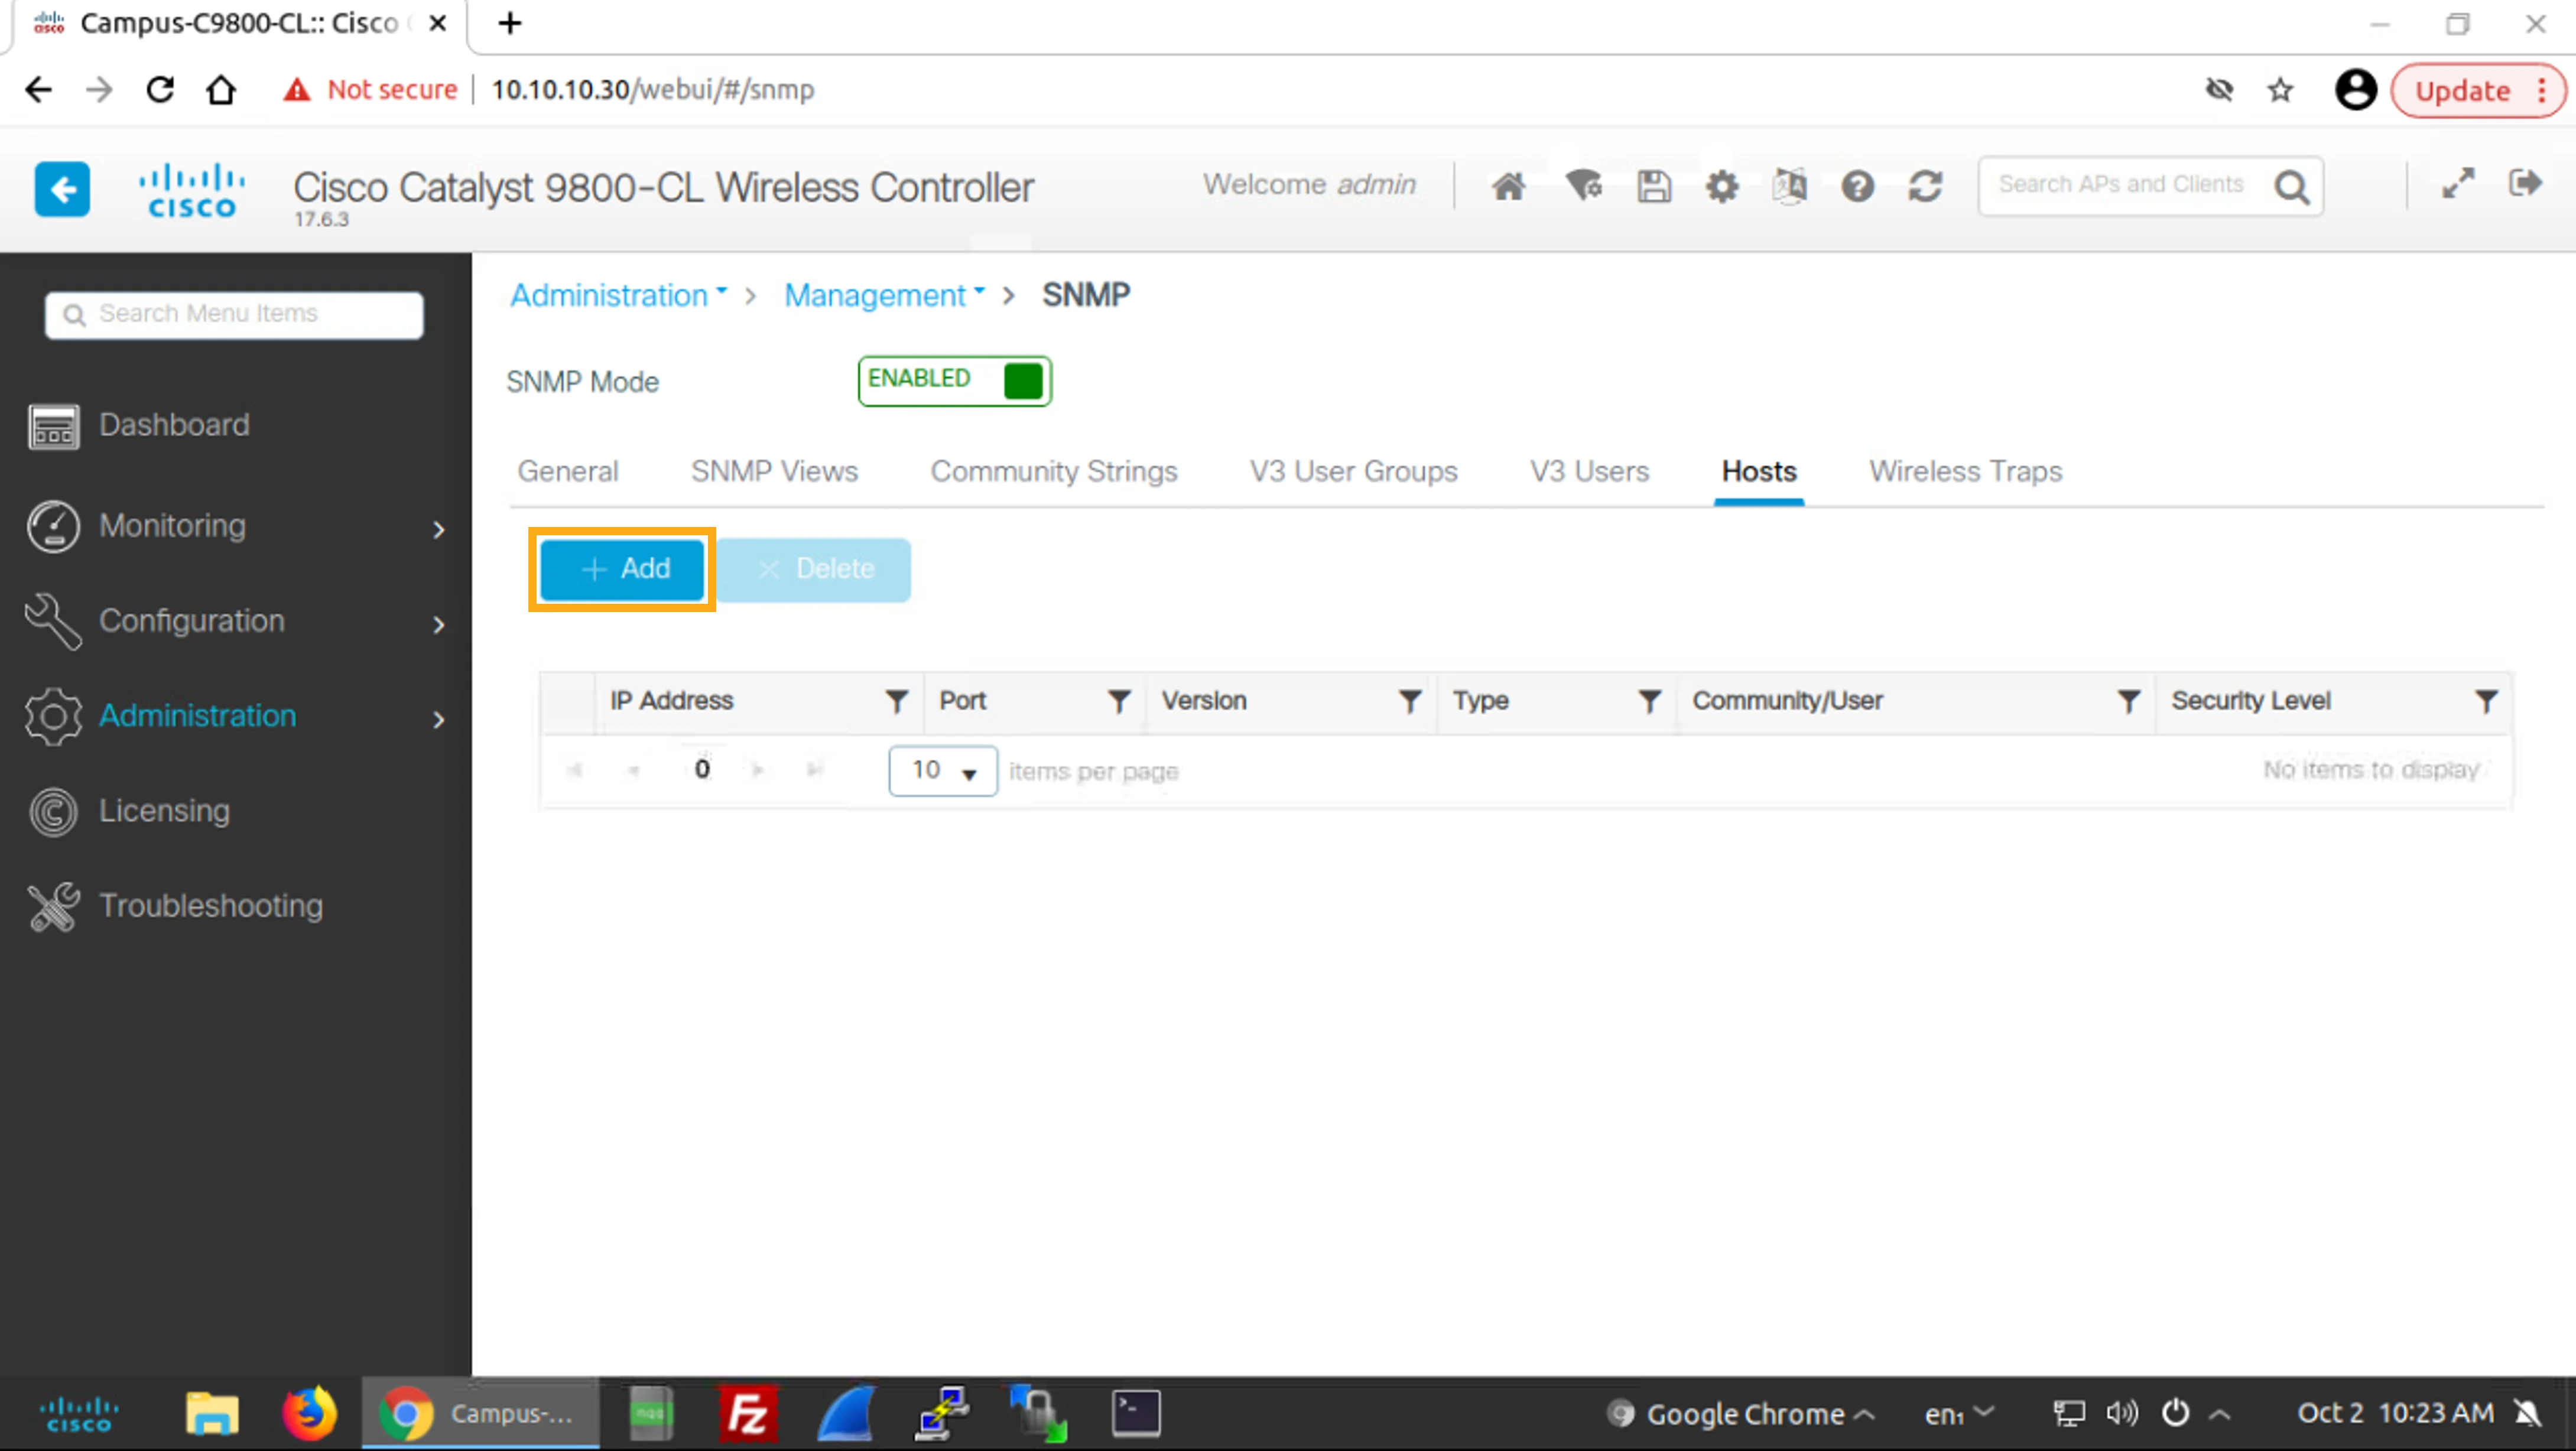
Click Hosts on your current Administration > Management > SNMP page. Click +Add to start configuring the host.
在目前的Administration > Management > SNMP頁面上按一下Hosts,再按一下+Add開始設定主機。
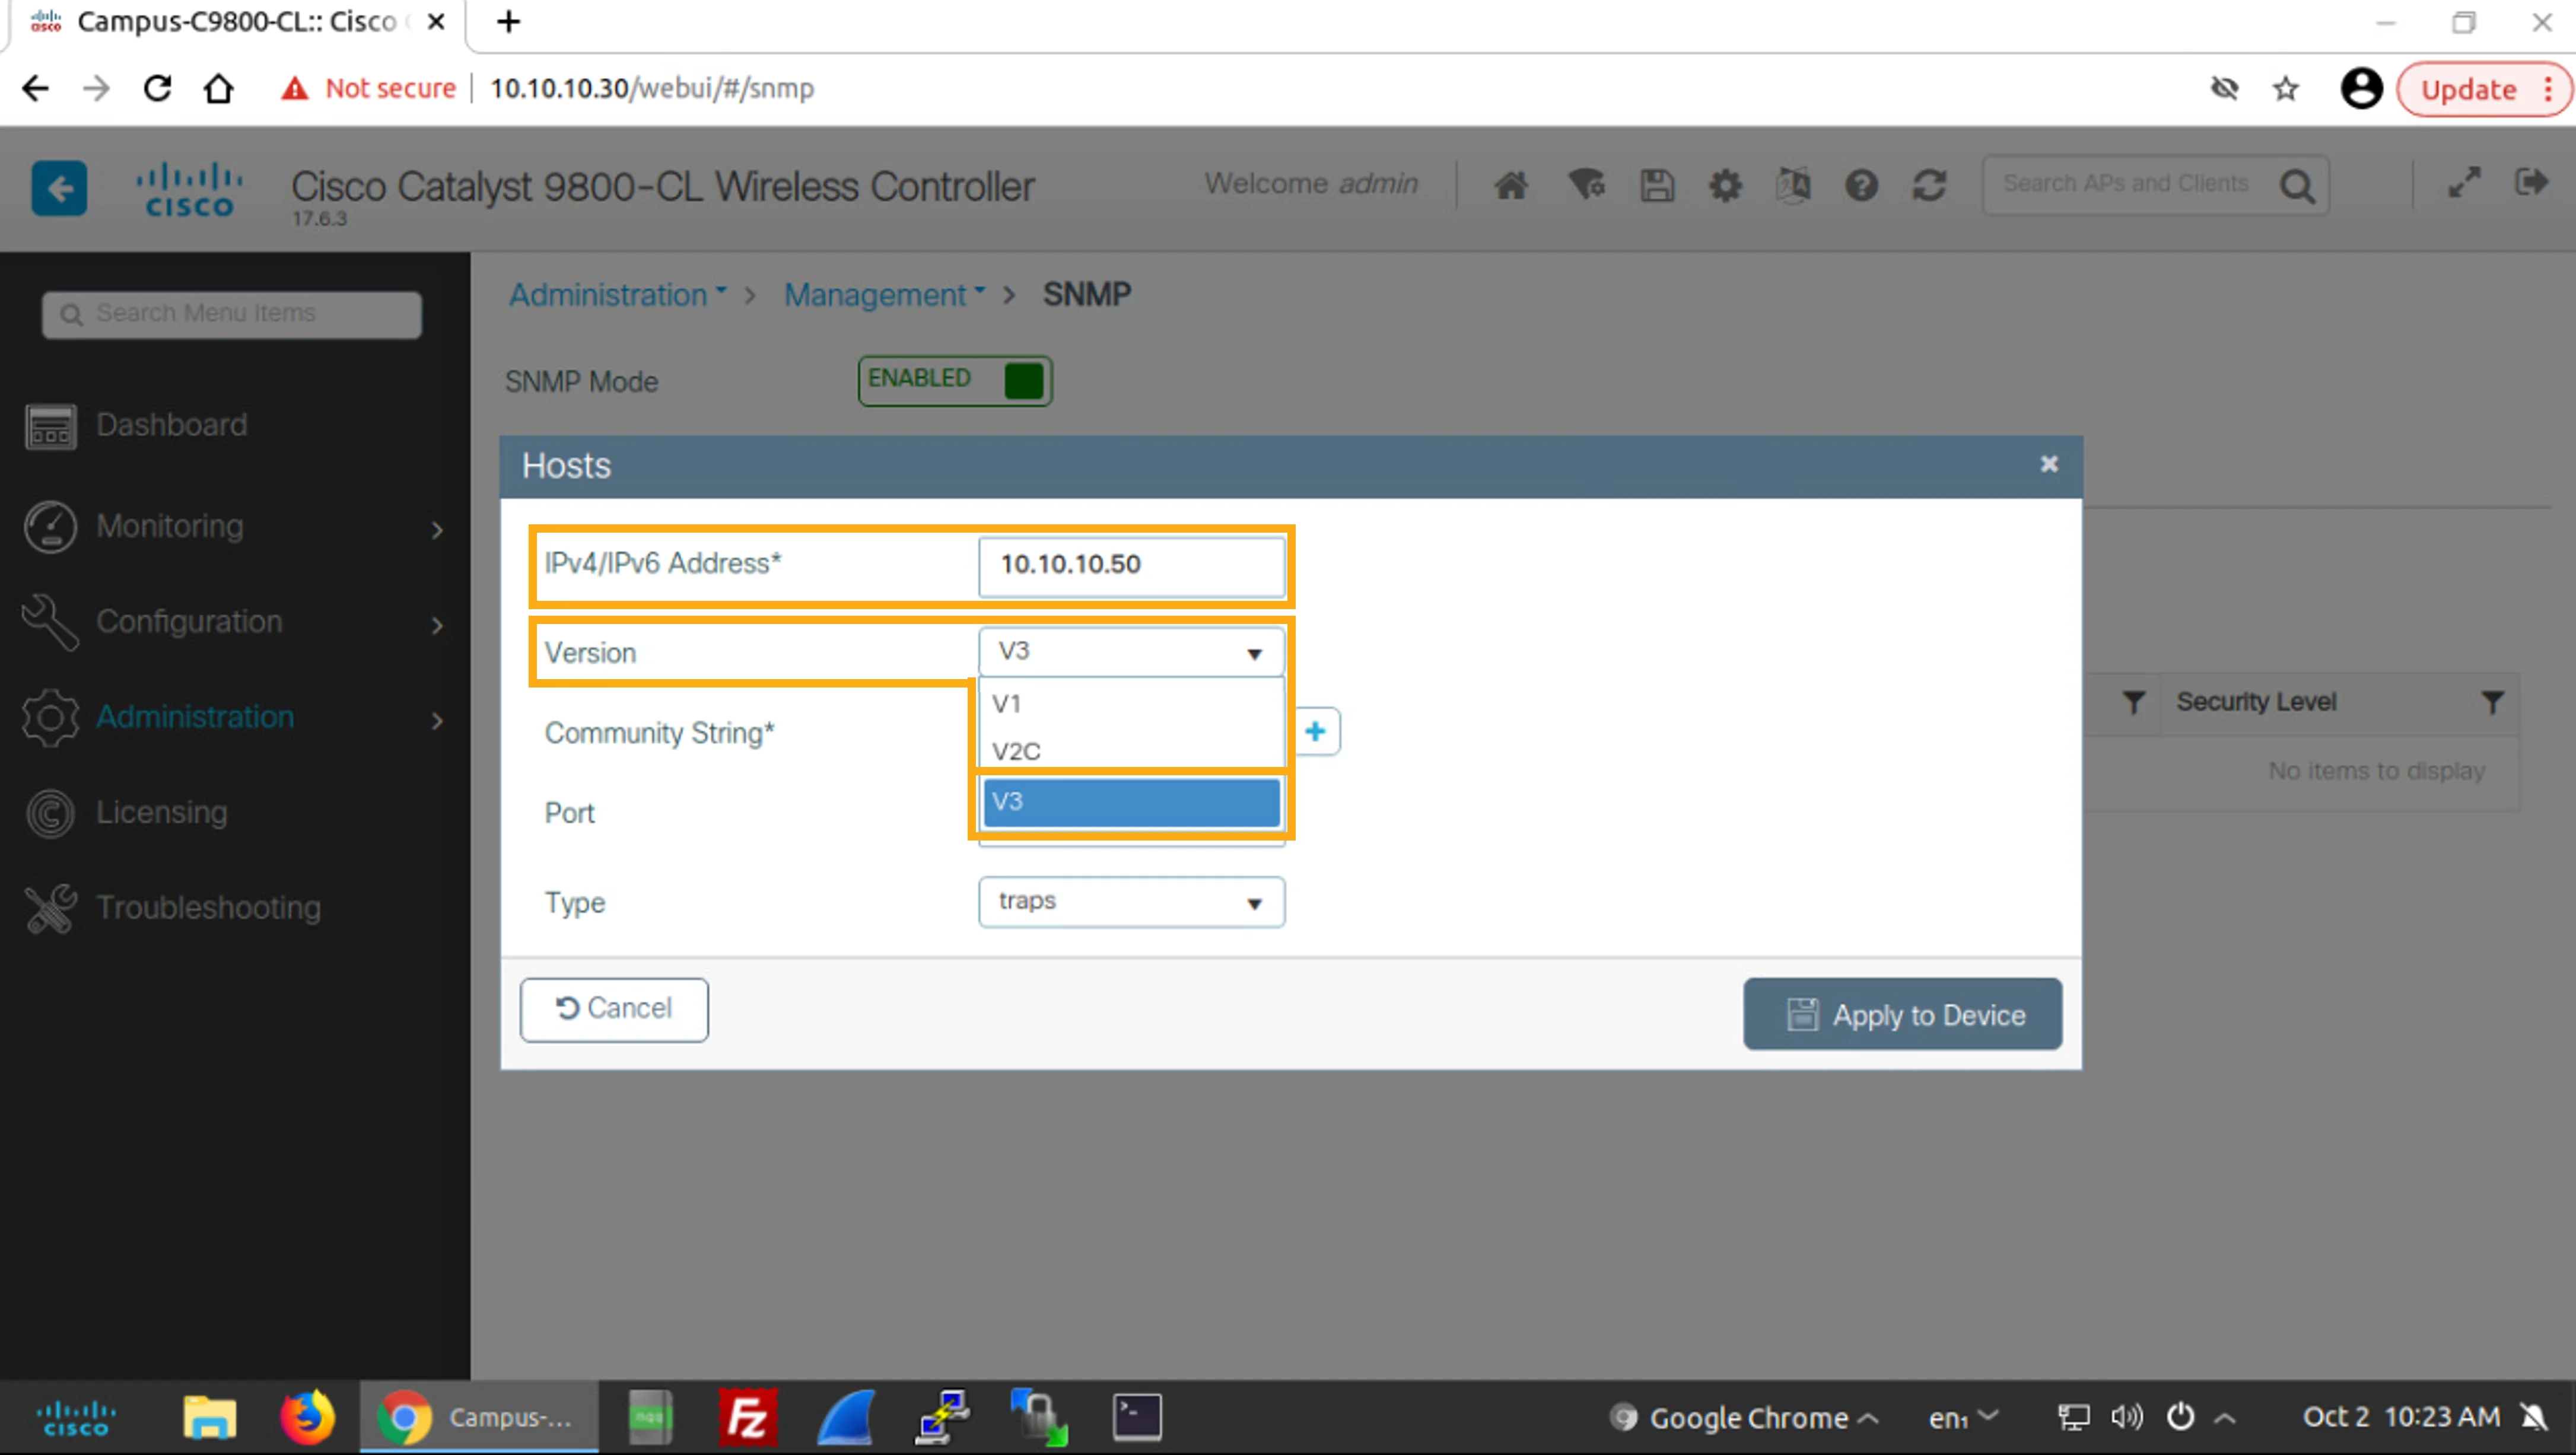
Set the IPv4/IPv6 Address to 10.10.10.50 and choose V3 in the Version drop-down list.
將IPv4/IPv6 Address設為 10.10.10.50,並在Version下拉式清單中選擇 V3。
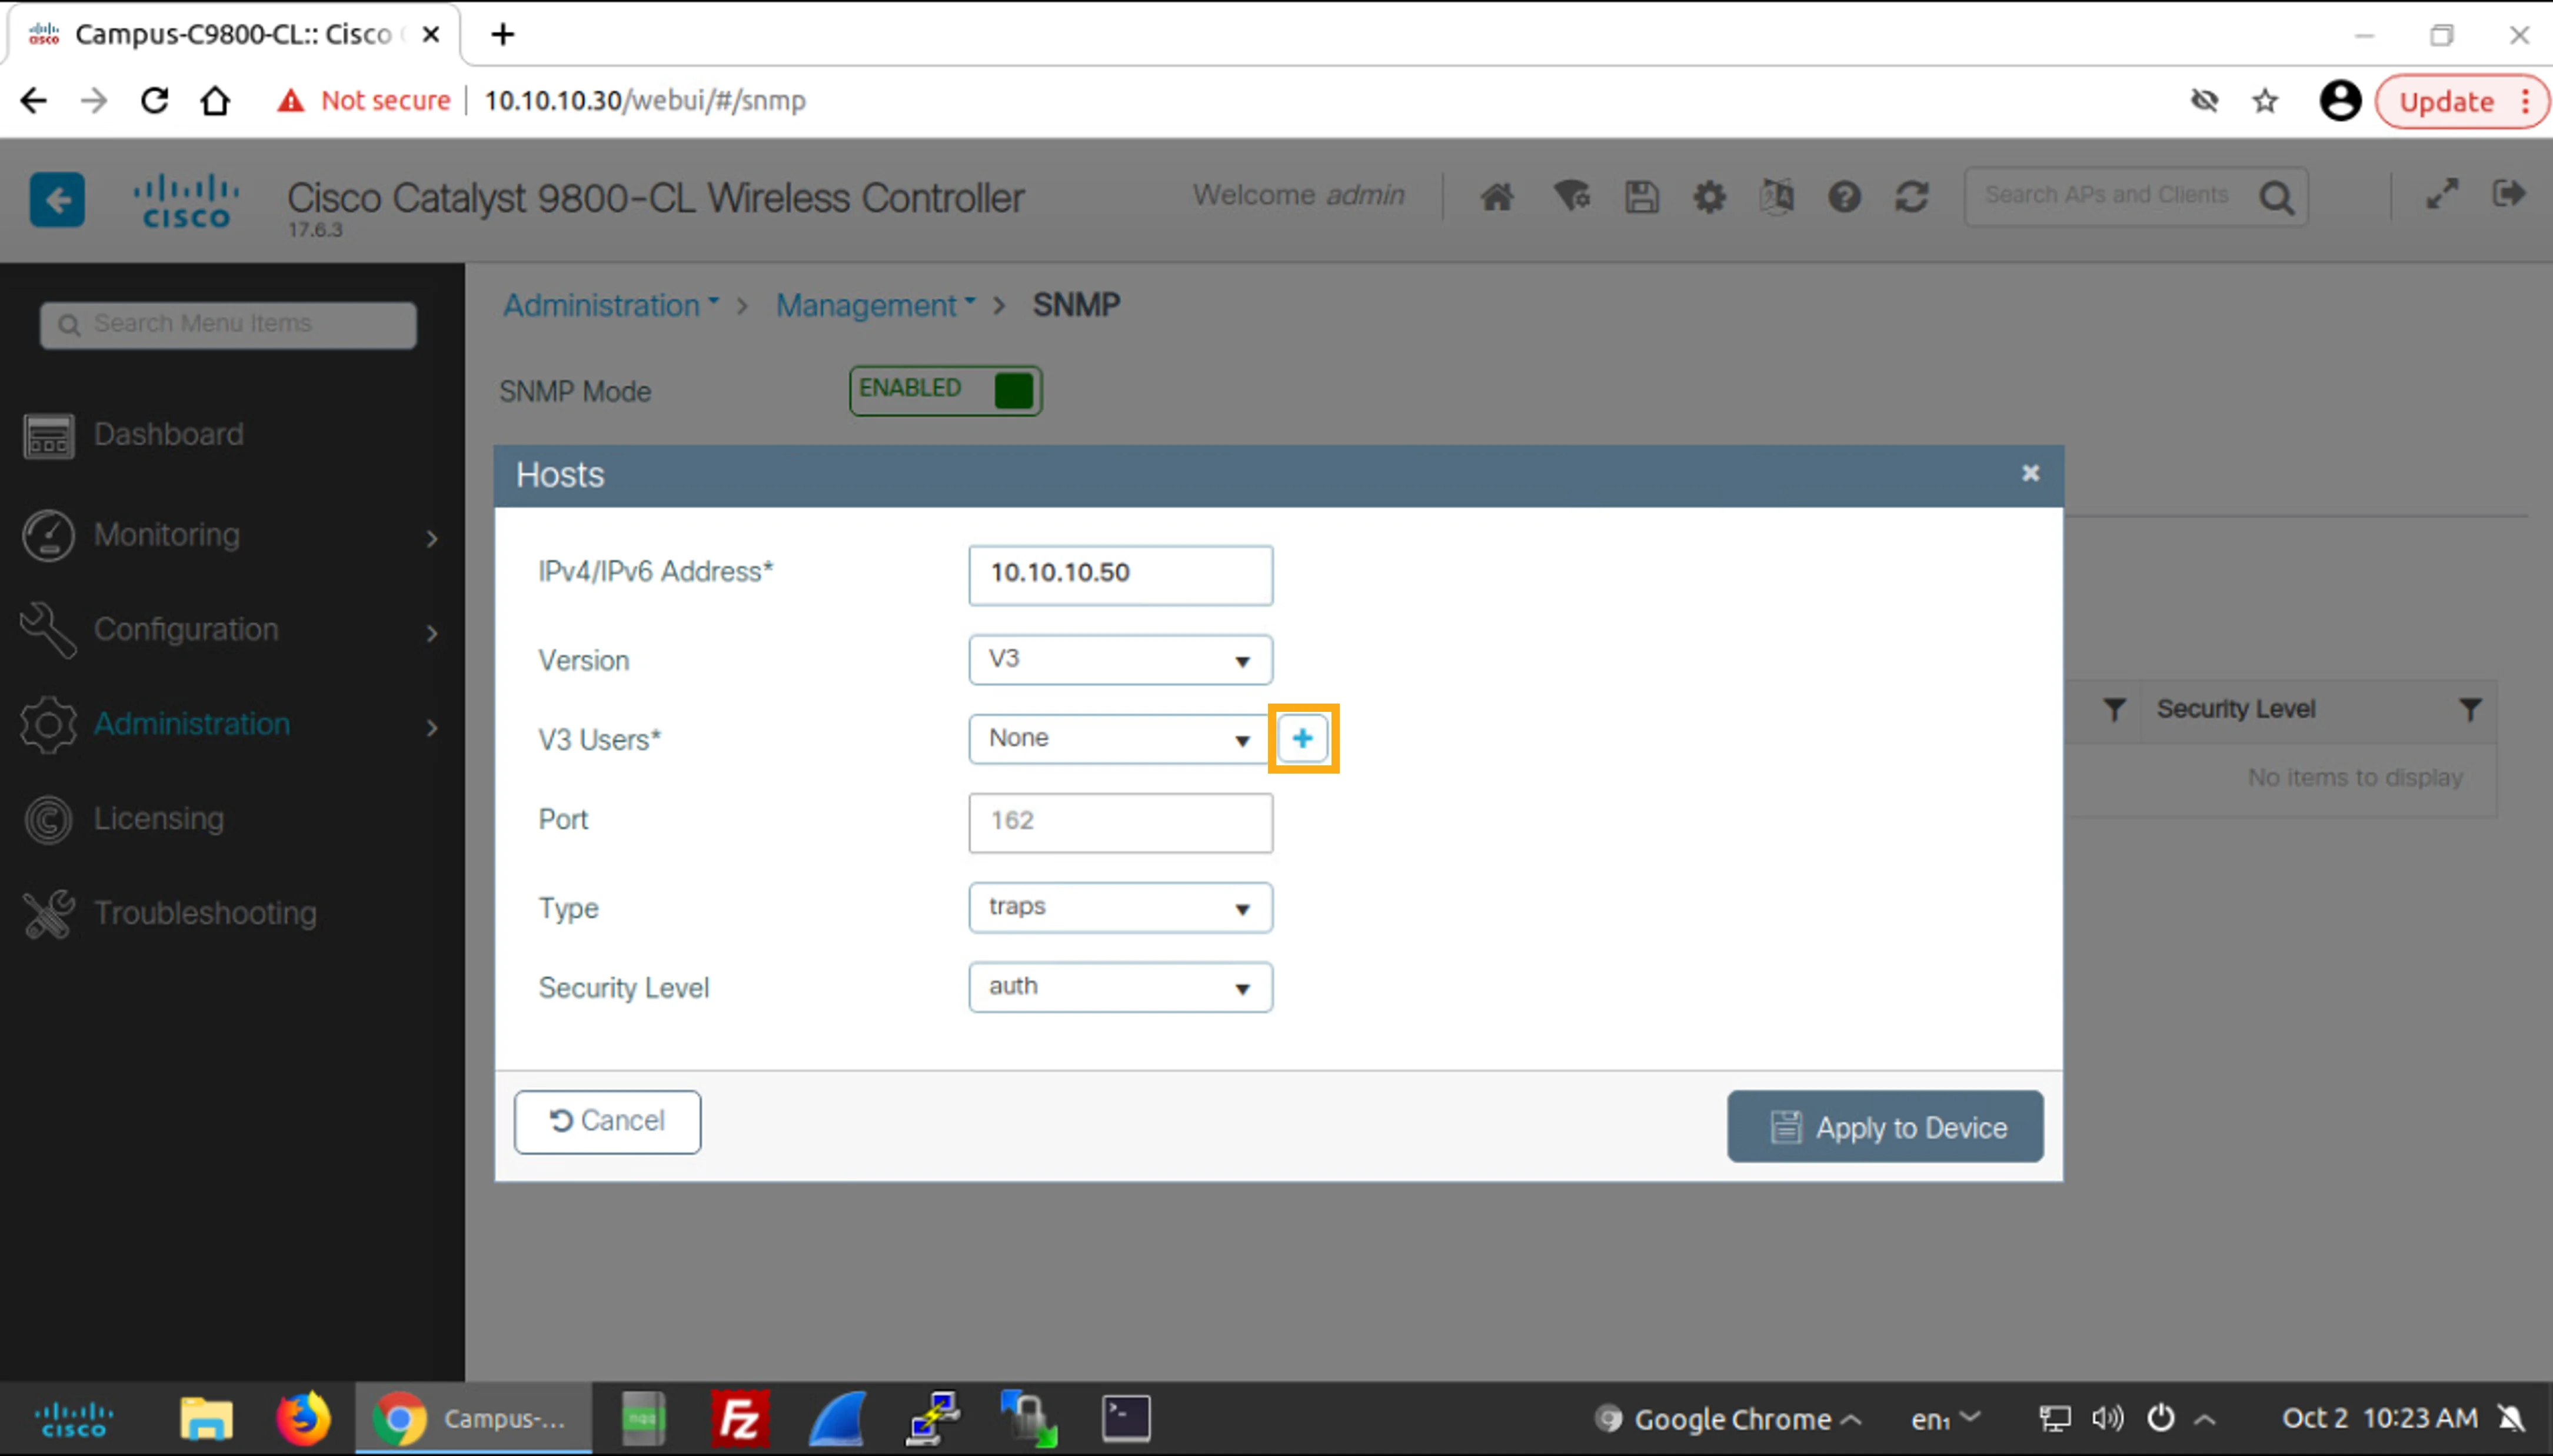
The screen refreshes. Click the plus sign (+) to the right of the V3 Users drop-down list.
畫面會重新整理。按一下V3 Users下拉式清單右側的加號(+)符號。
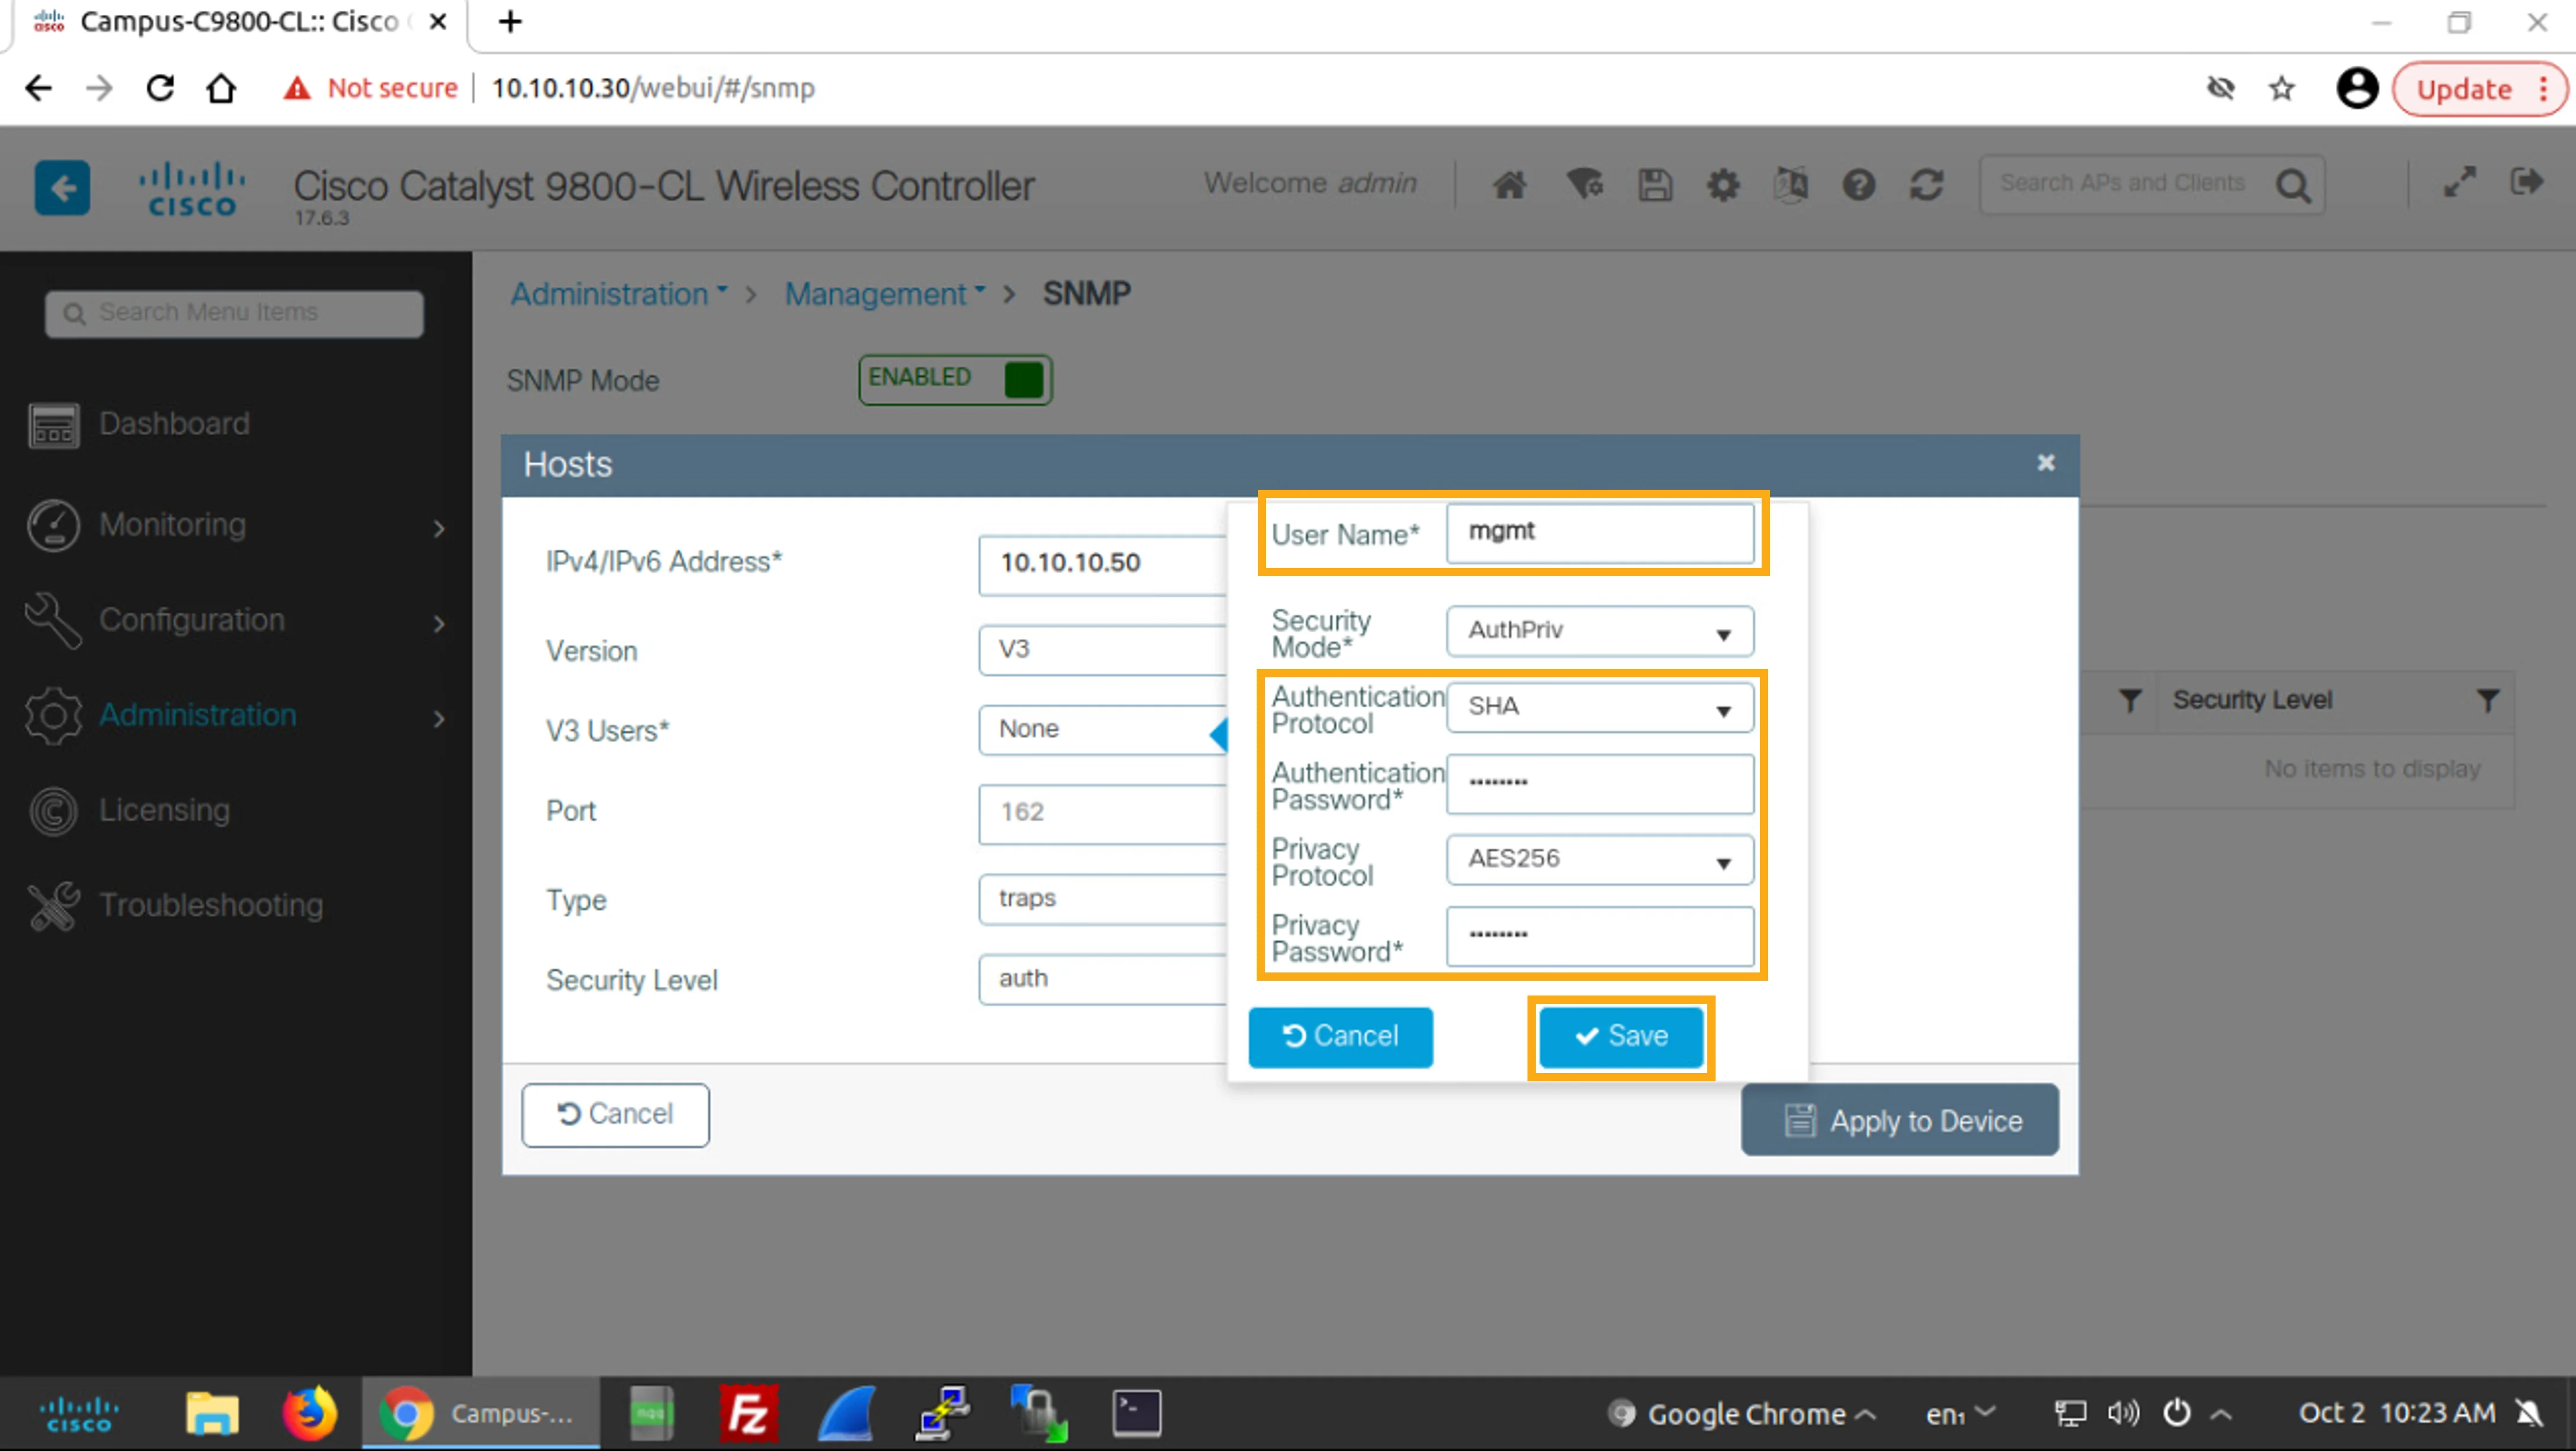
In the V3 Users dialog box, configure the following V3 User parameters:
在V3 Users對話方塊中,設定下列 V3 User 參數:
User Name User Name | mgmt mgmt |
Authentication Protocol Authentication Protocol | SHA SHA |
Authentication Password Authentication Password | Cisco123 Cisco123 |
Privacy Protocol Privacy Protocol | AES256 AES256 |
Privacy Password Privacy Password | Cisco123 Cisco123 |
Once done, click Save.
完成後,按一下Save。
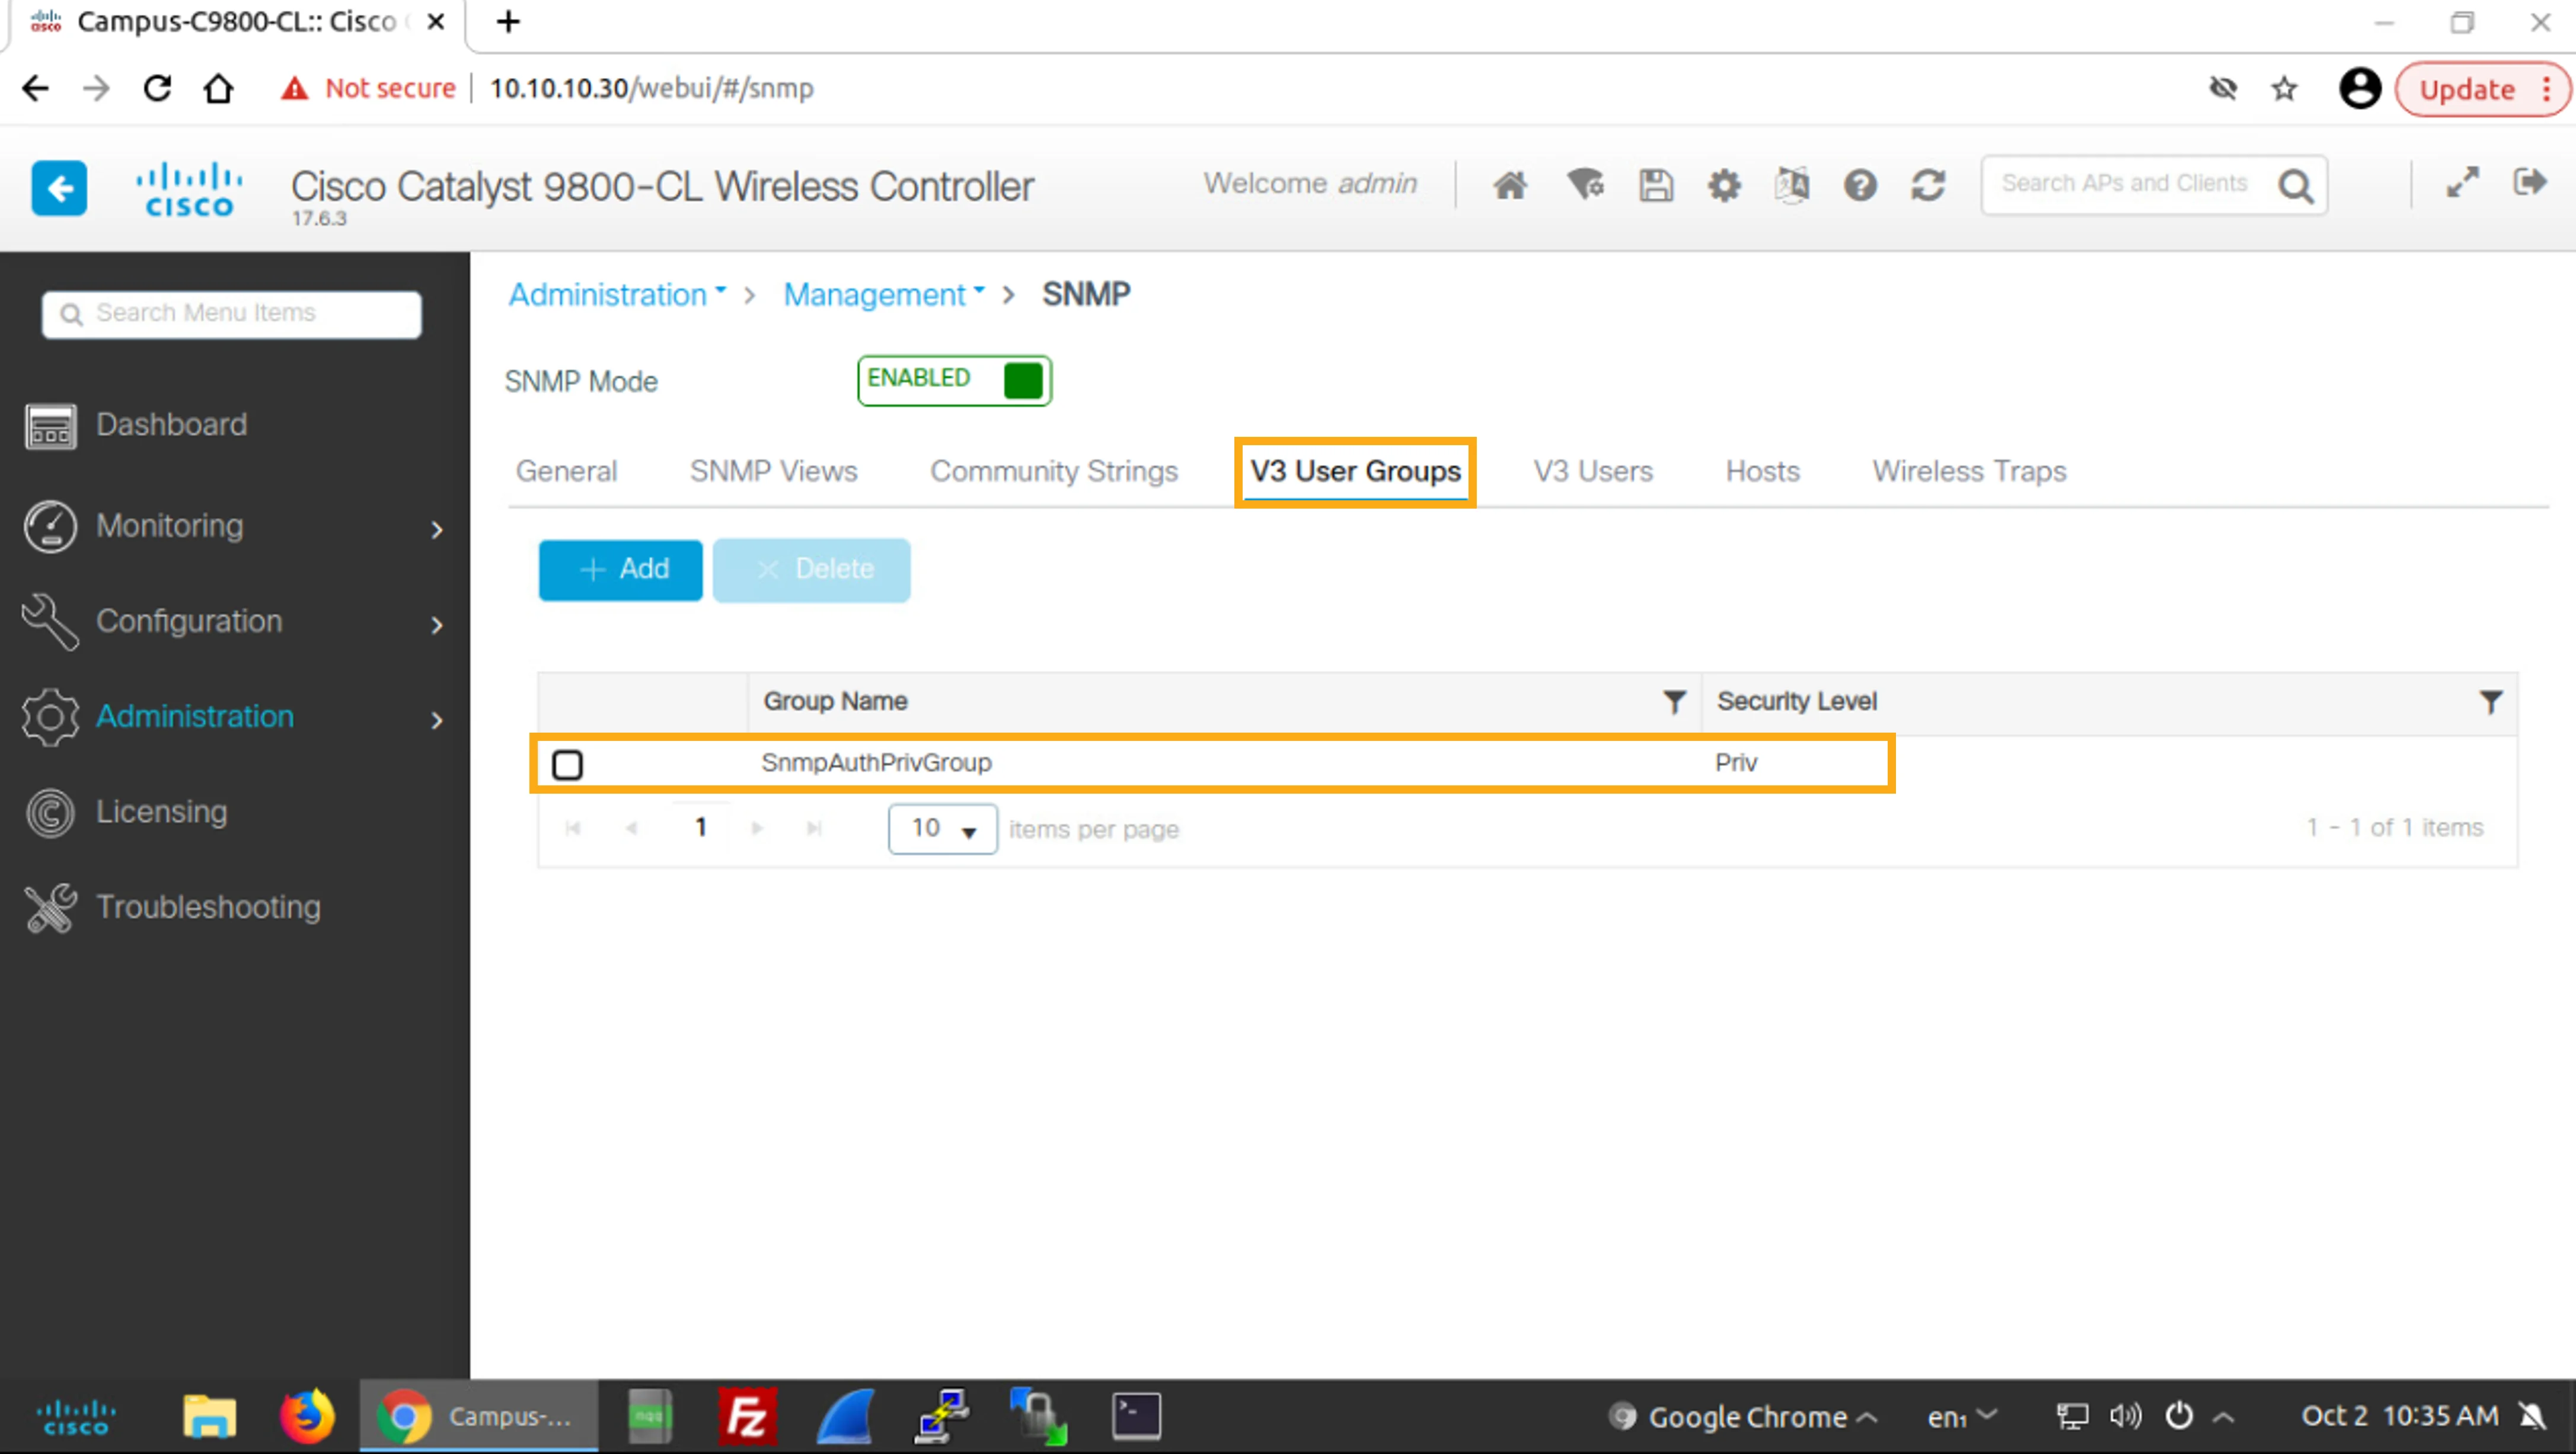
You are now back in the Hosts window. In the Security Level drop-down list, select priv and then click Apply to Device.
您現在回到Hosts視窗。在Security Level下拉式清單中選取 priv,然後按一下Apply to Device。
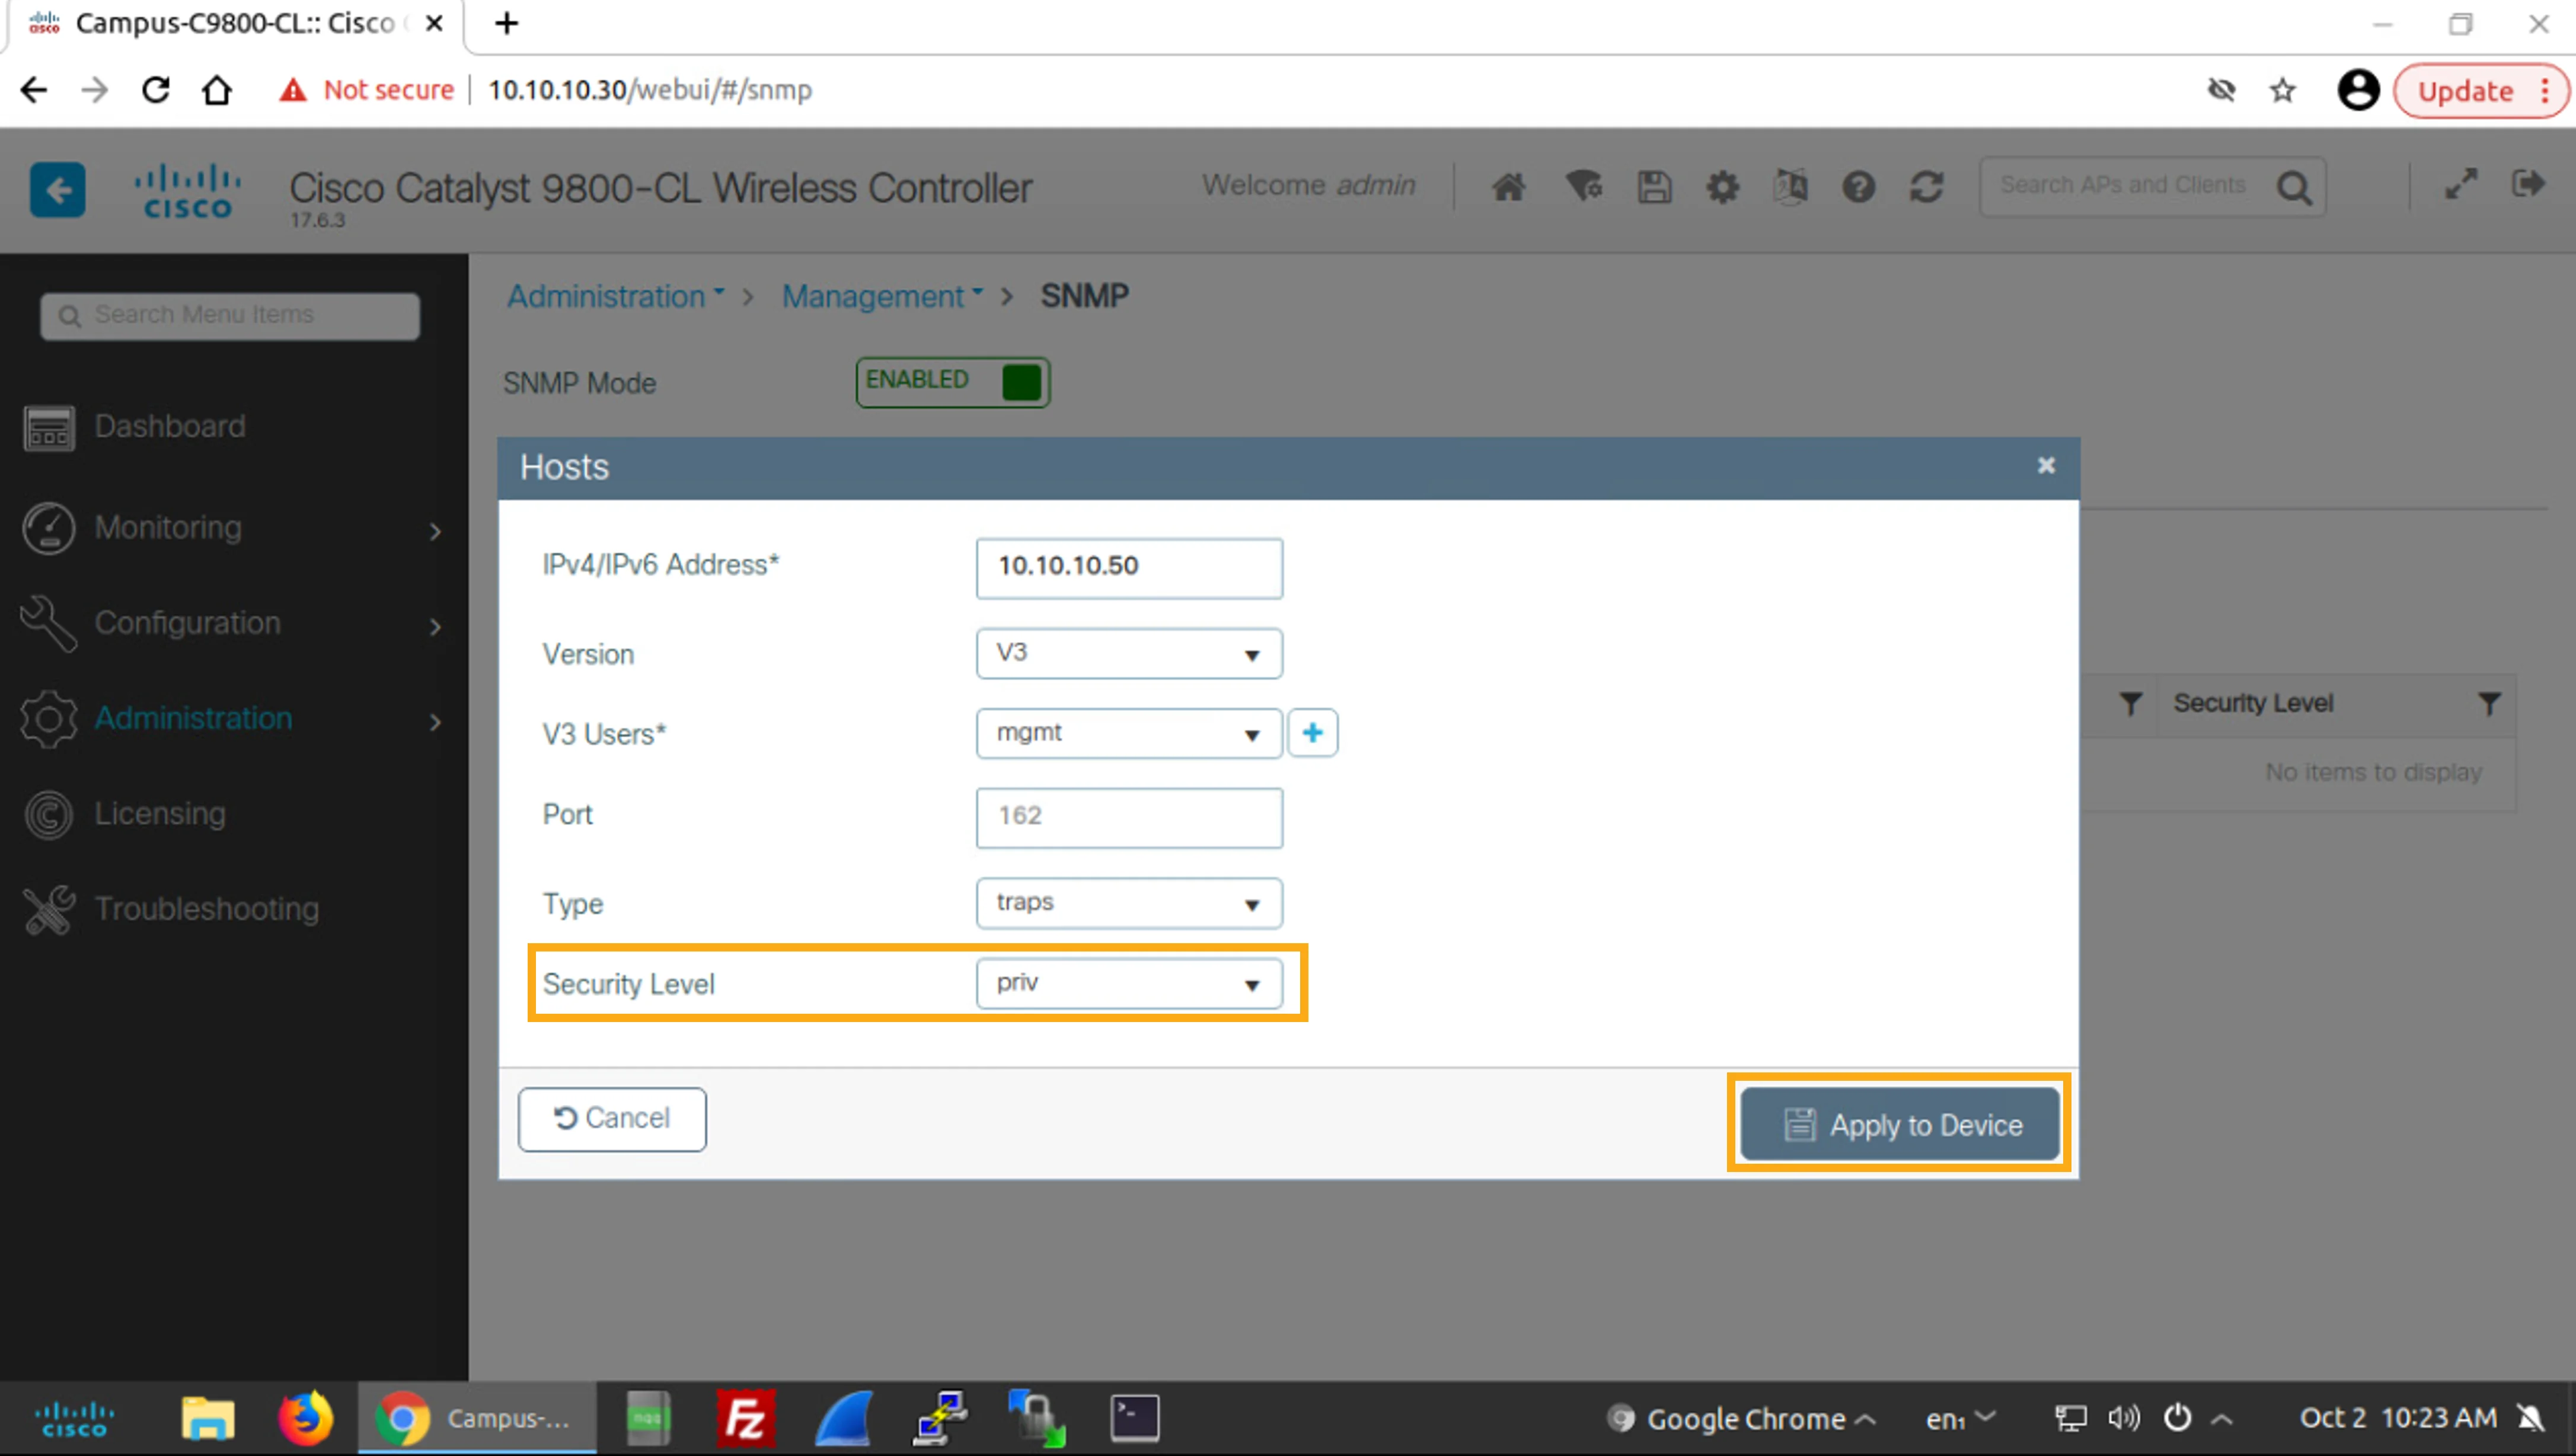
On your current Administration > Management > SNMP page Hosts tab, verify your SNMP host configuration.
在目前Administration > Management > SNMP頁面的Hosts索引標籤中,驗證您的 SNMP 主機設定。
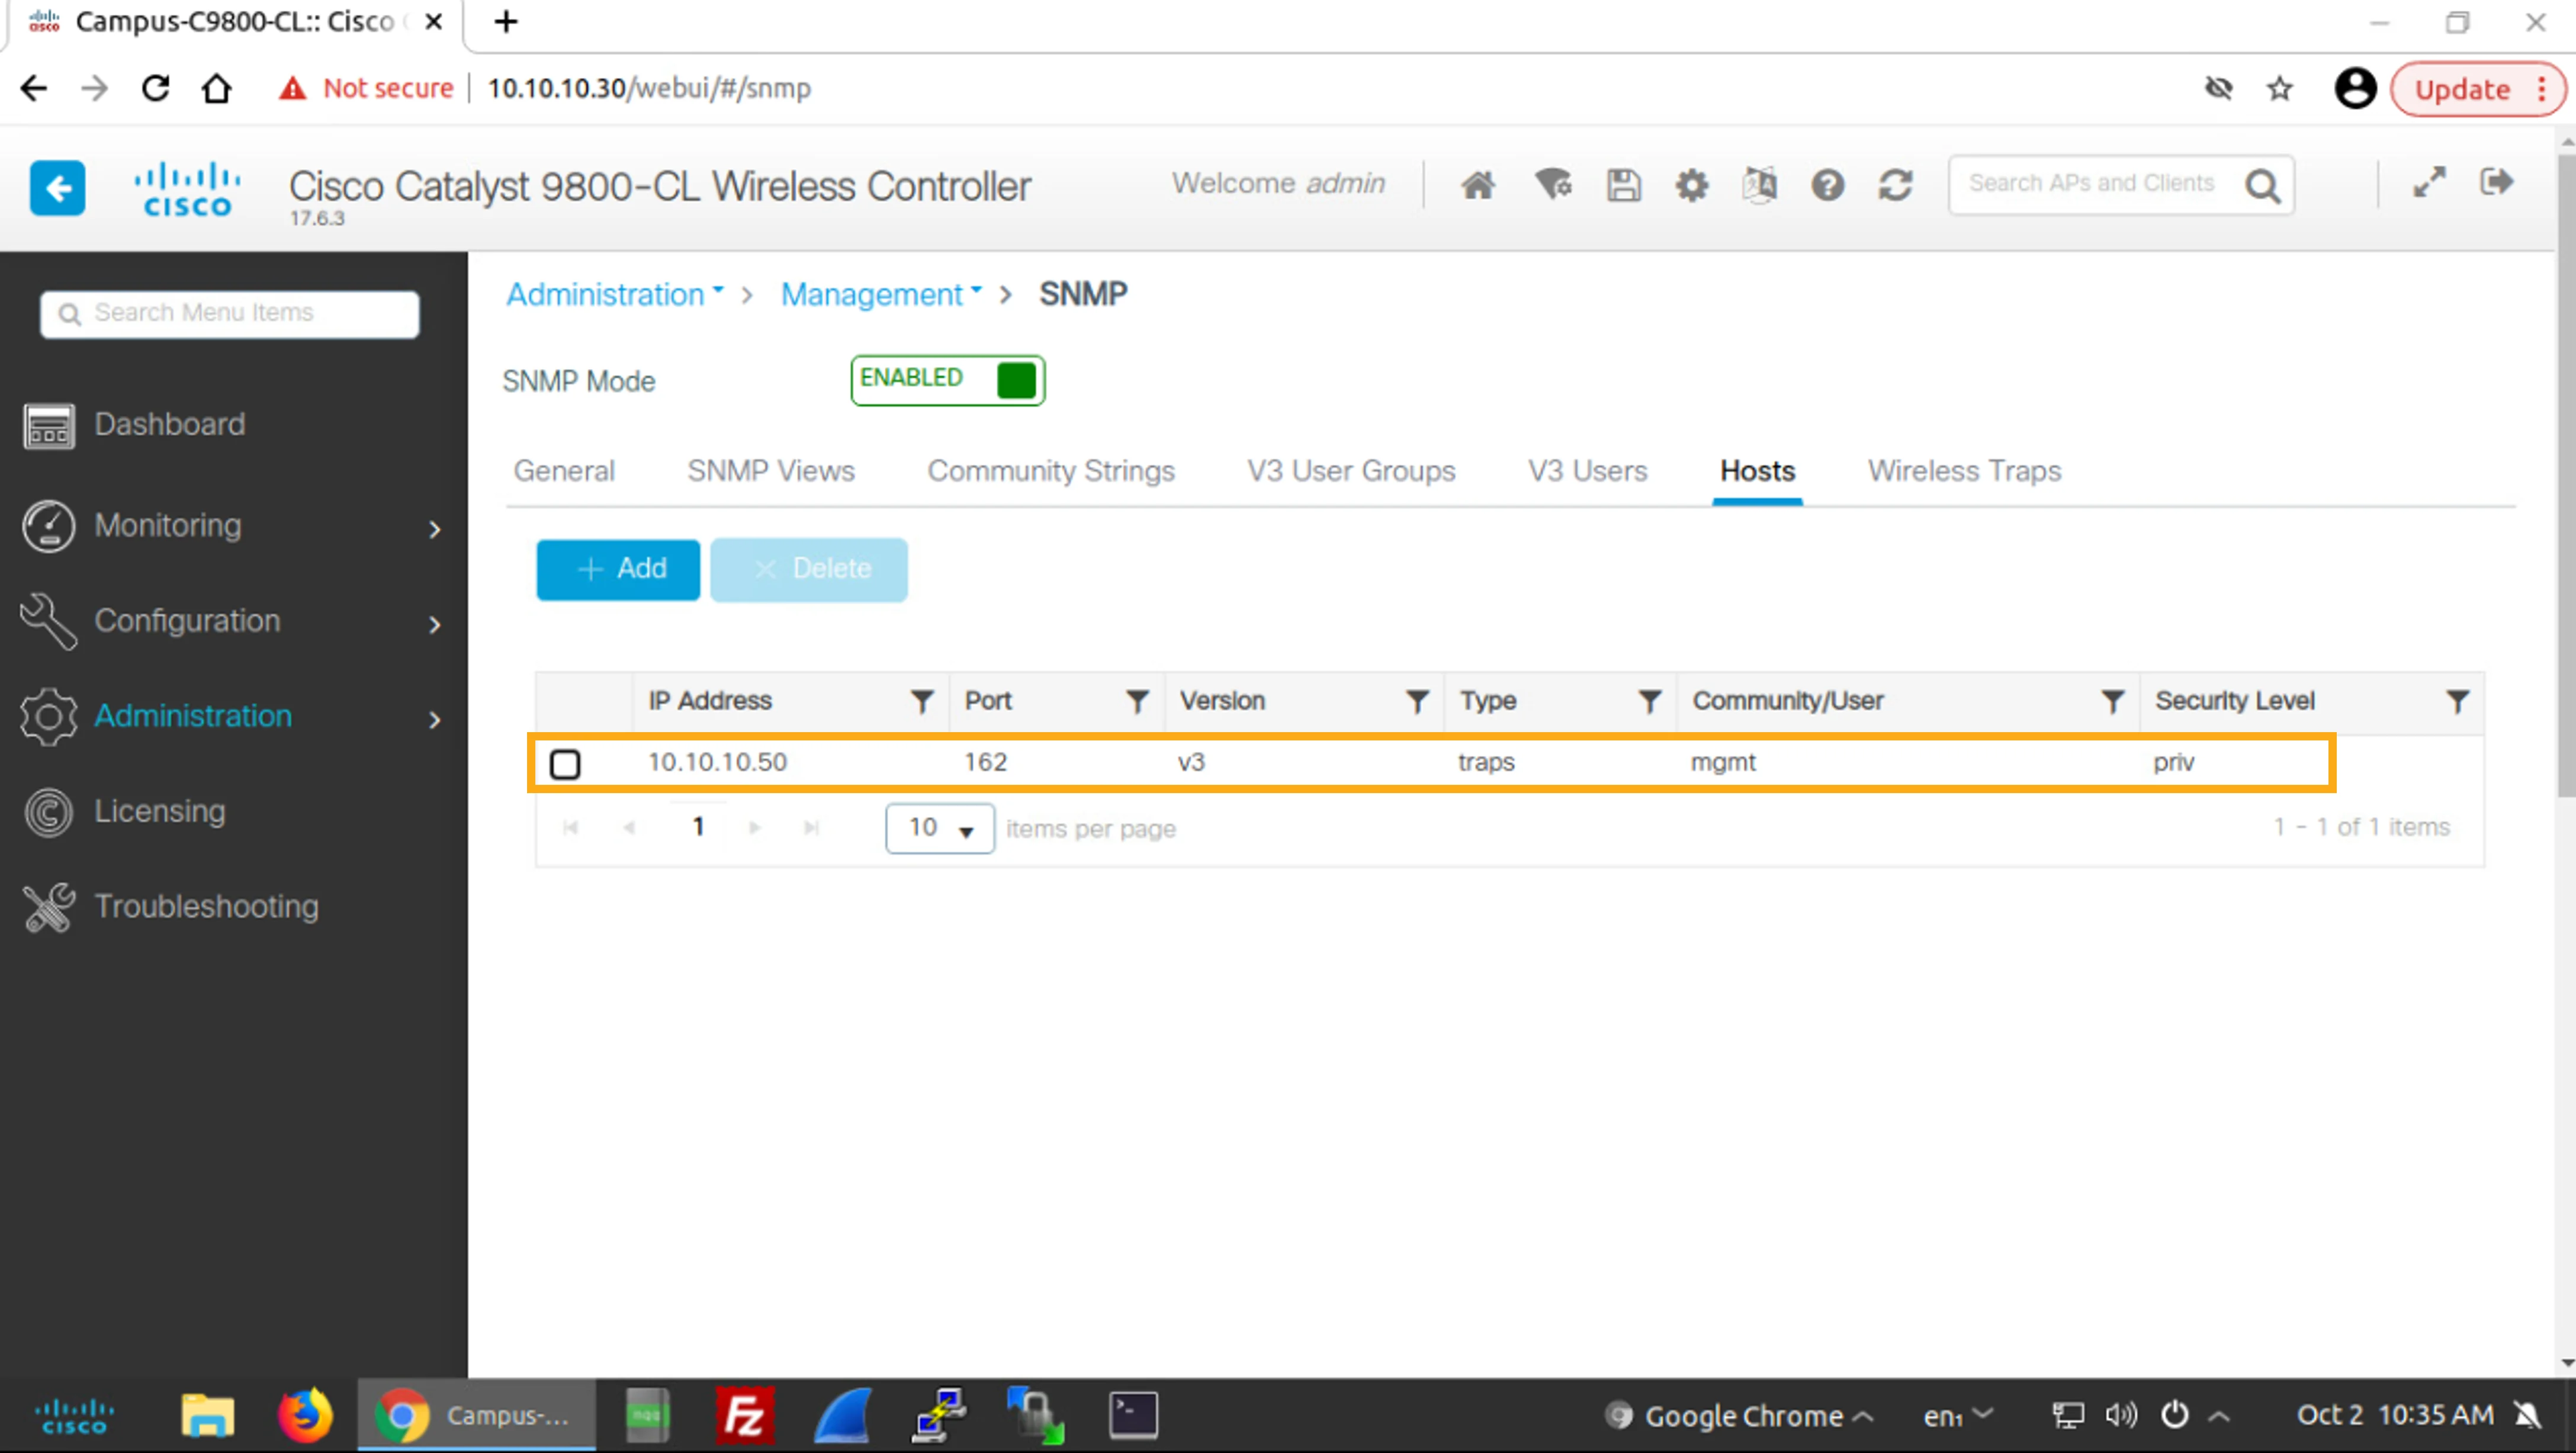
Click the V3 Users tab and verify the configuration of the SNMP version 3 user.
按一下V3 Users索引標籤,驗證 SNMP version 3 使用者的設定。
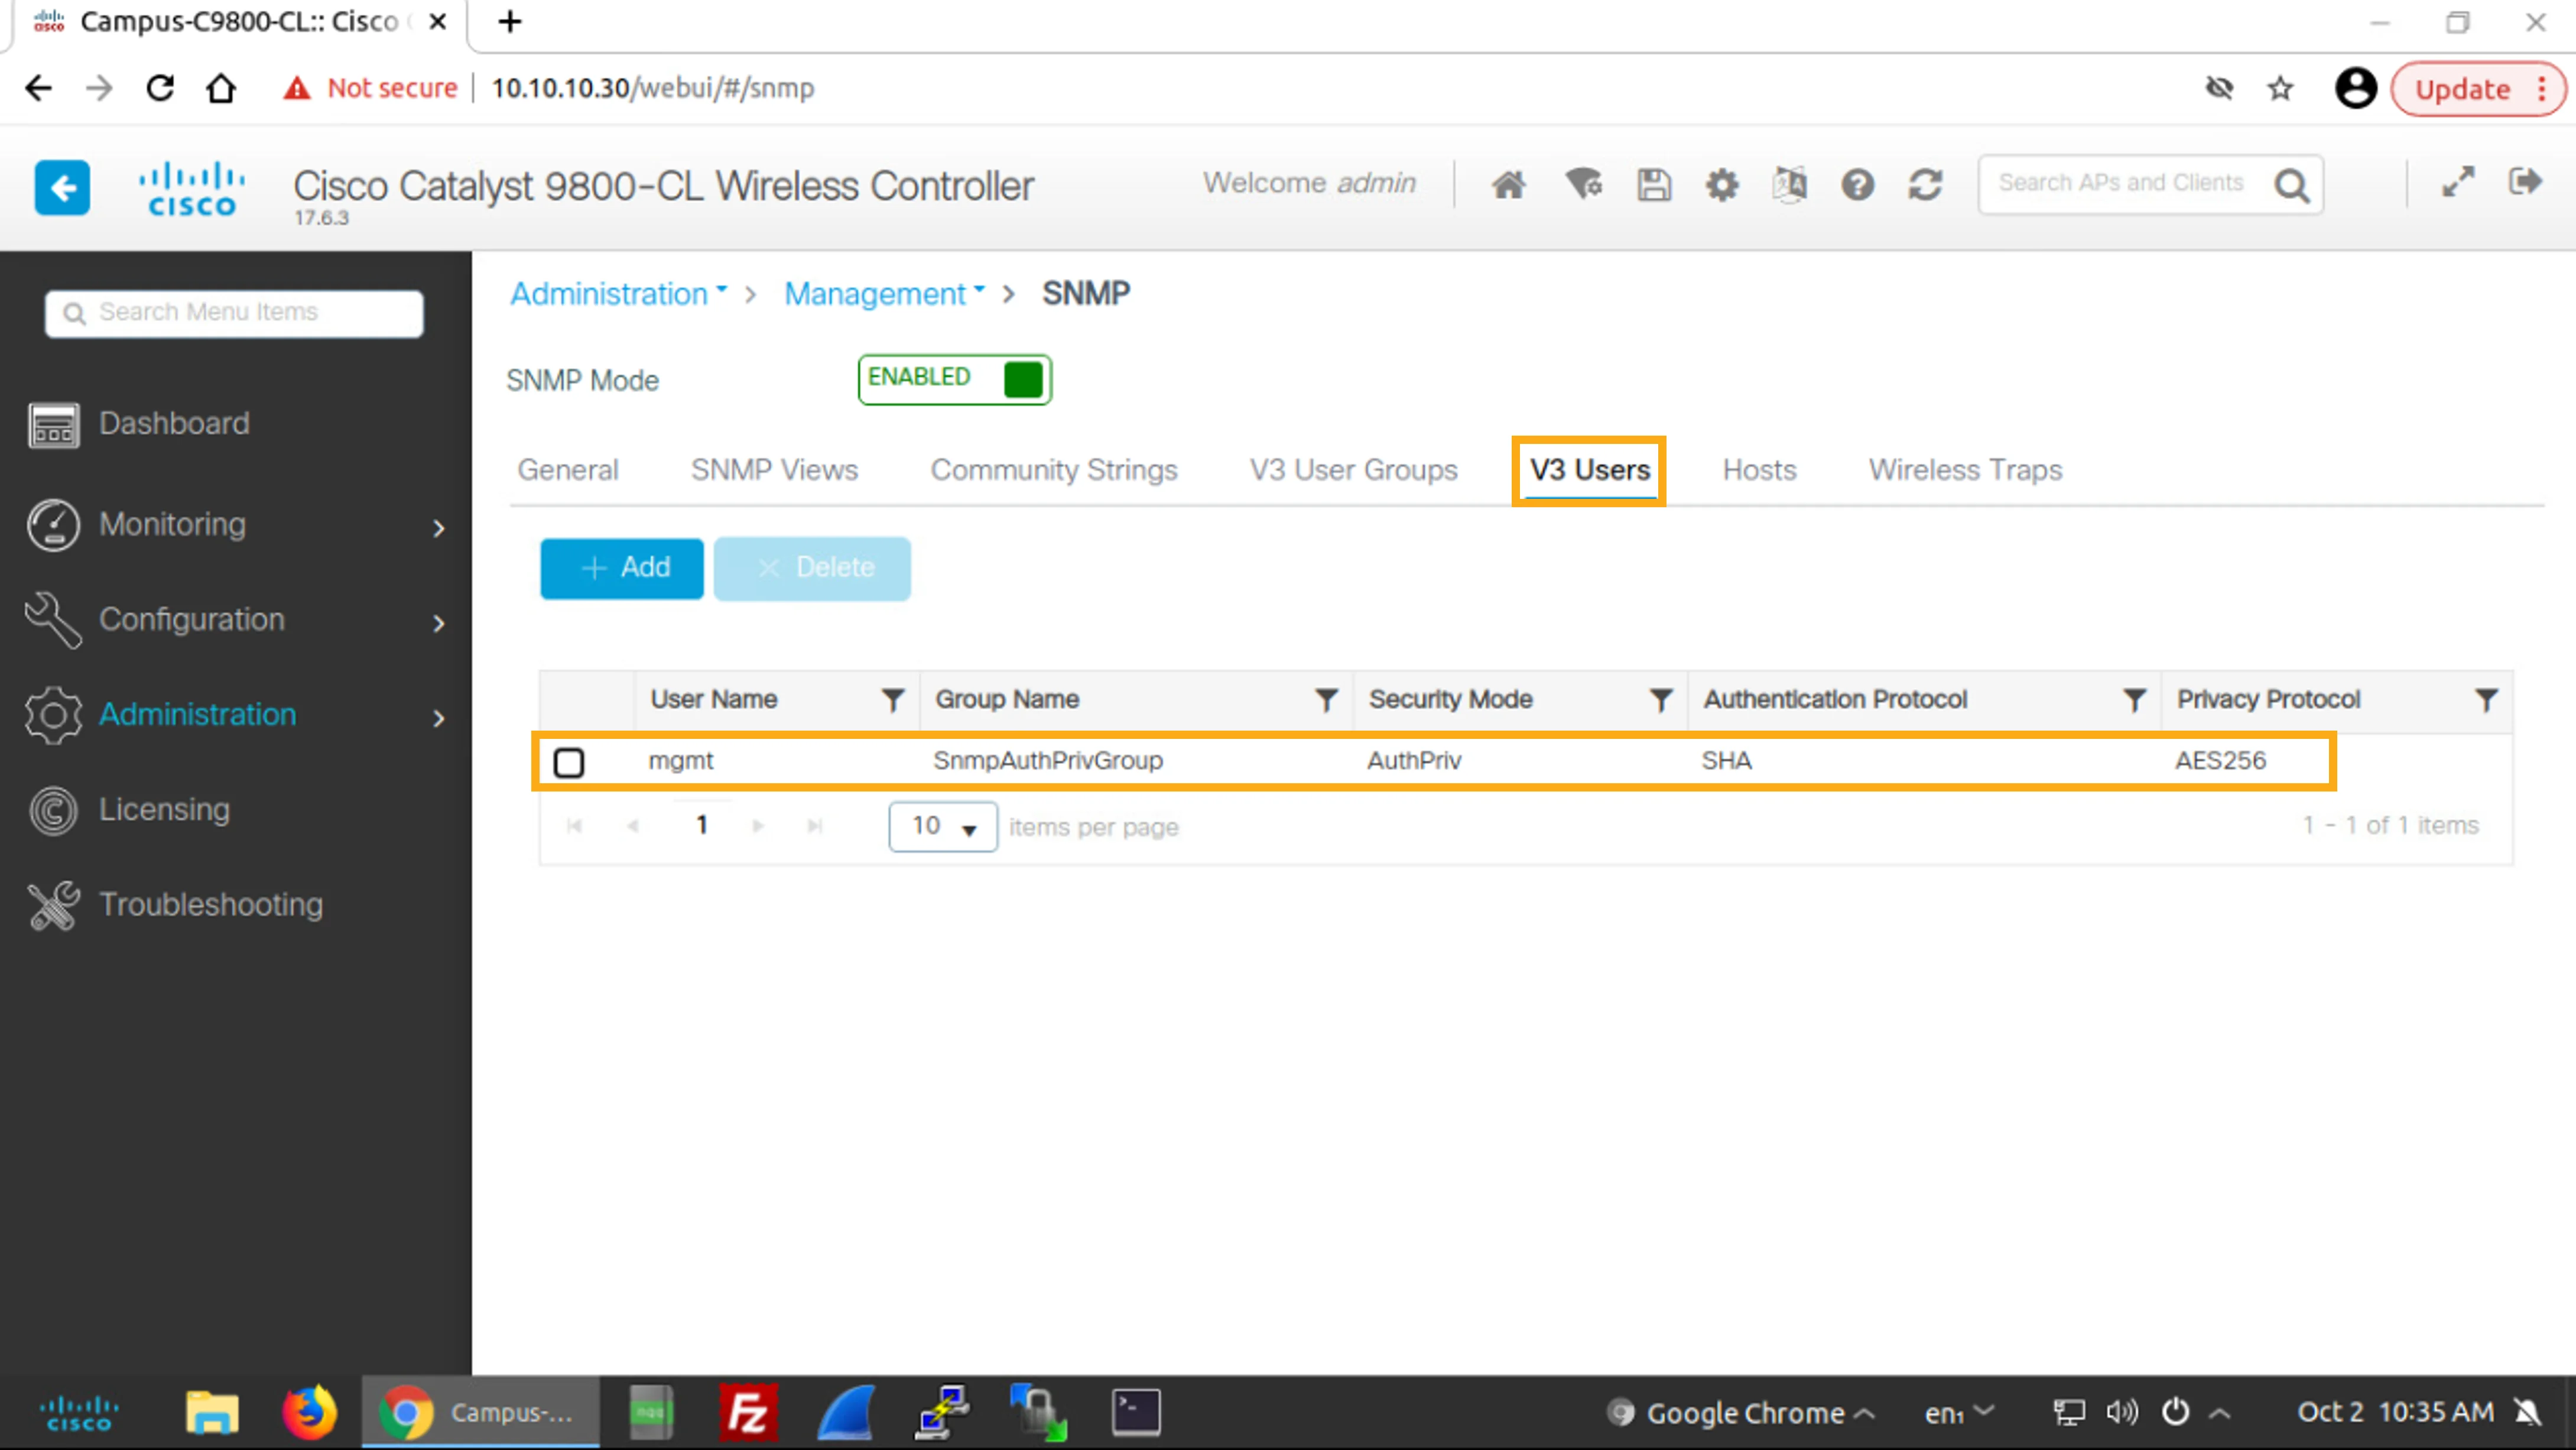
Click the V3 User Groups tab and verify the configuration of the SNMP version 3 user group.
按一下V3 User Groups索引標籤,驗證 SNMP version 3 使用者群組的設定。
This group was automatically created when you added the SNMP version 3 user called mgmt during the configuration of the SNMP host.
此群組是在設定 SNMP 主機期間,新增名為 mgmt 的 SNMP version 3 使用者時自動建立的。
Examine Enabled SNMP Traps
檢視已啟用的 SNMP Traps
You will examine which wireless-related SNMP traps are enabled by default and how the traps are organized in groups
您將檢視預設啟用了哪些與無線相關的 SNMP traps,以及這些 traps 如何依群組分類
SNMP traps are available at the Wireless Traps tab.
SNMP traps 可在Wireless Traps索引標籤中找到。
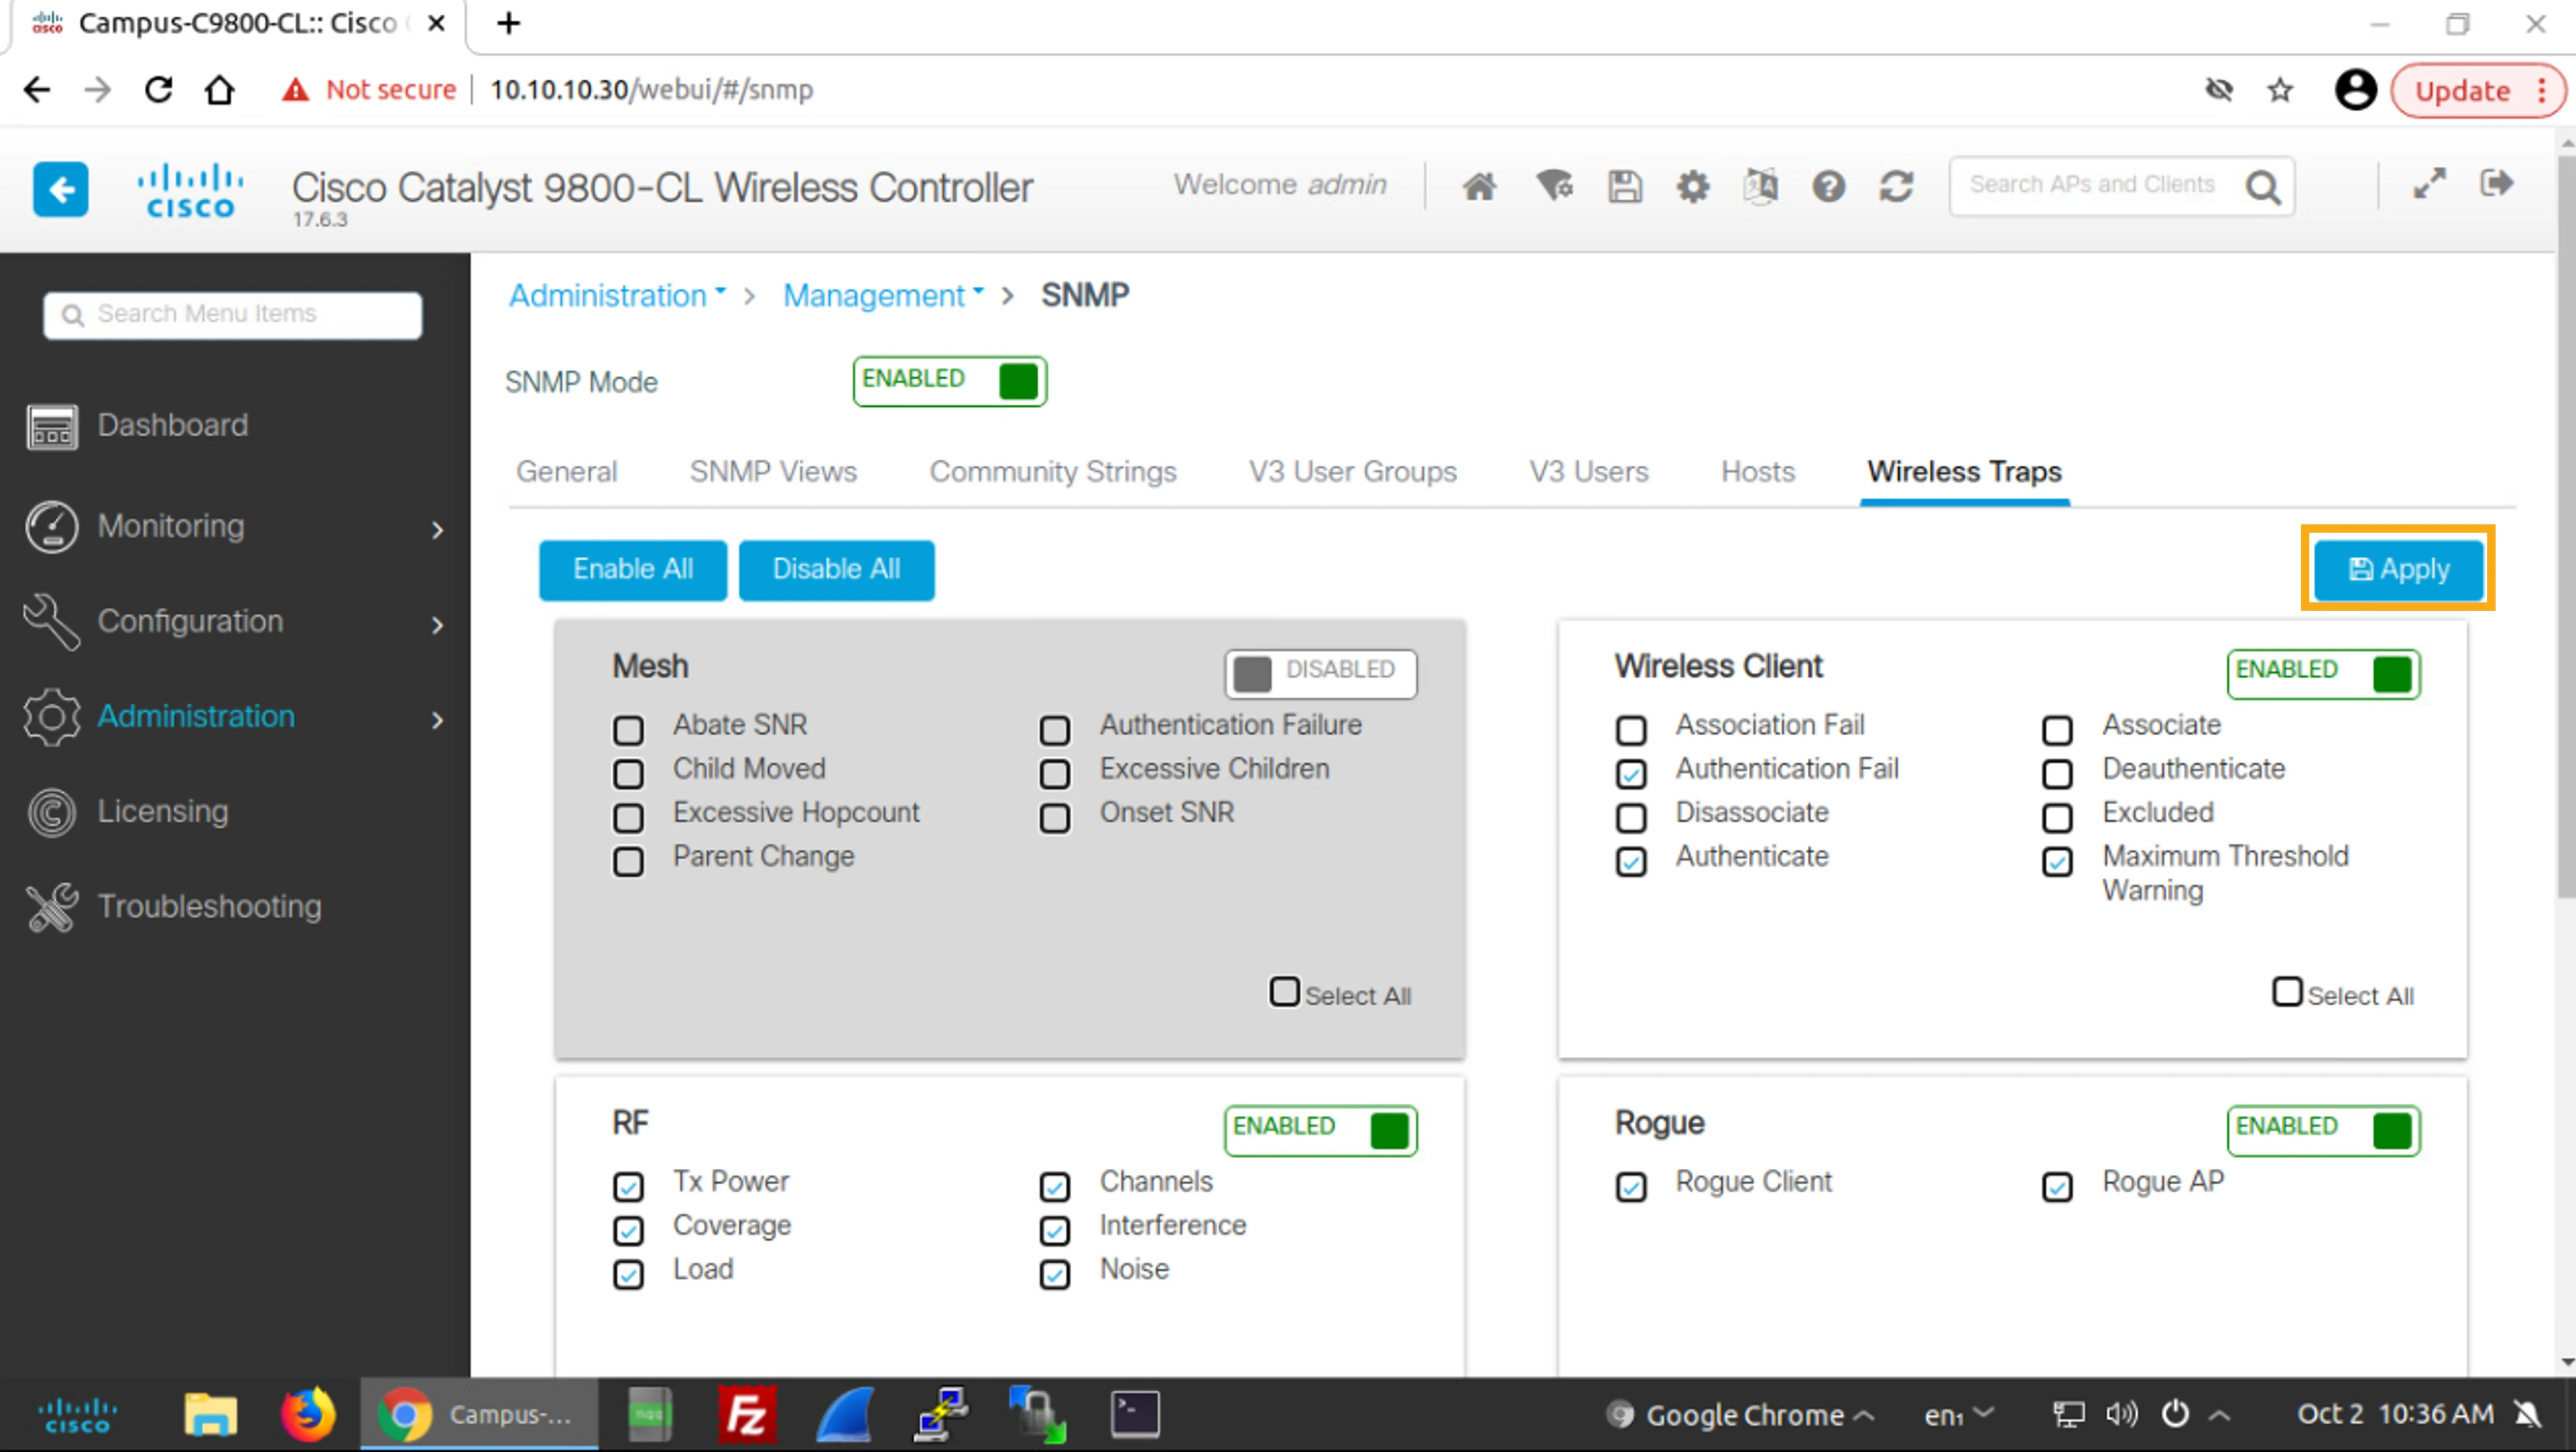
On your current Administration > Management > SNMP page, click the Wireless Traps tab.
在目前的Administration > Management > SNMP頁面上,按一下Wireless Traps索引標籤。
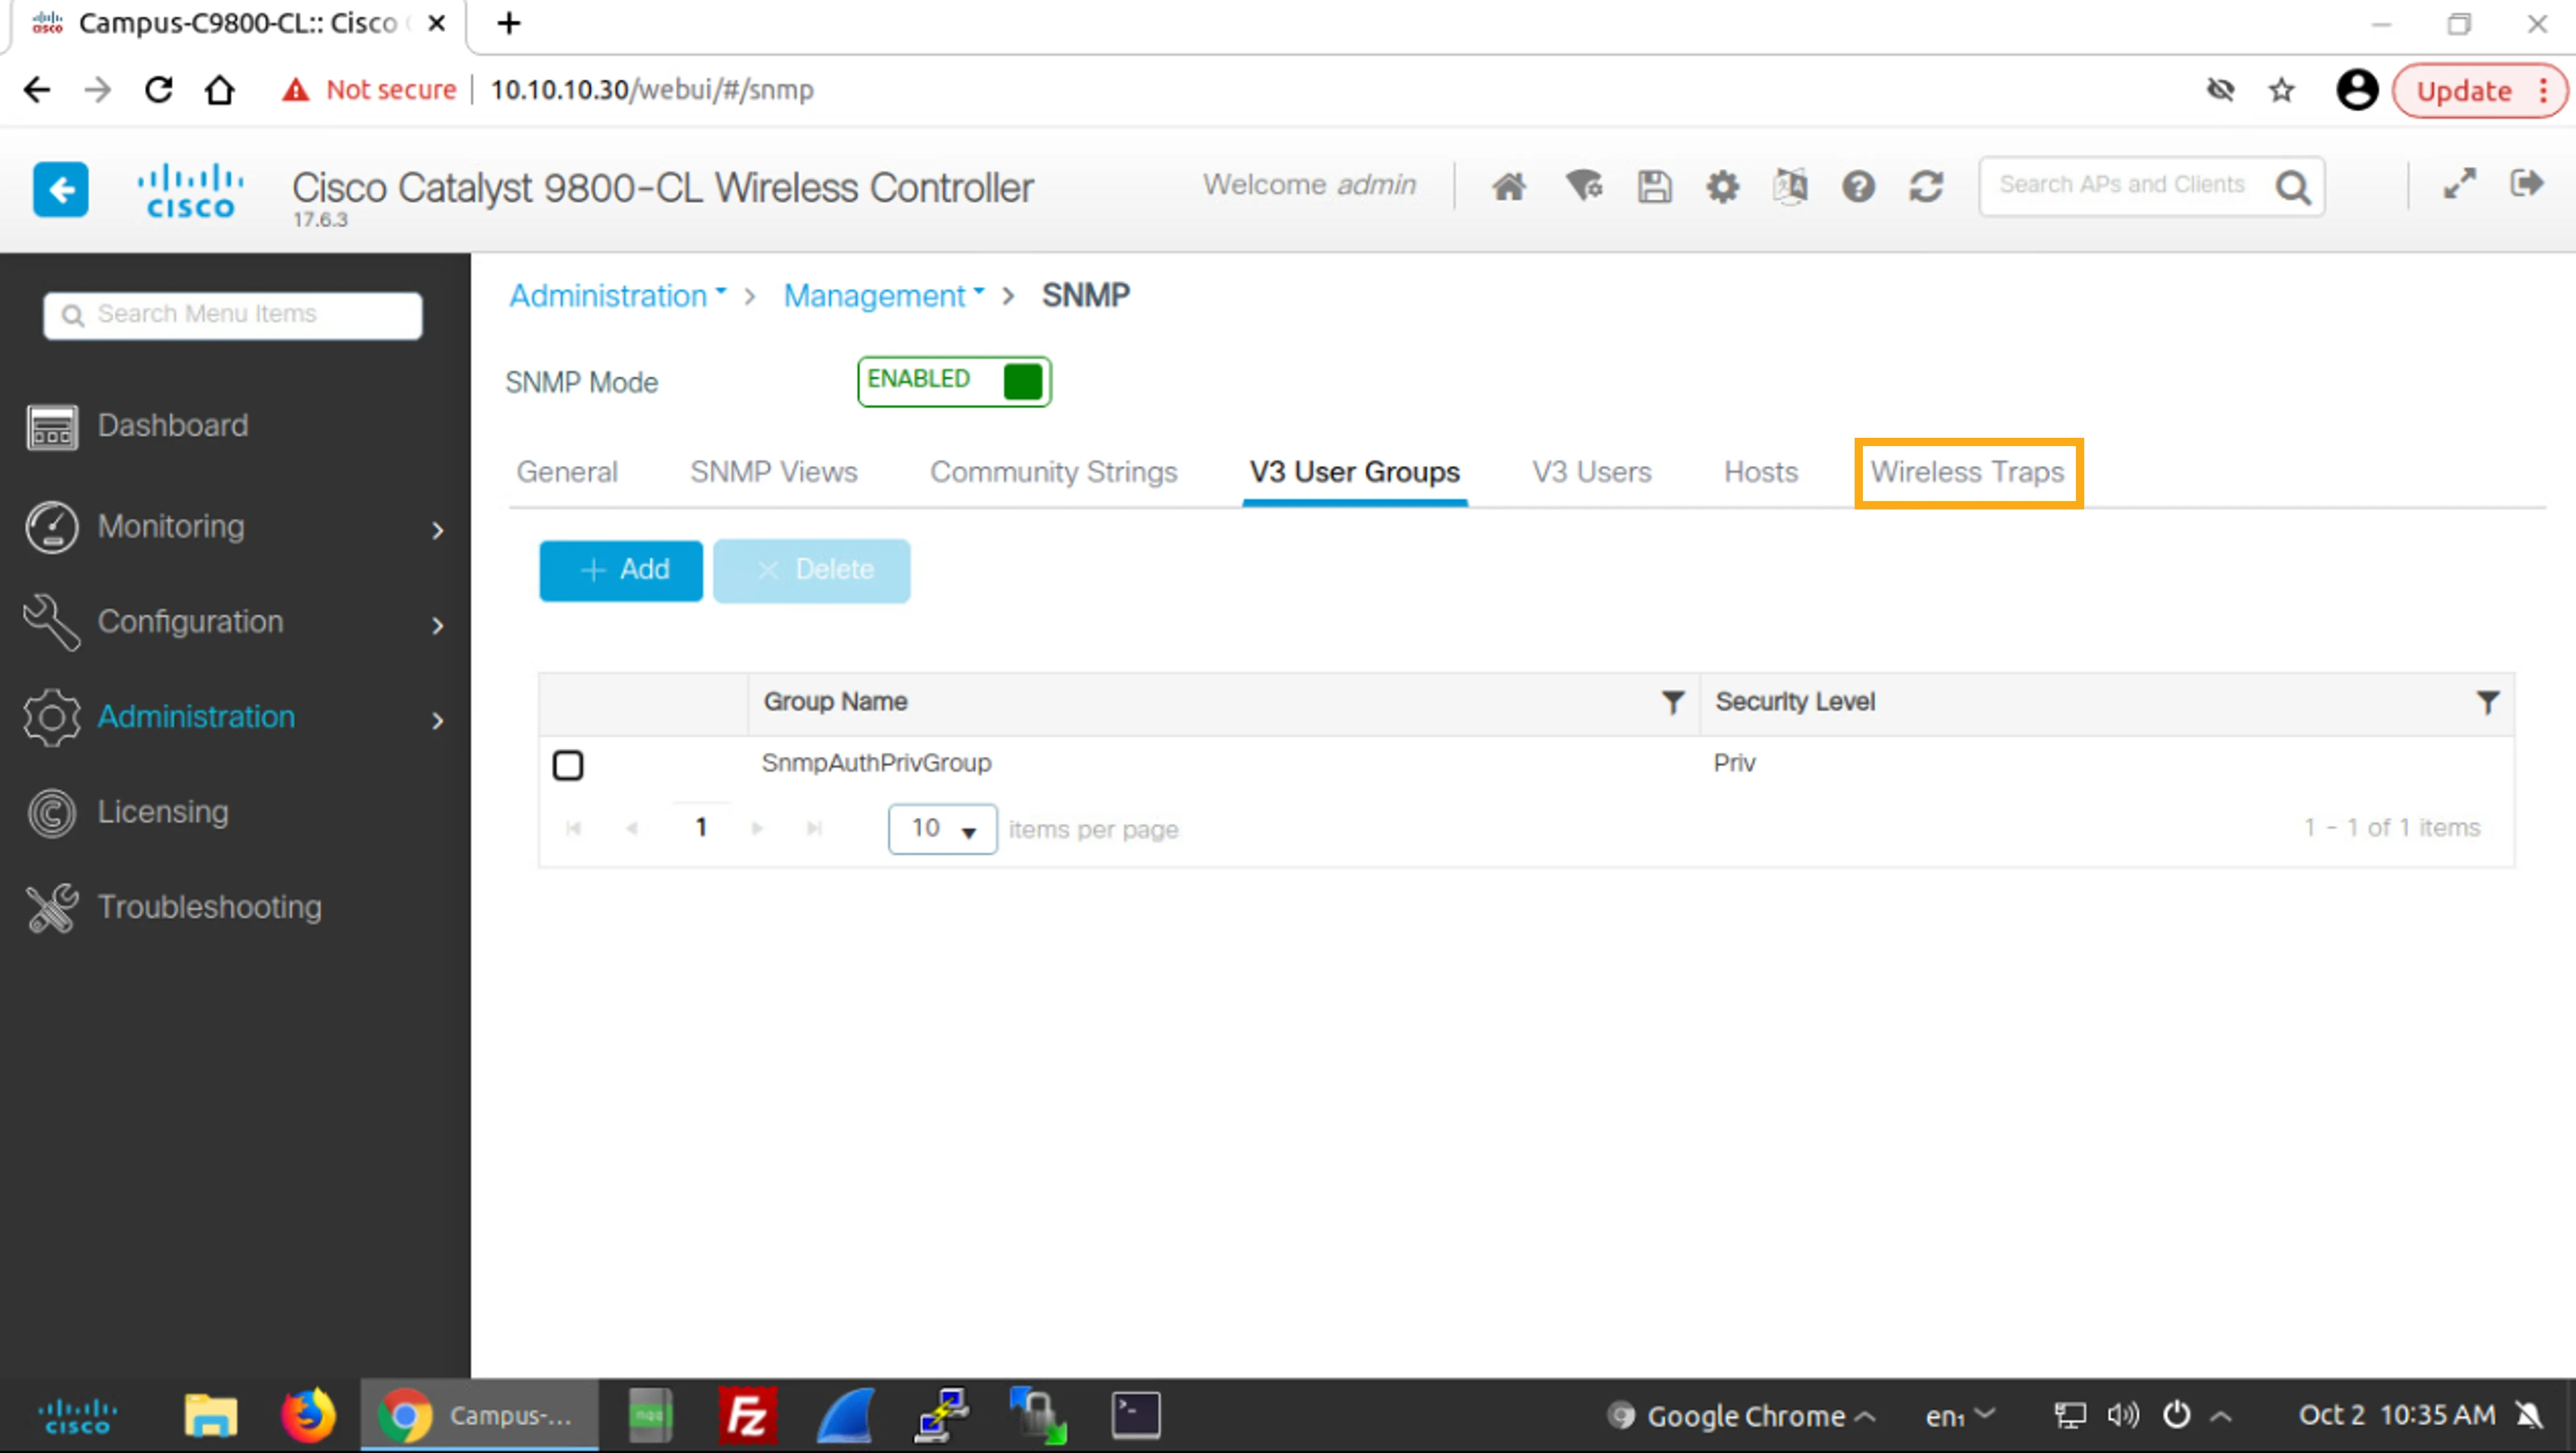
First, examine the Mesh and the Wireless Client groups at the top of the page.
首先,檢視頁面頂端的Mesh群組與Wireless Client群組。
Note that both groups are disabled. In the Mesh group, all subitems are unselected. In the Wireless Client group, one subitem, the Maximum Threshold Warning is selected.
請注意這兩個群組都是停用的。在Mesh群組中,所有子項目均未勾選。在Wireless Client群組中,有一個子項目Maximum Threshold Warning已被勾選。
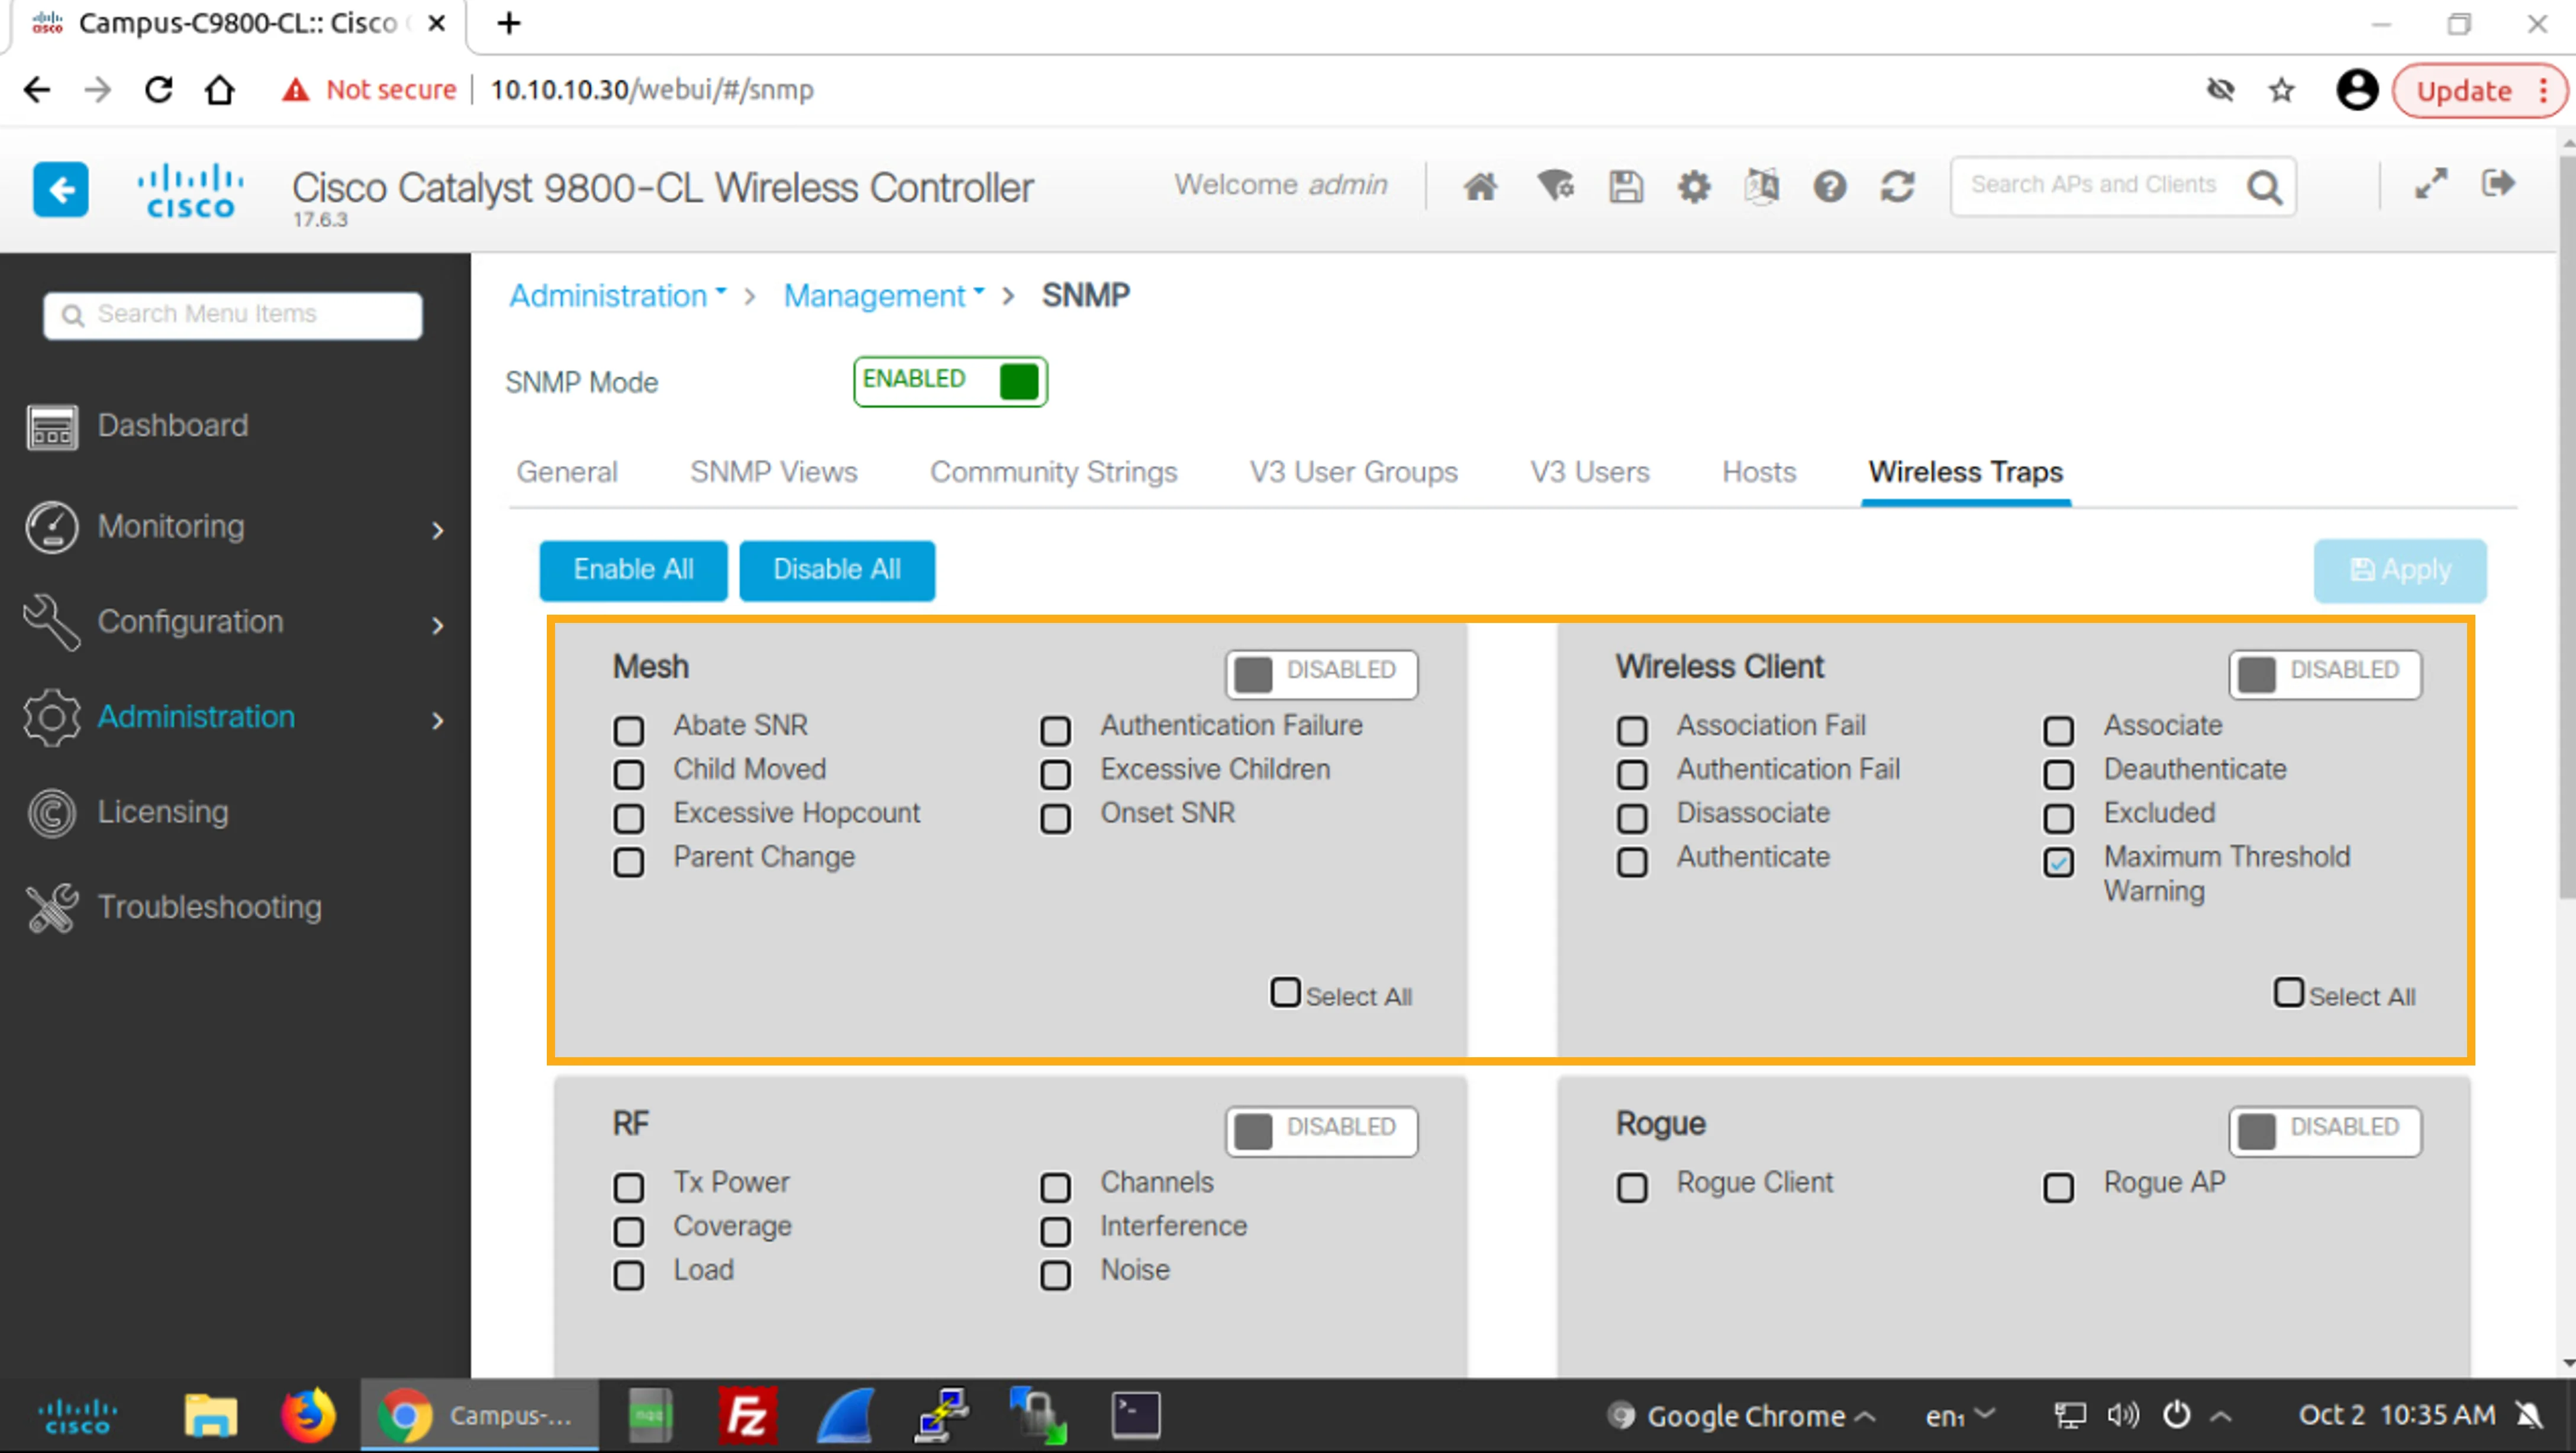
Click in the scroll bar area to move down the page so that you can see the remaining groups.
按一下捲軸區域向下移動頁面,以便查看其餘群組。
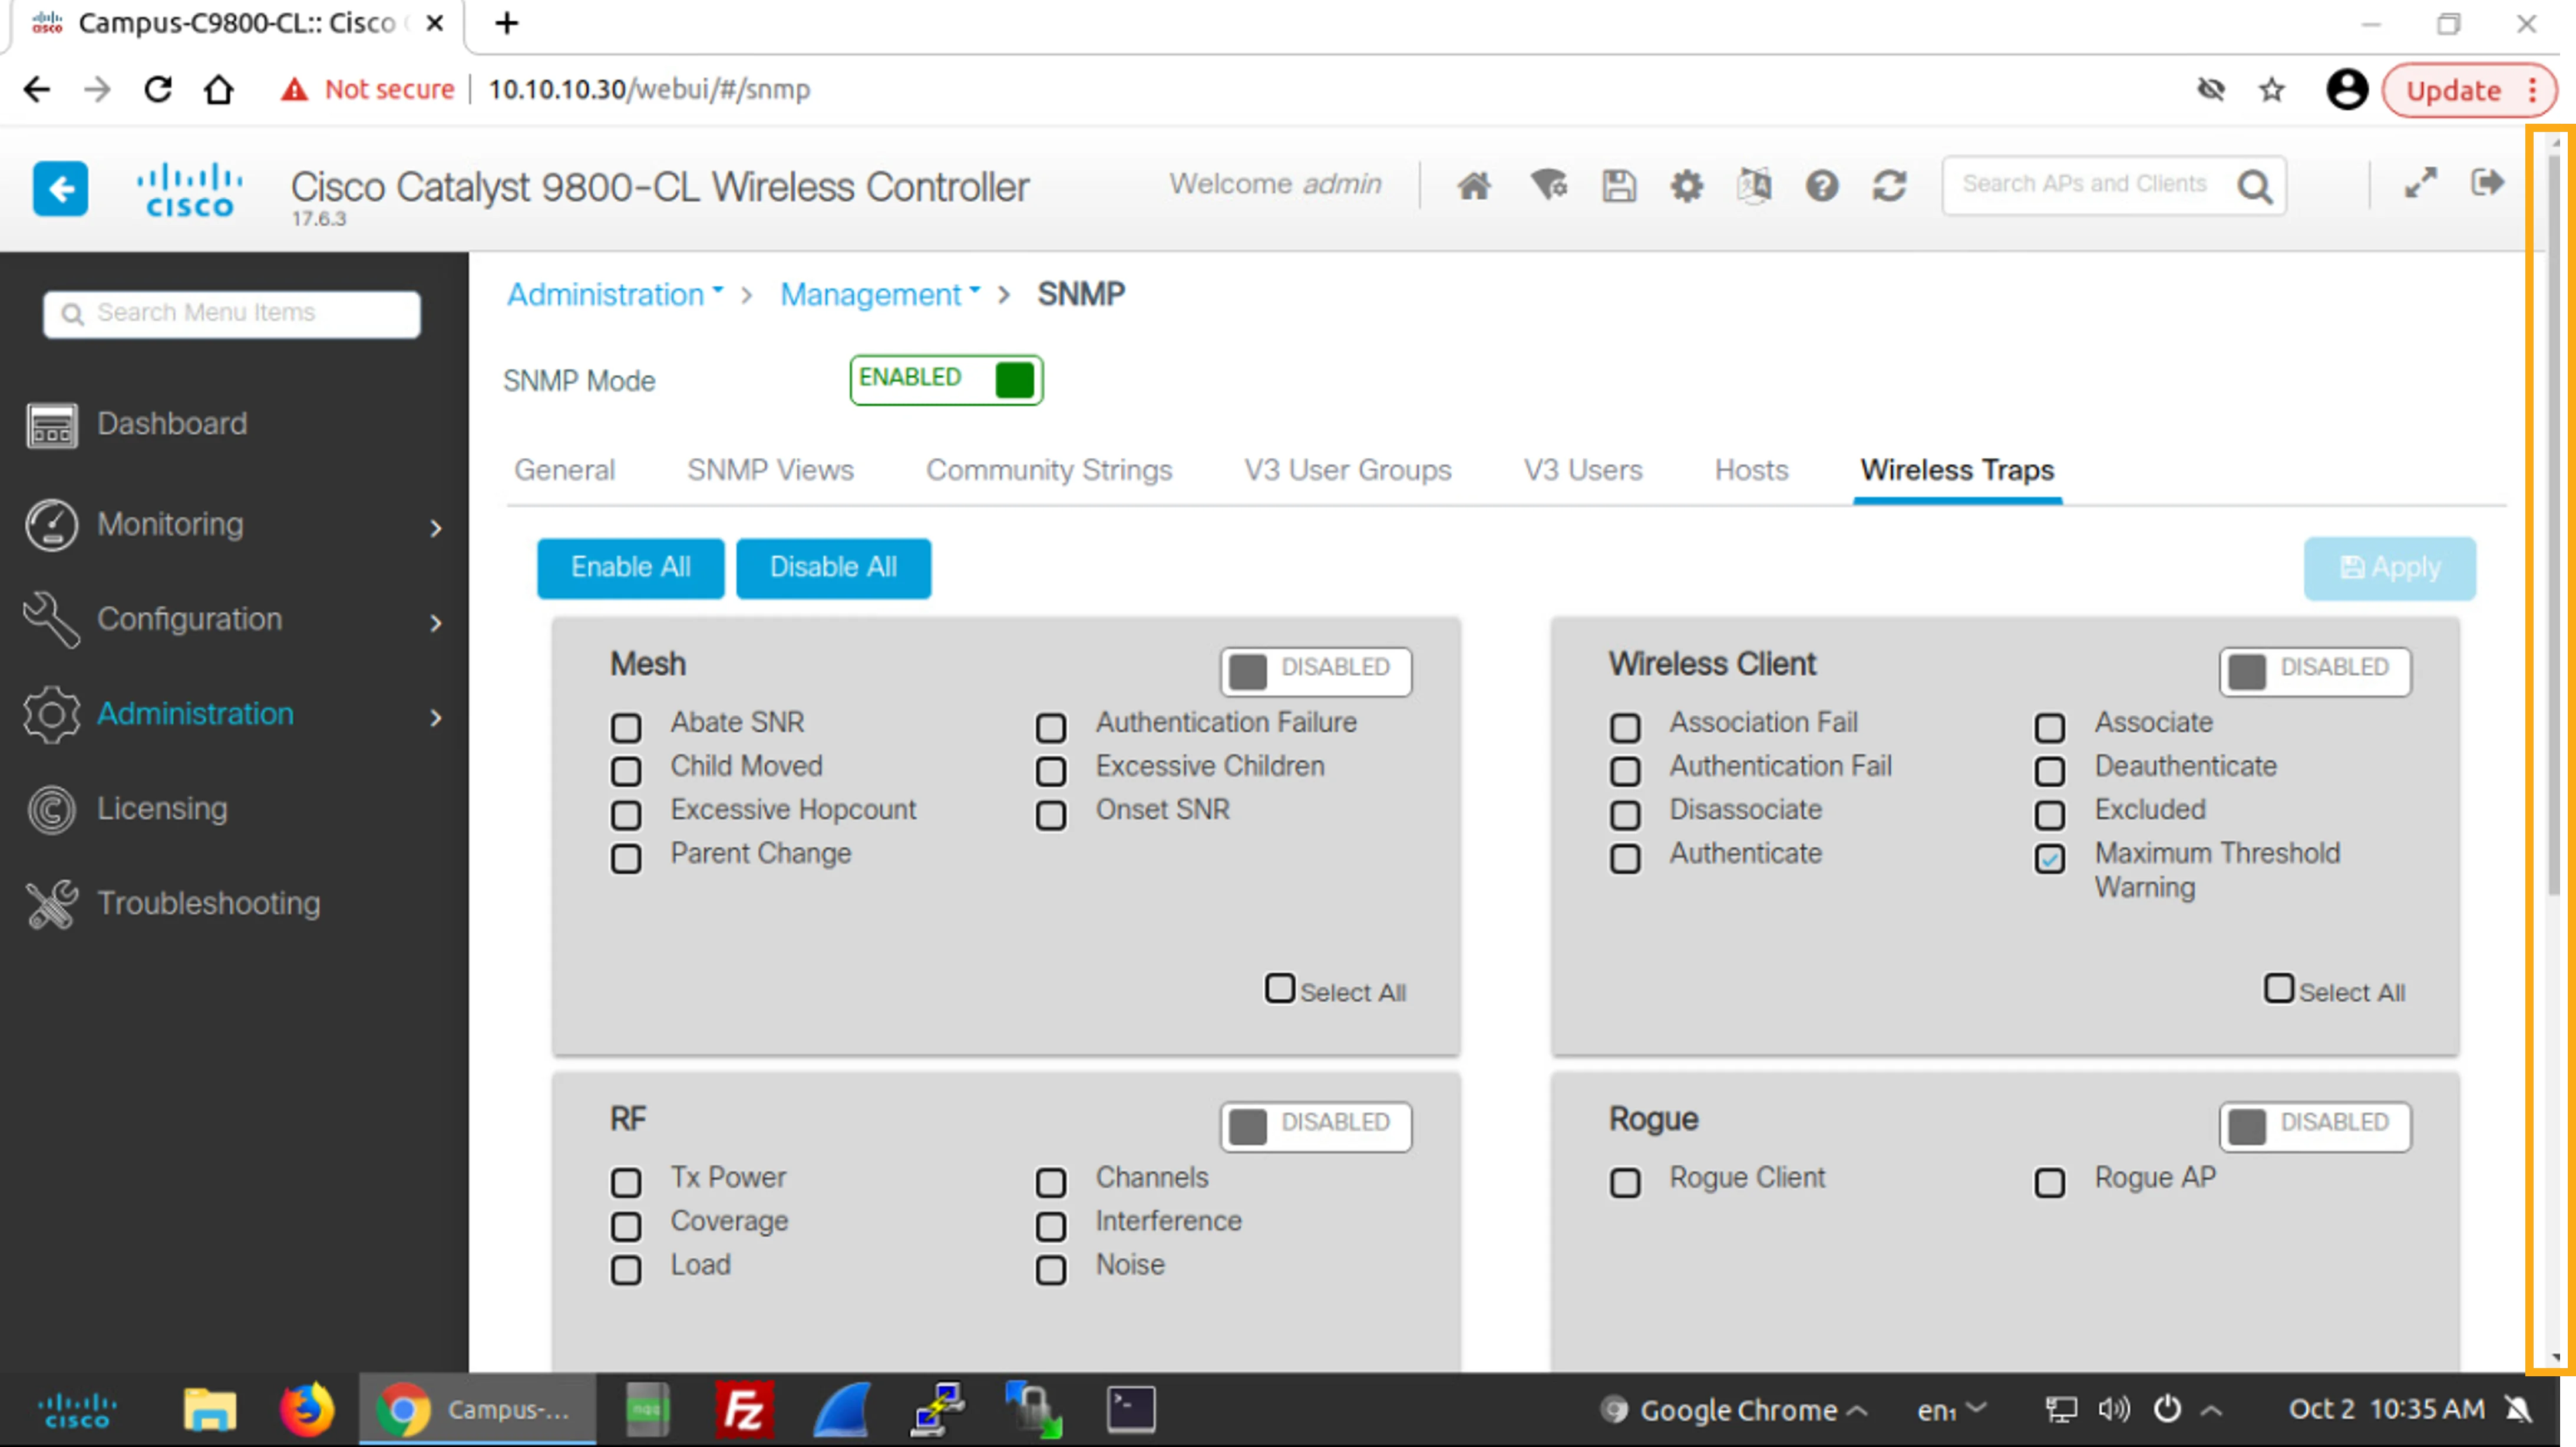
Examine the remaining wireless trap groups: RF, Rogue, Wireless Mobility, RRM, General Controller, and Access Point. All groups except the Access Point group are disabled. In these disabled groups, all subitems are unselected. The Access Point group is enabled and the Crash, No Radio Cards, and Register subitems are selected.
檢視其餘的無線 trap 群組:RF、Rogue、Wireless Mobility、RRM、General Controller與Access Point。除Access Point群組外,其餘群組均為停用狀態,這些停用群組中的所有子項目均未勾選。Access Point群組已啟用,且已勾選Crash、No Radio Cards與Register子項目。
Enable Additional Wireless-Related SNMP Traps
啟用其他無線相關的 SNMP Traps
In the next steps, you will enable additional SNMP traps that are related to wireless network operation.
接下來的步驟中,您將啟用其他與無線網路運作相關的 SNMP traps。
You will activate SNMP traps for the following groups and subitems:
您將為下列群組及子項目啟用 SNMP traps:
Group 群組 | Subitems 子項目 |
Access Points Access Points | All remaining subitems 其餘所有子項目
|
RF RF | All subitems 所有子項目
|
Rogue Rogue | All subitems 所有子項目
|
Wireless Client Wireless Client | Authentication FailAuthenticate Authentication FailAuthenticate
|
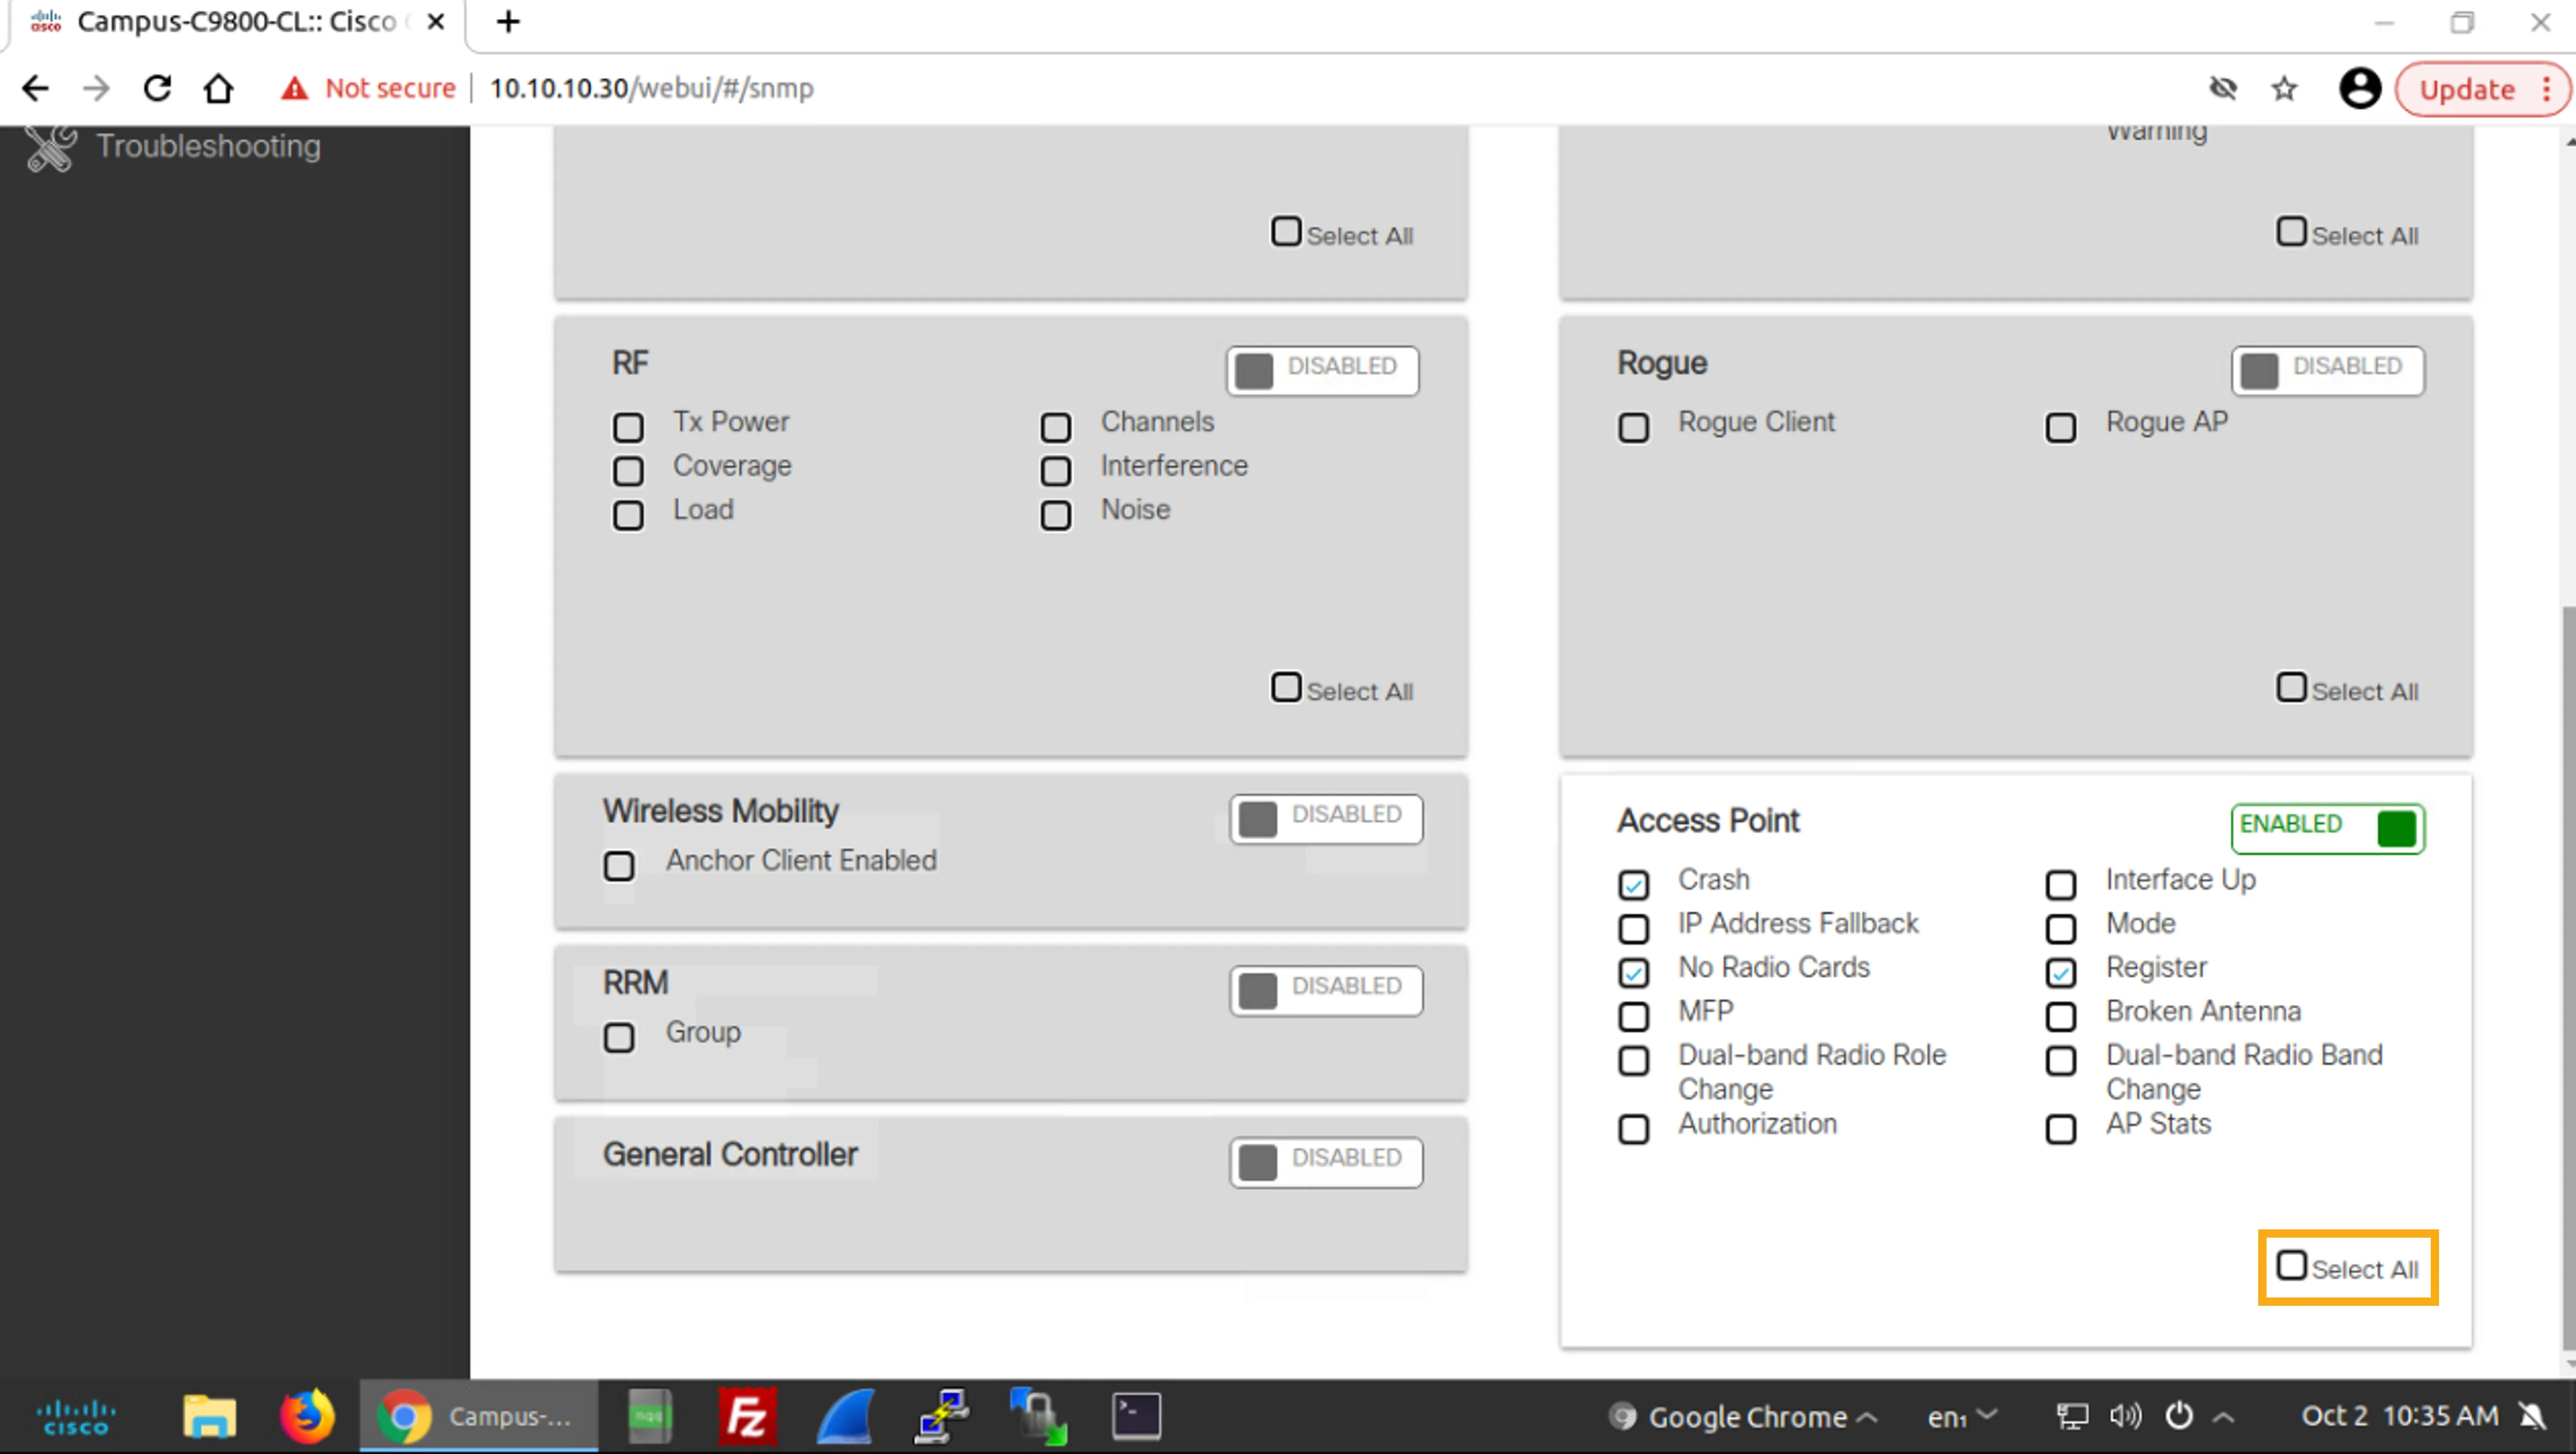
In the Access Point group, check the Select All check box.
在Access Point群組中,勾選Select All核取方塊。
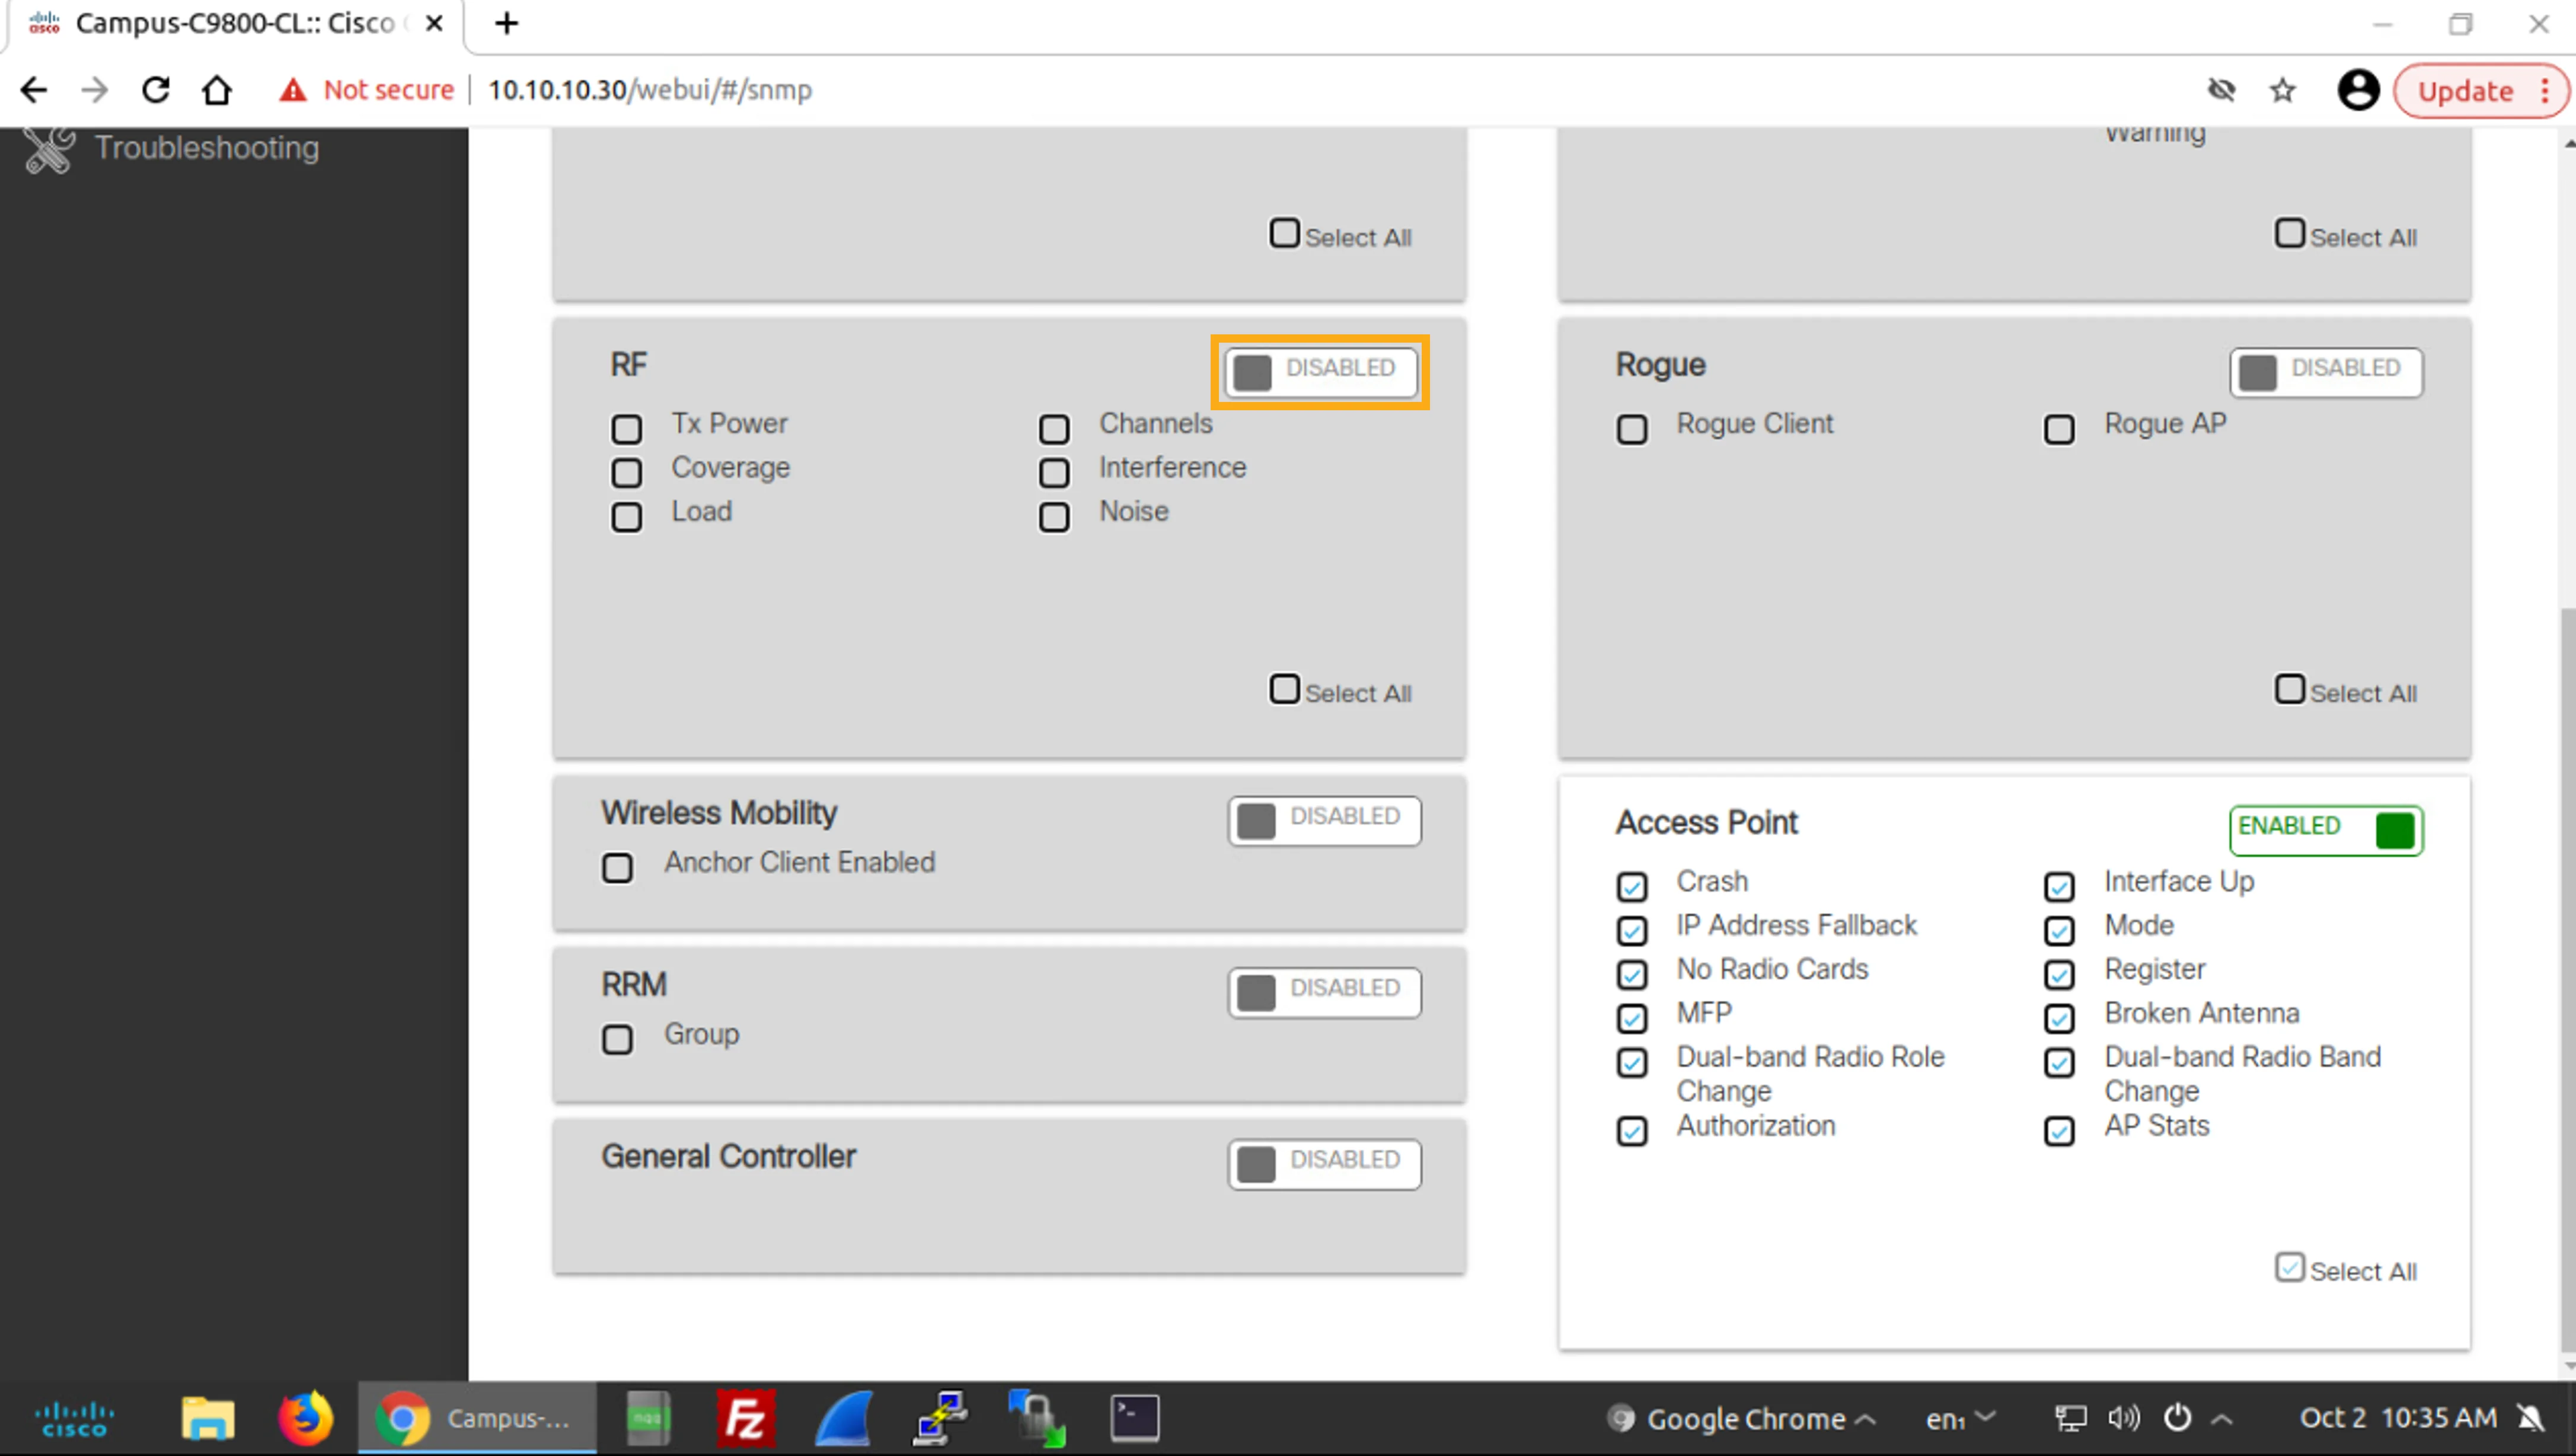
Enable the RF group and all its subitems.
啟用RF群組及其所有子項目。
To enable the RF group, click the slider that currently says DISABLED.
若要啟用RF群組,請按一下目前顯示DISABLED的滑動開關。
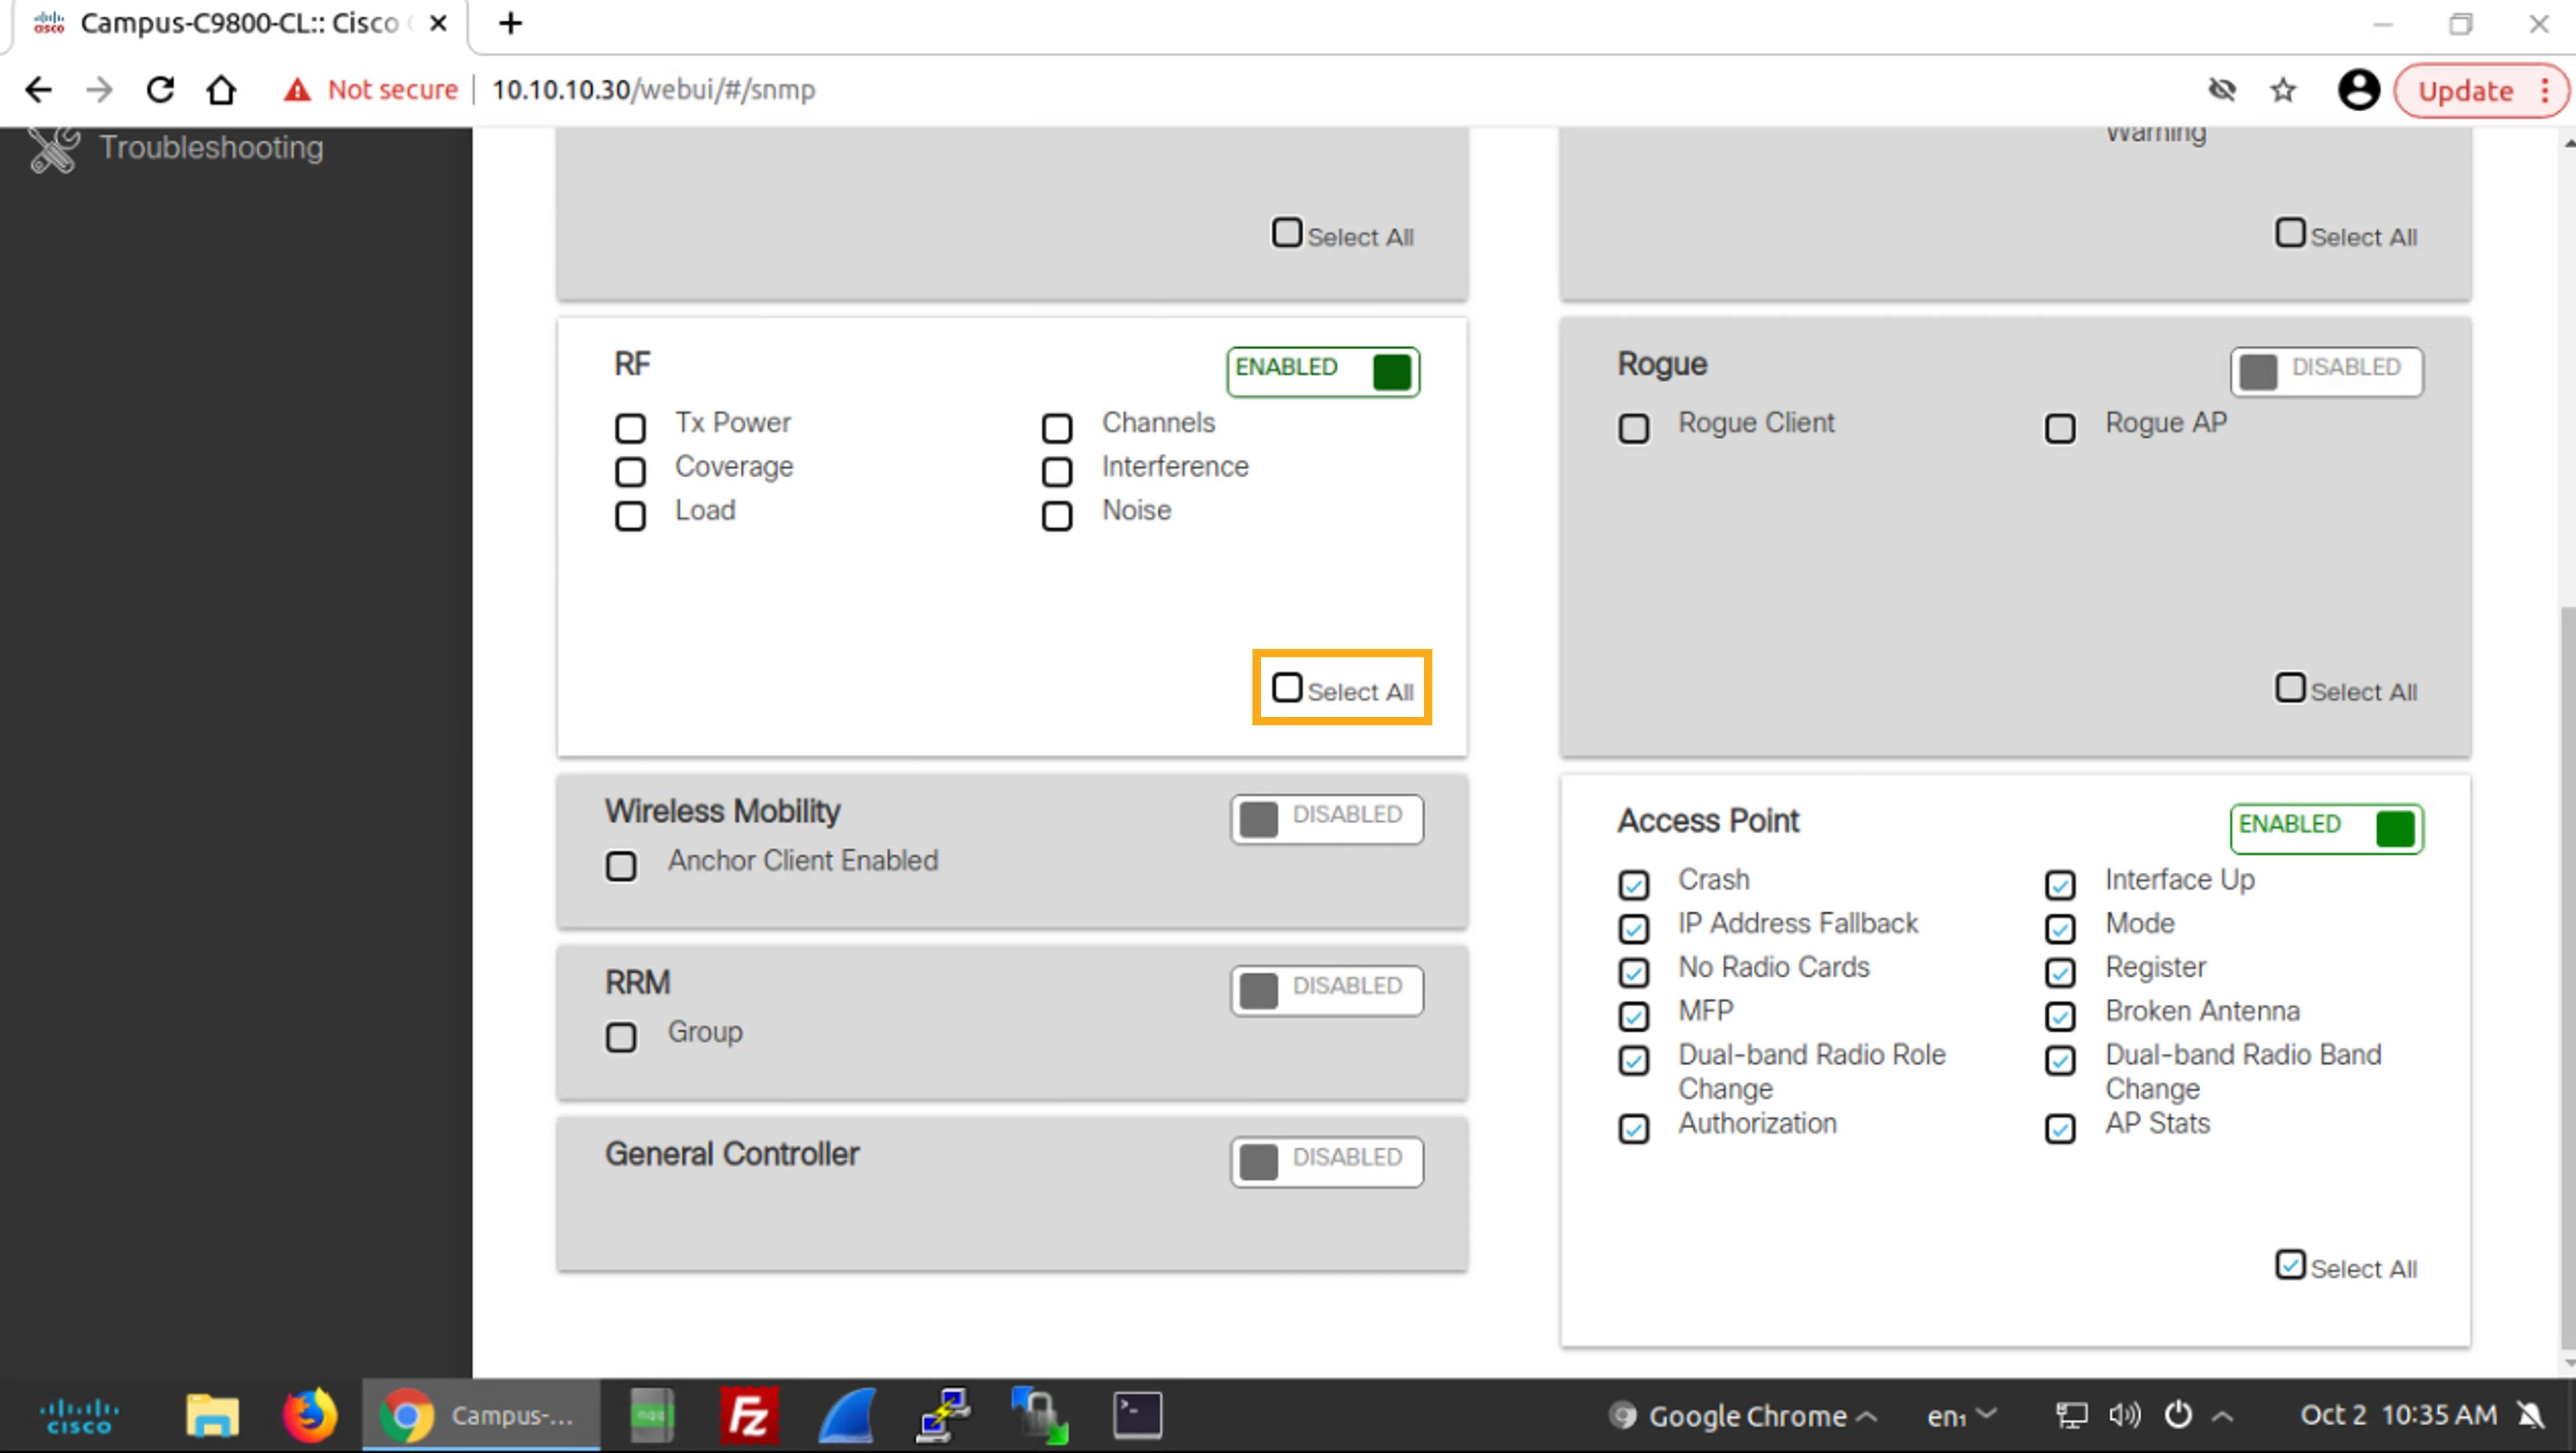
Then, in the RF group, check the Select All check box.
接著,在RF群組中勾選Select All核取方塊。
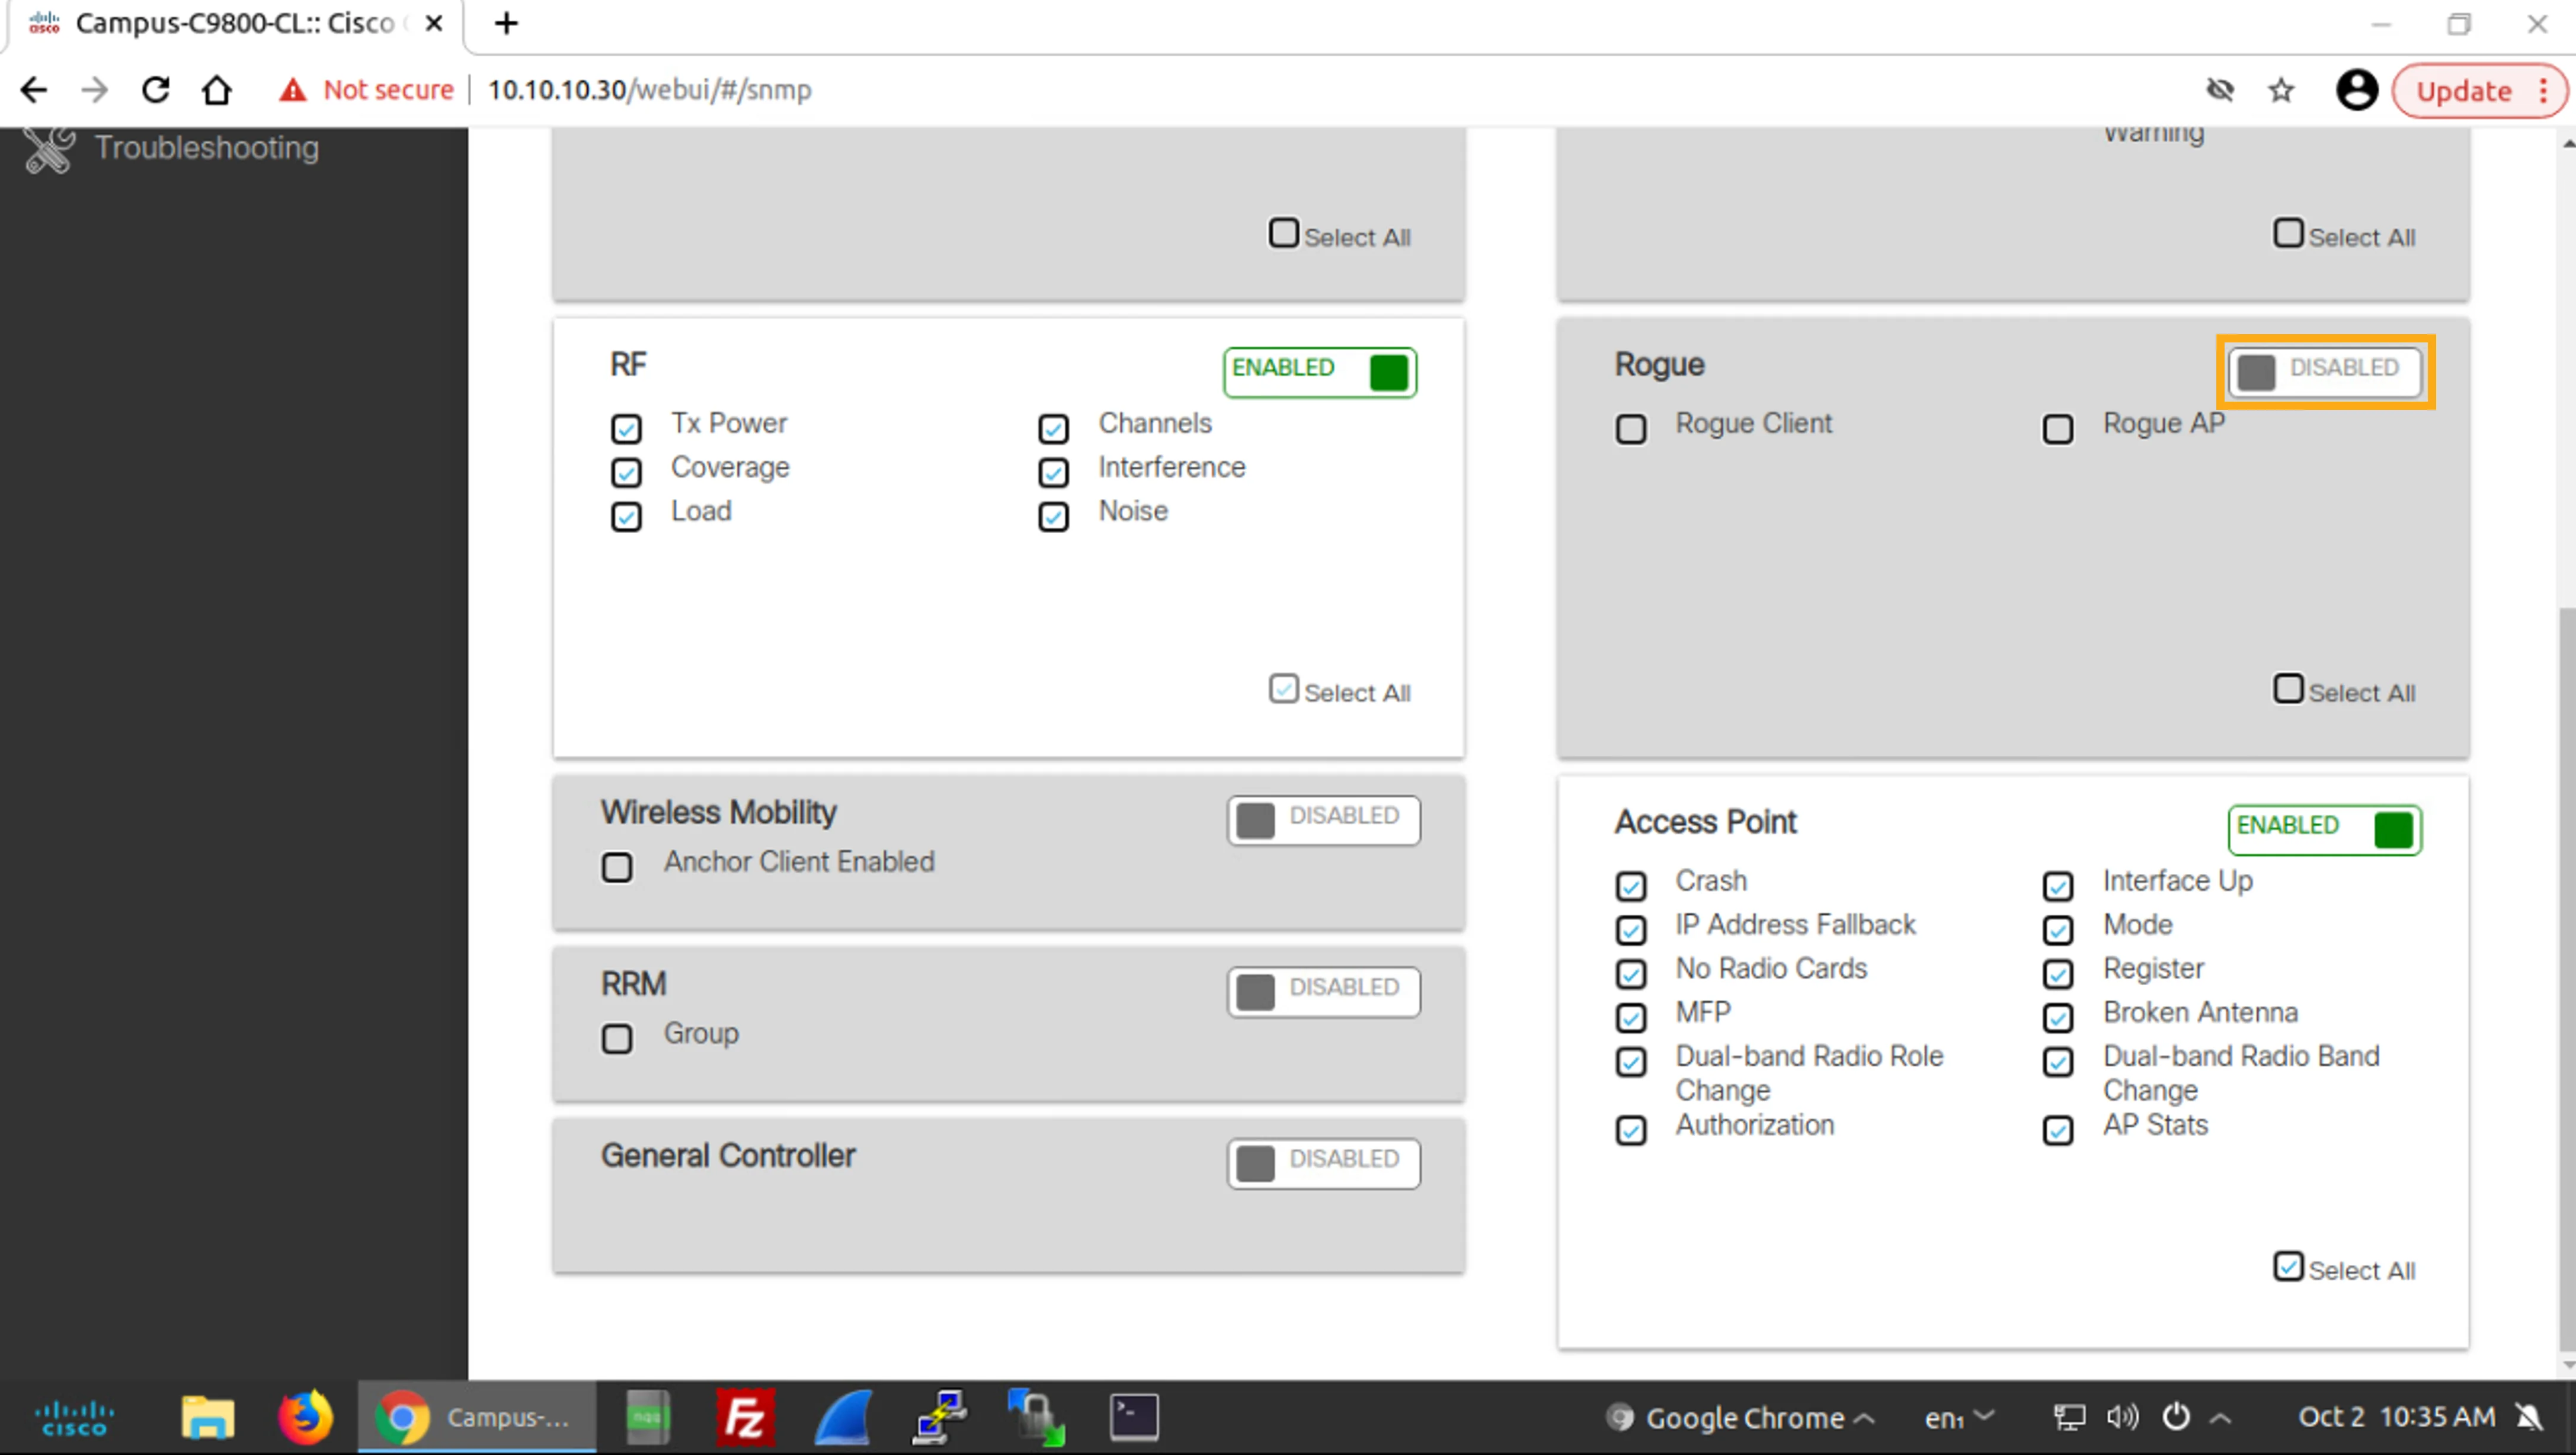
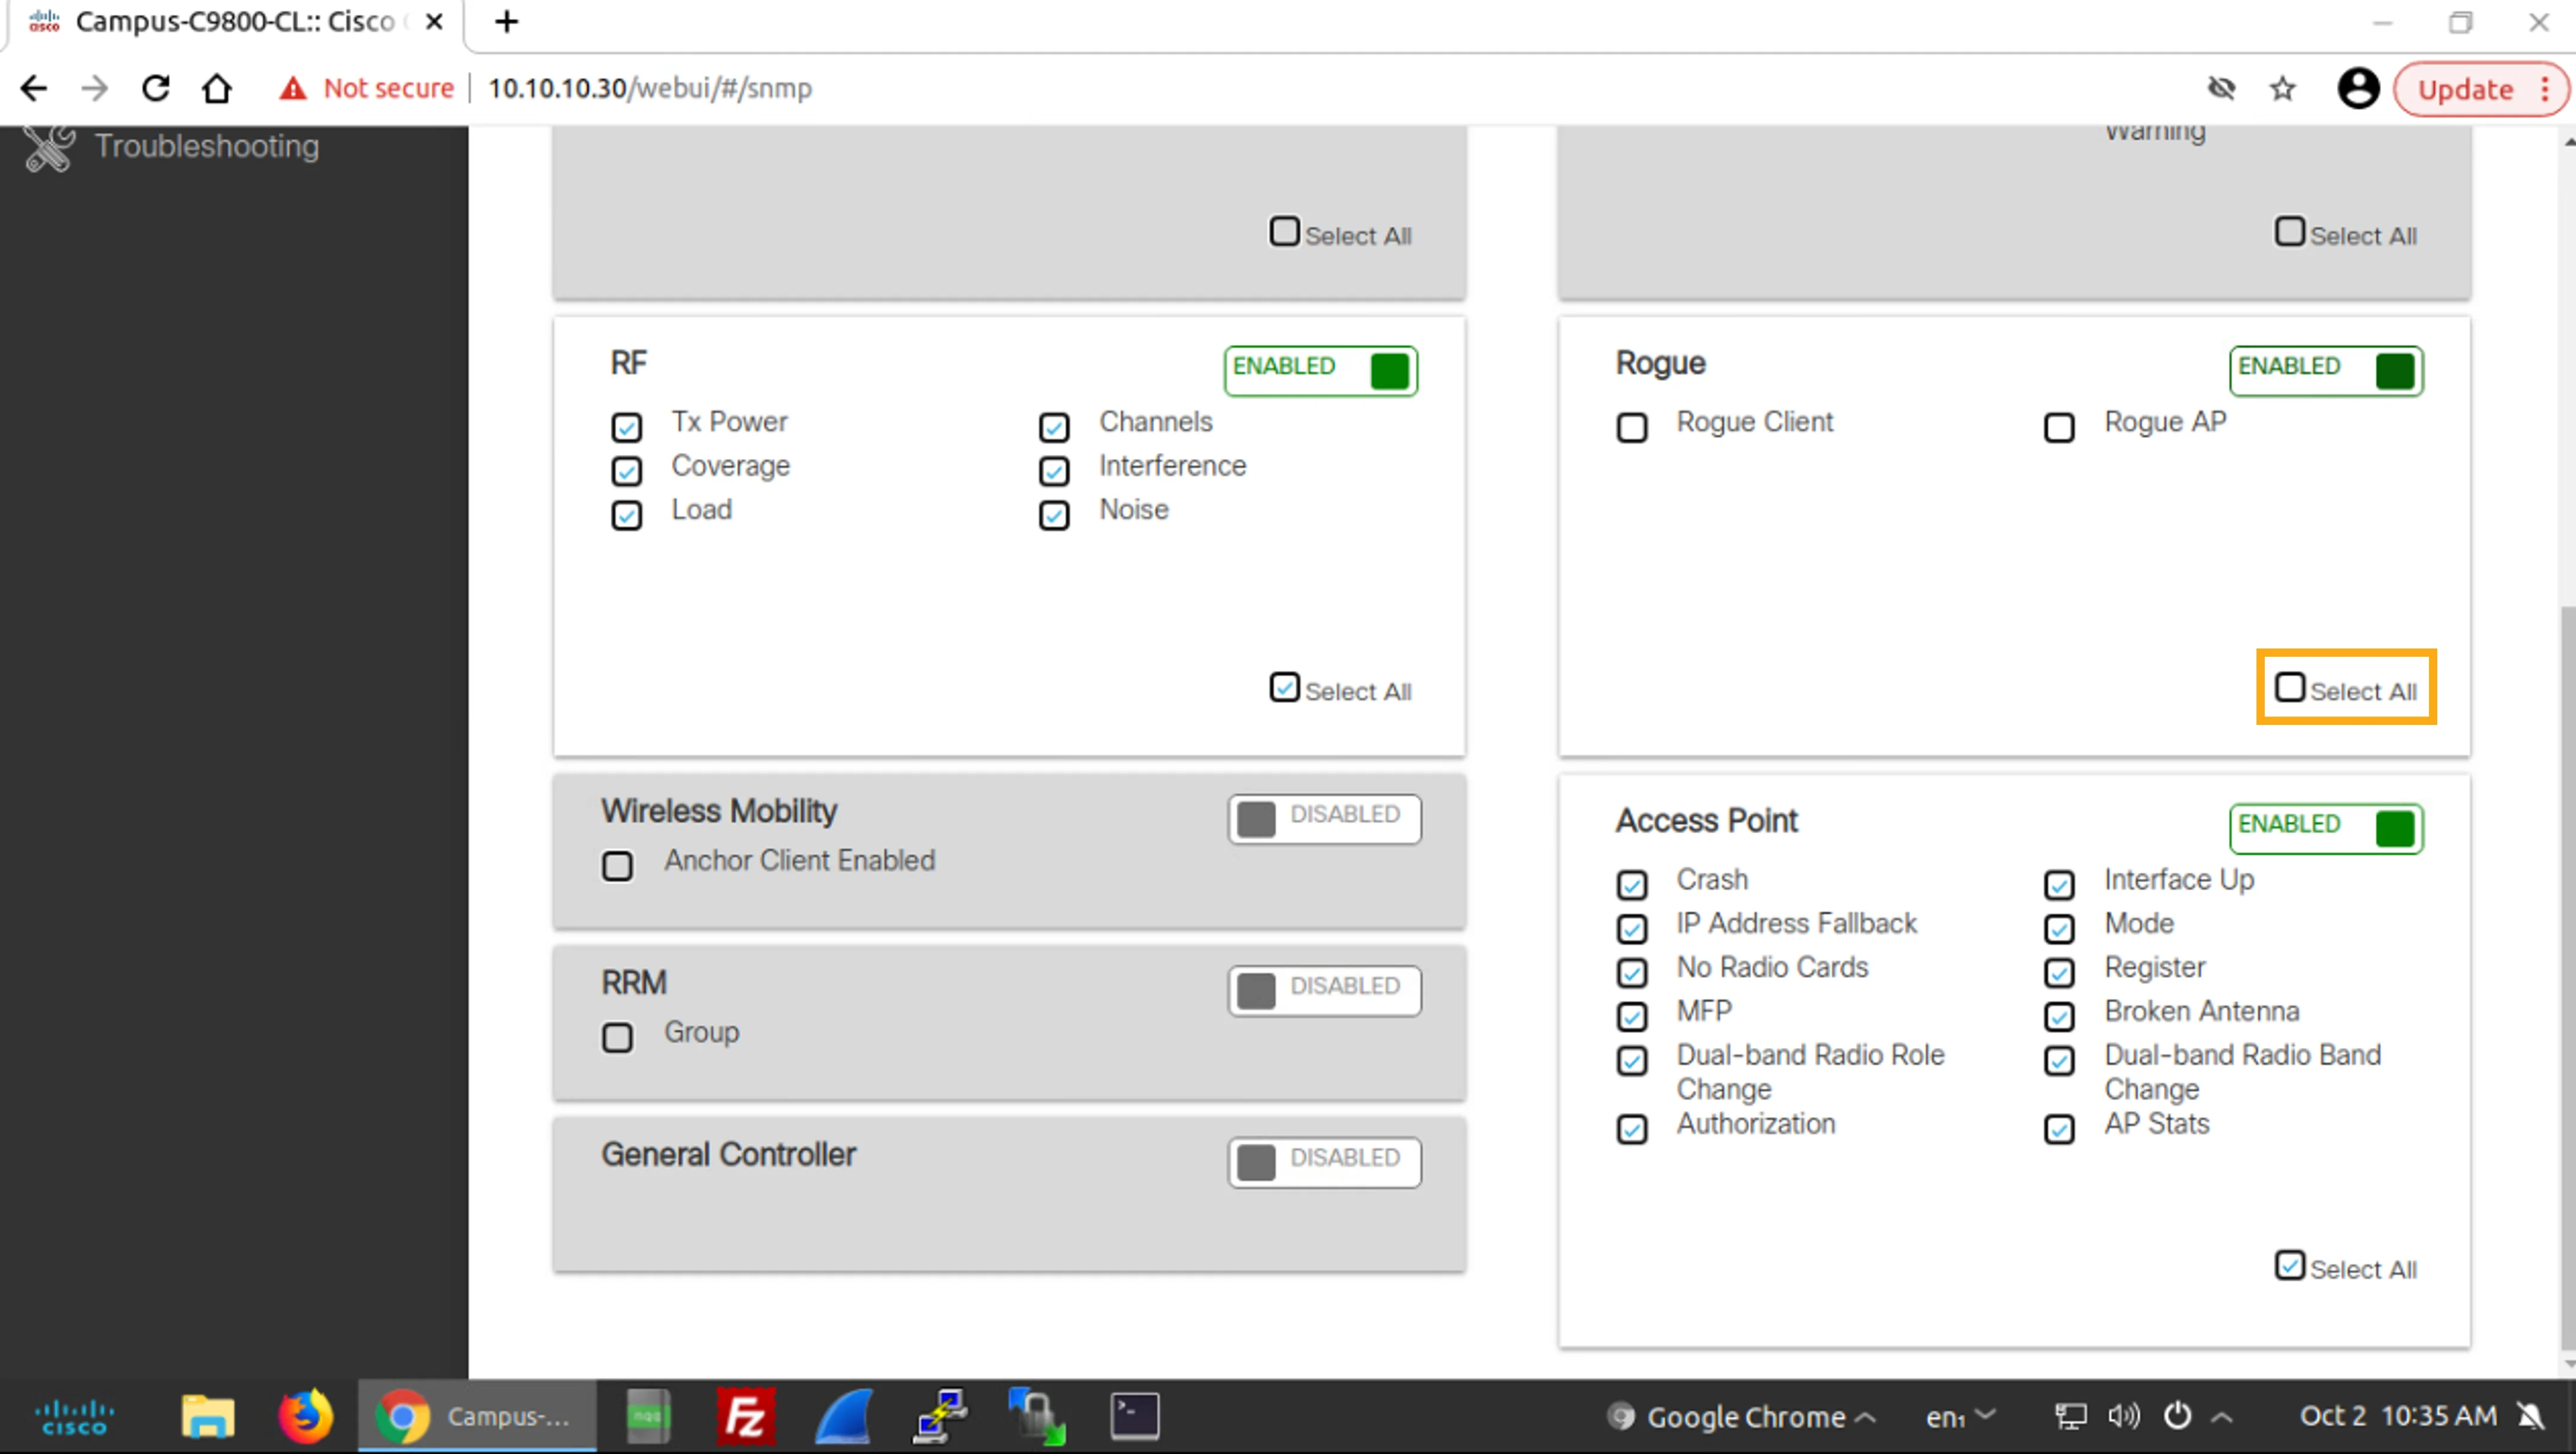
Enable the Rogue group and all its subitems.
啟用Rogue群組及其所有子項目。
To enable the Rogue group, click the slider that currently says DISABLED.
若要啟用Rogue群組,請按一下目前顯示DISABLED的滑動開關。
Then, in the Rogue group, check the Select All check box.
接著,在Rogue群組中勾選Select All核取方塊。
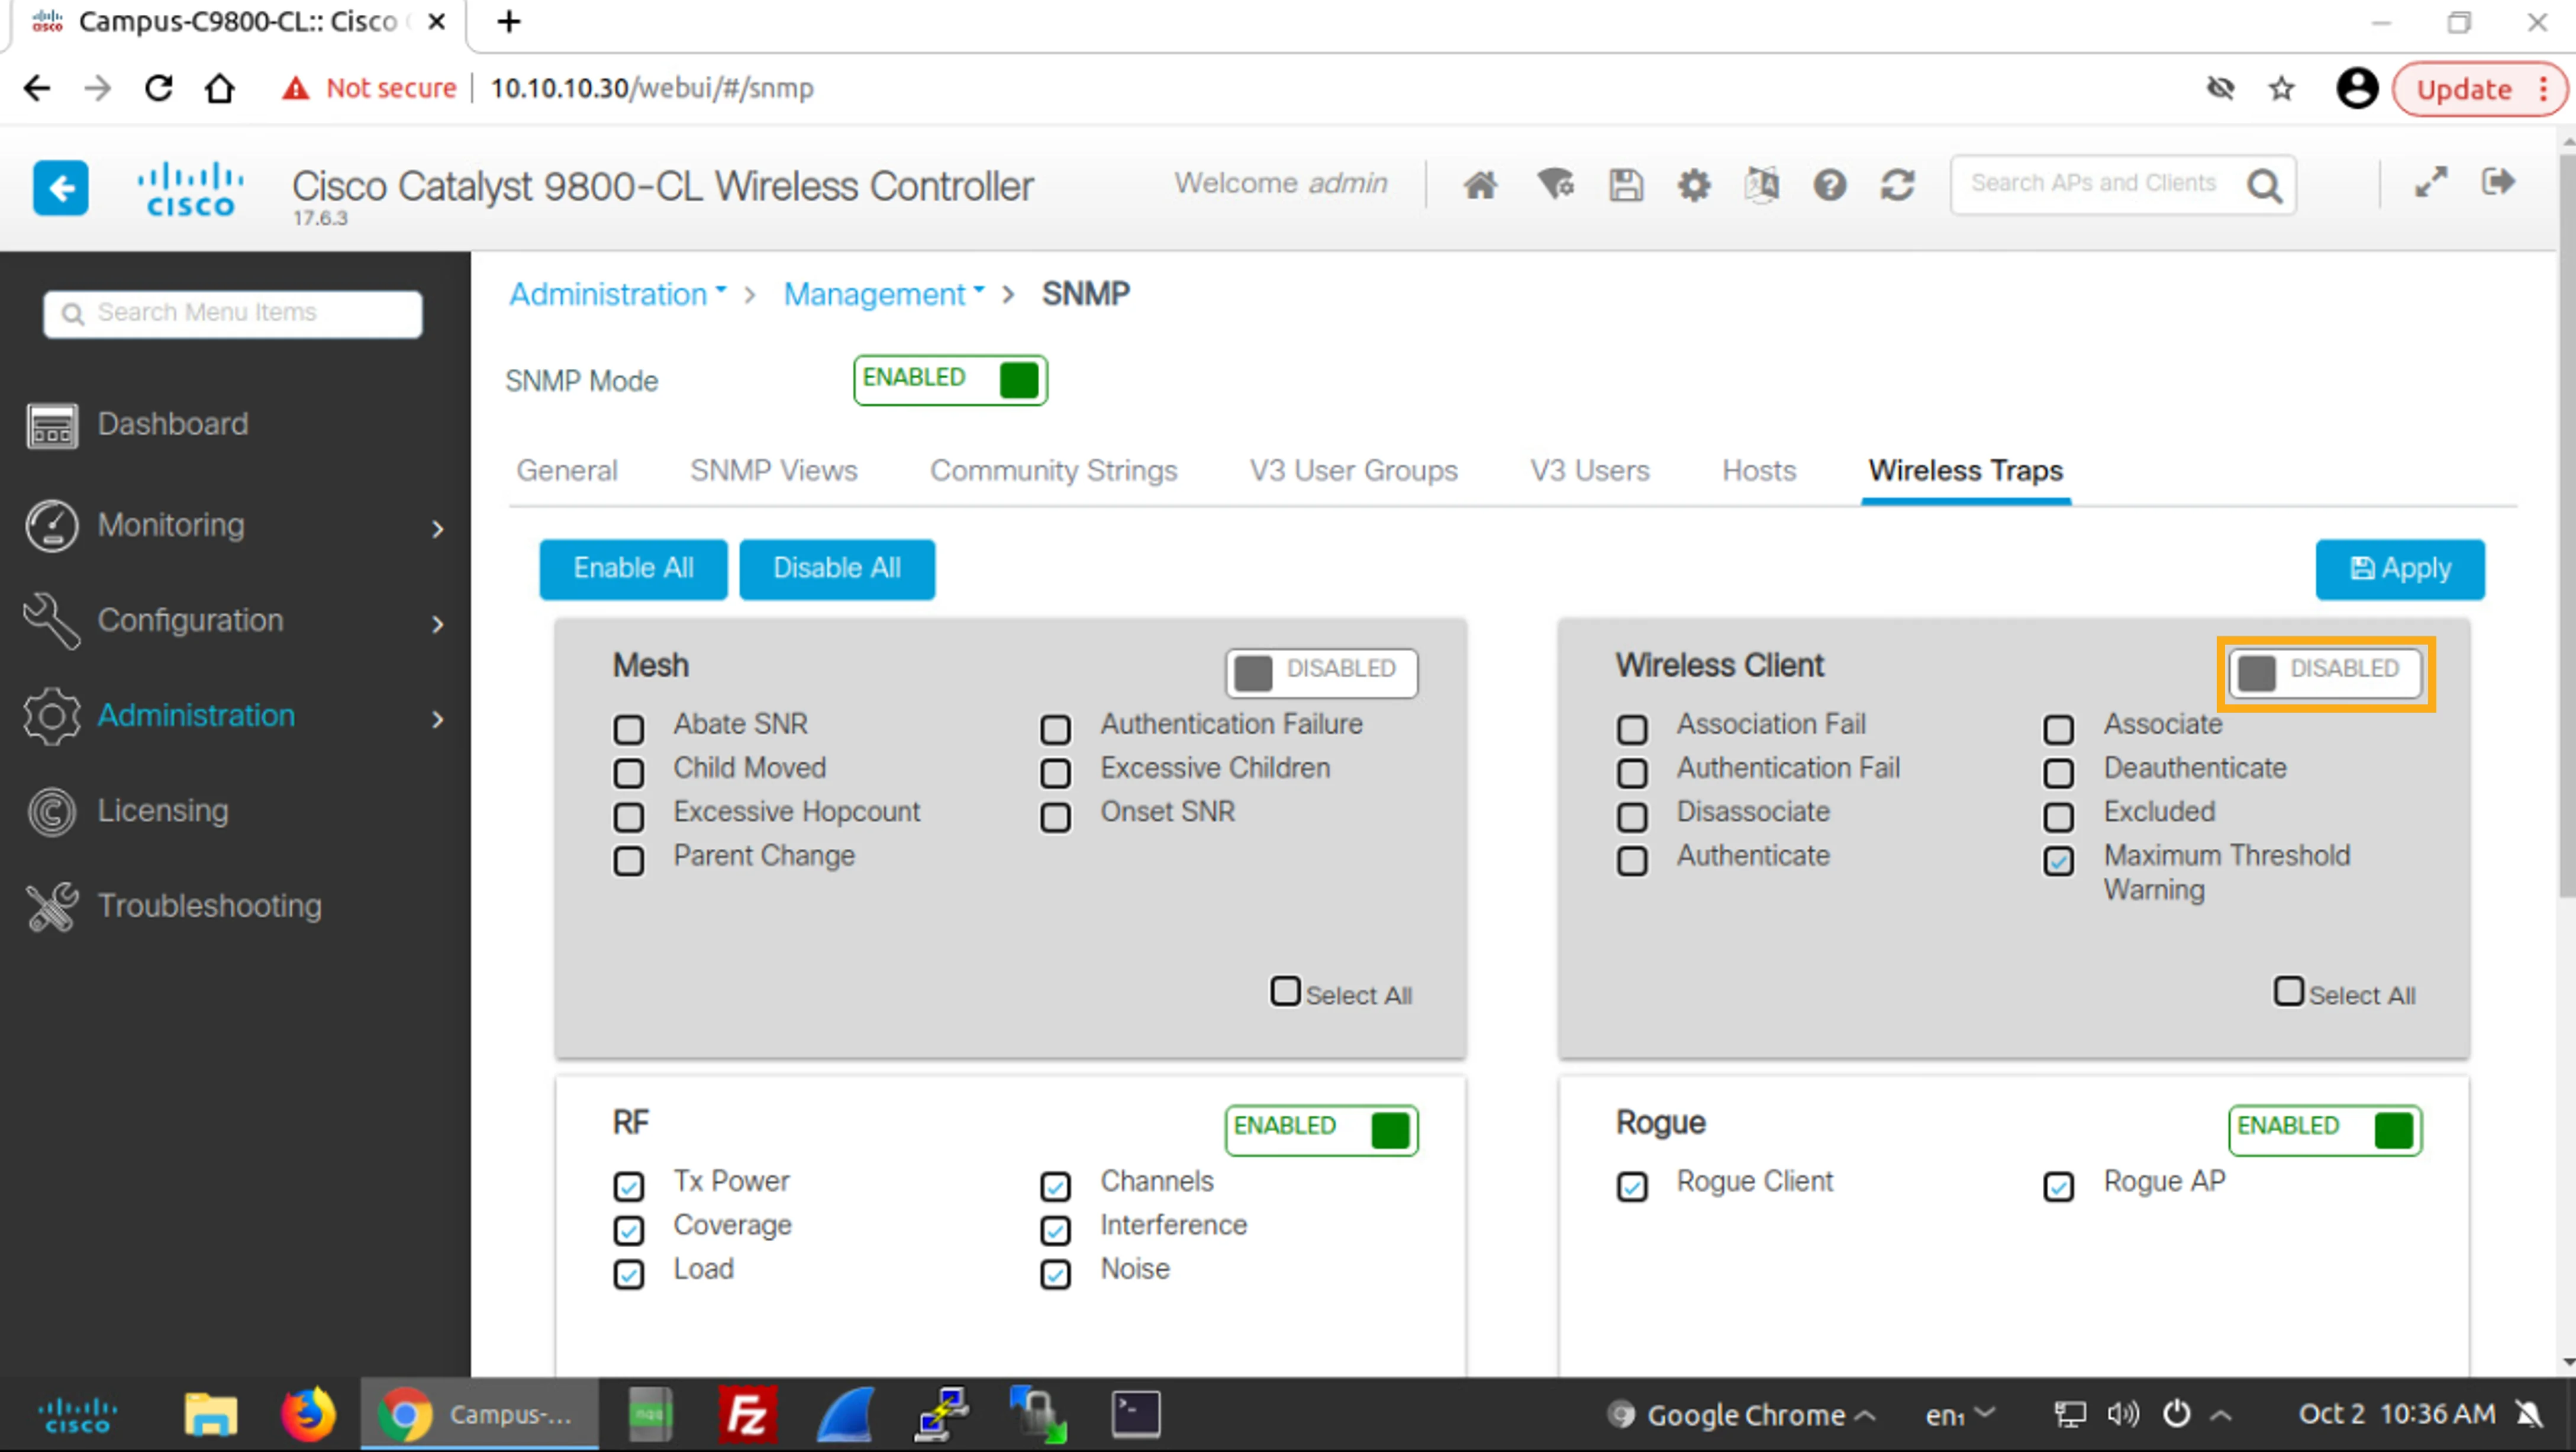
Scroll to the top of the page, enable the Wireless Client group, and enable the Authentication Fail and Authenticate subitems.
捲動至頁面頂端,啟用Wireless Client群組,並啟用Authentication Fail與Authenticate子項目。
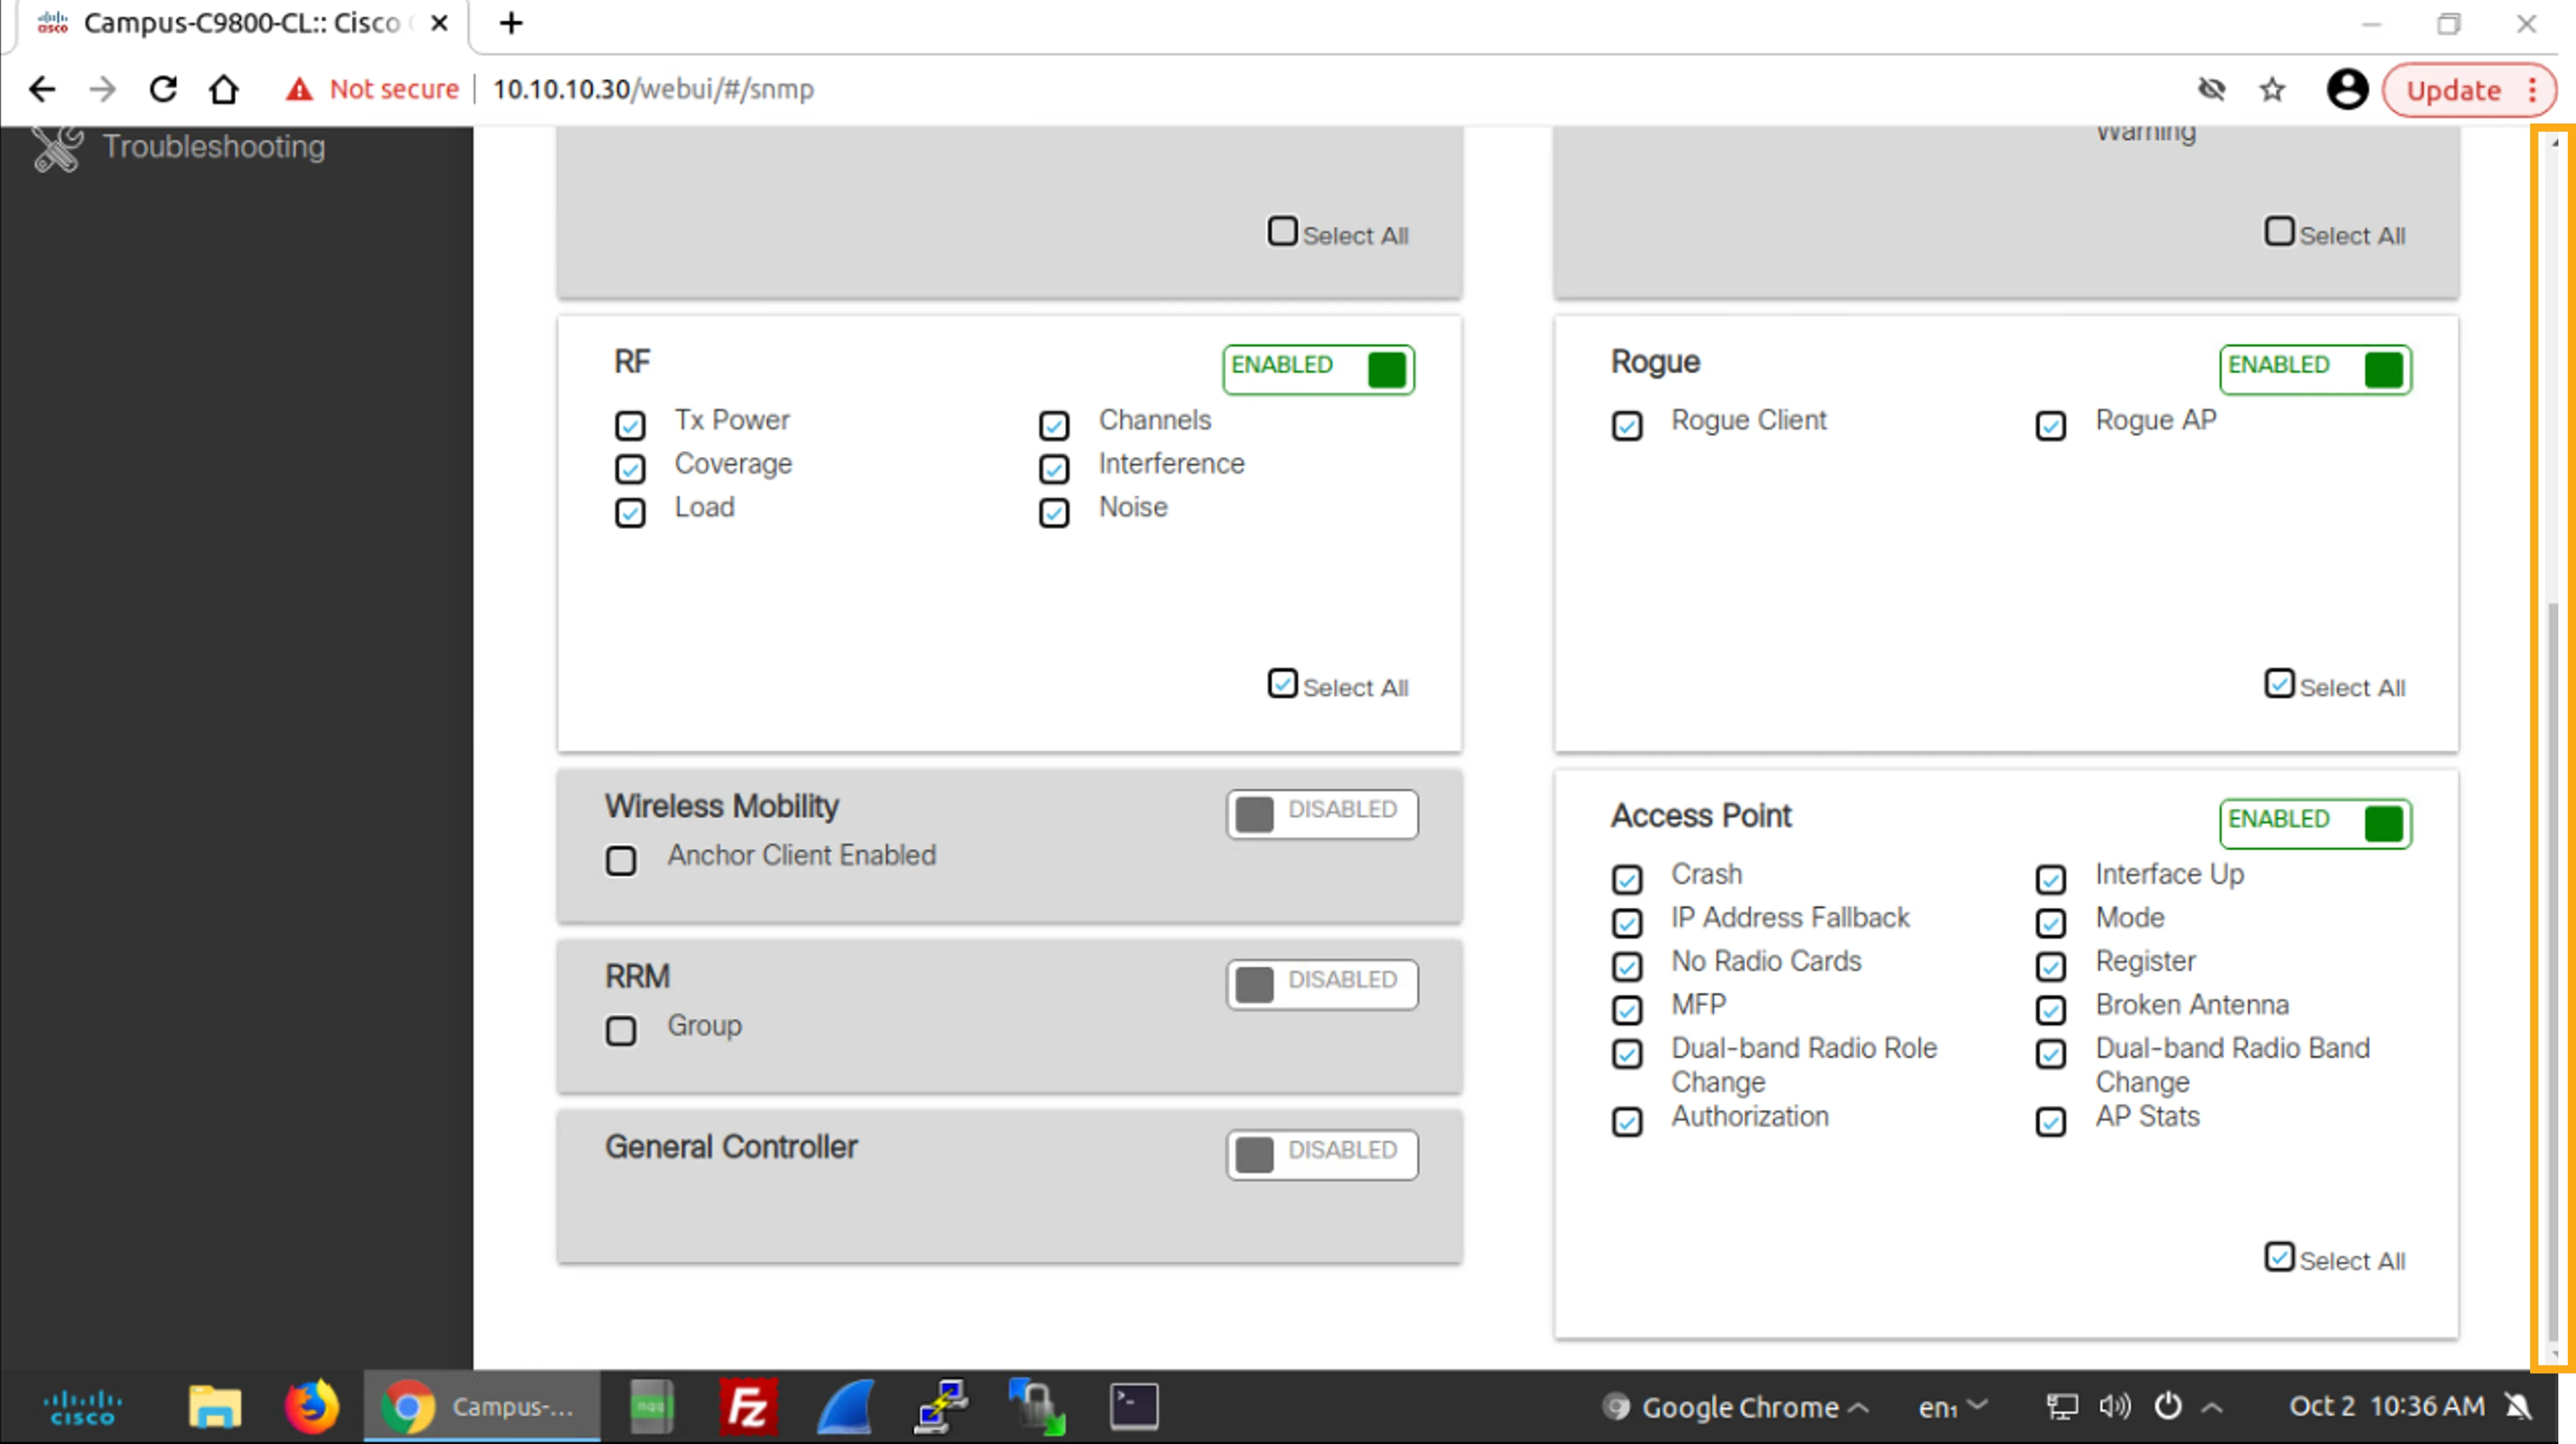
Click in the scroll bar area to move to the top of the page.
按一下捲軸區域移動到頁面頂端。
To enable the Wireless Client group, click the slider that currently says DISABLED.
若要啟用Wireless Client群組,請按一下目前顯示DISABLED的滑動開關。
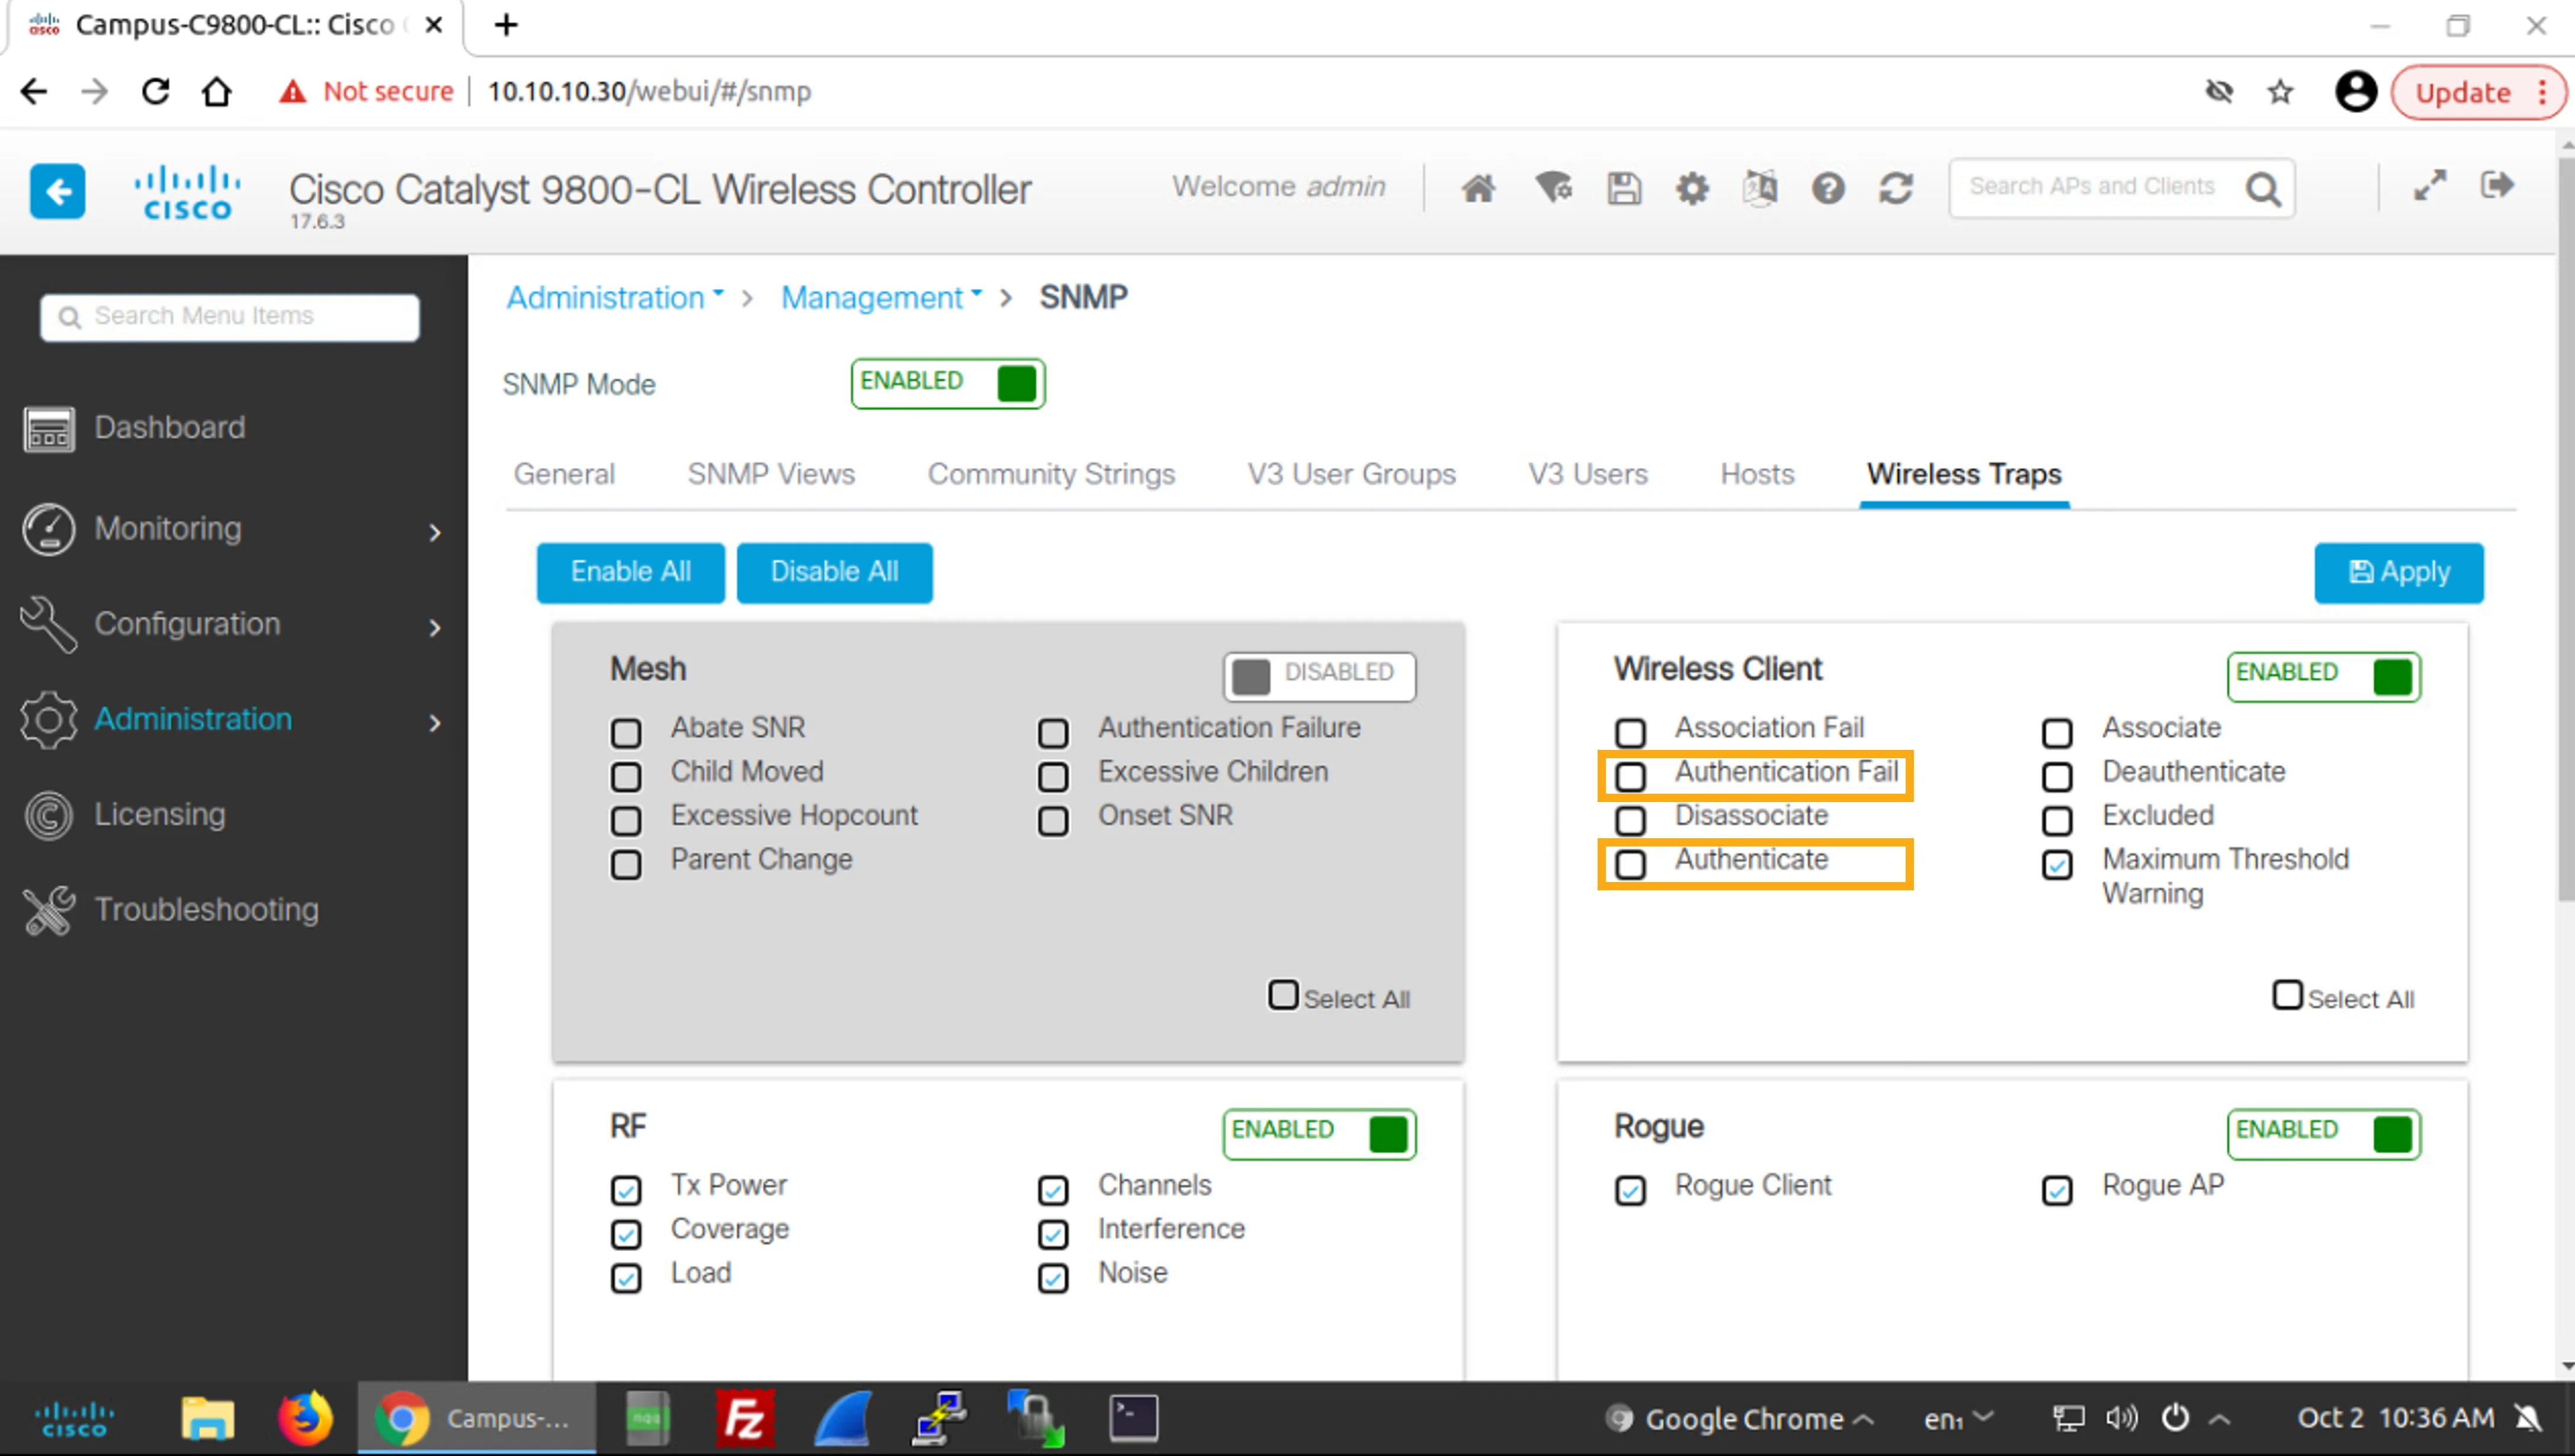
In the Wireless Client group, check the Authentication Fail subitem check box and then the Authenticate subitem check box. These subitems will be then added to the already selected subitem (Maximum Threshold Warning).
在Wireless Client群組中,勾選Authentication Fail子項目核取方塊,再勾選Authenticate子項目核取方塊。這些子項目會加入已勾選的子項目(Maximum Threshold Warning)之中。
Finally, click Apply to apply your configuration changes.
最後,按一下Apply套用您的設定變更。
Review Syslog Messages and Configure the Campus WLC to Send Syslog Messages to an External Server
檢視 Syslog 訊息並將 Campus WLC 設定為將 Syslog 訊息傳送至外部伺服器
In the next steps, you will look at local syslog messages using the Campus WLC web GUI. Then, you will configure the WLC to send syslog messages to an external syslog server. Configuring network devices to send syslog messages to a syslog server allows centralized collection of all syslog messages from all network devices.
接下來的步驟中,您將使用 Campus WLC 網頁 GUI 查看本機的 syslog 訊息,接著將 WLC 設定為把 syslog 訊息傳送至外部 syslog 伺服器。將網路裝置設定為傳送 syslog 訊息至 syslog 伺服器,可讓所有網路裝置的 syslog 訊息集中收集。
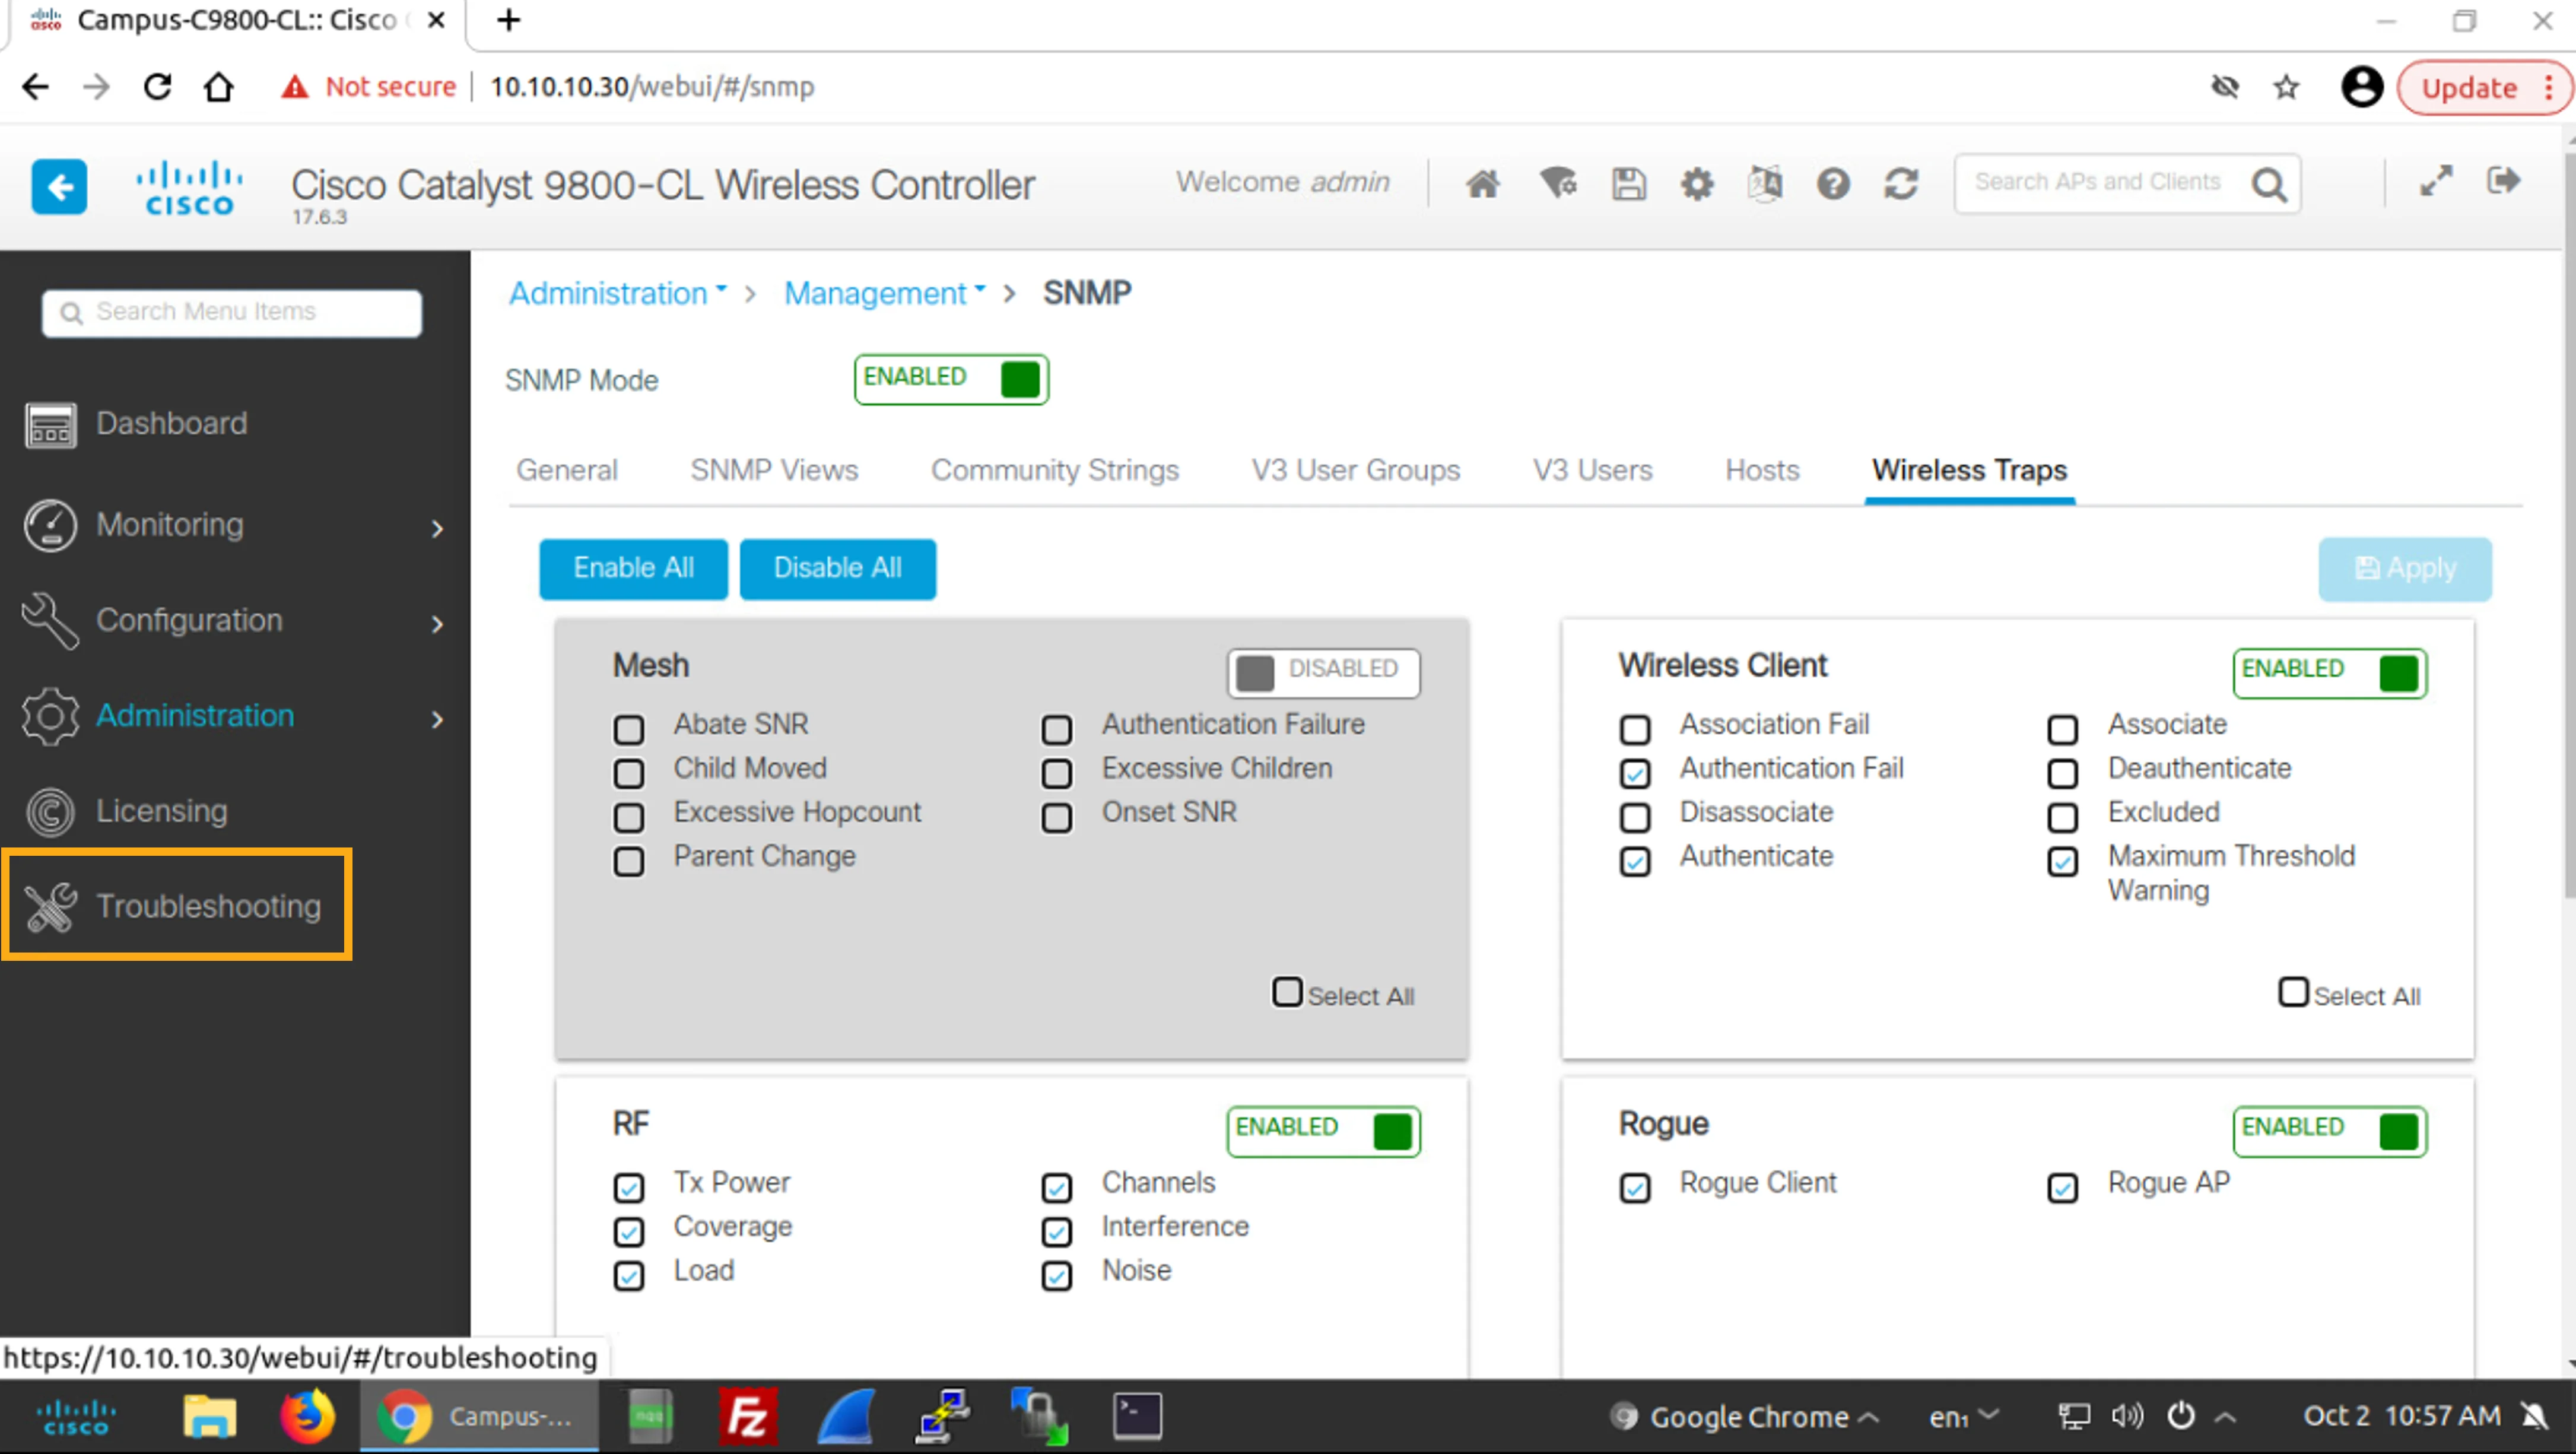
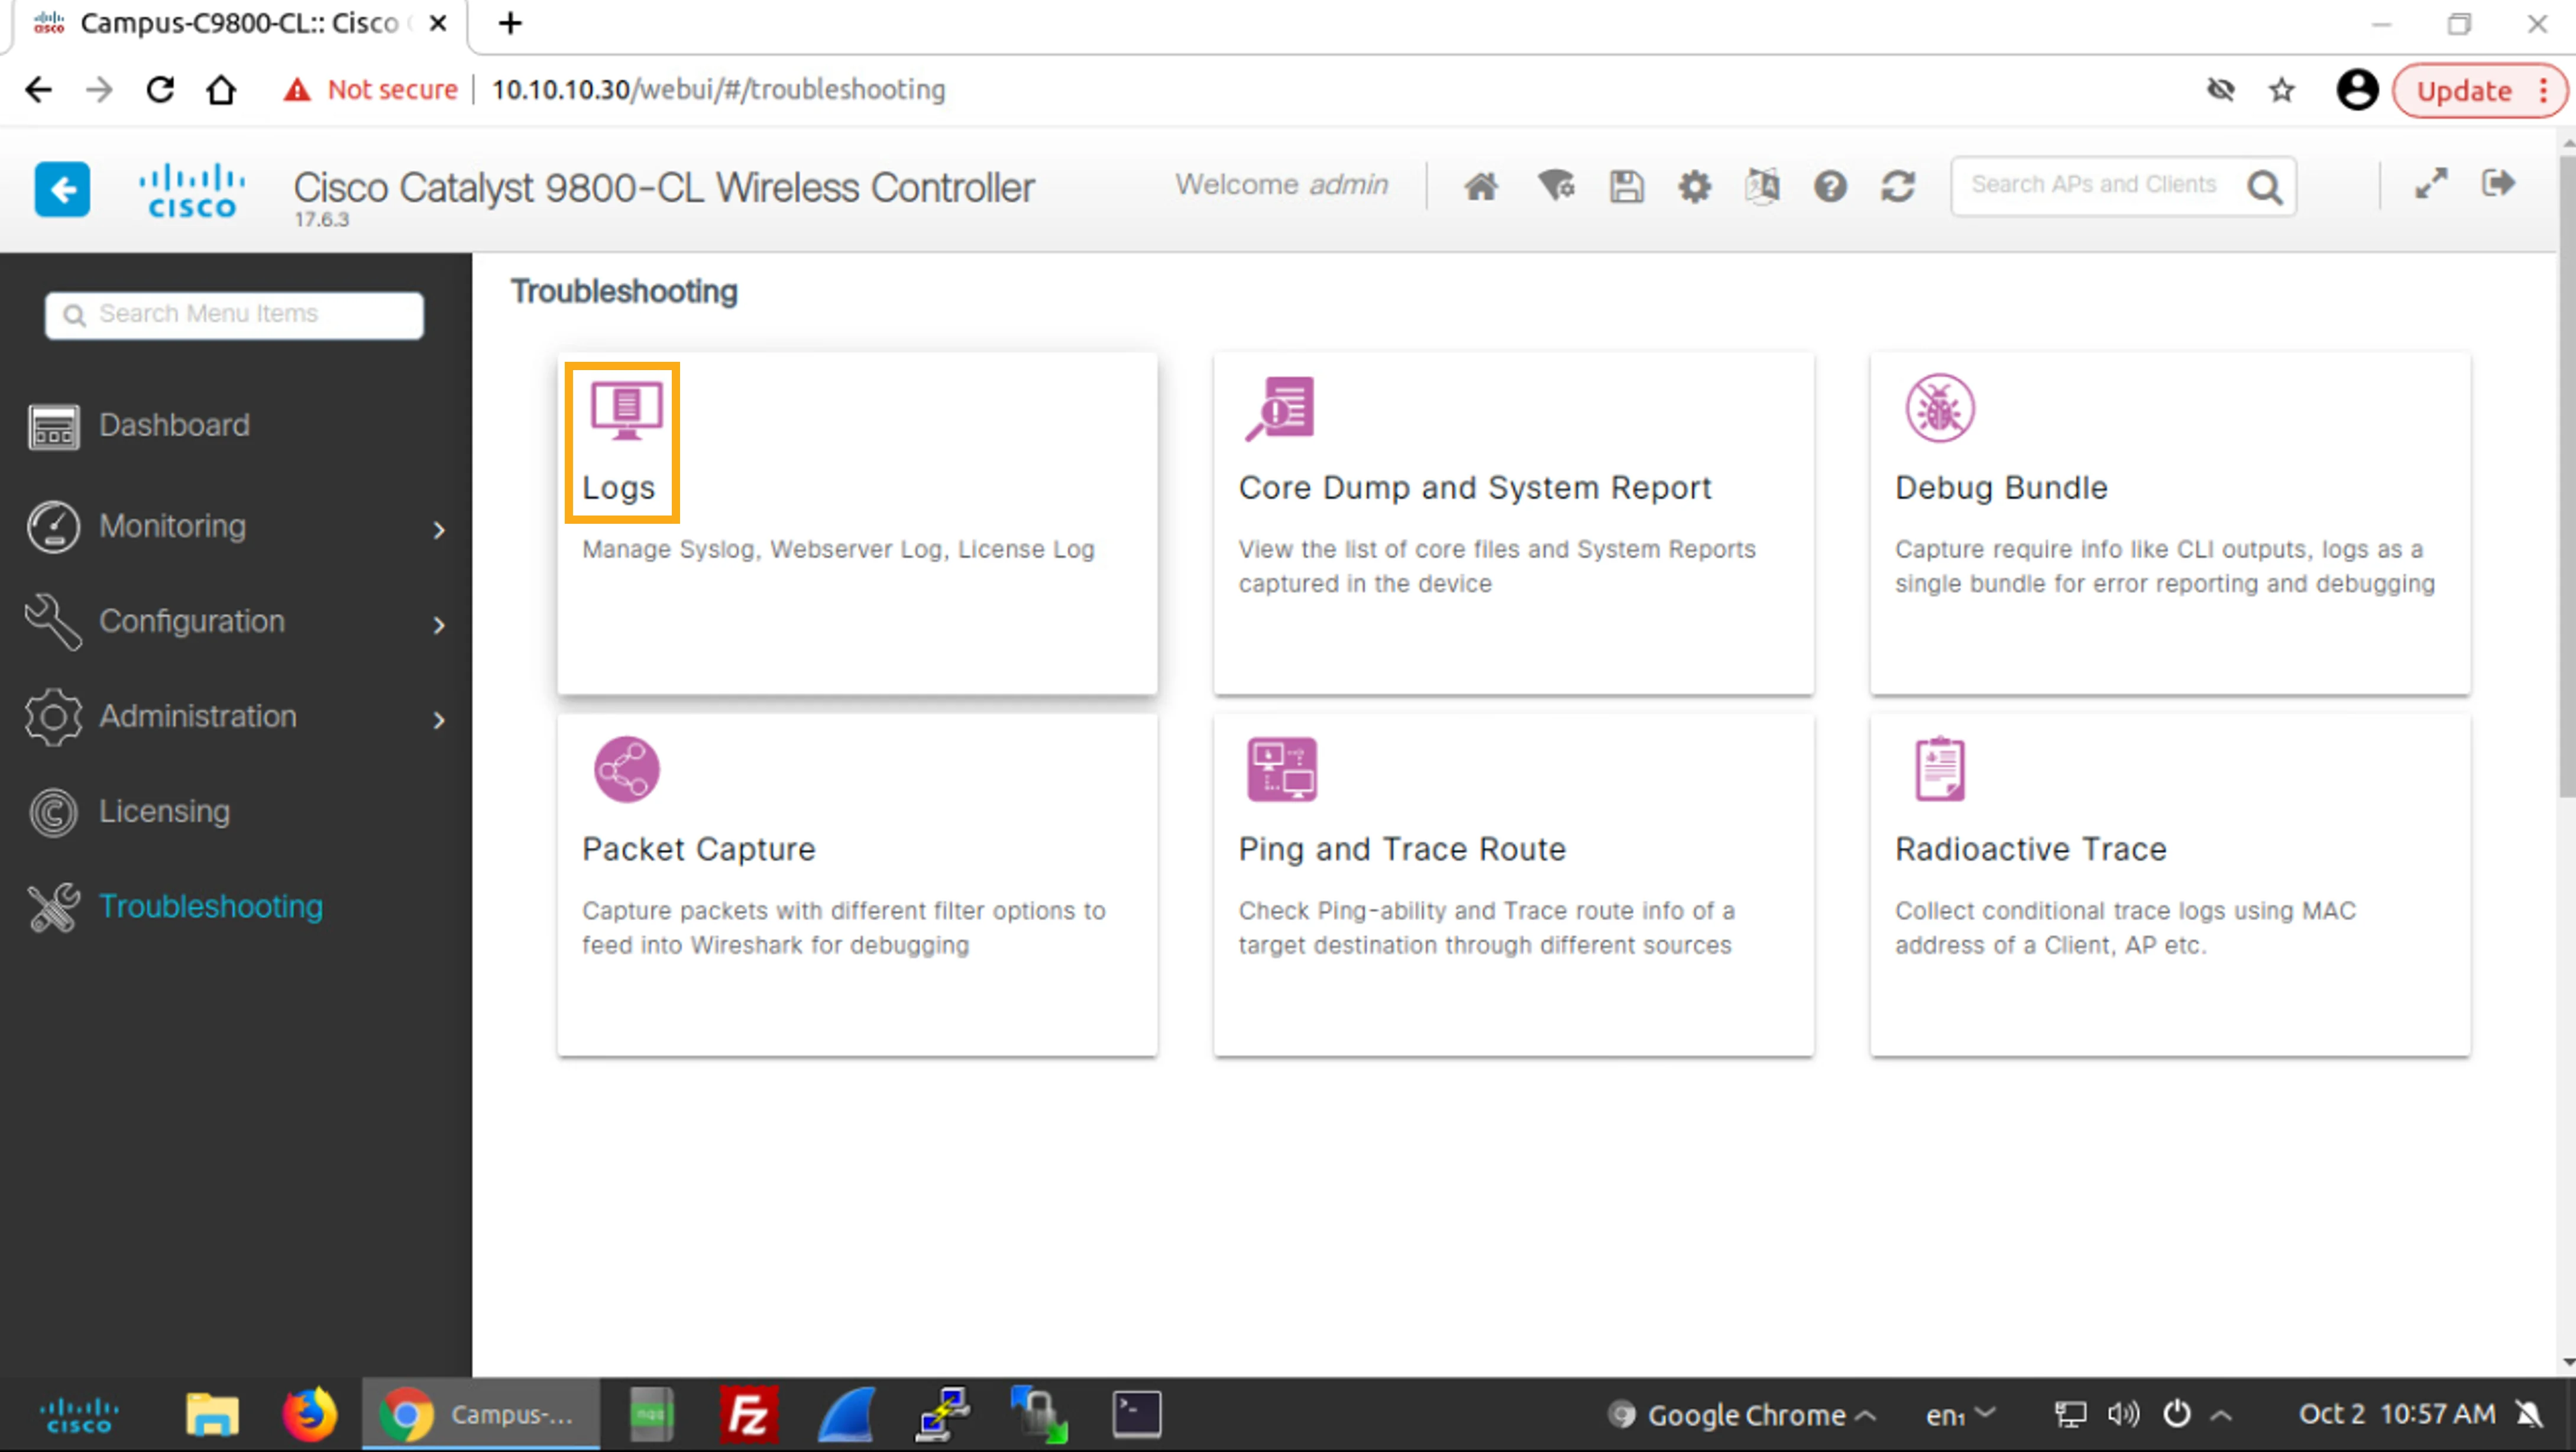
Choose Troubleshooting and then click Logs to get to the Troubleshooting > Syslog page.
選擇Troubleshooting,再按一下Logs以前往Troubleshooting > Syslog頁面。
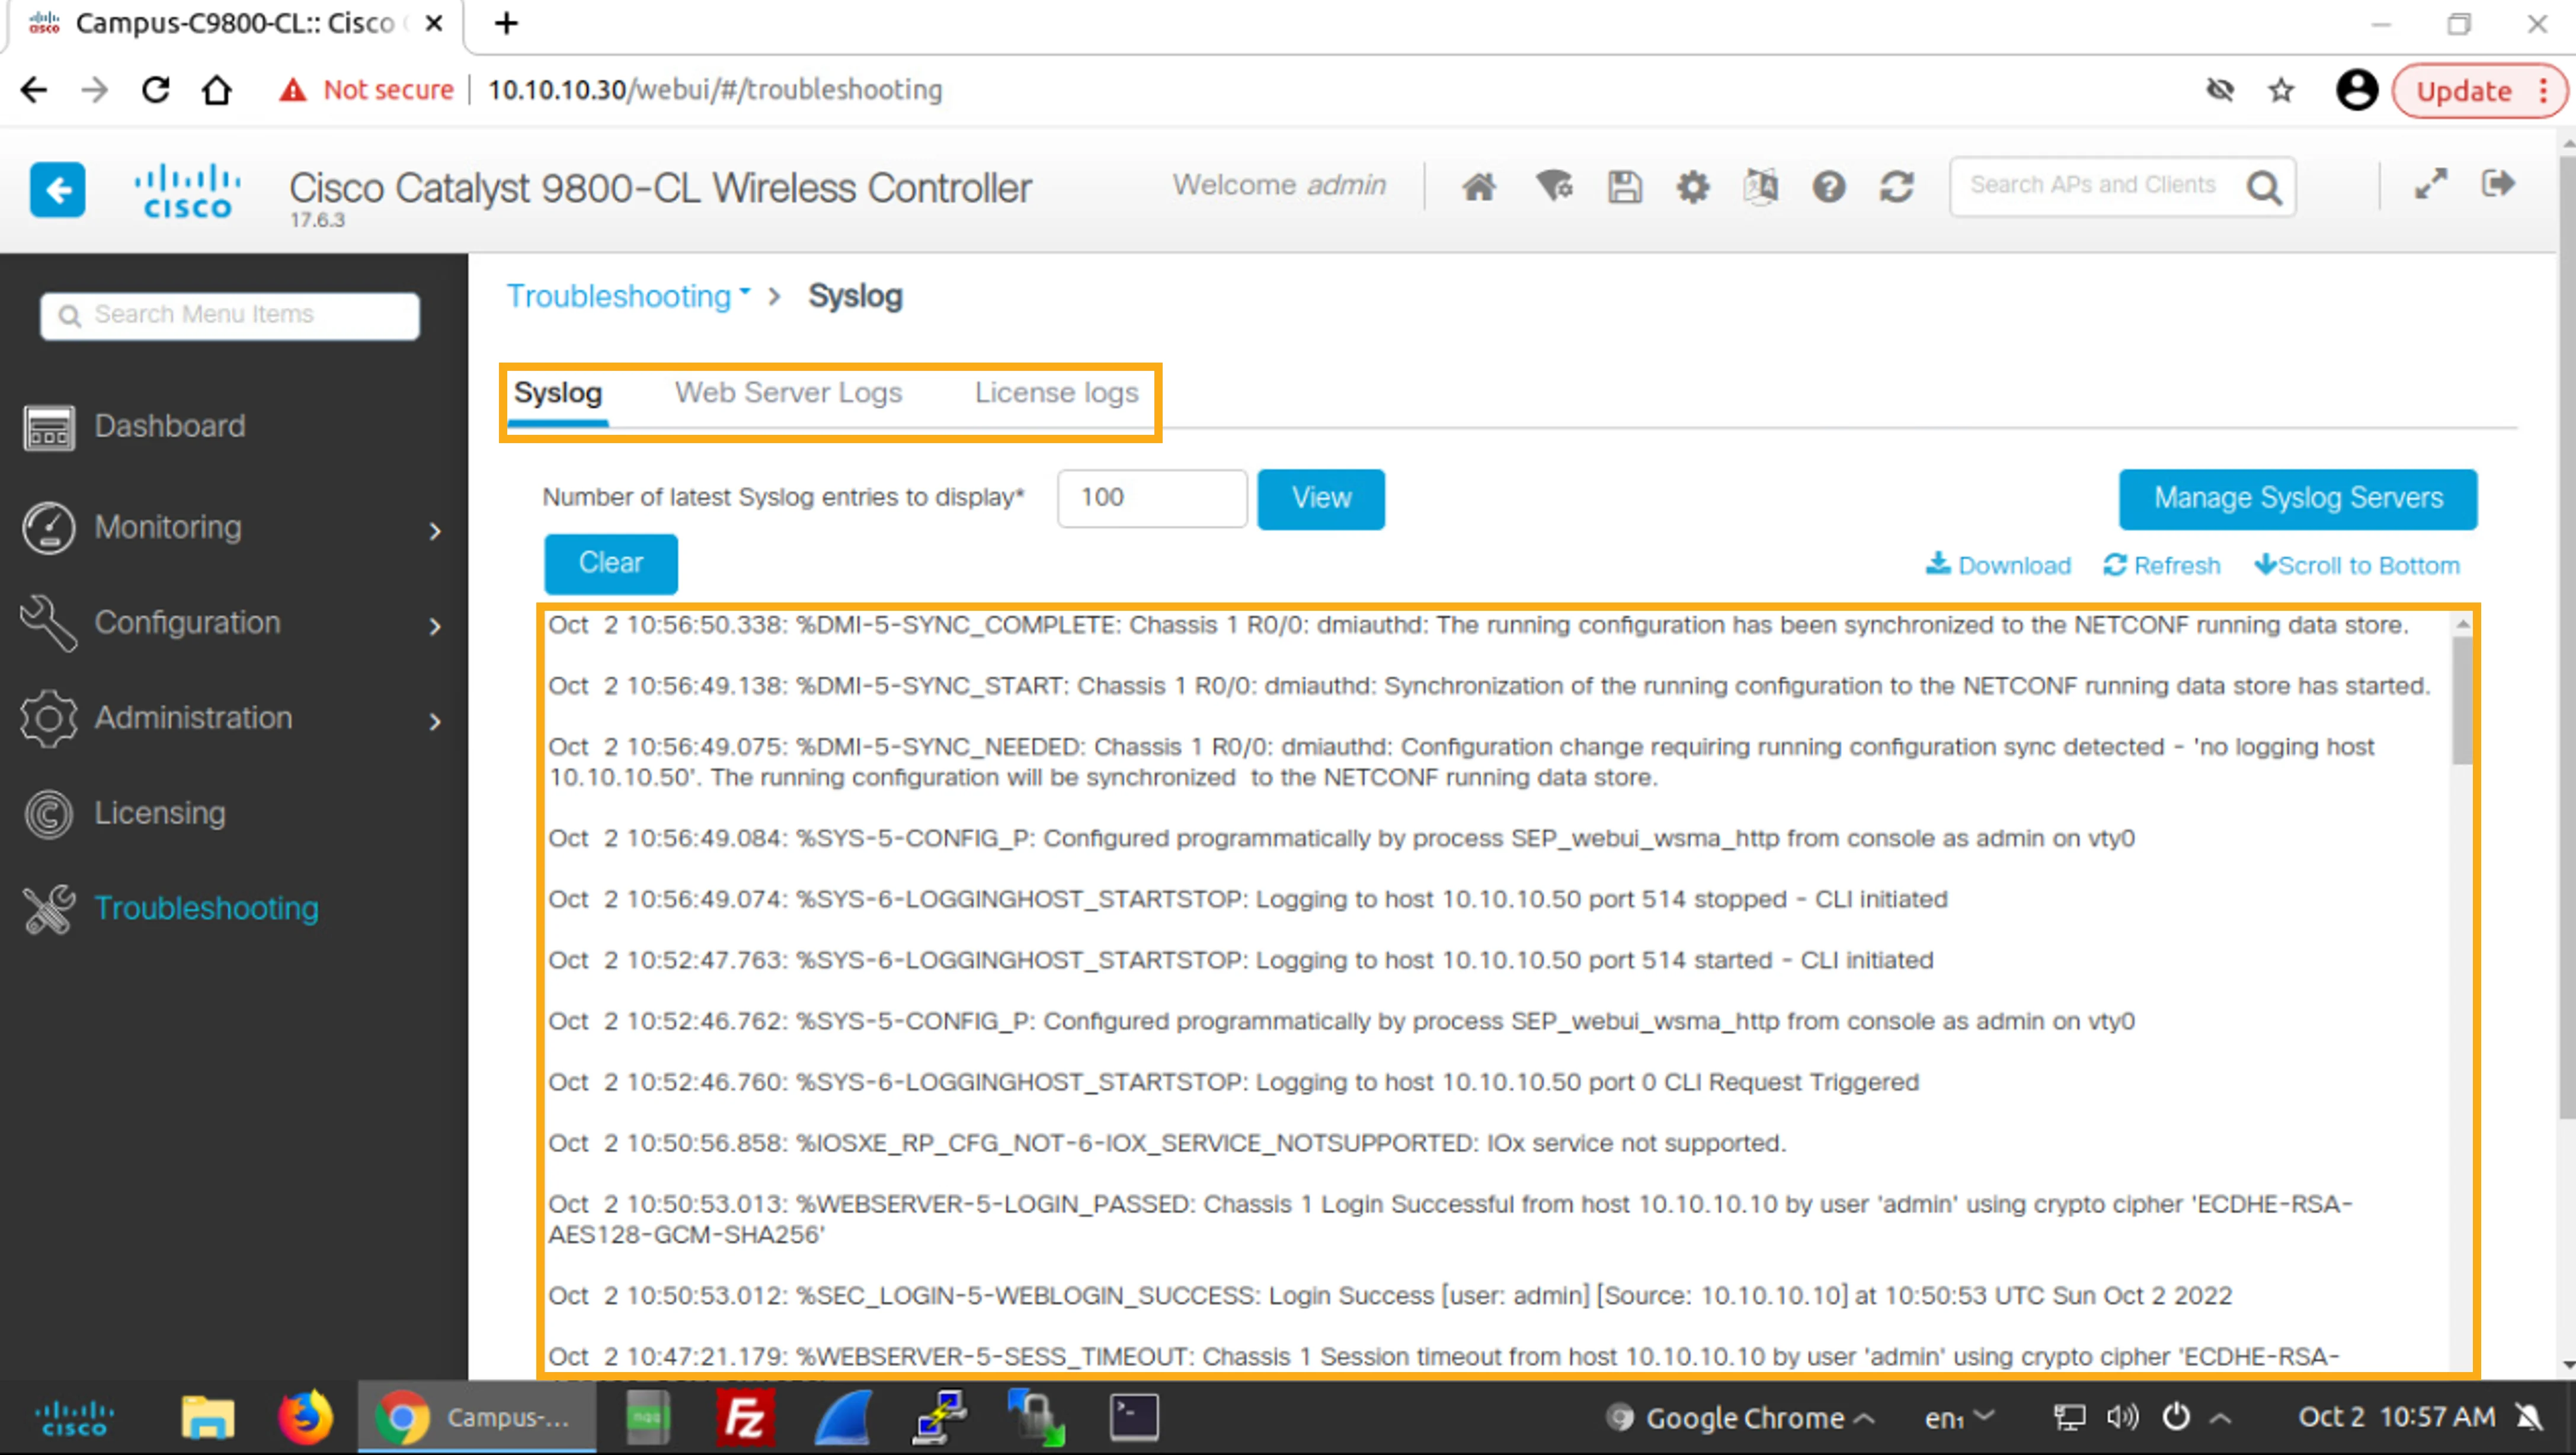
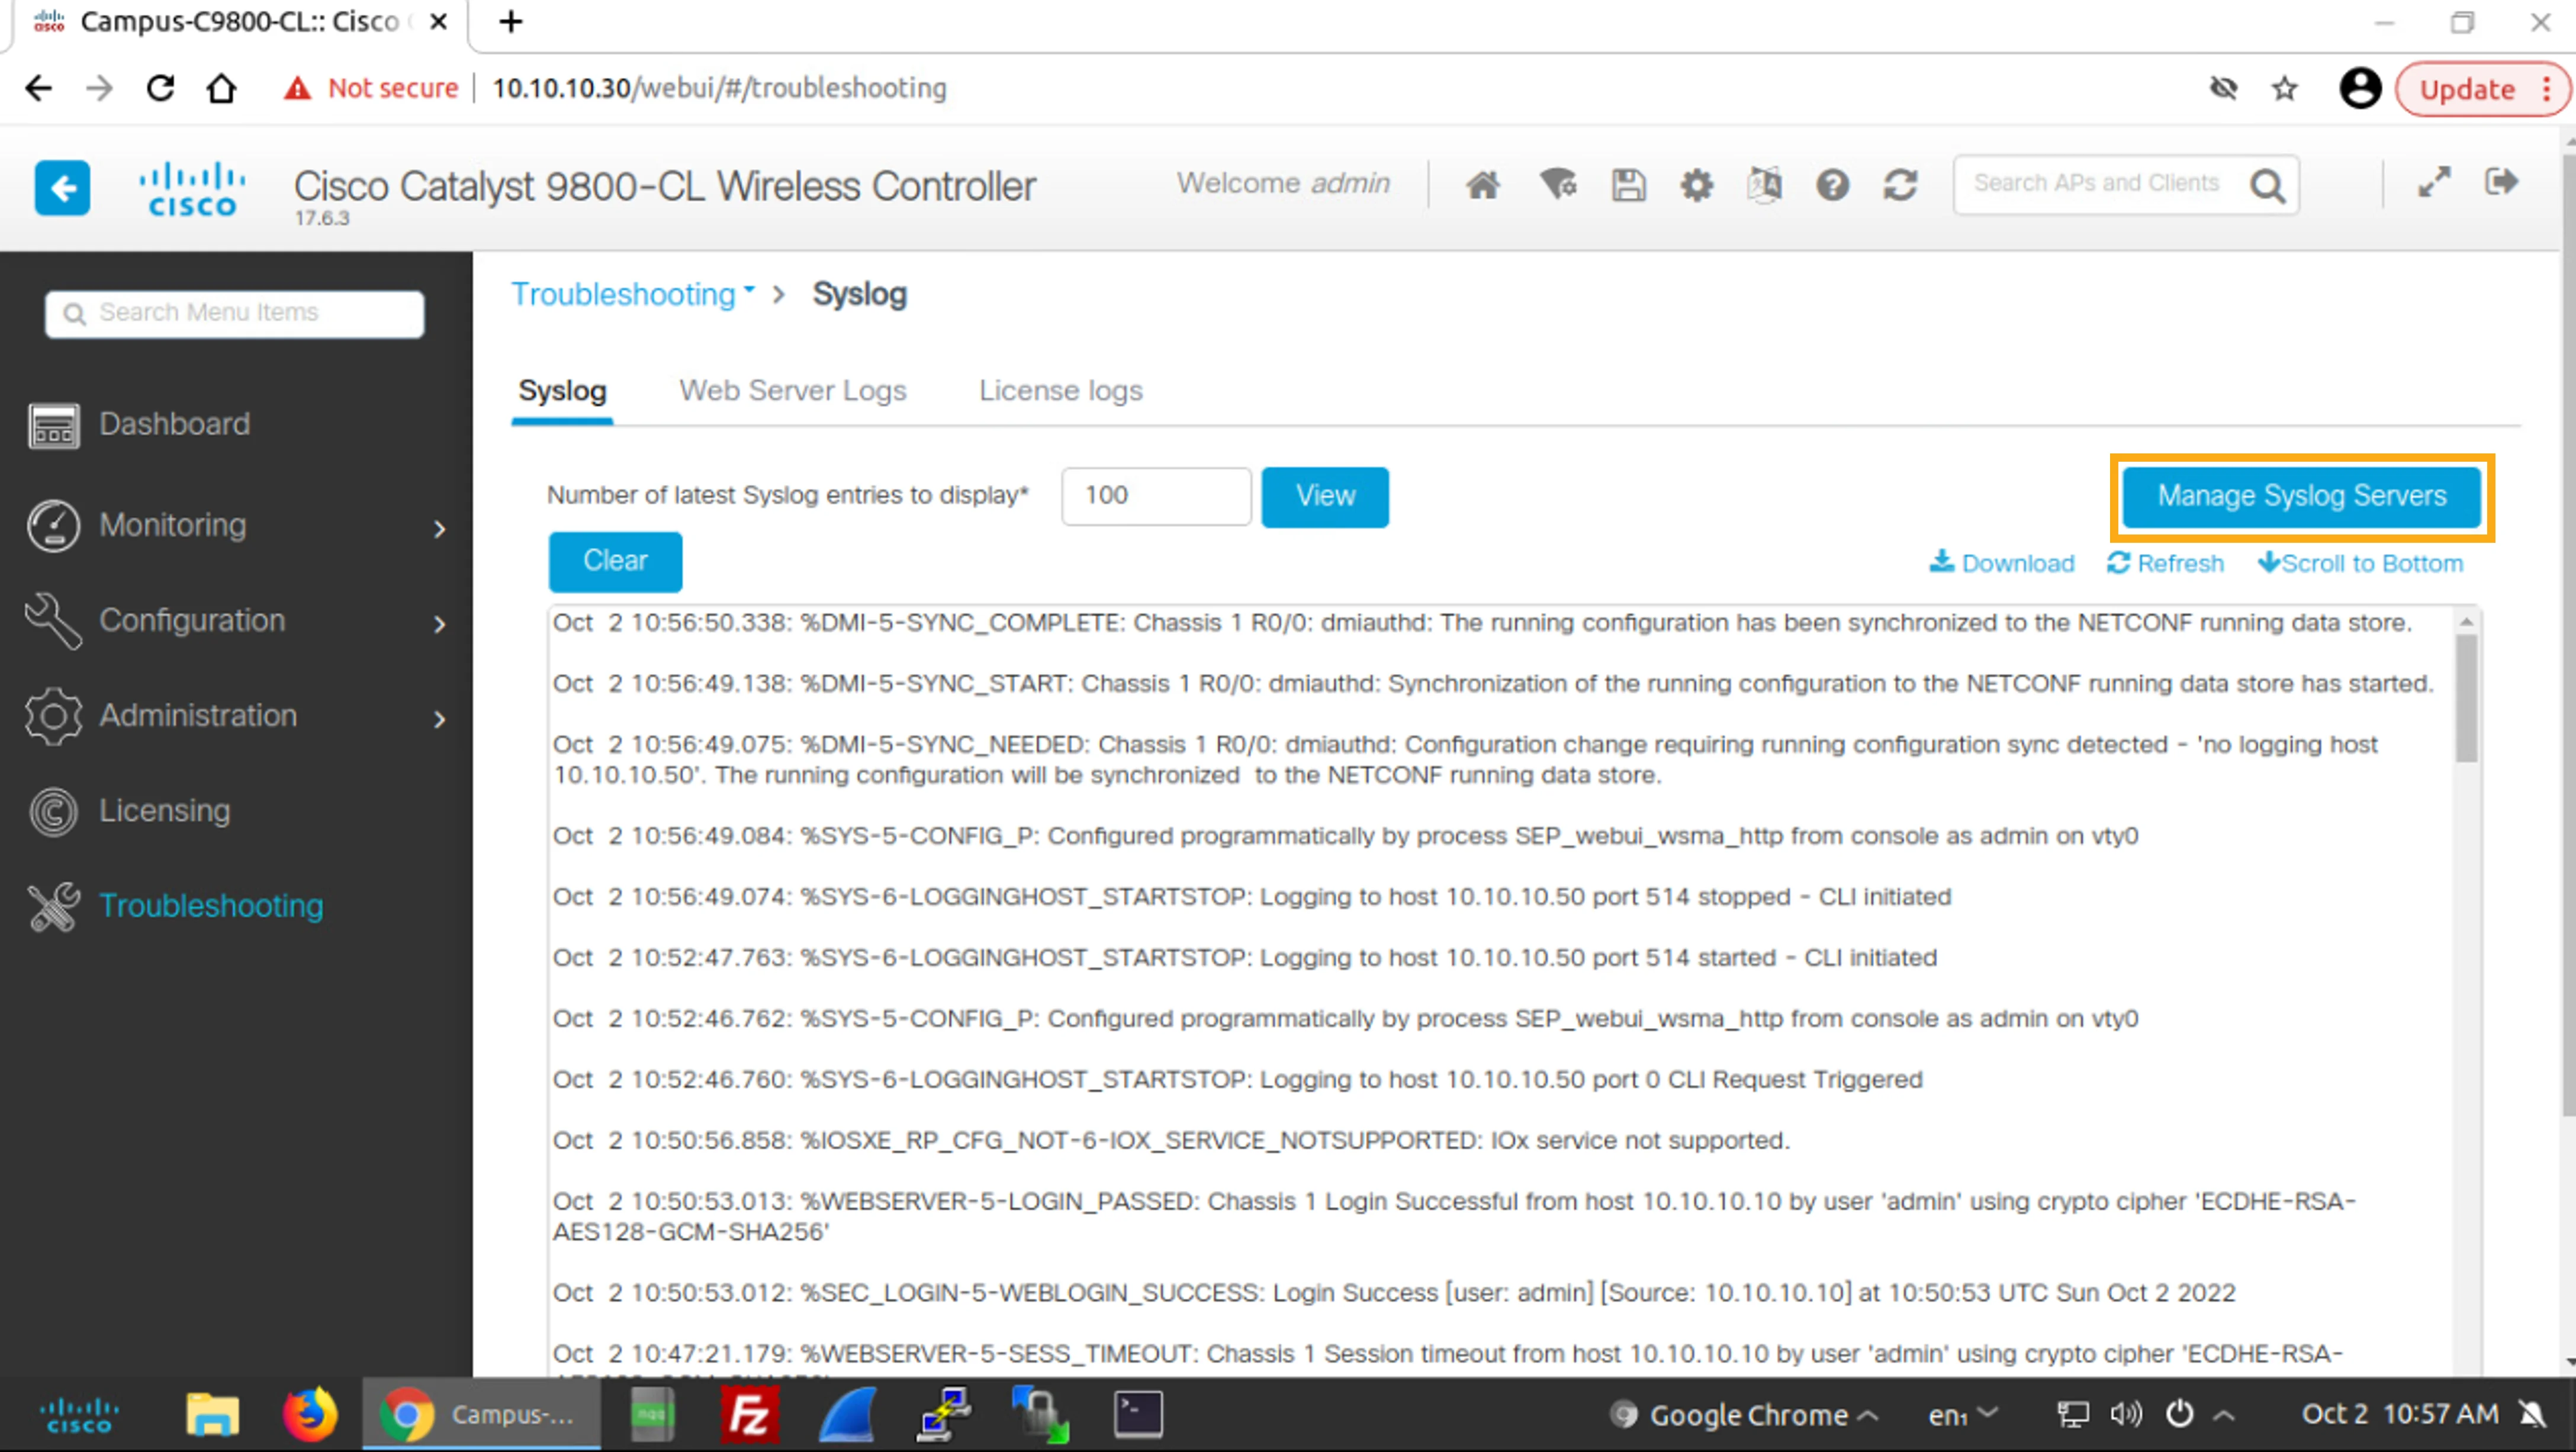
Examine the Syslog page. Note that there are three categories of log messages: Syslog, Web Server Logs, and License logs. By default, the Syslog tab with syslog messages is shown.
檢視Syslog頁面。請注意記錄訊息共有三個類別:Syslog、Web Server Logs與License記錄。系統預設會顯示含 syslog 訊息的Syslog索引標籤。
Click Manage Syslog Servers and set the log level to notifications.
按一下Manage Syslog Servers,並將記錄層級設為notifications。
Click Manage Syslog Servers.
按一下Manage Syslog Servers。
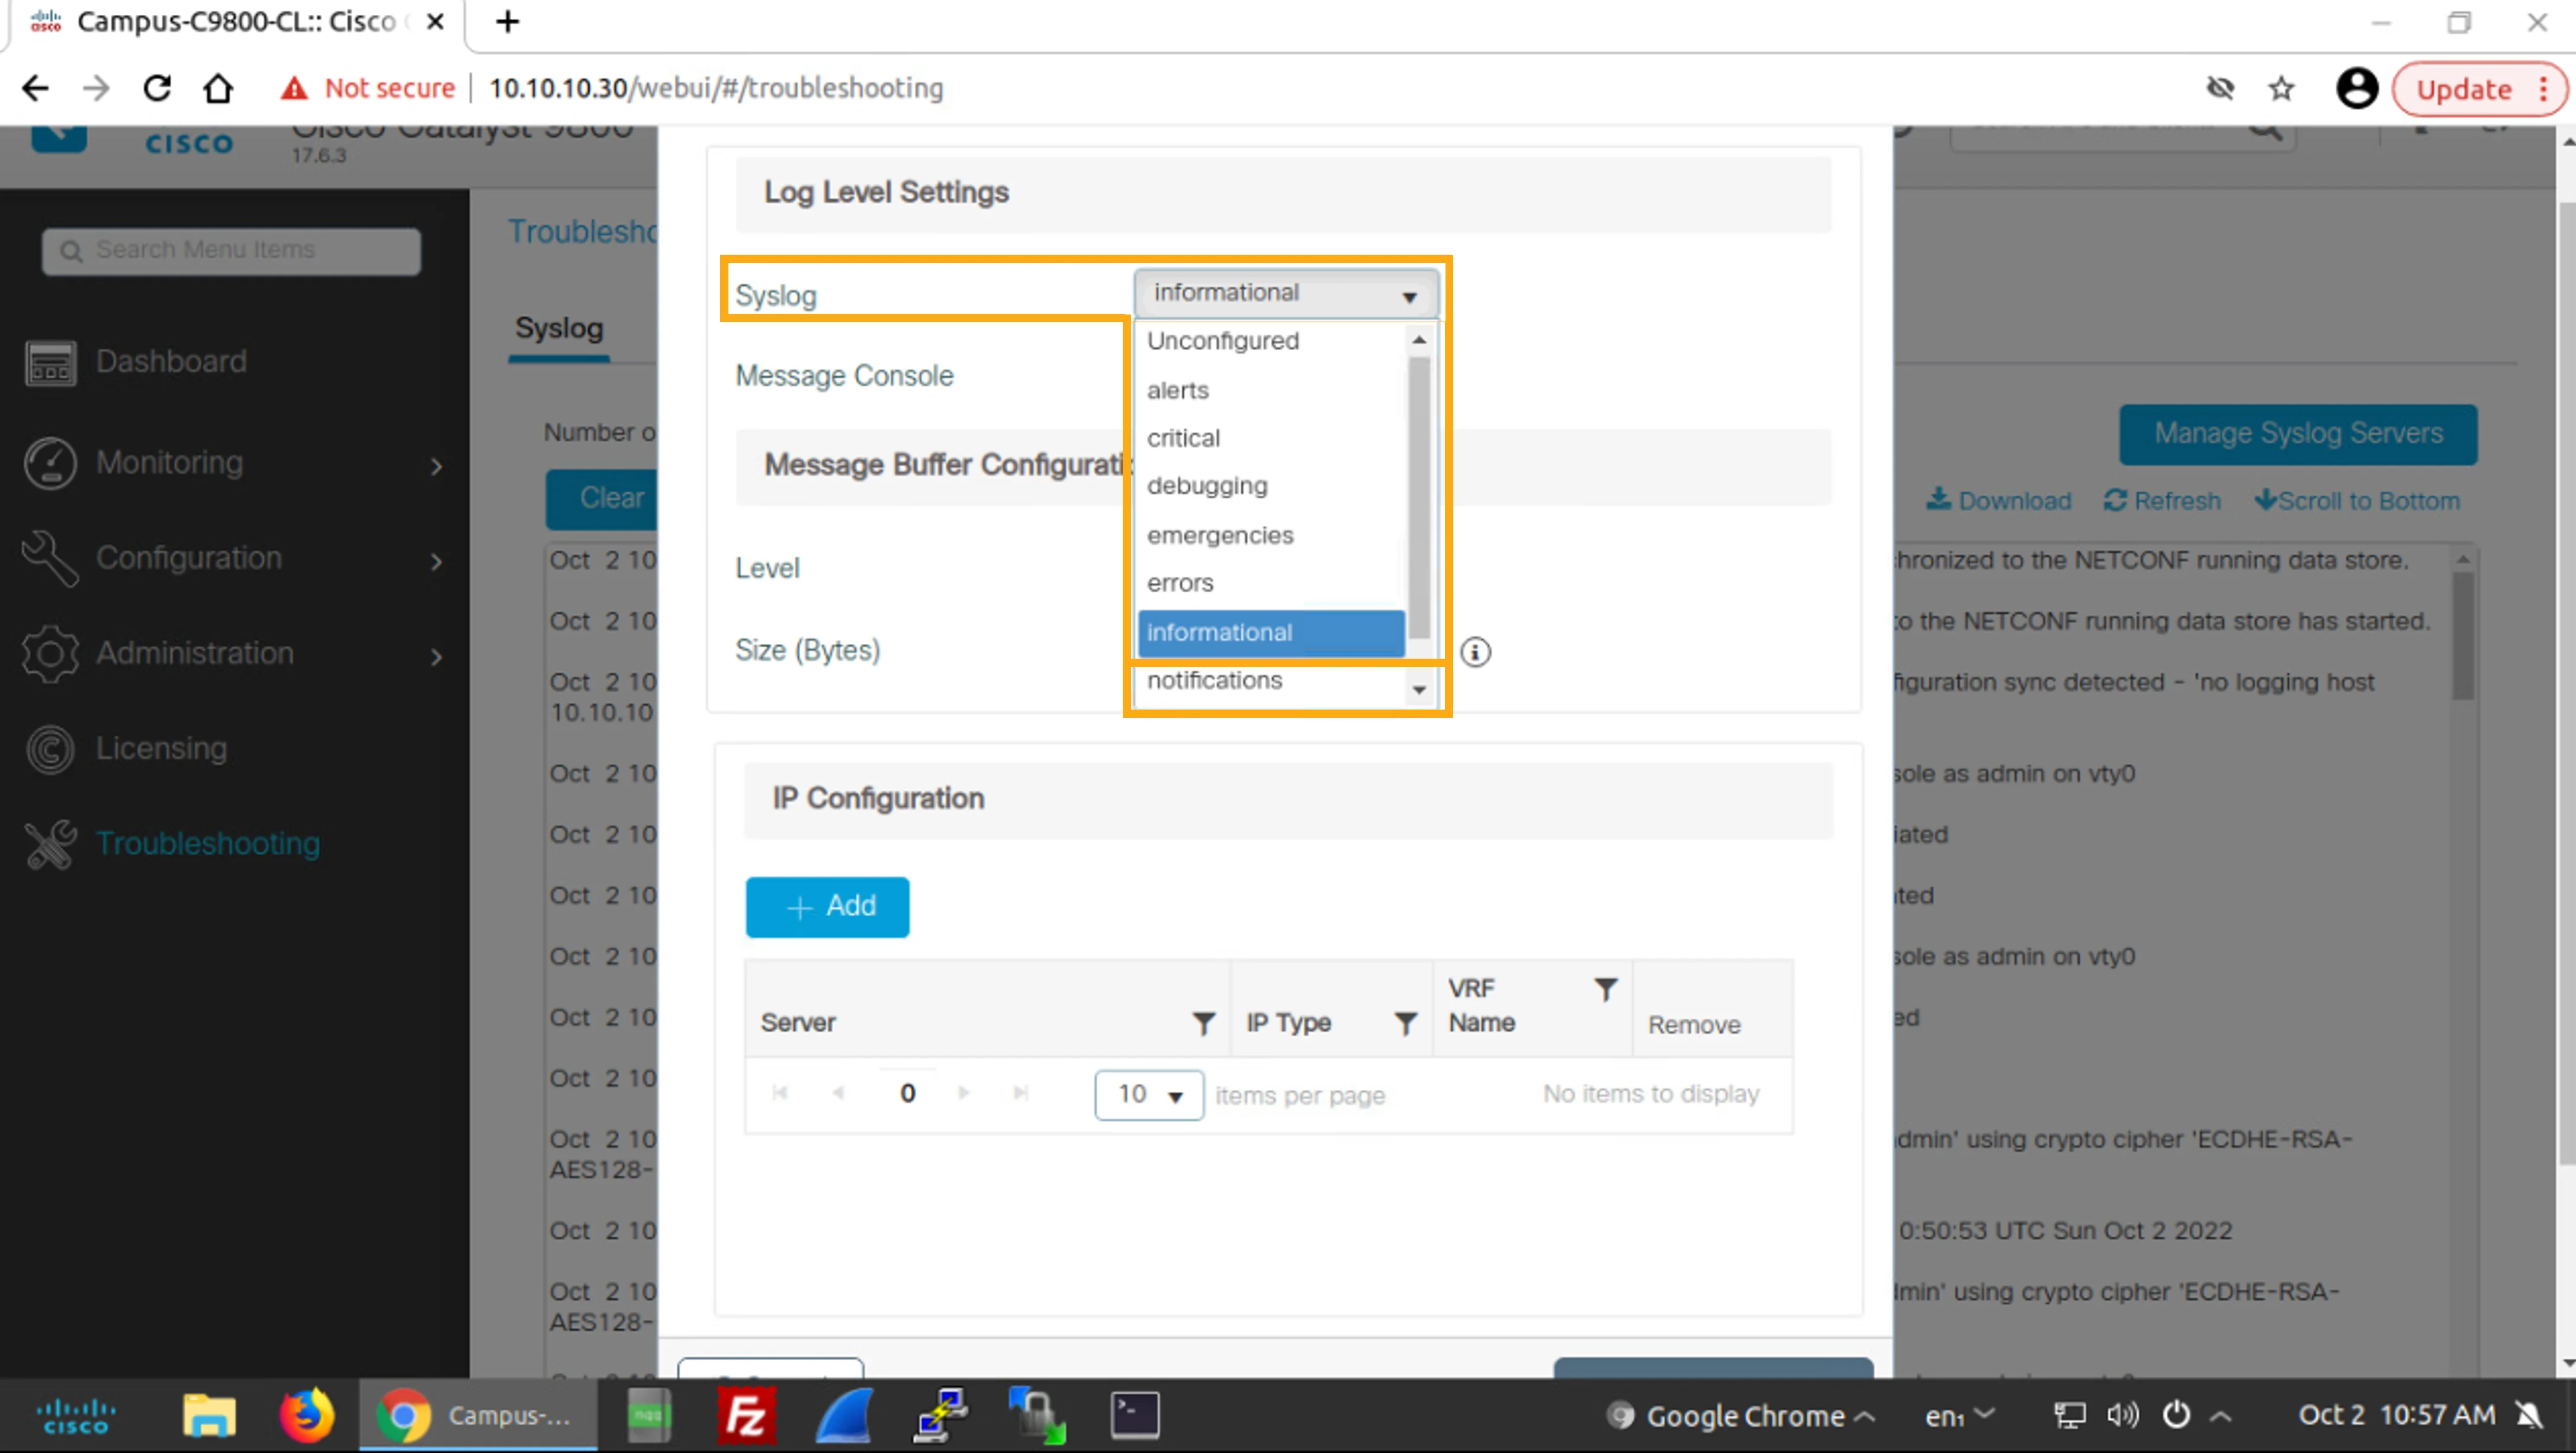
In the Log Level Settings window, in the Syslog drop-down list, change the messages level from the default value of informational to notifications.
在Log Level Settings視窗中,於Syslog下拉式清單,將訊息等級從預設值informational變更為notifications。
Add Syslog Server
新增 Syslog 伺服器
You will now add the syslog server to the Campus WLC. The syslog server is already available at the IP address 10.10.10.50.
您現在要將 syslog 伺服器新增到 Campus WLC。此 syslog 伺服器已存在,IP 位址為 10.10.10.50。
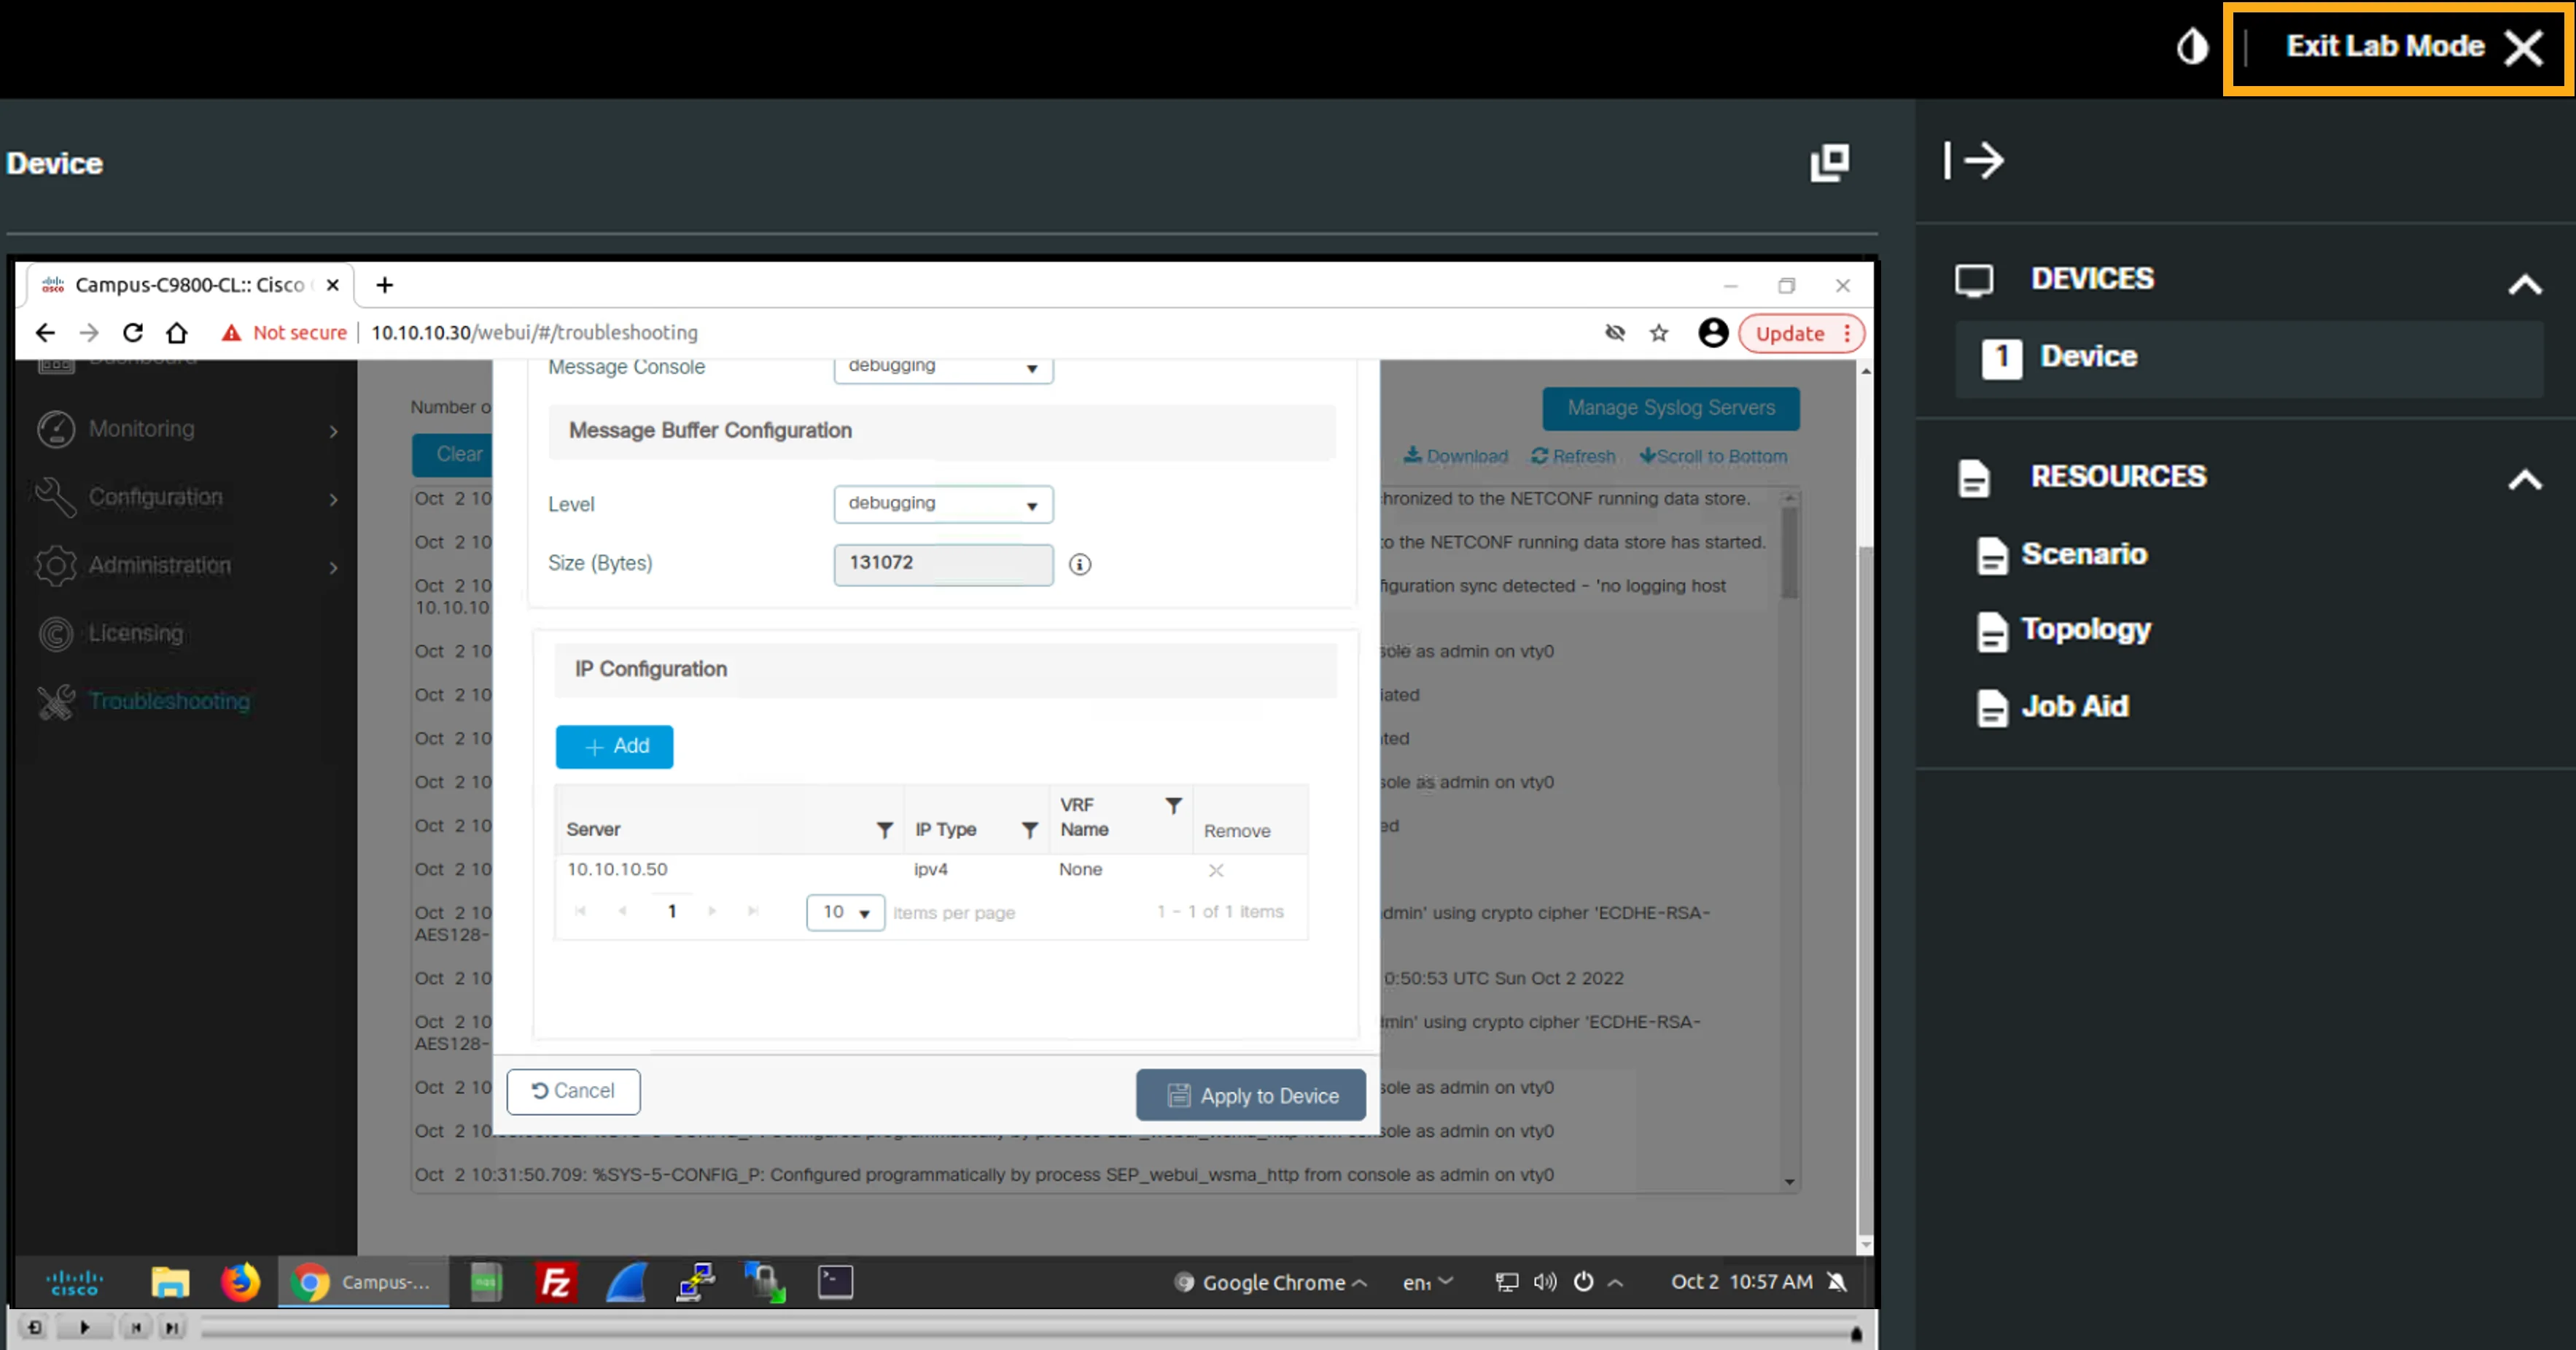
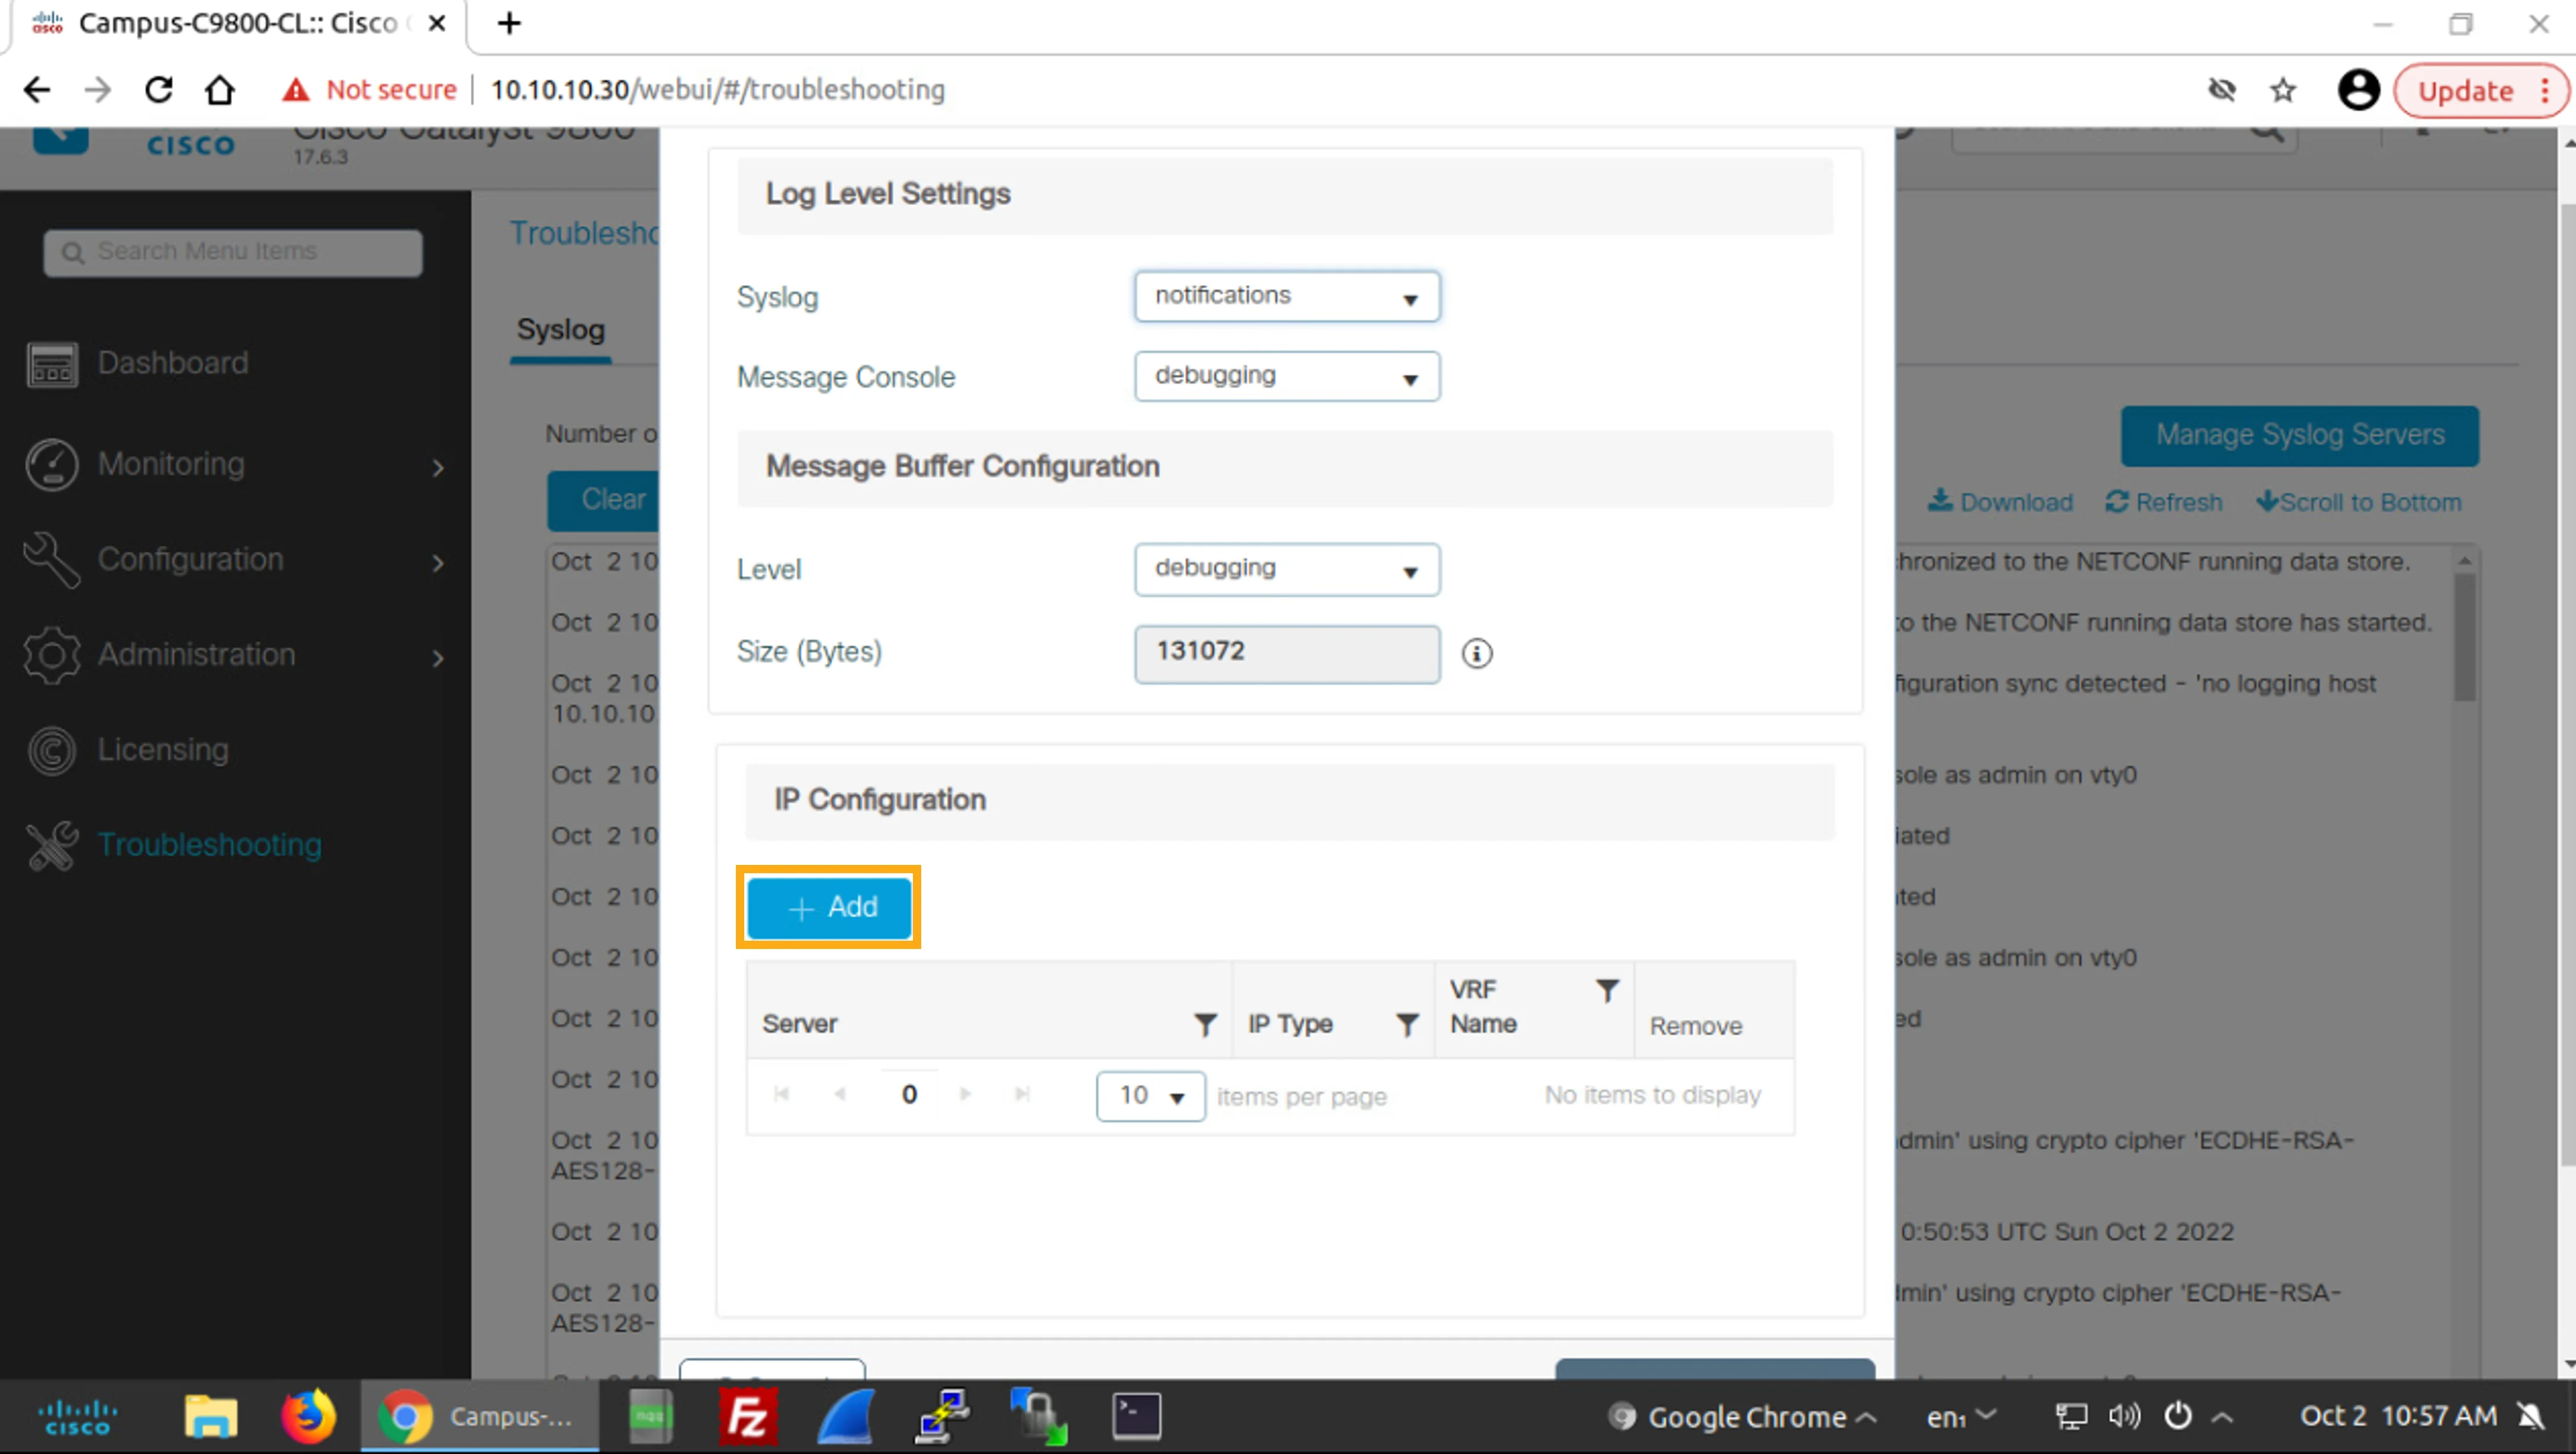
In the IP Configuration section, click +Add to add the syslog server.
在IP Configuration區段中,按一下+Add新增 syslog 伺服器。
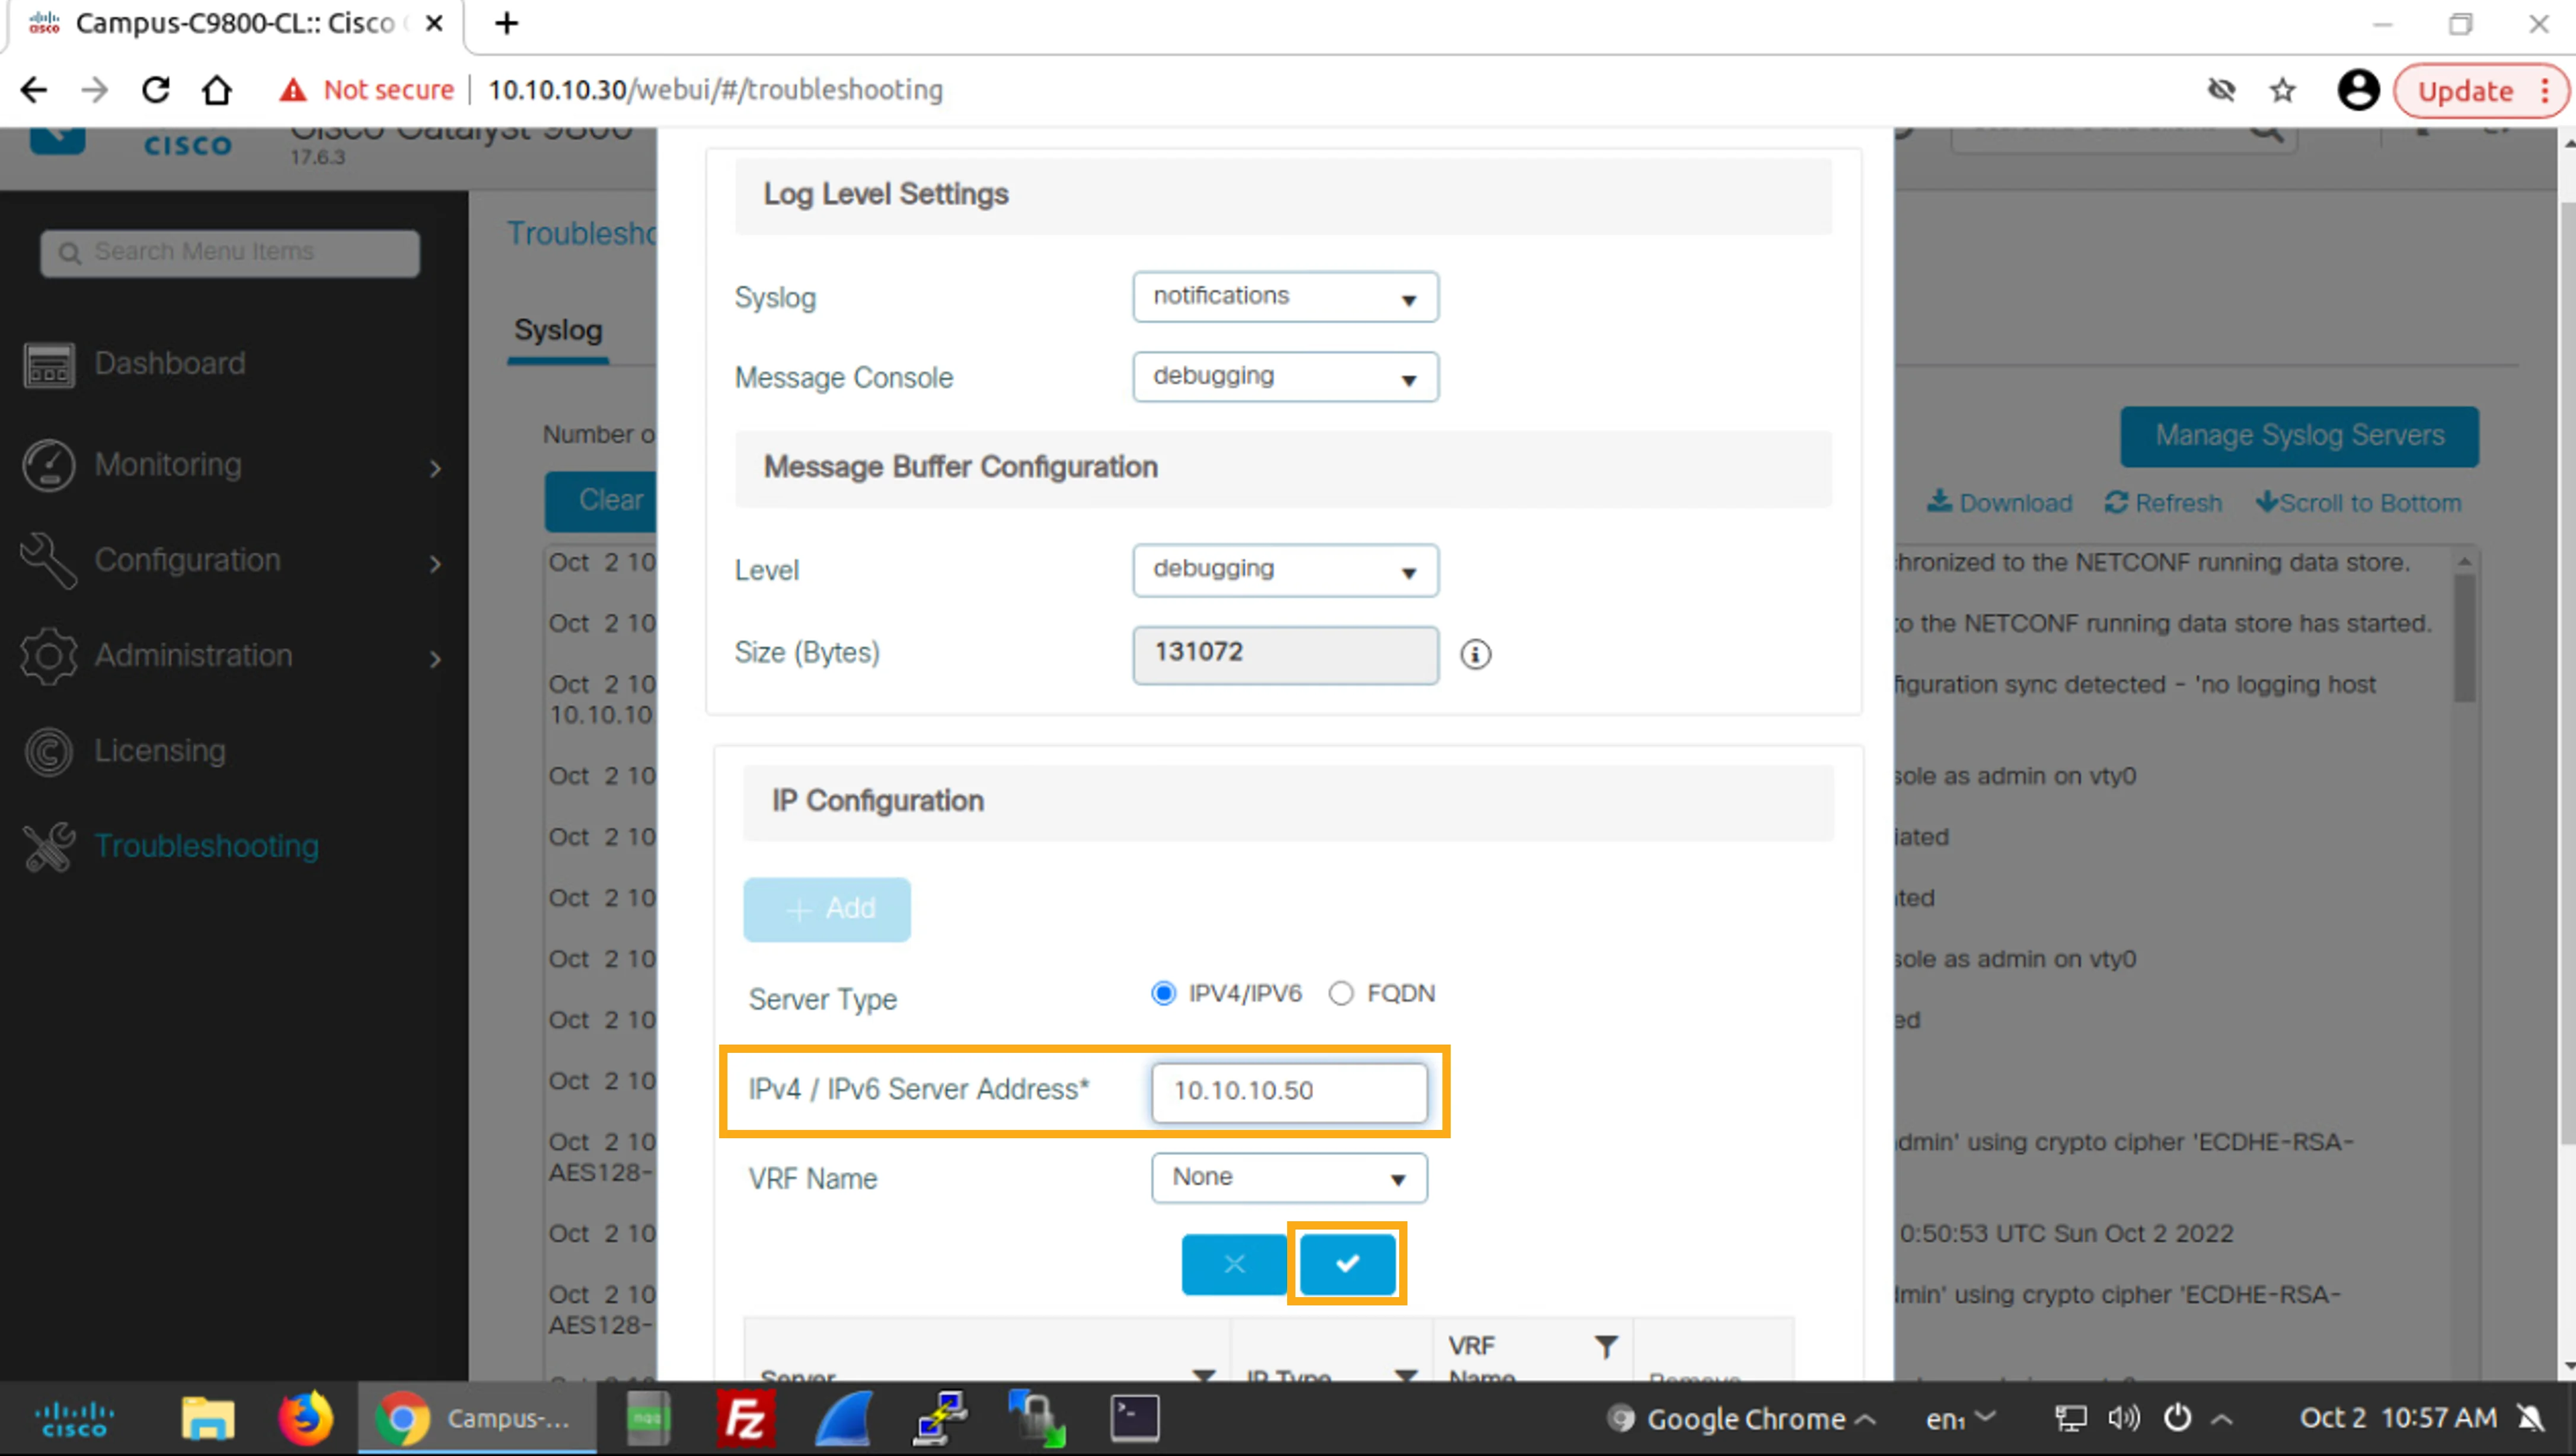
Then add the server IP address and click the blue check box (") button to save your changes.
接著輸入伺服器 IP 位址,並按一下藍色的核取方塊(")按鈕以儲存變更。
Click +Add.
按一下+Add。
In the IPv4 /IPv6 Server Address input field, enter 10.10.10.50 and click the blue check box (") button.
在IPv4 /IPv6 Server Address輸入欄位中輸入 10.10.10.50,並按一下藍色核取方塊(")按鈕。
Click in the scroll bar area to move down to the bottom of the page.
按一下捲軸區域移動到頁面底部。
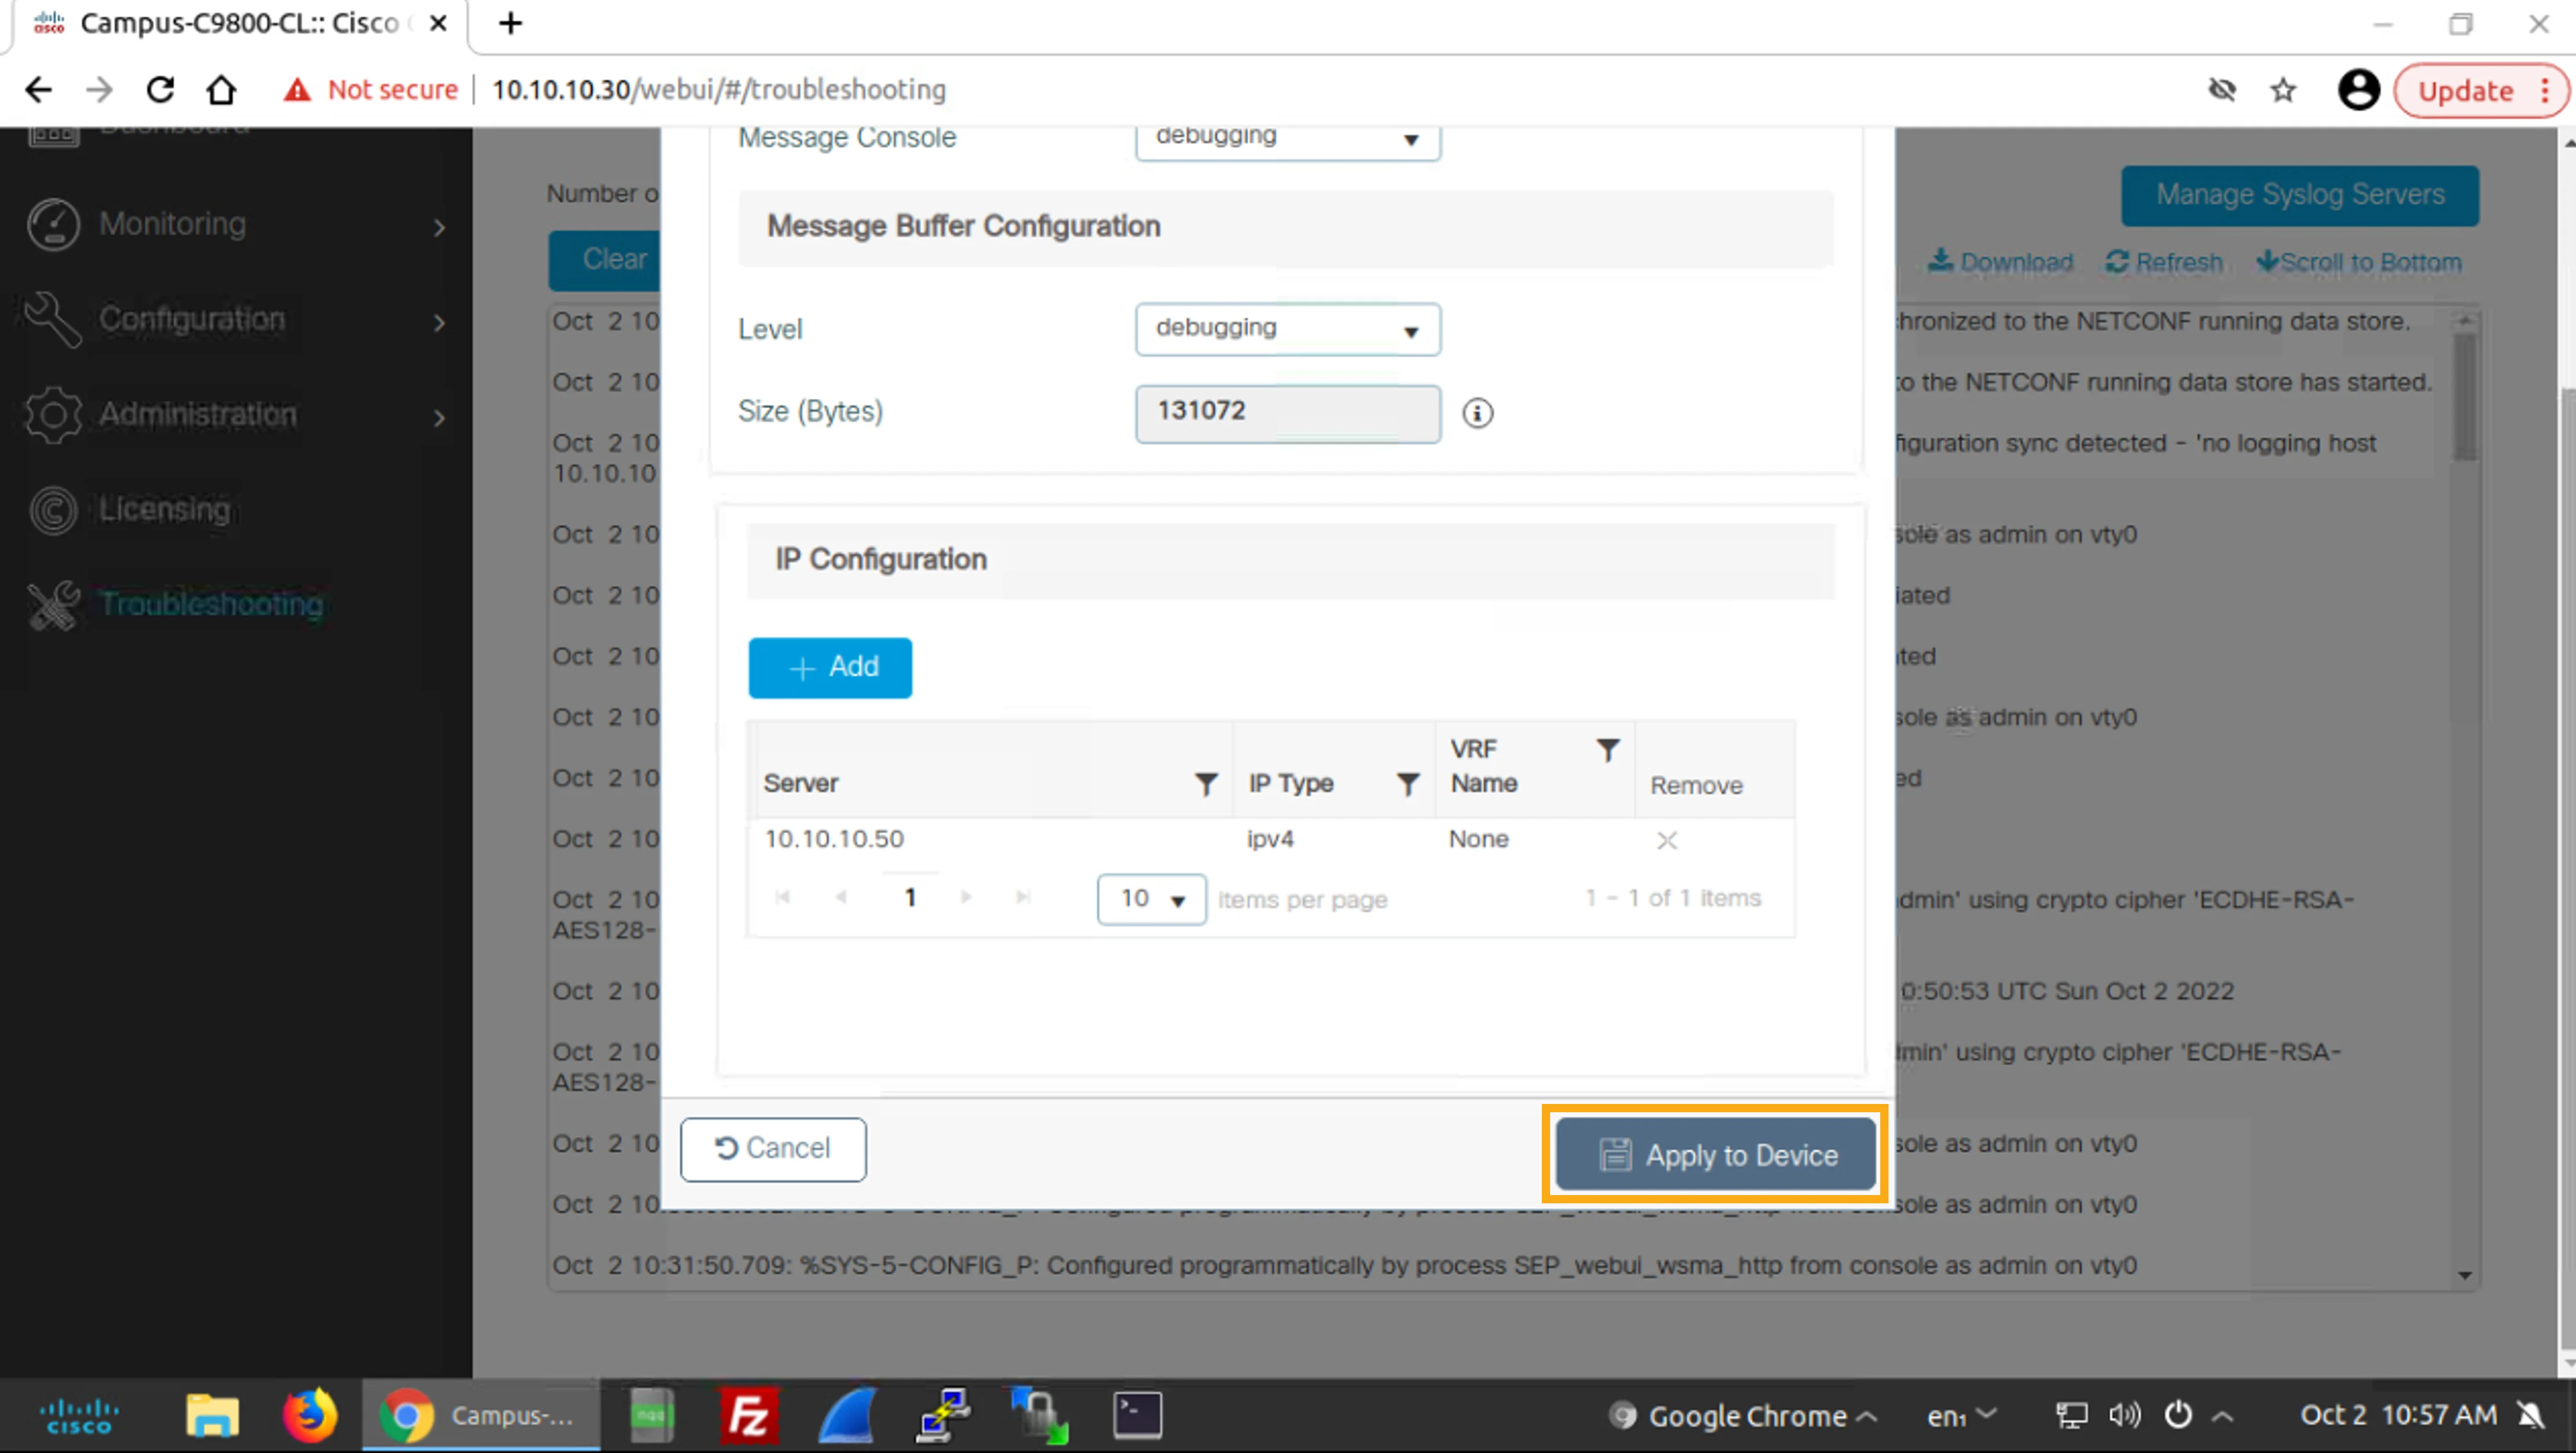
Then, click Apply to Device to apply your syslog server configuration changes.
接著按一下Apply to Device套用您的 syslog 伺服器設定變更。
Click in the scroll bar area.
按一下捲軸區域。
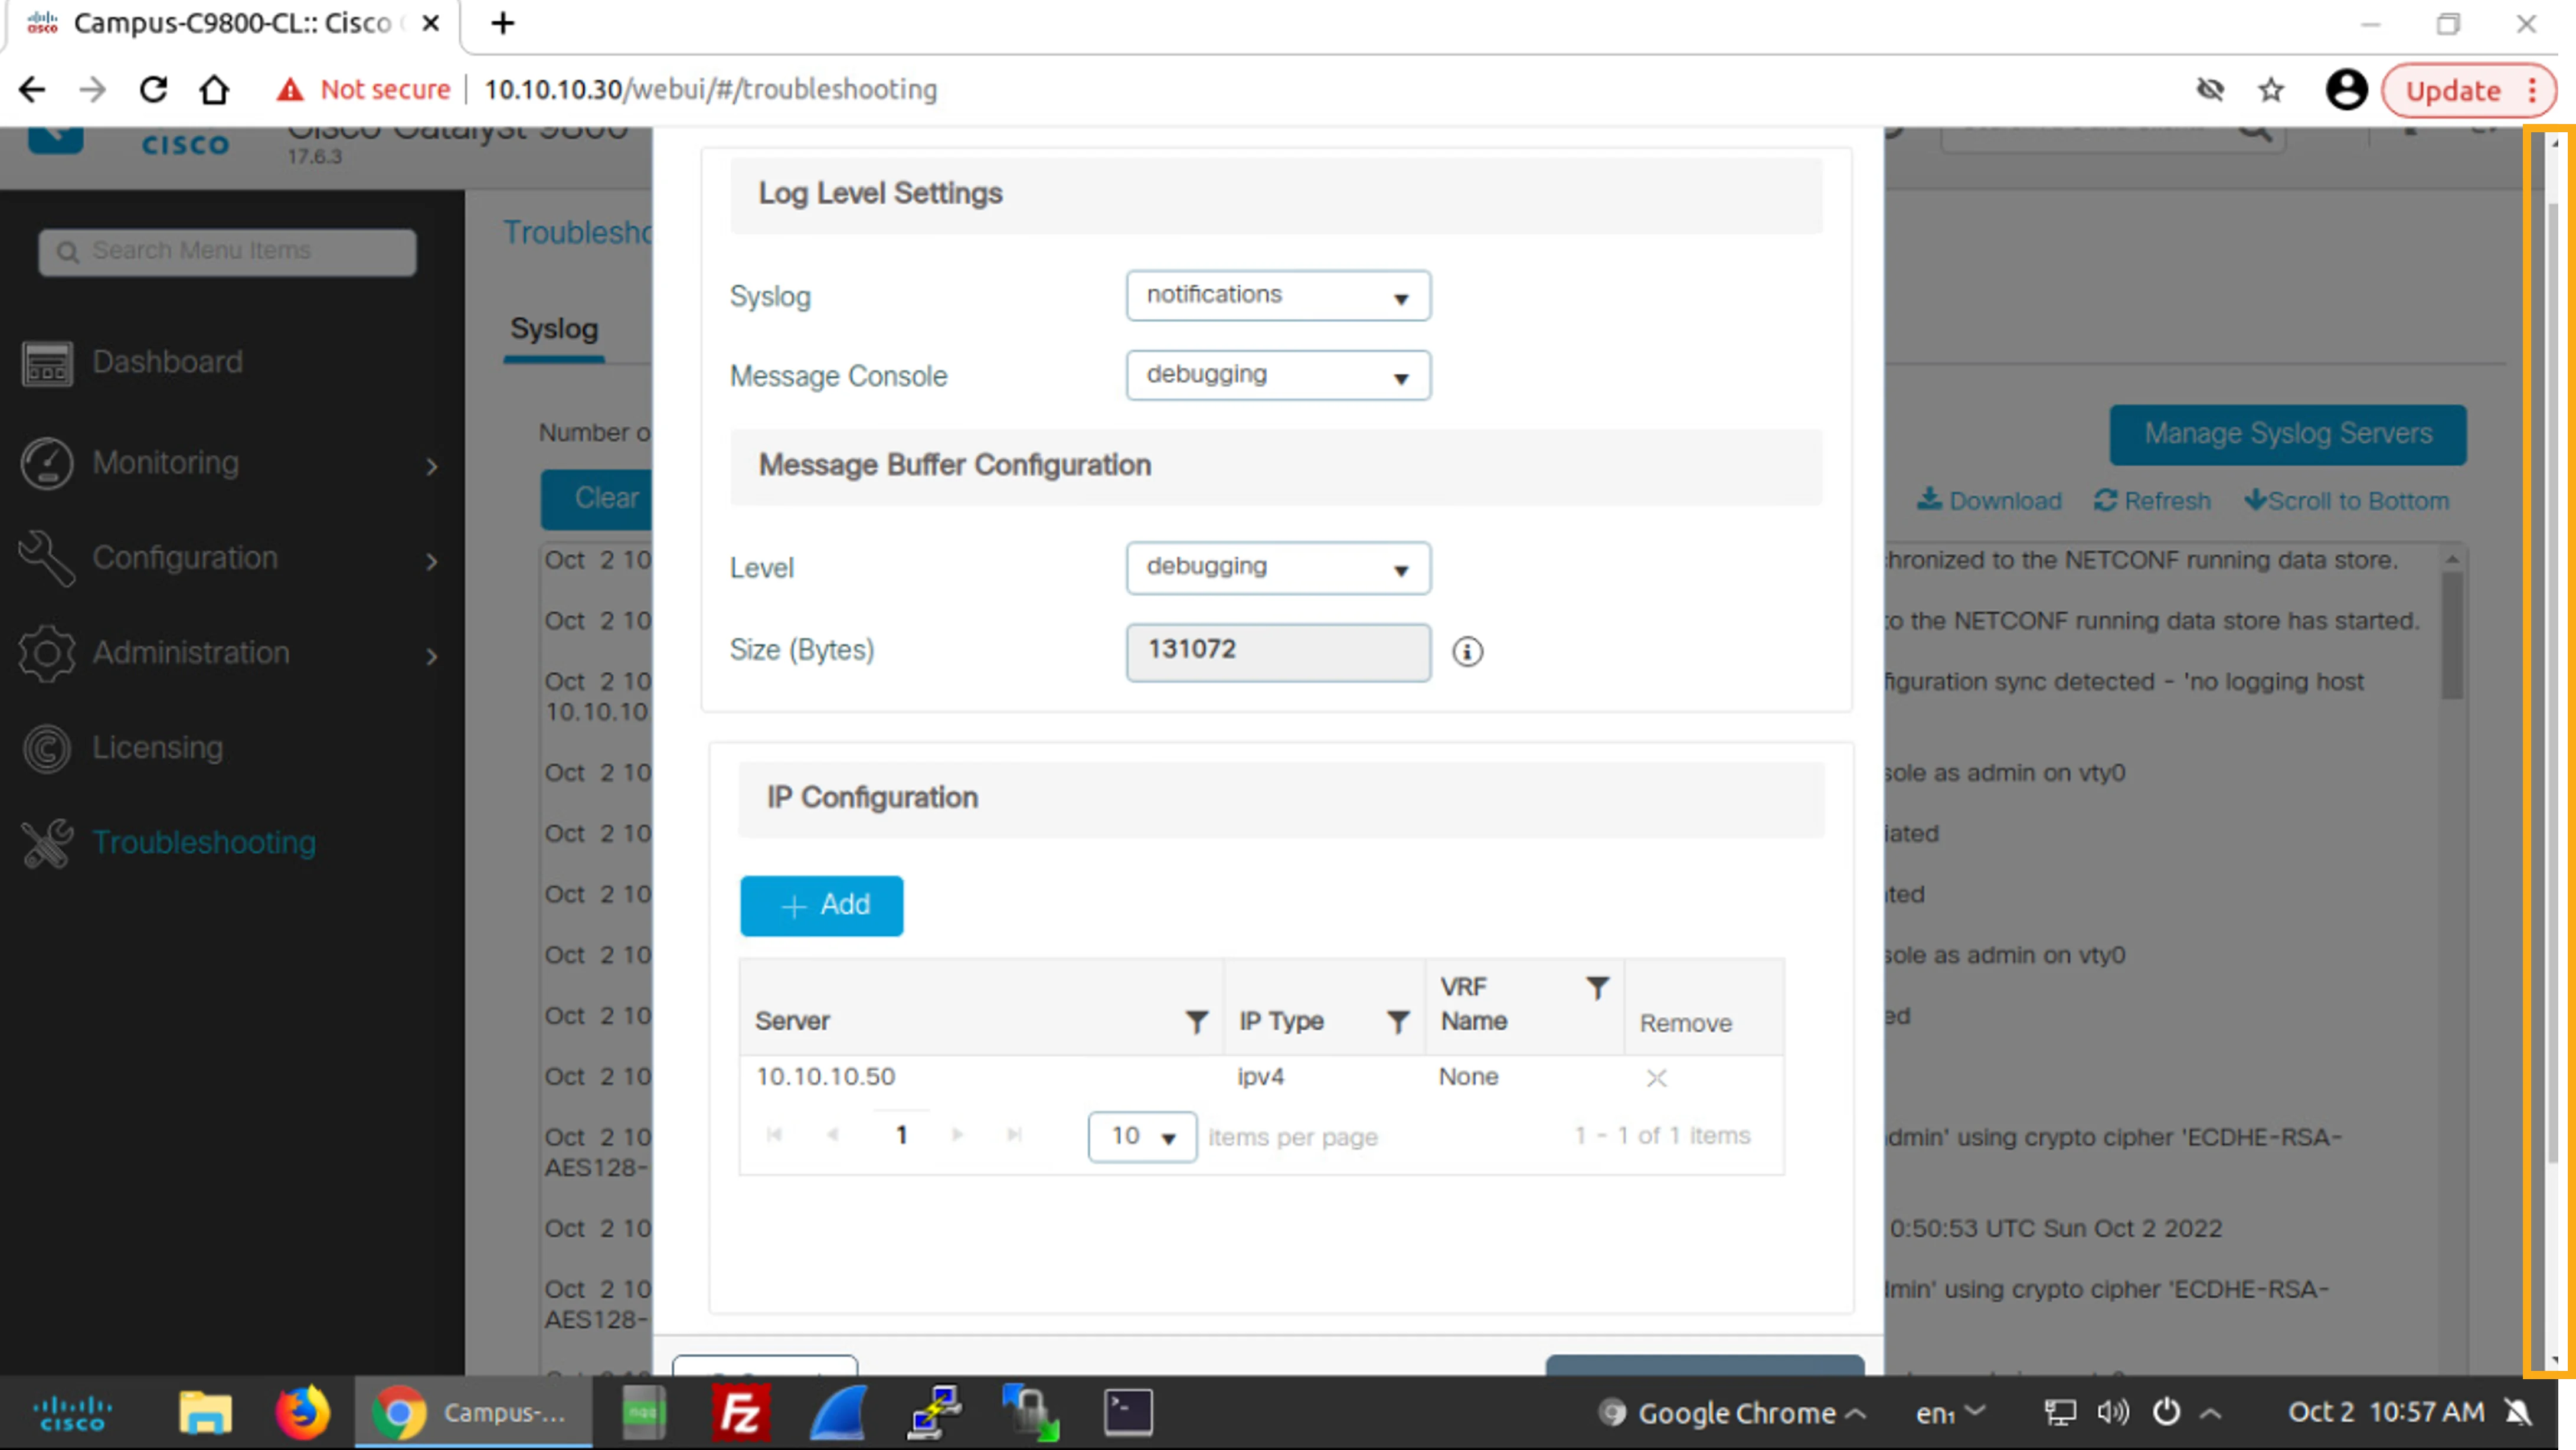
Click Apply to Device.
按一下Apply to Device。
You have reached the last step of this simulation. Click Exit Lab Mode to end the simulation.
您已到達此模擬的最後一個步驟。按一下Exit Lab Mode以結束模擬。